Free Book Chapter 21 - Procedures
(Copied from App Inventor 2 Book: Create Your Own Android Apps chapter 21 to allow translation)
- These blocks are shown with Inline inputs, which reduces the width of the blocks. You can right-click blocks
to toggle between “Inline” and “External” inputs.
CHAPTER 21
Defining Procedures and Reusing Blocks
Programming languages such as App Inventor
provide a base set of built-in functionality—in App
Inventor’s case, a base set of blocks. Programming
languages also provide a way to extend that
functionality by adding new functions (blocks) to
the language. In App Inventor, you do this by
defining procedures—named sequences of blocks
—that your app can call just as it calls App
Inventor’s predefined blocks. As you’ll see in this
chapter, being able to create such abstractions is
very important for solving complex problems,
which is the cornerstone of building truly
compelling apps.
When parents tell their child, “Go brush your
teeth before bed,” they really mean, “Take your
toothbrush and toothpaste from the cabinet,
squeeze out some toothpaste onto the brush,
swivel the brush on each tooth for 10 seconds (ha!),” and so on. “Brush your teeth” is
an abstraction: a recognizable name for a sequence of lower-level instructions. In this
case, the parents are asking the child to perform the instructions that they’ve all
agreed mean “brush your teeth.”
In programming, you can create such named sequences of instructions. Some
programming languages call them functions or subprograms. In App Inventor, they’re
called procedures. A procedure is a named sequence of blocks that you can call from
any place in an app.
Figure 21-1 is an example of a procedure that estimates the distance, in miles,
between two GPS coordinates you send to it.
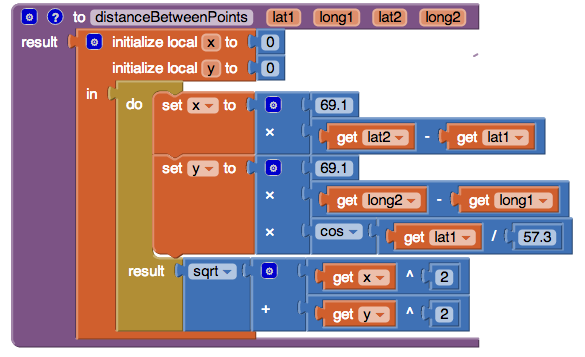
Figure 21-1. Procedure for computing the distance between points
Don’t worry too much about the internals of this procedure just yet; all you need to
realize at the moment is that procedures like this let you extend the language by
which you design and build programs. If every parent had to explain the steps of
“brush your teeth” to his or her child each night, that kid might not make it to the fifth
grade. It’s much more efficient to just say, “Brush your teeth,” and everyone can move
on with getting to bed at a reasonable hour.
Similarly, after you define the procedure distanceBetweenPoints, you can ignore
the details of how it works and simply refer to (call) the procedure’s name when
designing or coding a larger app. This type of abstraction is key to solving large
problems and lets us break down a large software project into more manageable
chunks of code.
Procedures also help reduce errors because they eliminate redundancy in your
code. With procedures, you can put a chunk of code in one place and then call it from
various places throughout your app. So, if you’re building an app that needs to know
the minimum distance between your current location and 10 other spots, you don’t
need to have 10 copies of the blocks shown in Figure 21-2. Instead, you just define the
distanceBetweenPoints procedure and then call it whenever you need it. The
alternative—copying and pasting blocks—is much more code-dependent (recall the
discussion from Chapter 19) and, consequently, error-prone because when you make
a change, you have to find all the other copies of those blocks and change each one
in the same way. Imagine trying to find the 5 to 10 places where you pasted a
particular chunk of code in an app with 1,000 lines or blocks! A procedure lets you
instead encapsulate blocks in one place, and then call it many times.
Procedures also help you build up a library of code that can be reused in many
apps. Even when building an app for a very specific purpose, experienced
programmers are always thinking of ways to create the code in such a way that you
can reuse it in other apps. Some programmers never even create apps, but instead
focus solely on building reusable code libraries for other programmers to use in their
apps!
Eliminating Redundancy
The blocks in Figure 21-2 are from a Note Taker app. Take a look at the blocks and see
if you can you identify the redundant ones.

Figure 21-2. A Note Taker app with redundant code
The redundant blocks are the ones involving a for each block (actually the for
each and its nested blocks and the set NotesLabel.Text to above it). In all three for
each instances, the block’s job is to display the list of notes. In this app, this behavior
needs to take place in three event handlers: when a new item is added, when an item
is removed, and when the list is loaded from the database upon application launch.
When experienced programmers see such redundancy, a bell goes of in their
heads, probably even before they’ve copied and pasted the blocks in the first place.
They know that it’s best to encapsulate such redundancy into a procedure, both to
make the program more understandable and so that changes will be much easier to
make later.
Accordingly, an experienced programmer would create a procedure, move a copy
of the redundant blocks into it, and then call the procedure from the three places
containing the redundant blocks. The app will not behave any differently, but it will
be easier to maintain and easier for other programmers to work with. Such code
(block) reorganization is called refactoring.
Defining a Procedure
Let’s build a procedure to do the job of the redundant code blocks from Figure 21-2. In
App Inventor, you define a procedure in a manner similar to how you define variables.
From the Procedures drawer, drag out either a to procedure block or a to procedure
result block. Use the latter if your procedure should calculate some value and return
it (we’ll discuss this approach a bit later in the chapter).
After dragging out a to procedure block, you can change its default name by
clicking the word “procedure” and typing a new name. The redundant blocks that you
want to refactor carry out the job of displaying a list, so we’ll name the procedure
displayList, shown in Figure 21-4.
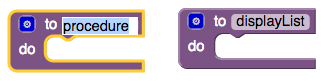
Figure 21-4. Click “procedure” to name your procedure
The next step is to add the blocks within the procedure. In this case, we’re using
blocks that already exist, so we’ll drag one of the original redundant blocks out of its
event handler and place it within the to displayList block, as shown in Figure 21-5.
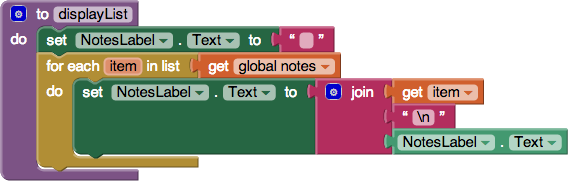
Figure 21-5. The displayList procedure encapsulates the redundant code
Calling a Procedure
Procedures, like displayList and “brush your teeth,” are entities with the potential to
perform a task. However, they’ll only perform that task if they are called upon to do
so. Thus far, we’ve created a procedure but haven’t called it. To call a procedure means
to invoke it, or to make it happen.
In App Inventor, when you define a procedure, a call block is automatically added
to the Procedures drawer as shown in Figure 21-6.
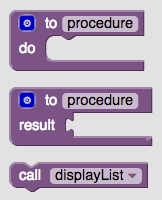
Figure 21-6. A call block appears in the Procedures drawer when you define a
procedure
You’ve been using call blocks already to call App Inventor’s predefined functions,
such as Ball.MoveTo and Texting.SendMessage. When you define a procedure, you
have in essence created your own block; you’ve extended the App Inventor language.
Using the new call block, you can invoke your creation.
For the Note Taker app example, you’d drag out three call displayList blocks and
use them to replace the redundant code in the three event handlers. For instance, the
ListPicker1.AfterPicking event handler (for deleting a note) should be modified as
illustrated in Figure 21-7.
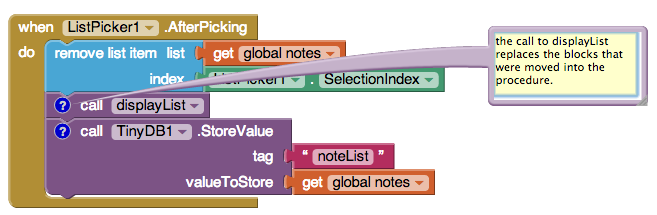
Figure 21-7. Using the displayList call to invoke the blocks now in the procedure
The Program Counter
To understand how the call block works, think of an app as having a pointer that
steps through the blocks that are performing functions. In computer science, this
pointer is called the program counter.
When the program counter is performing the blocks within an event handler and it
reaches a call block, it jumps over to the procedure and executes the blocks in it.
When the procedure completes, the program counter jumps back to its previous
location (the call block) and proceeds from there. So, for the Note Taker example, the
remove list item block is executed; then the program counter jumps to the
displayList procedure and performs the blocks in that procedure (setting the
NotesLabel.Text to the empty text, and the for each); and finally the program
counter returns to perform the TinyDB1.StoreValue block.
Adding Parameters to Your Procedure
The displayList procedure allows redundant code to be refactored into a single
place. The app is easier to understand because you can read the event handlers at a
high level and generally ignore the details of how a list is displayed. It is also helpful
because you might decide to modify how you display the list, and the procedure
makes it possible for you to make such a modification in a single place (instead of
three).
The displayList procedure has limits in terms of its general usefulness, however.
The procedure only works for a specific list (notes) and displays that list in a specific
label (NotesLabel). You couldn’t use it to display a different data list—for example, a
list of the app’s users—because it is defined too specifically.
App Inventor and other languages provide a mechanism called parameters for
making procedures more general-purpose. Parameters comprise the information a
procedure needs to do its job. They provide the specifics of how the procedure should
be performed. In our bedtime tooth-brushing example, you might define “toothpaste
type” and “brushing time” as parameters of the procedure “brush your teeth.”
You define parameters for a procedure by clicking the blue icon at the upper-left of
the procedure definition. For the displayList procedure, we would define a
parameter named “list,” as shown in Figure 21-8.
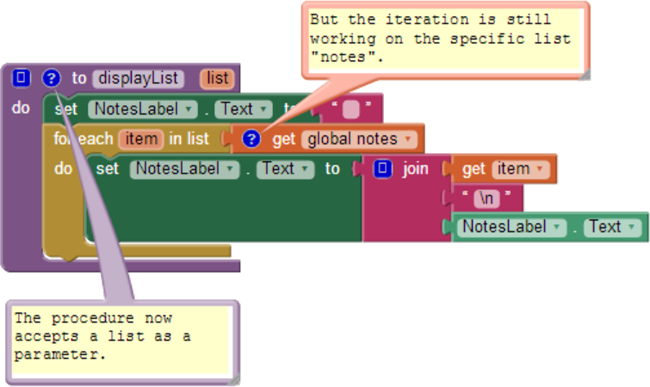
Figure 21-8. The procedure now accepts a list as a parameter
Even with the parameter defined, the blocks still refer directly to the specific list
notes (it’s plugged into the “in list” slot of the for each). Because we want the
procedure to use the list we send in as a parameter, we replace the reference to
global notes with a reference to get list, as demonstrated in Figure 21-9.
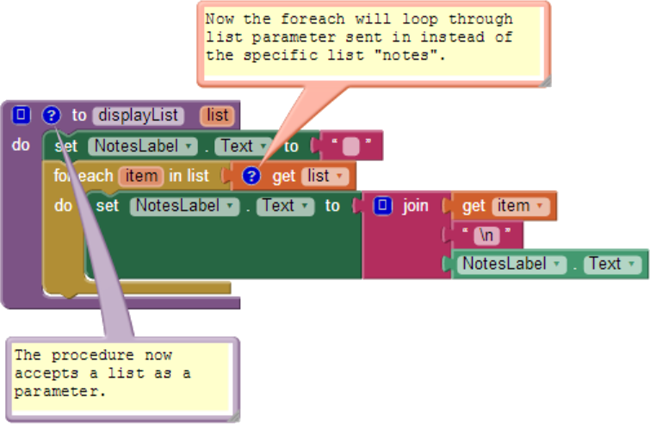
Figure 21-9. Now the for each will use the list sent in
The new version of the procedure is more generic: calls to displayList can now
send it any list, and displayList will display it. When you add a parameter to a
procedure, App Inventor automatically puts a corresponding socket in the call block.
So, when the parameter list is added to displayList, the call blocks to displayList
look like Figure 21-10.
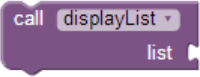
Figure 21-10. Calling displayList now requires you to specify which list to display
The parameter list within the procedure definition is called a formal parameter.
The corresponding socket within the call block is called an actual parameter. When
you call a procedure from somewhere in the app, you must supply an actual
parameter for each formal parameter of the procedure. You do this by filling in all the
sockets in the call.
For the Note Taker app, you add a reference get global notes as the actual
parameter. Figure 21-11 shows how ListPicker.AfterSelection should be modifed.
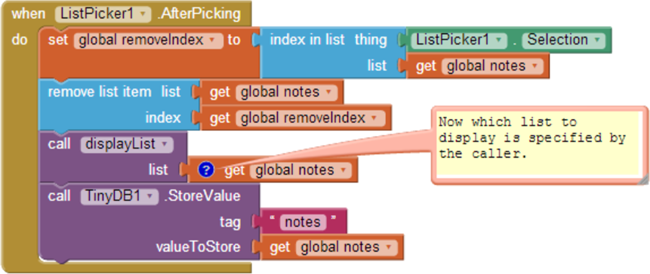
Figure 21-11. Calling the displayList with notes sent as the actual parameter
Now, when displayList is called, the list notes is sent over to the procedure and
placed in the parameter list. The program counter proceeds to execute the blocks in
the procedure, referring to the parameter list but really working with the variable
notes.
Because of the parameter, you can now use the procedure displayList with any
list, not just notes. For example, if the Note Taker app were shared among a list of
users and you wanted to display the list of users, you could call displayList and send
it the userList, as demonstrated in Figure 21-12.

Figure 21-12. The displayList procedure can now be used to display any list, not just
notes
Returning Values from a Procedure
There is still one issue with the displayList procedure in terms of its general
usefulness—can you figure out what it is? As it’s currently written, it can display any
list of data, but it will always display that data in the label NotesLabel. What if you
wanted the list to be displayed in a different user interface object (e.g., you had a
different label for displaying the userList)?
One solution is to reconceptualize the procedure and change its job from
displaying a list in a particular label to simply returning a text object that you can
display anywhere. To do this, you use a procedure result block, depicted in
Figure 21-13, instead of the procedure block.
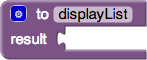
Figure 21-13. The procedure result block
You’ll notice that, when compared to the procedure block, the procedure result
block has an extra socket at the bottom. You place a variable in this slot and it’s
returned to the caller. So, just as the caller can send data to a procedure with a
parameter, a procedure can send data back with a return value.
Figure 21-14 shows the reworked version of the preceding procedure, this time
using a procedure result block. Observe that because the procedure is now doing a
different job, its name is changed from displayList to listToText.
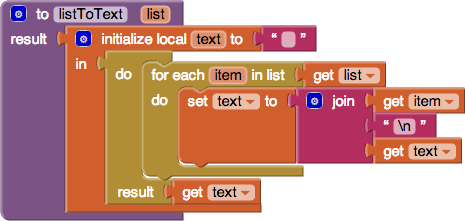
Figure 21-14. listToText returns a text object that the caller can place in any label
In the blocks shown in Figure 21-14, a local variable text is defined to hold the data
as the procedure iterates through each item on the list. text is initialized as a local
variable, instead of a global one, because it is used only in this procedure.
This text variable replaces the overly specific NotesLabel component that was
being used in the displayList version of this procedure. When the for each
completes, the variable text contains the list items, with each item separated by a
newline character, \n (e.g., “item1\nitem2\item3”). This text variable is then plugged
into the return value socket.
When a procedure result is defined, its corresponding call blocks look different
than those for a procedure. Compare the call to listToText with the call to the
displayList in Figure 21-15.

Figure 21-15. The call on the right returns a value and so must be plugged into
something
The difference is that the call listToText has a plug on its left side. This is
because when the call is executed, the procedure will run through its task and then
return a value to the call block. That return value must be plugged into something.
In this case, the callers to displayList can plug that return value into any label
they want. For the Note Taker example, the three event handlers that need to display
a list will call the procedure, as shown in Figure 21-16.

Figure 21-16. Converting the list notes into text and displaying it in NotesLabel
The important point here is that because the procedure is completely generic and
doesn’t refer to any lists or labels specifically, another part of the app could use it to
display any list in any label, as exemplified in Figure 21-17.

Figure 21-17. The procedure is no longer tied to a particular Label component
Reusing Blocks Among Apps
Reusing code blocks through procedures need not be restricted to a single app. There
are many procedures, such as listToText, that you could use in just about any app
you create. In practice, organizations and programming communities build up code
libraries of procedures for their domains of interest.
Typically, programming languages provide an import utility through which you can
include library code in any app. App Inventor doesn’t yet have such a utility. The only
way to share procedures is to create a special library app and begin new app
development by saving a new copy of that app and working from it.
The distanceBetweenPoints Procedure
With the displayList (listToText) example, we characterized procedure definition as
a way to eliminate redundant code: you start writing code, find redundancies as you
go along, and refactor your code to eliminate them. Generally, however, a software
developer or team will design an app from the beginning with procedures and
reusable parts in mind. This sort of planning can save you significant time as the
project progresses.
Consider an app to determine the closest local hospital to the user’s current
location—something that would come in very handy in case of an emergency. Here’s
a high-level design description of the app:
When the app launches, find the distance, in miles, between the current location and the
first hospital. Then find it for the second hospital, and so on. When you have the distances,
determine the minimum distance and display the address (and/or a map) to that location.
From this description, can you determine the procedures this app needs?
Often, the verbs in such a description hint at the procedures you’ll need. Repetition
in your description, as indicated with the “so on,” is another clue. In this case, finding
the distance between two points and determining the minimum of some distances are
two necessary procedures.
Let’s think about the design of the procedure for finding the distance between two
points, which we’ll name distanceBetweenPoints (fine, so originality is not my strong
suit). When designing a procedure, you need to determine its inputs and outputs: the
parameters the caller will send to the procedure for it to do its job, and the result
value the procedure will send back to the caller. In this case, the caller needs to send
the latitude and longitude of both points to the procedure, as shown in Figure 21-18.
The procedure’s job is to return the distance, in miles.
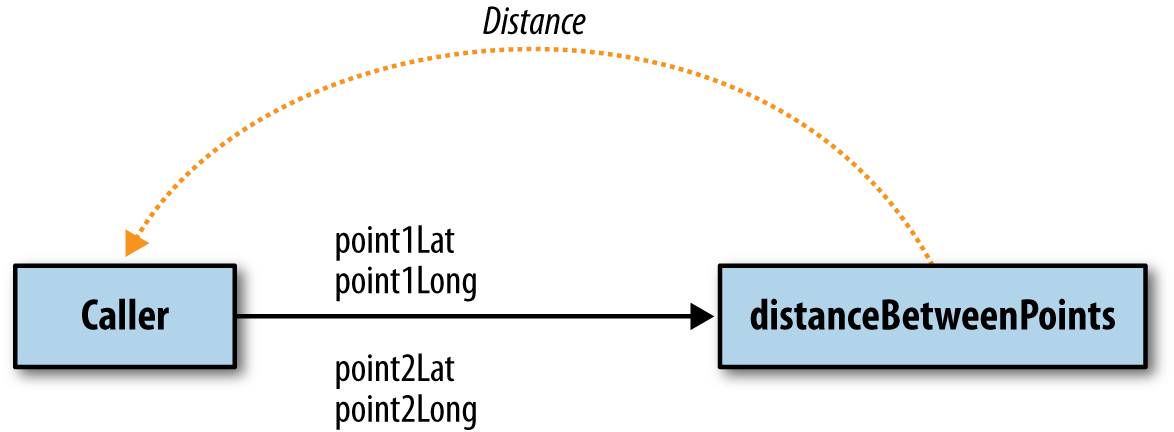
Figure 21-18. The caller sends four input parameters and receives a distance
Figure 21-19 shows the procedure we encountered at the beginning of the chapter,
using a formula for approximating the mileage between two GPS coordinates.
Figure 21-19. distanceBetweenPoints procedure
Figure 21-20 shows blocks that make two calls to the procedure, each of which
finds the distance from the current location to a particular hospital.
For the first call, the actual parameters for the first point are the the current
readings from the LocationSensor, whereas the second point is defined by the GPS
coordinates for St. Mary’s Hospital. The resulting value is placed in the variable
distanceStMarys. The second call is similar but instead uses the data for CPMC
Hospital for the second point.
The app goes on to compare the two distances returned to determine which
hospital is closest. But, if there were more hospitals involved, you’d really need to
compare a list of distances to find the shortest. From what you’ve learned, can you
create a procedure called findMinimum that accepts a list of numbers as a parameter
and returns the index of the minimum?
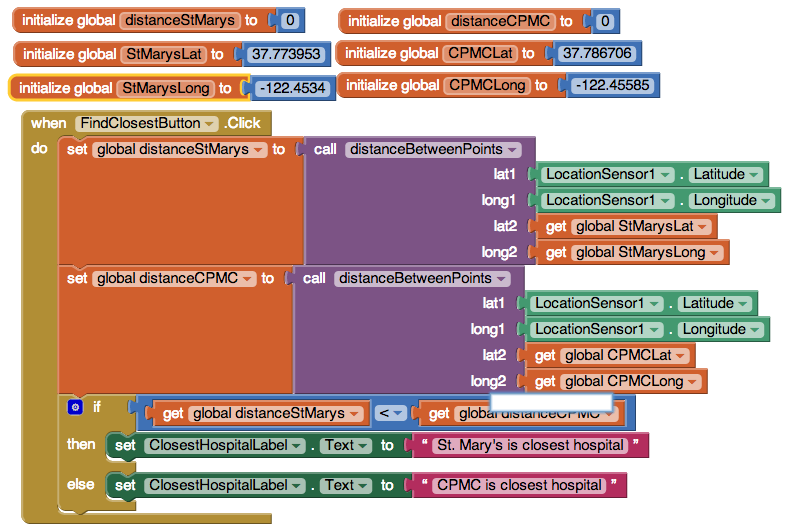
Figure 21-20. Two calls to the distanceBetweenPoints procedure
Summary
Programming languages such as App Inventor provide a base set of built-in
functionality. Through the use of procedures, app inventors can extend that language
with new abstractions. App Inventor doesn’t provide a block for displaying a list, so
you build one. Need a block for computing the distance between GPS coordinates?
You can create your own.
The ability to define higher-level procedure blocks is the key to engineering large,
maintainable software and solving complex problems without being constantly
overwhelmed by all of the details. Procedures let you encapsulate code blocks and
give those blocks a name. While you program the procedure, you focus solely on the
details of those blocks. However, in programming the rest of the app, you now have
an abstraction—a name—that you can refer to at a high level.