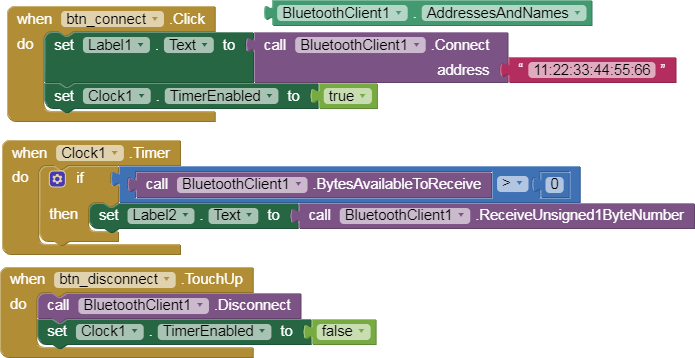
Hello friends,
In this topic I am going to show some examples of Arduino UNO with the Bluetooth HC-06 module.
I will start with simple examples and later I will put some more complicated codes.
Hello friends,
In this topic I am going to show some examples of Arduino UNO with the Bluetooth HC-06 module.
I will start with simple examples and later I will put some more complicated codes.
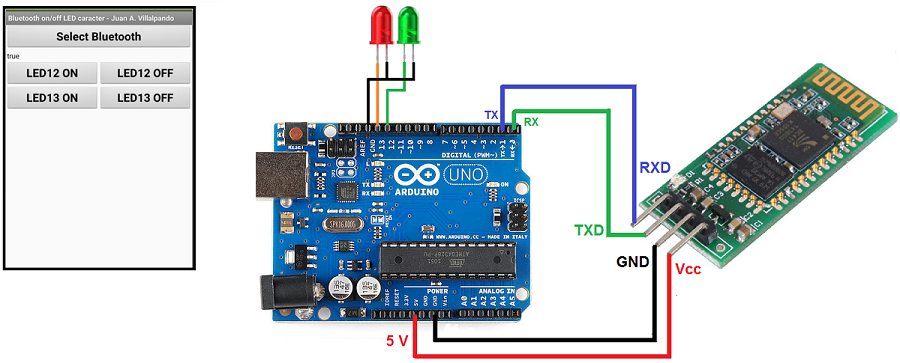
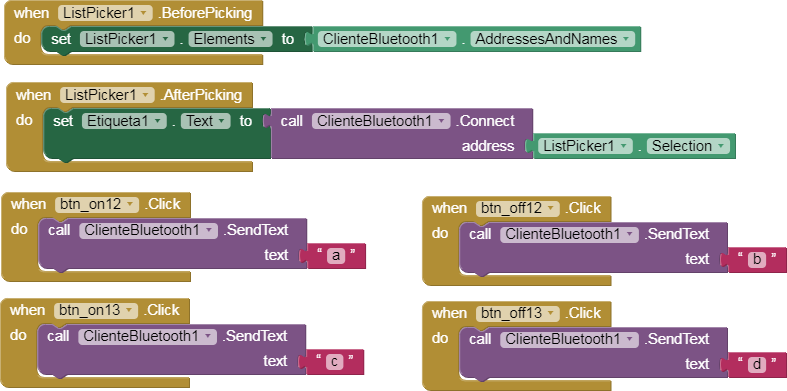
1.- App sends simple char. Arduino on-off LED12 and LED13.
p9A0i_bluetooth_caracter.aia (2.4 KB)
// Juan A. Villalpando
// http://kio4.com/appinventor/9A0_Resumen_Bluetooth.htm

#define Pin12  12
#define Pin13  13
char caracter;

void setup() {
  Serial.begin(9600);
  pinMode(Pin12, OUTPUT);
  pinMode(Pin13, OUTPUT);
}

void loop() {
  if(Serial.available()) {
  caracter = Serial.read();

    if(caracter == 'a'){ digitalWrite(Pin12, HIGH);}
    if(caracter == 'b'){ digitalWrite(Pin12, LOW);}
    if(caracter == 'c'){ digitalWrite(Pin13, HIGH);}
    if(caracter == 'd'){ digitalWrite(Pin13, LOW);}
  }

}
Instead of using LEDs you can put Relays.
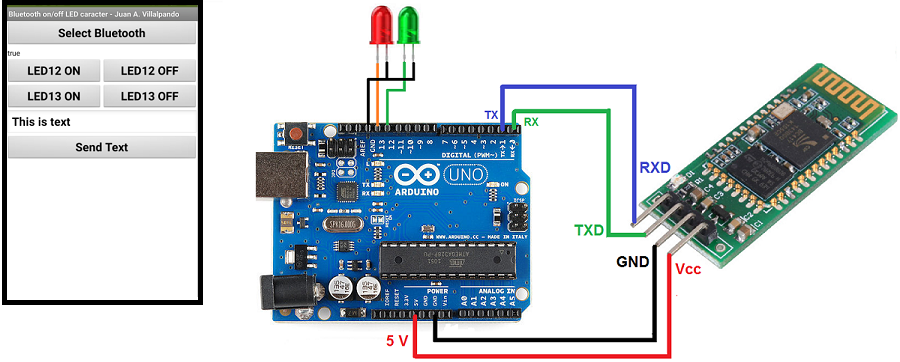
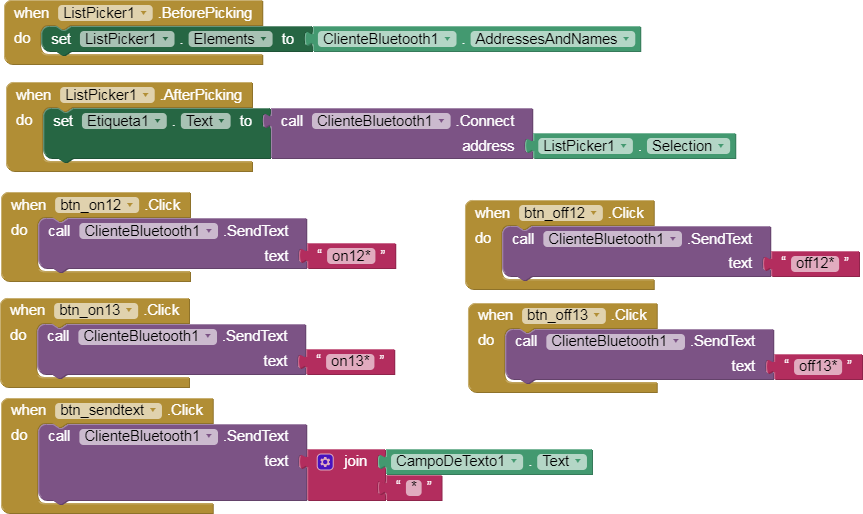
2A.- App sends text. Arduino on-off LED12 and LED13. Serial Monitor. With asterisk.
p9A0i_bluetooth_texto.aia (2.6 KB)
// Juan A. Villalpando
// http://kio4.com/appinventor/9A0_Resumen_Bluetooth.htm

#define Pin12  12
#define Pin13  13
char caracter;
String palabra;

void setup() {
  Serial.begin(9600);
  pinMode(Pin12, OUTPUT);
  pinMode(Pin13, OUTPUT);
}

void loop() {
  if(Serial.available()) {
  caracter = Serial.read();
  palabra = palabra + caracter;

   if(caracter == '*') {
    palabra = palabra.substring(0, palabra.length() - 1); // Delete last char *
    Serial.println(palabra);
     if (palabra == "on12"){digitalWrite(Pin12, HIGH);}
     if (palabra == "off12"){digitalWrite(Pin12, LOW);}
     if (palabra == "on13"){digitalWrite(Pin13, HIGH);}
     if (palabra == "off13"){digitalWrite(Pin13, LOW);}
     palabra = "";
     delay(100);
   }
  }
}
oooooooooooooooo0000000000000000ooooooooooooooooooo
2B.- App sends text. Arduino on-off LED12 and LED13. Serial Monitor. Without asterisk.
p9A0i_bluetooth_texto_2.aia (2.6 KB)
// Juan A. Villalpando
// http://kio4.com/appinventor/9A0_Resumen_Bluetooth.htm

#define Pin12  12
#define Pin13  13
char caracter;
String palabra;

void setup() {
  Serial.begin(9600);
  pinMode(Pin12, OUTPUT);
  pinMode(Pin13, OUTPUT);
}

void loop() {
  if(Serial.available()) {
  caracter = Serial.read();
  palabra = palabra + caracter;

     Serial.println(palabra);
     if (palabra.indexOf("on12")>= 0){digitalWrite(Pin12, HIGH); palabra = "";}
     if (palabra.indexOf("off12")>= 0){digitalWrite(Pin12, LOW); palabra = "";}
     if (palabra.indexOf("on13")>= 0){digitalWrite(Pin13, HIGH); palabra = "";}
     if (palabra.indexOf("off13")>= 0){digitalWrite(Pin13, LOW); palabra = "";}
     delay(100);
  }
}
3.- App sends several information at the same time.
In this example we will use the same App as in the previous example.
Suppose we want to send two information at the same time, for example we want to turn on LED12 and turn off LED13.
We write in the TextBox: on12, off13 [the asterisk will be added automatically at the end of this text]

The Arduino code will check if the text sent contains the string: on12, off12, on13, off13
To check if a substring is in a text we use indexOf: if(palabra.indexOf("on12")>= 0)
We can also put the text in another order: off13, on12
// Juan A. Villalpando
// http://kio4.com/appinventor/9A0_Resumen_Bluetooth.htm

#define Pin12  12
#define Pin13  13
char caracter;
String palabra;

void setup() {
  Serial.begin(9600);
  pinMode(Pin12, OUTPUT);
  pinMode(Pin13, OUTPUT);
}

void loop() {
  if(Serial.available()) {
  caracter = Serial.read();
  palabra = palabra + caracter;

   if(caracter == '*') {
    palabra = palabra.substring(0, palabra.length() - 1); // Delete last char *
    Serial.println(palabra);
     if(palabra.indexOf("on12")>= 0){digitalWrite(Pin12, HIGH);}
     if(palabra.indexOf("off12")>= 0){digitalWrite(Pin12, LOW);}
     if(palabra.indexOf("on13")>= 0){digitalWrite(Pin13, HIGH);}
     if(palabra.indexOf("off13")>= 0){digitalWrite(Pin13, LOW);}
     palabra = "";
     delay(100);
   }
  }
}
4.- App sends three values separated by comma. Arduino receives them and separates them.
In this example we will use the same App as in the previous example.
We assume that the App wants to send these numbers separated by commas to the Arduino: 126,3,58

An asterisk will be added indicating end of message. [126,3,58*]
In this case it is necessary to indicate the end of the message (example with asterisk) since we can send any number.
Arduino will receive that text and separate it by the comma.
Check Serial Monitor.
// Juan A. Villalpando
// http://kio4.com/appinventor/9A0_Resumen_Bluetooth.htm

char caracter;
String palabra;

String red;
String green;
String blue;
int ind1;
int ind2;
int ind3;

void setup() {
  Serial.begin(9600);
}

void loop() {
  if(Serial.available()) {
  caracter = Serial.read();
  palabra = palabra + caracter;

   if(caracter == '*') {
    palabra = palabra.substring(0, palabra.length() - 1); // Delete last char *
        Serial.println(palabra);
        ind1 = palabra.indexOf(',');
        red = palabra.substring(0, ind1);
        ind2 = palabra.indexOf(',', ind1+1 );
        green = palabra.substring(ind1+1, ind2);
        ind3 = palabra.indexOf(',', ind2+1 );
        blue = palabra.substring(ind2+1);

        Serial.print("red = ");
        Serial.println(red);
        Serial.print("green = ");
        Serial.println(green);
        Serial.print("blue = ");
        Serial.println(blue);
        Serial.println();
     palabra = "";
     delay(10);
   }
  }
}

ooooooooooooooo000000o000000ooooooooooooooo
Another way to split the data in with this getValue function:
Serial.println(palabra);
red = getValue(palabra,',',0);
green = getValue(palabra,',',1);
blue = getValue(palabra,',',2);
(...)
///////////////// Function Split by char ////////////////
String getValue(String data, char separator, int index)
{
int found = 0;
int strIndex[] = {0, -1};
int maxIndex = data.length()-1;
for(int i=0; i<=maxIndex && found<=index; i++){
if(data.charAt(i)==separator || i==maxIndex){
found++;
strIndex[0] = strIndex[1]+1;
strIndex[1] = (i == maxIndex) ? i+1 : i;
}
}
return found>index ? data.substring(strIndex[0], strIndex[1]) : "";
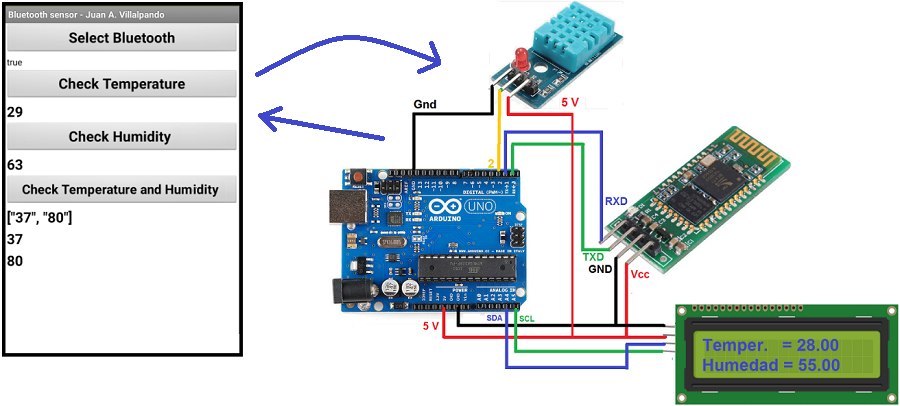
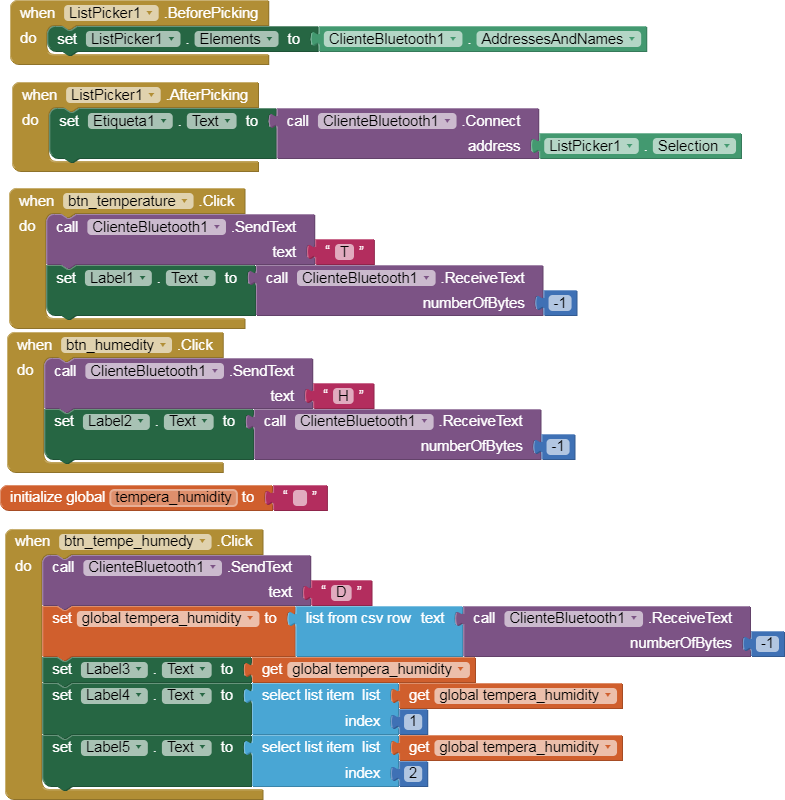
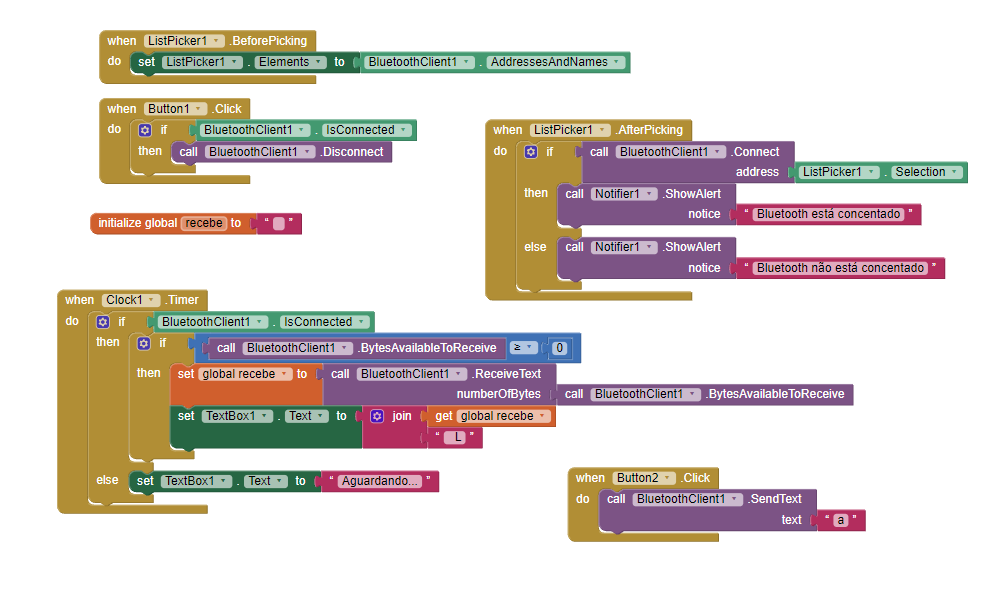
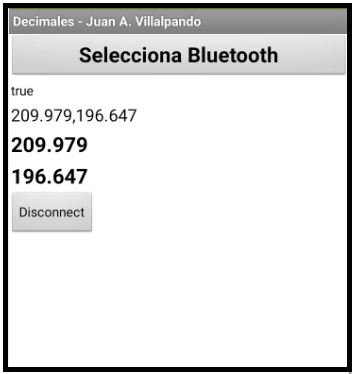
}5.- App requests temperature and humidity to the Arduino. The Arduino sends values.
p9A0i_bluetooth_temperatura.aia (3.3 KB)
When Click in tempe_humidity Button, App sends the character “D”.
Arduino concatenates the temperature and humidity Strings separated by a comma:
37,80
App ReceiveText 37,80 converts it to a list and separates the values.
Note: the DelimiterByte must have the value 10. [10 is ASCII New Line, LF. Arduino \n]
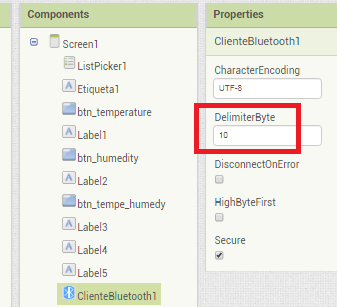
In this Arduino code I do not use the sensor or the I2C LCD to simplify its content.
Here you can see the code with the sensor and the I2C LCD
// Juan A. Villalpando
// http://kio4.com/appinventor/9A0_Resumen_Bluetooth.htm

char caracter;
int temperature = 0;
int humidity = 0;
String tempera_humidity;

void setup() {
  Serial.begin(9600);
}

void loop() {
  temperature = random(20,40);
  humidity = random(50,95);
  delay(500);

  if(Serial.available()) {
  caracter = Serial.read();

    if(caracter == 'T'){Serial.println(temperature);}
    if(caracter == 'H'){Serial.println(humidity);}
    if(caracter == 'D'){
    tempera_humidity = (String) temperature + "," + (String) humidity;
    Serial.println(tempera_humidity);
    }
  }

}
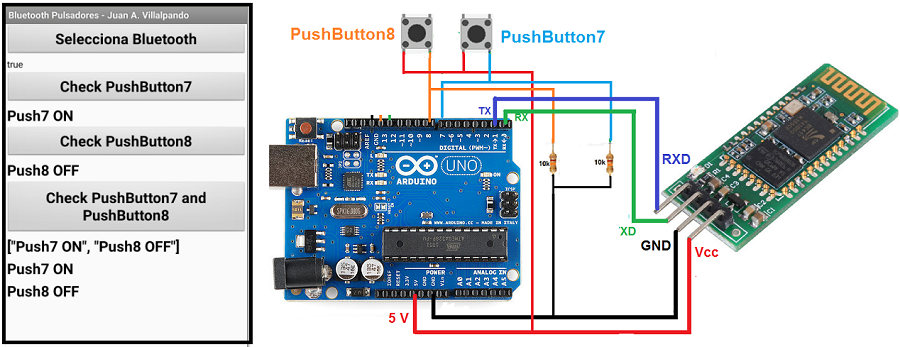
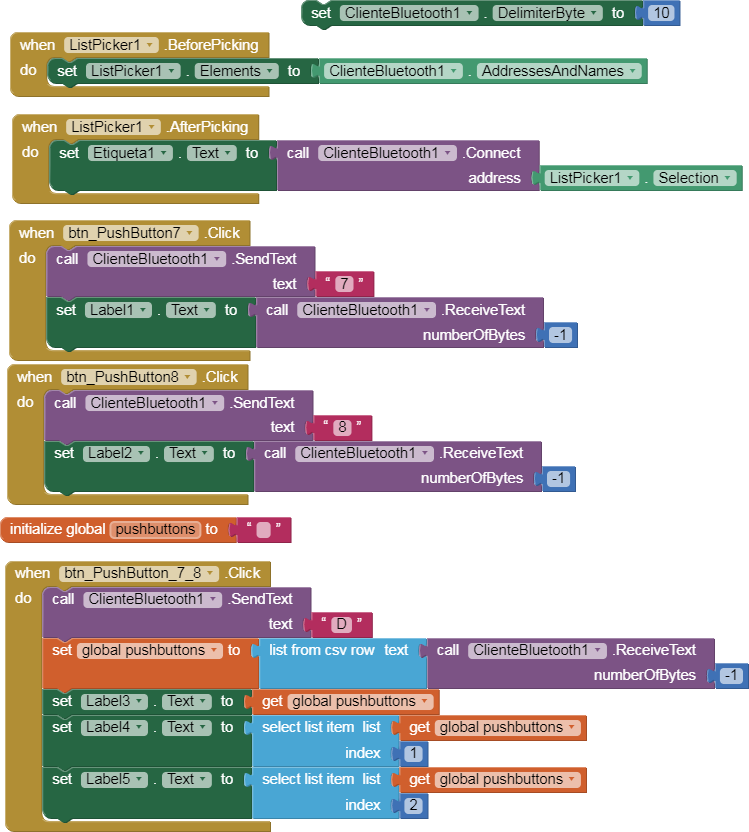
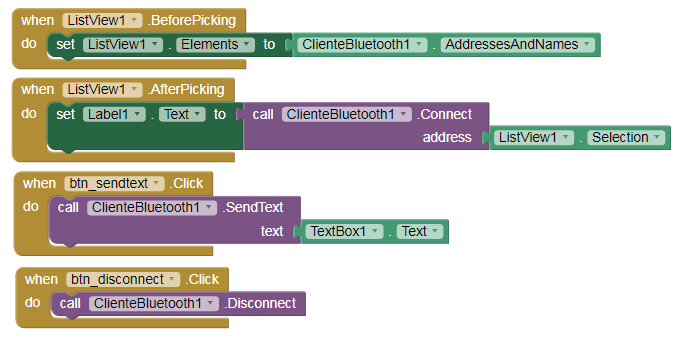
6.- App checks status 2 PushButtons.
p9A0i_bluetooth_pulsadores.aia (3.4 KB)
// Juan A. Villalpando
// http://kio4.com/appinventor/9A0_Resumen_Bluetooth.htm

char caracter;

#define push7 7   // PushButton 7.
#define push8 8   // PushButton 8.
String status_push7;
String status_push8;
String status;


void setup() {
  Serial.begin(9600);
  pinMode(push7, INPUT);
  pinMode(push8, INPUT);
}

void loop() {
  delay(50);

  if(Serial.available()) {
  caracter = Serial.read();
  if (digitalRead(push7) == HIGH) {status_push7 = "Push7 ON";} else {status_push7 = "Push7 OFF";}
  if (digitalRead(push8) == HIGH) {status_push8 = "Push8 ON";} else {status_push8 = "Push8 OFF";}
  status = status_push7 + "," + status_push8;

    if(caracter == '7'){Serial.println(status_push7);}
    if(caracter == '8'){Serial.println(status_push8);}
    if(caracter == 'D'){Serial.println(status);}
  }
}
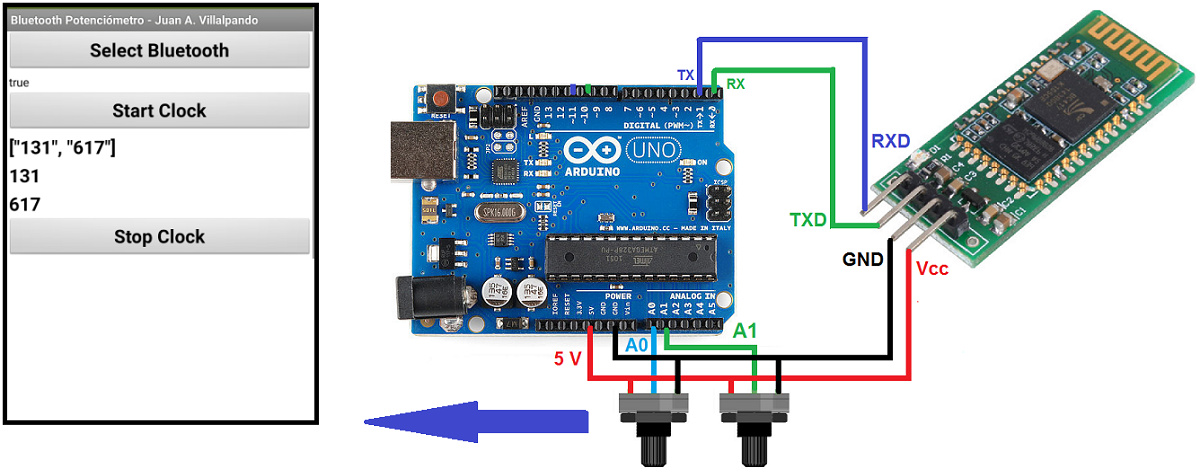
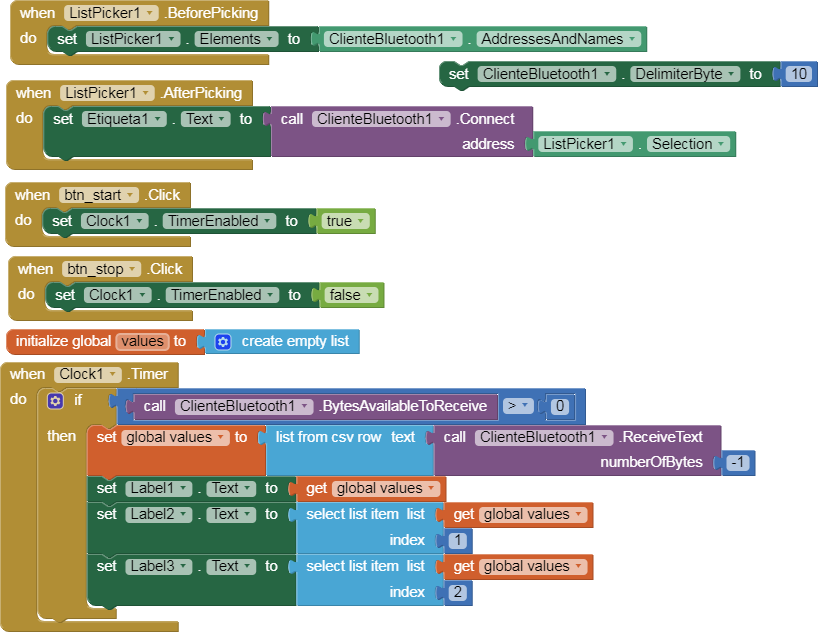
7.- App gets the value of two potentiometers.
p9A0i_bluetooth_potenciometro.aia (3.3 KB)
// Juan A. Villalpando
// http://kio4.com/appinventor/9A0_Resumen_Bluetooth.htm

int value_pot0;
int value_pot1;
String value;


void setup() {
  Serial.begin(9600);
}

void loop() {
    value_pot0 = analogRead(A0);
    value_pot1 = analogRead(A1);
    value = (String) value_pot0 + "," + (String) value_pot1;
    Serial.println(value);
    delay(200); // It should be slower than the Clock Interval.
}
8.- App receives data from Arduino. Clock.Interval. Arduino delay. Buffer.
p9A0i_bluetooth_aleatorio.aia (2.9 KB)
a)
Clock.Interval = 300
Arduino delay = 200
App cannot process the information because the Clock "is slower" than the Arduino.
The buffer is being filled, values that arrive and have not yet been processed.
When the Buffer reaches a certain value, for example 120, you remove power to the Arduino. What happens with buffer?
b) Change Clock.Interval
Clock.Interval = 100
Arduino delay = 200
Therefore, Clock.Interval < delay Arduino
// Juan A. Villalpando
// http://kio4.com/appinventor/9A0_Resumen_Bluetooth.htm

int aleatorio;

void setup() {
  Serial.begin(9600);
}

void loop() {
    aleatorio = random(0,100);
    Serial.println(aleatorio);
    delay(200); // Clock.Interval < delay Arduino
}
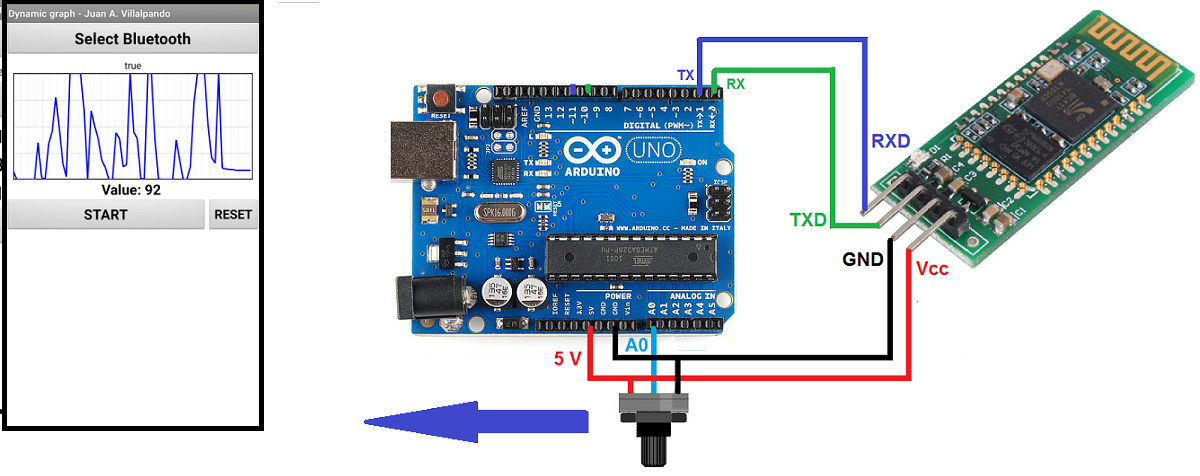
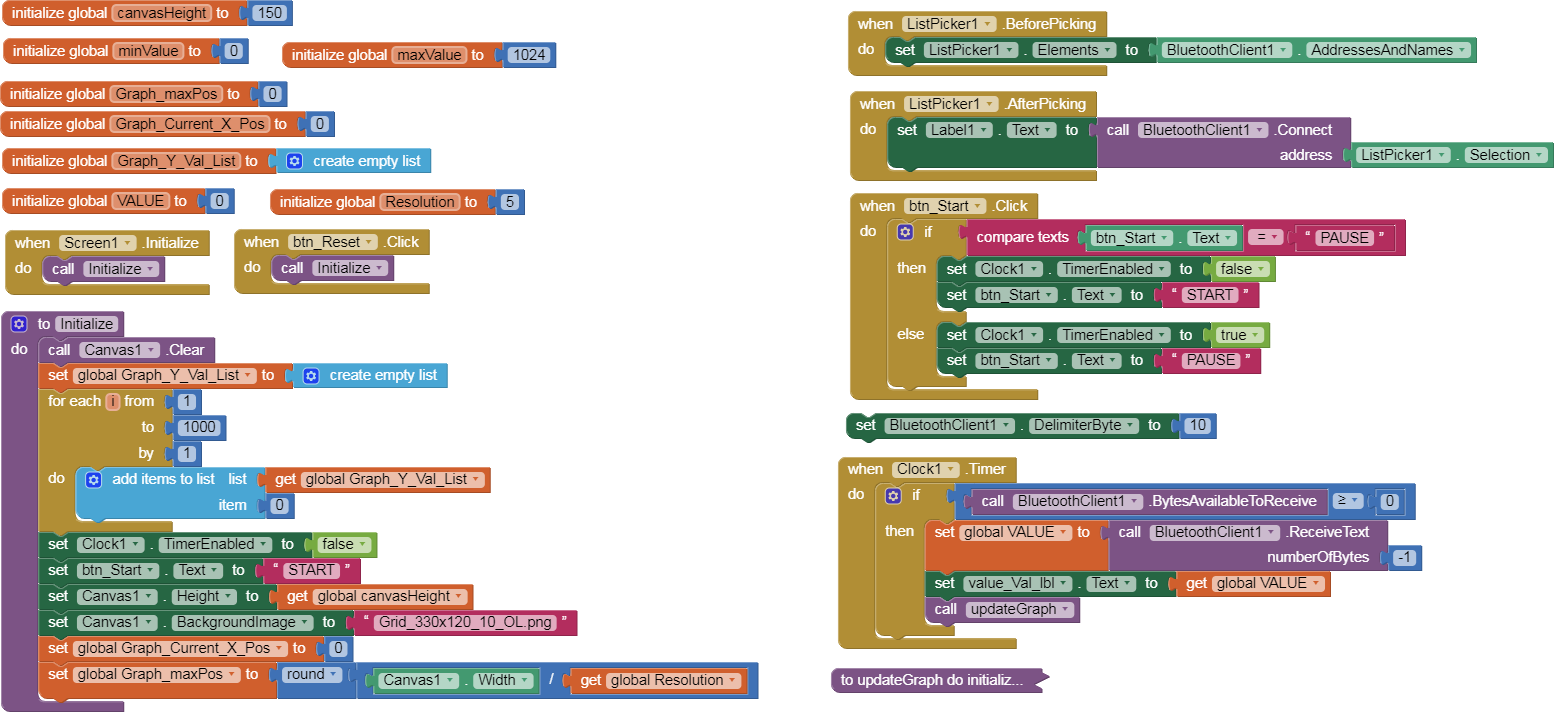
9.- A potentiometer in Arduino sends values to the App. Dynamic graph. Shift left.
p9A0i_bluetooth_dinamico.aia (8.1 KB)
// Juan A. Villalpando
// http://kio4.com/appinventor/9A0_Resumen_Bluetooth.htm

int value_pot0;

void setup() {
  Serial.begin(9600);
}

void loop() {
    value_pot0 = analogRead(A0);
    Serial.println(value_pot0);
    delay(100); // It should be slower than the Clock Interval.
}
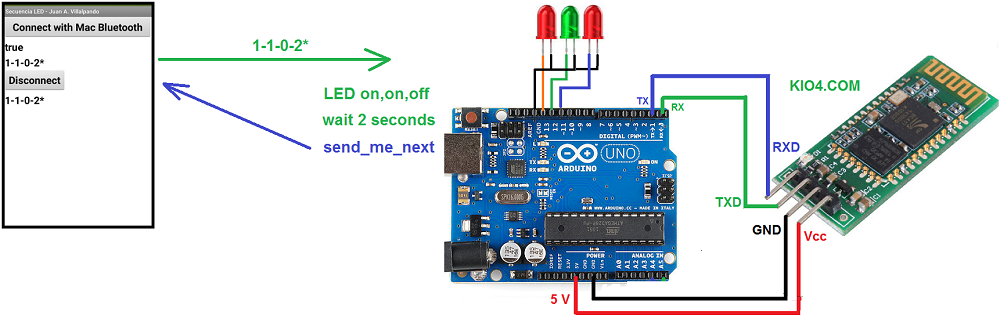
10.- Three LEDS on-off according to a sequence saved in a file.
p9A0i_bluetooth_secuencia3LED.aia (5.0 KB)
In file rutina2.csv this content:
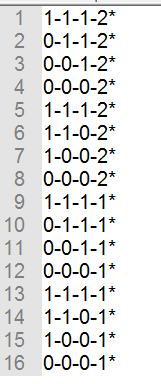
Levels of: LED11 - LED12 - LED13 - Time in seconds of this combination.
App sends 1-1-0-2*
Arduino set LEDs on, on, off
and wait 2 seconds.
then Arduino sends to App “send_me_next”
When App receives “send_me_next”
App “send_next” combination: 1-0-0-2*
// Juan A. Villalpando
// http://kio4.com/appinventor/9A0_Resumen_Bluetooth.htm

char caracter;
String palabra;
int LED11 = 11;
int LED12 = 12;
int LED13 = 13;
int valor11;
int valor12;
int valor13;

int Tiempo = 1000000;
unsigned long currentMillis;
unsigned long previousMillis = currentMillis;

int k1;
int k2;
int k3;
int k4;

void setup() {
  Serial.begin(9600);
  pinMode(LED11, OUTPUT);
  pinMode(LED12, OUTPUT);
  pinMode(LED13, OUTPUT);
}

void loop() {
  if(Serial.available()) {
  caracter = Serial.read();
  palabra = palabra + caracter;
        Serial.println(palabra);

  if(caracter == '*') {
      palabra = palabra.substring(0, palabra.length() - 1); // Delete last char *
      k1 = palabra.indexOf('-');
      valor11 = palabra.substring(0, k1).toInt();
      k2 = palabra.indexOf('-', k1+1);
      valor12 = palabra.substring(k1+1, k2).toInt();
      k3 = palabra.indexOf('-', k2+1);
      valor13 = palabra.substring(k2+1, k3).toInt();
      k4 = palabra.indexOf('-', k3+1);
      Tiempo = 1000 * palabra.substring(k3+1, k4).toInt();
      palabra = "";
      digitalWrite(LED11, valor11);
      digitalWrite(LED12, valor12);
      digitalWrite(LED13, valor13);
  }

    previousMillis = currentMillis;
} // =>Fin del available
      tiempo();
} // =>Fin del loop

void tiempo() {
  currentMillis = millis();
  if (currentMillis >= (previousMillis + Tiempo)) {
    previousMillis = currentMillis;
    Serial.println("send_me_next"); // Envíame el siguiente.
  }
  }
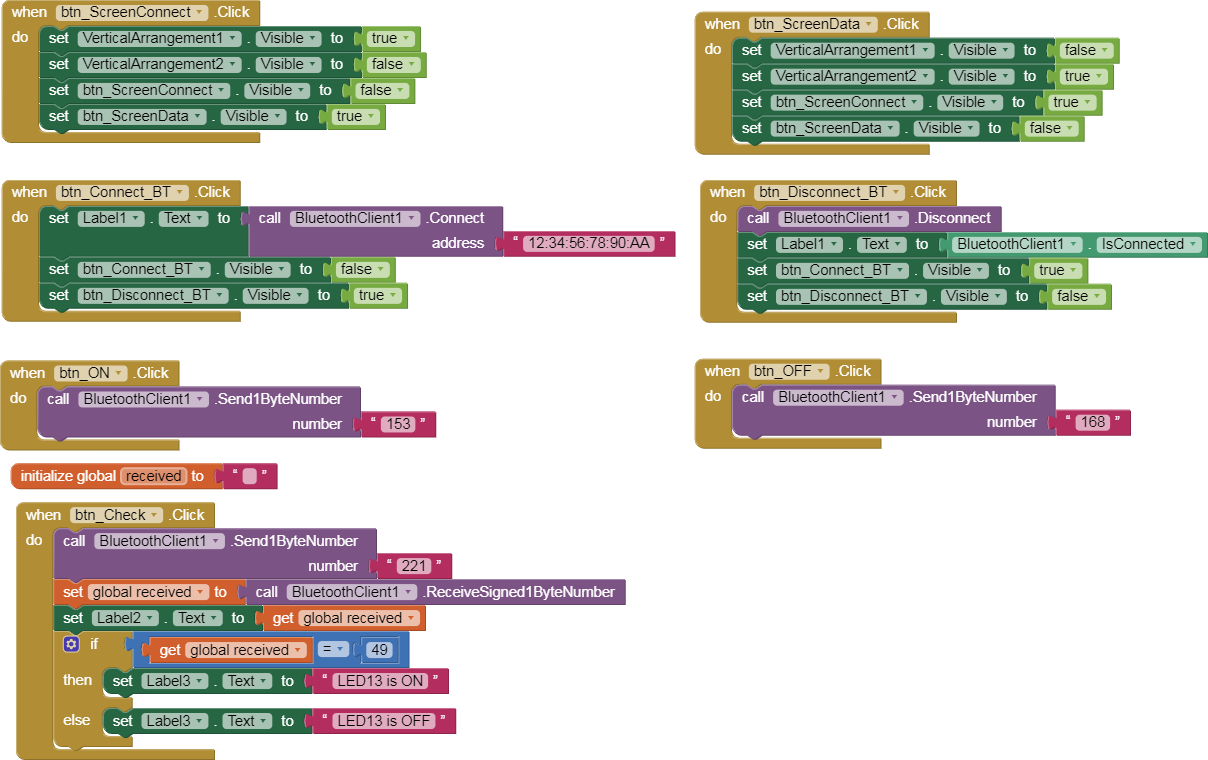
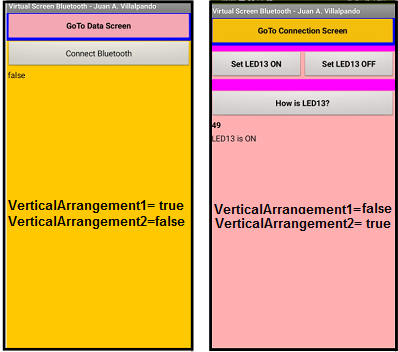
11.- Virtual Screen with two VerticalArrangement.
p9A0i_bluetooth_virtual.aia (4.1 KB)
// Juan A. Villalpando
// http://kio4.com/appinventor/9A0_Resumen_Bluetooth.htm

#define LED13 13
byte StatusLED13;

void setup()
{
  Serial.begin(9600);
  pinMode(LED13, OUTPUT);
}

void loop() {
  if(Serial.available())
  {
    int dato = Serial.read();
    if(dato == 153){digitalWrite(LED13, HIGH);}
    if(dato == 168){digitalWrite(LED13, LOW);}
    if(dato == 221){
      StatusLED13 = digitalRead(LED13);
      Serial.print(StatusLED13); // Sends 48 or 49
      }
   }
}
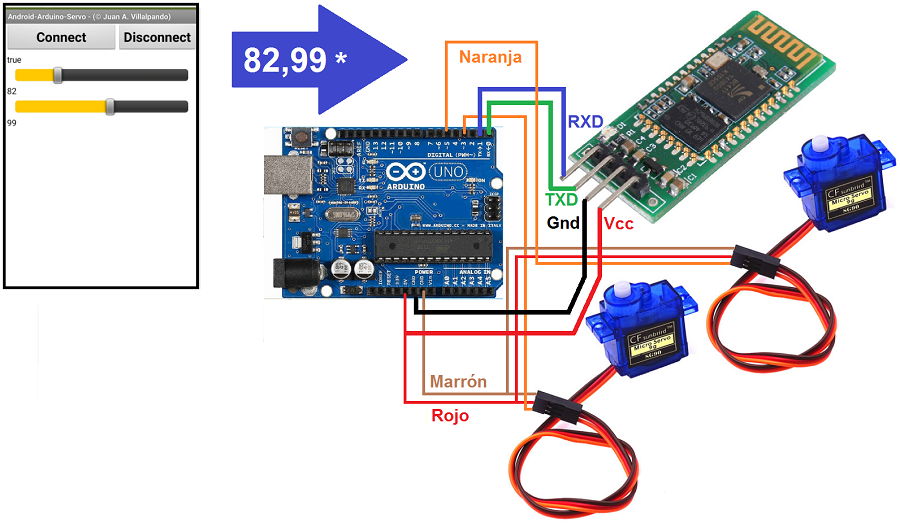
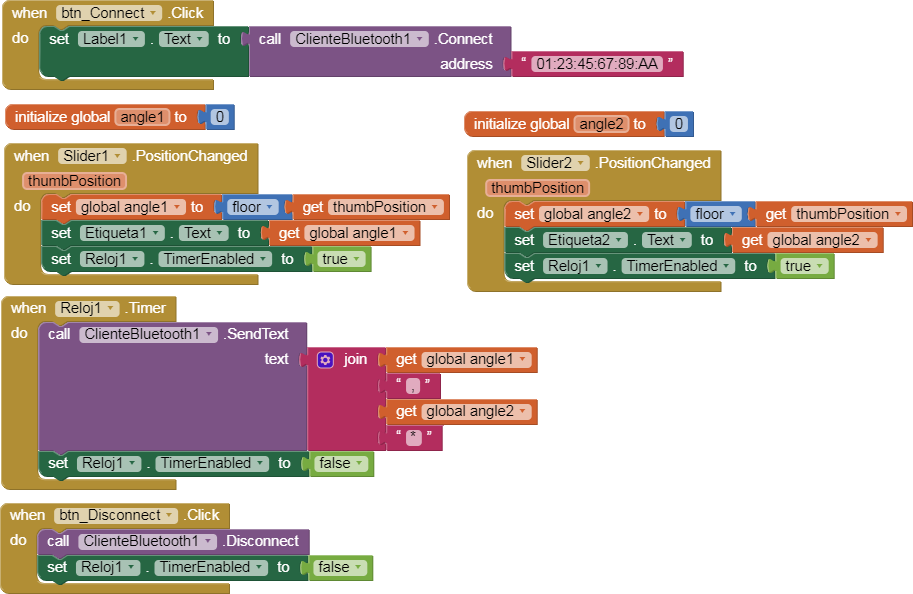
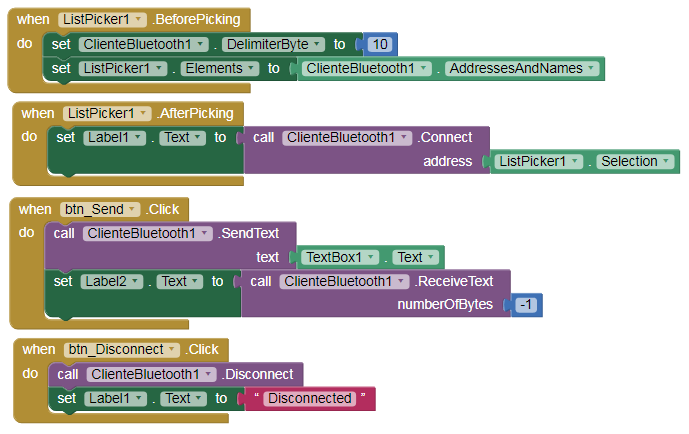
12.- App moves two Servos by Sliders.
p9A0i_bluetooth_servos.aia (3.2 KB)
// Juan A. Villalpando
// http://kio4.com/appinventor/9A0_Resumen_Bluetooth.htm

#include <Servo.h>
Servo servo3;
Servo servo5;
const int pwmPin3 = 3; // Servo3 pin3 PWM
const int pwmPin5 = 5; // Servo5 pin5 PWM

char caracter;
String palabra;
String angulo_1;
String angulo_2;

int k1;

void setup() {
Serial.begin(9600);
pinMode (pwmPin3, OUTPUT);
pinMode (pwmPin5, OUTPUT);
servo3.attach(pwmPin3);
servo5.attach(pwmPin5);
}

void loop() {

  if(Serial.available())
  {
    caracter = Serial.read();
    palabra = palabra + caracter;

if (caracter == '*') {
      Serial.println(palabra);
      palabra = palabra.substring(0, palabra.length() - 1); // Delete last char *
      k1 = palabra.indexOf(',');
      angulo_1 = palabra.substring(0, k1);
      angulo_2 = palabra.substring(k1+1, -1);

      servo3.write(angulo_1.toInt());
      servo5.write(angulo_2.toInt());
      palabra = "";
  }
      }
} // => Fin Loop
Note: if you use more than 2 servos you will need to power them with an external power source. Video: Each servo needs about 400 mA.
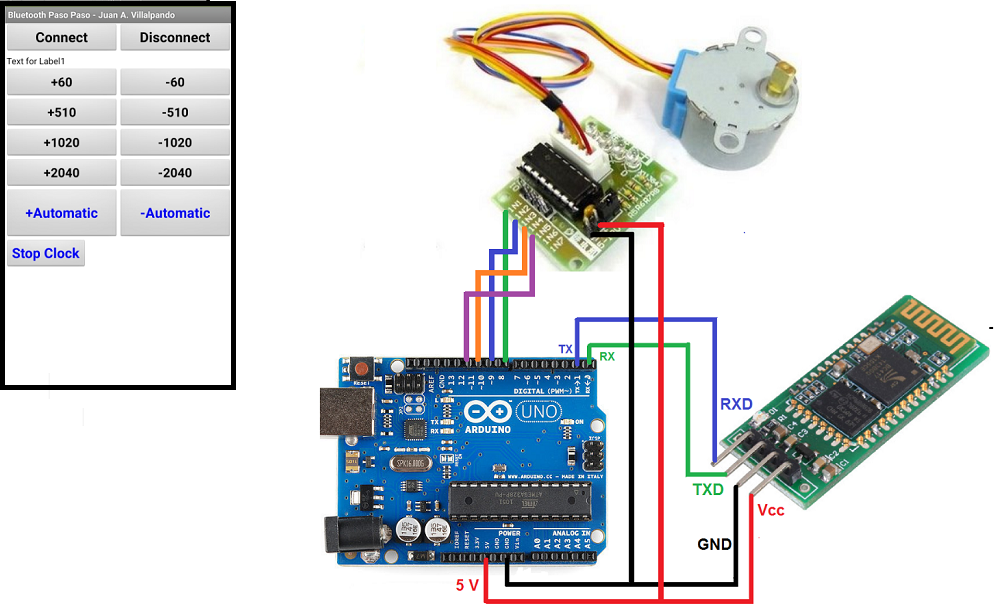
13.- App moves a Stepper motor.
p9A0i_bluetooth_pasopaso.aia (3.1 KB)
In a servo you order:
set 34º
set 12º
set 96º, it is not necessary to know the previous position.
In a stepper motor, you order:
set 20 step clockwise
set 80 step anticlockwise, it is necessary to know the previous position to place it in a new position.
I will use: Stepper motor 28BYJ-48 ULN2003
It is convenient to power this motor through an external source, in this experimental example I will feed it with the 5 V of Arduino.
// Juan A. Villalpando
// http://kio4.com/appinventor/9A0_Resumen_Bluetooth.htm

#include <Stepper.h>
#define STEPS 64

// Secuencia 1-3-2-4
Stepper motor(STEPS, 8, 10, 9, 11);

char caracter;
void setup() {
Serial.begin(9600);
motor.setSpeed(200);
}

void loop() {
if( Serial.available() ) {
  caracter = Serial.read();
  Serial.print(caracter);
  if(caracter == '1'){motor.step(60);}
  if(caracter == '2'){motor.step(-60);}
  if(caracter == '3'){motor.step(510);}
  if(caracter == '4'){motor.step(-510);}
  if(caracter == '5'){motor.step(1020);}
  if(caracter == '6'){motor.step(-1020);}
  if(caracter == '7'){motor.step(2040);}
  if(caracter == '8'){motor.step(-2040);}

  if(caracter == 'A'){motor.step(100);}
  if(caracter == 'B'){motor.step(-100);}
  }
}
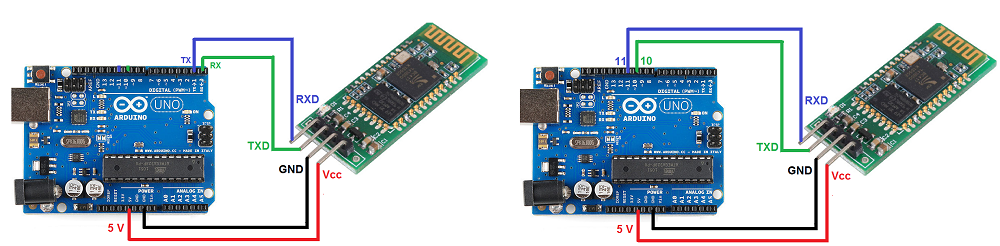
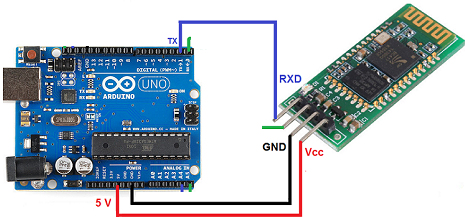
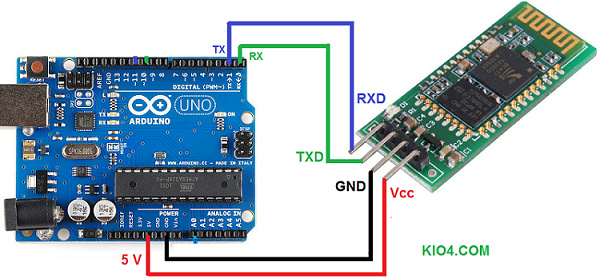
14. Where do we connect the Bluetooth module in Arduino UNO?
p9A0i_bluetooth_Serial.aia (2.9 KB)
Terminals 0 (RX) and 1 (TX) are used by Arduino as the default Serial RX/TX. Use it to upload sketch, Serial Monitor, Bluetooth. So when we are going to upload a sketch for Bluetooth we must disconnect the RX cable from the Arduino.
We can use other terminals to connect the Bluetooth module, for example 10 and 11, in this case we need the “SoftwareSerial” library. Now when we upload a sketch it is not necessary to remove the RX cable.
- CODE FOR MODULE IN default RX/TX pin 0 and 1 of Arduino.
// Juan A. Villalpando
// http://kio4.com/appinventor/9A0_Resumen_Bluetooth.htm

#define Pin13  13
char caracter;

void setup() {
  Serial.begin(9600);
  pinMode(Pin13, OUTPUT);
}

void loop() {
  if(Serial.available()) {
    caracter = Serial.read();
    if(caracter == 'a'){ digitalWrite(Pin13, HIGH);}
    if(caracter == 'b'){ digitalWrite(Pin13, LOW);}
    Serial.println(caracter);
  }
}
- CODE FOR MODULE IN pin10 and pin11 with SoftwareSerial library.
// Juan A. Villalpando
// http://kio4.com/appinventor/9A0_Resumen_Bluetooth.htm

#include <SoftwareSerial.h>
SoftwareSerial I2CBT(10,11);
// El TX del módulo BT va al pin10 del Arduino
// El RX del módulo BT va al pin11 del Arduino

#define Pin13  13
char caracter;

void setup() {
  I2CBT.begin(9600); // To read and write Bluetooth
  Serial.begin(9600); // To print in Serial Monitor
  pinMode(Pin13, OUTPUT);
}

void loop() {
  if(I2CBT.available()) {
    caracter = I2CBT.read();
    if(caracter == 'a'){ digitalWrite(Pin13, HIGH);}
    if(caracter == 'b'){ digitalWrite(Pin13, LOW);}
    Serial.println(caracter); // Serial Monitor
    I2CBT.println(caracter);  // return Bluetooth
    //  I2CBT.write(caracter);  // return Bluetooth
  }
}
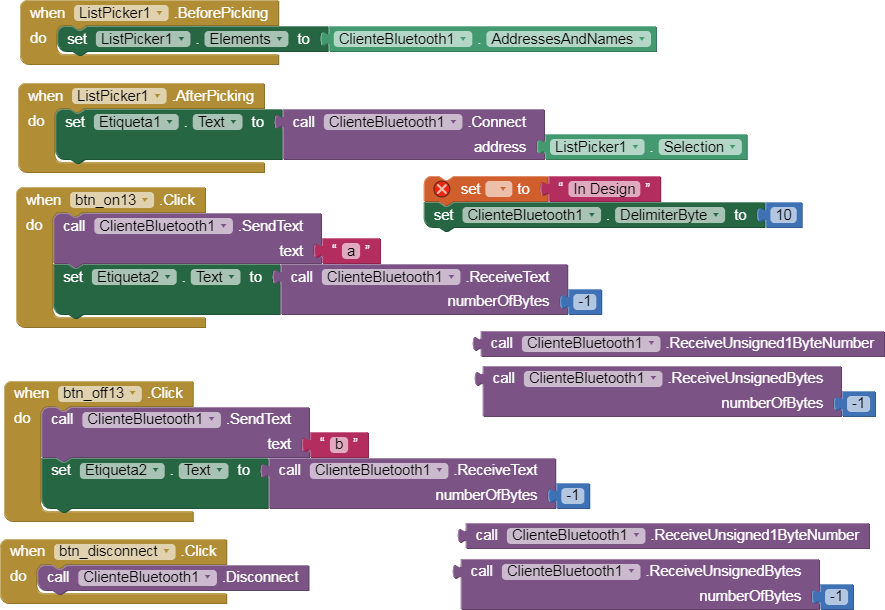
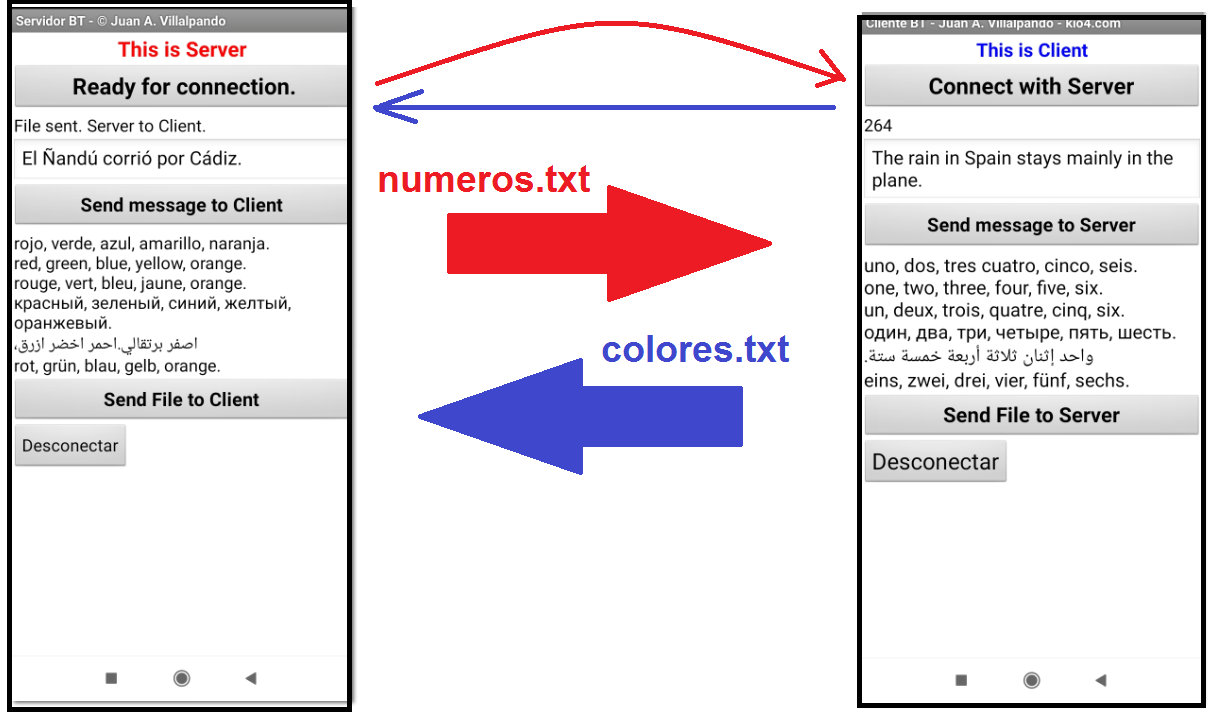
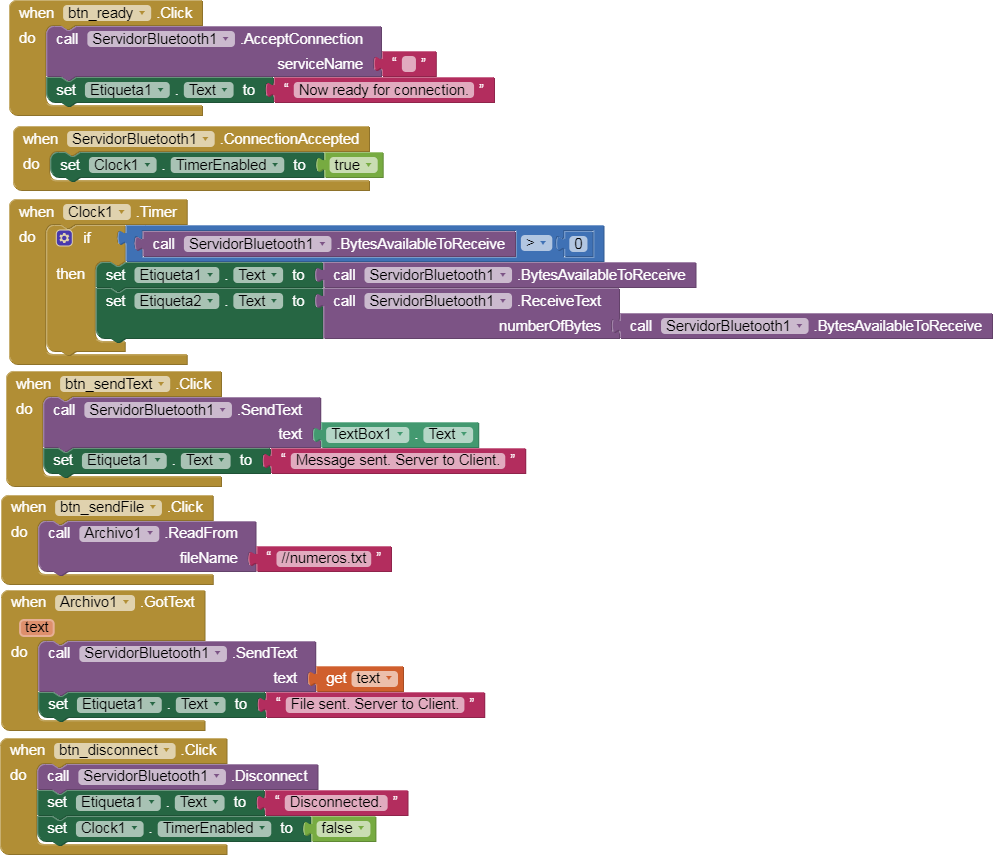
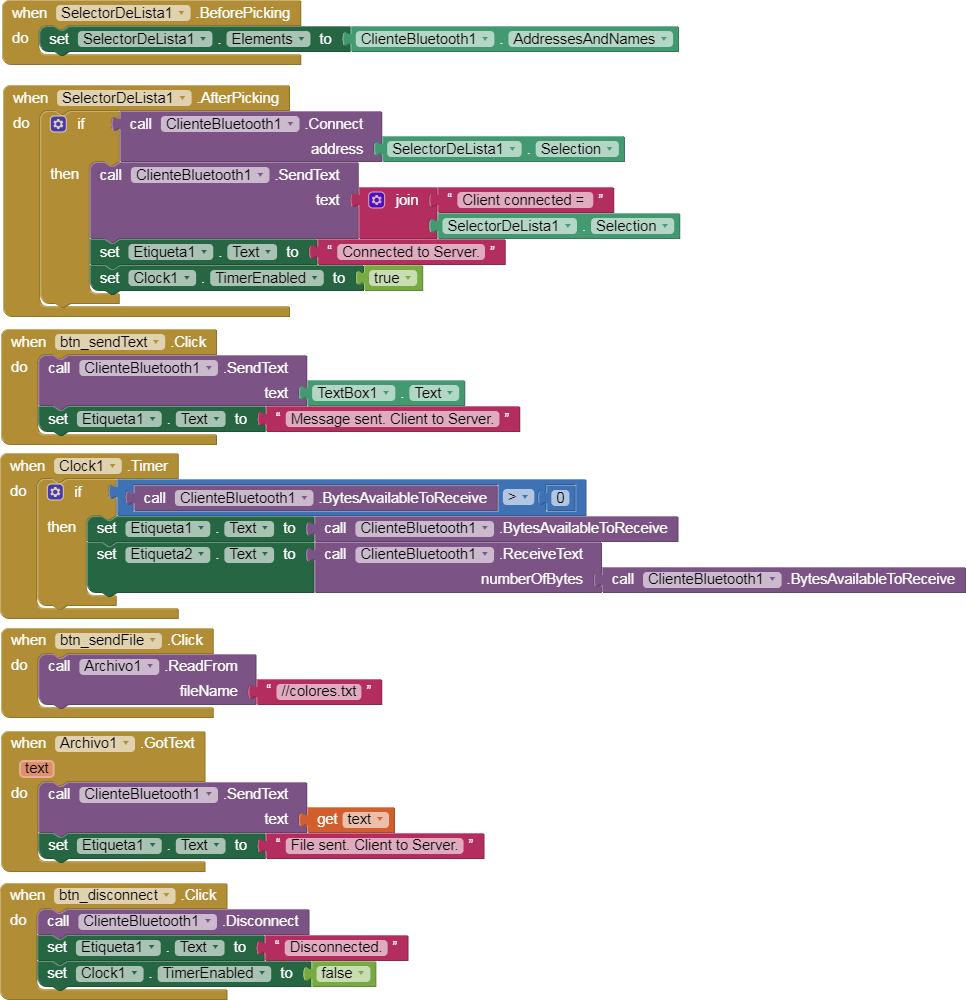
15.- Send text file from Server to Client and from Client to Server. Message Mobile to Mobile by Bluetooth.
p9A0i_BT_Server_File.aia (3.3 KB)
p9A0i_BT_Client_File.aia (3.4 KB)
- Blocks Server.
- Blocks Client.
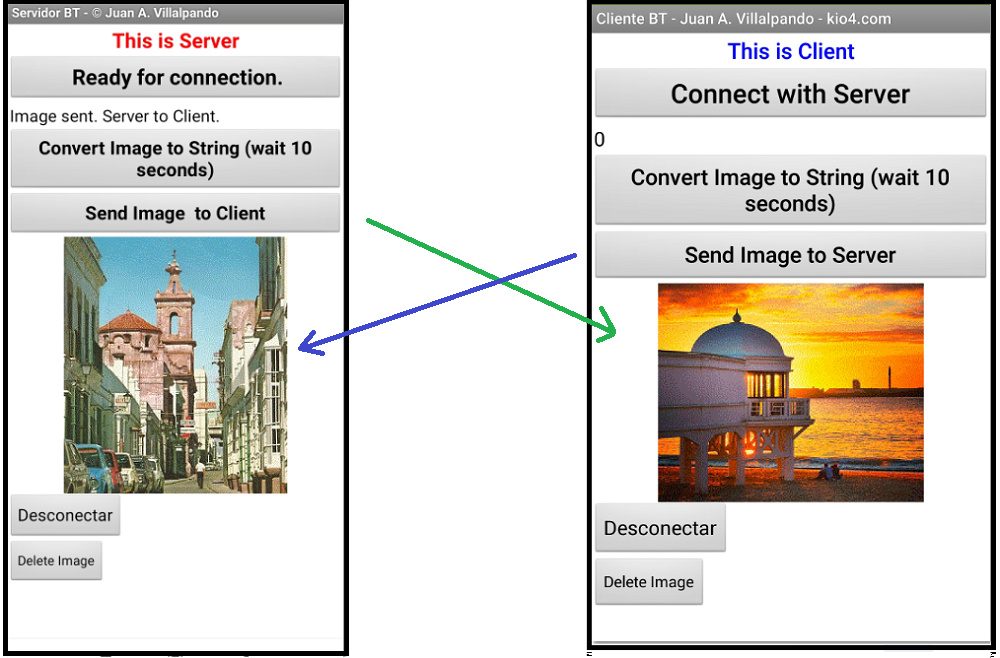
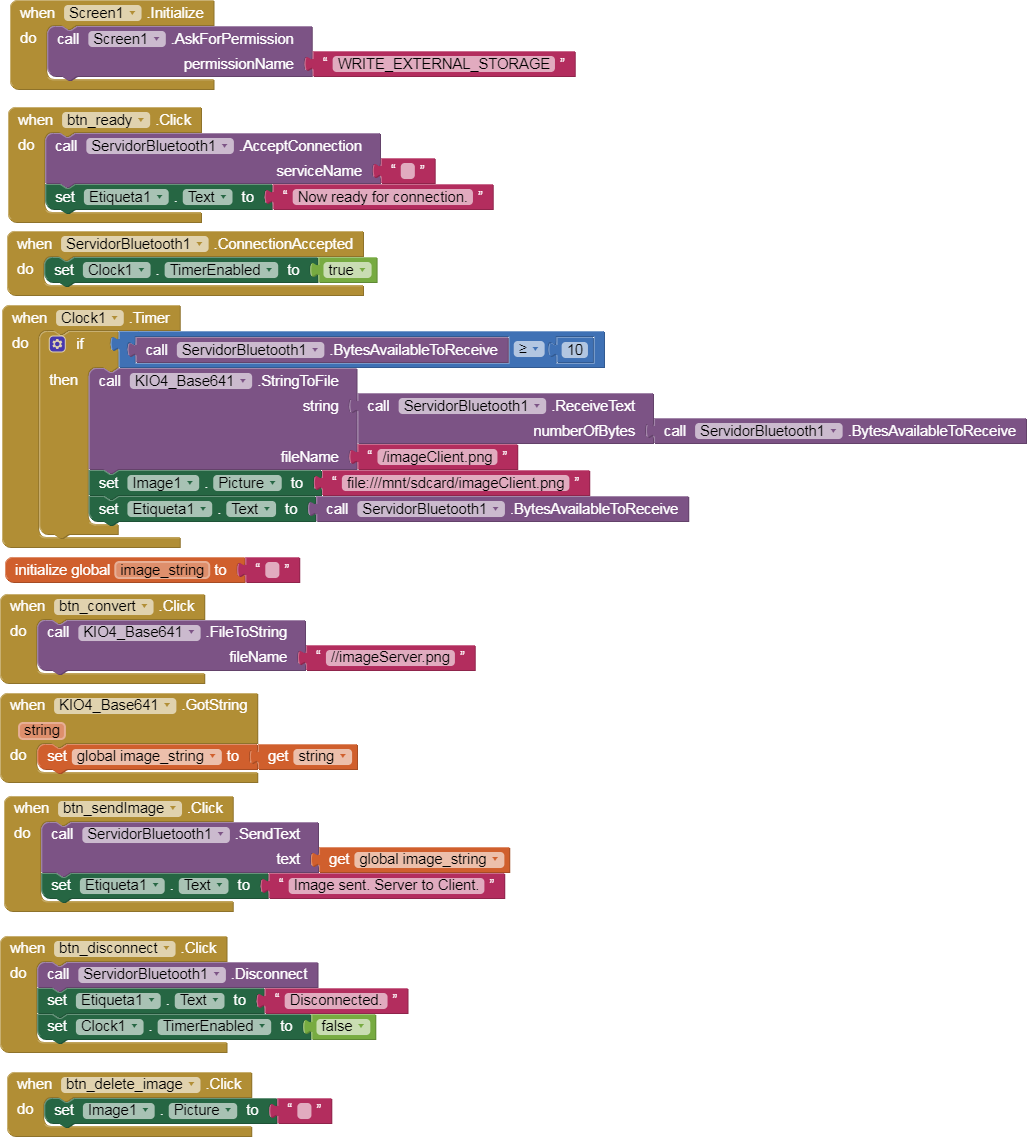
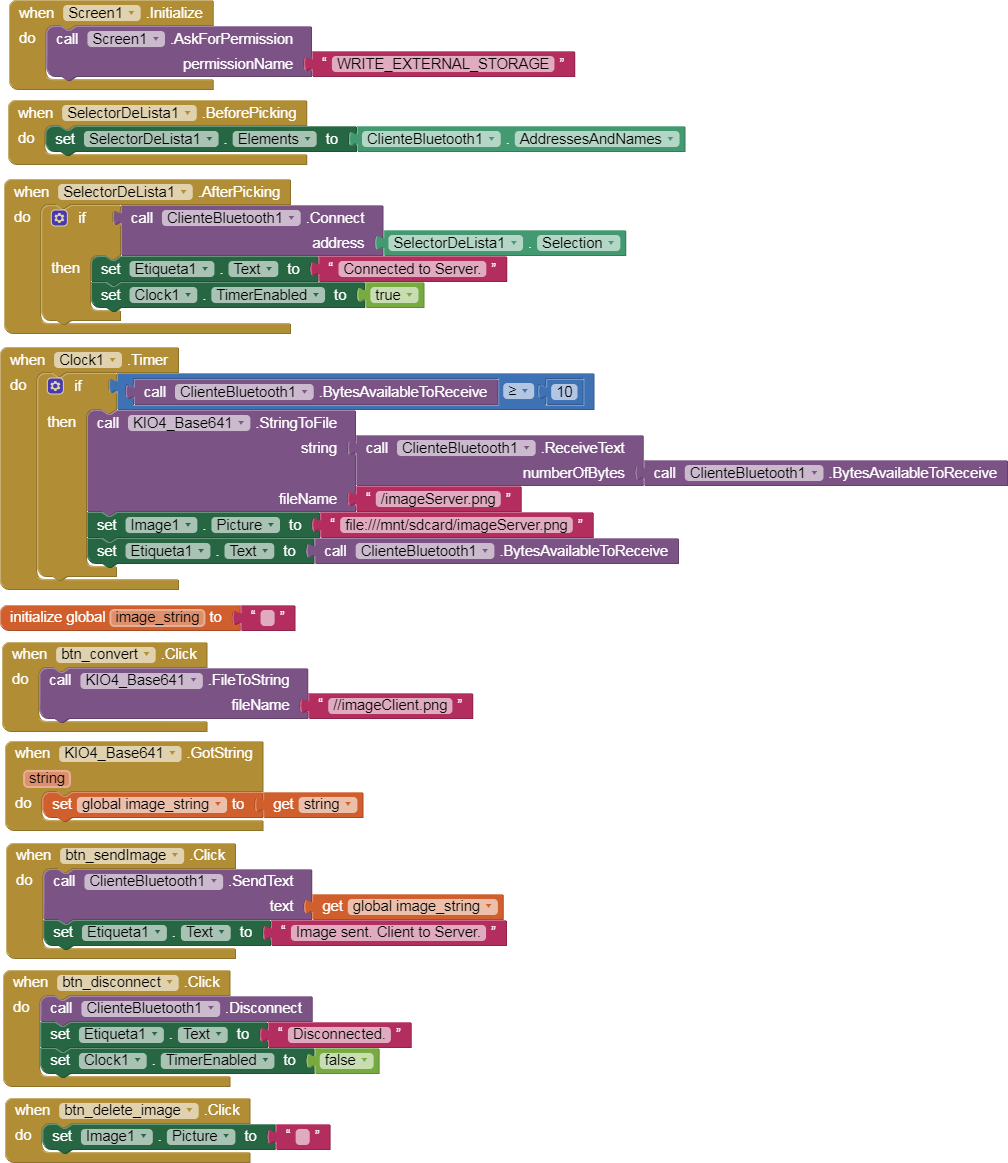
16.- Send Image file from Server to Client and from Client to Server.
This example is only experimental, there are problems with file size, clock interval, conversion … Try.
p9A0i_BT_Server_Image.aia (41.9 KB)
p9A0i_BT_Client_Image.aia (55.6 KB)
- Blocks Server.
- Blocks Client.
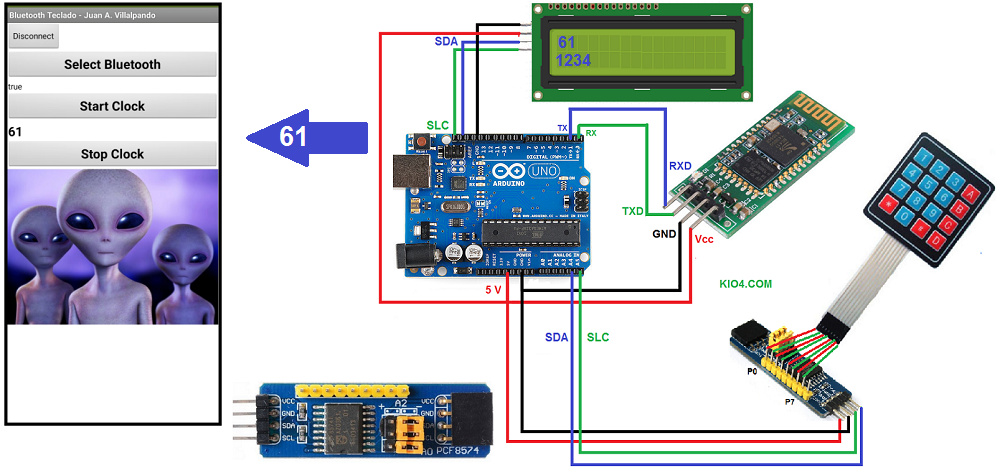
17.- Write number with KeyPad in Arduino and sends to App by Bluetooth. LCD I2C.
p9A0i_bluetooth_teclado.aia (1.8 MB)
// Juan A. Villalpando
// http://kio4.com/appinventor/9BA_bluetooth_teclado_LCD.htm

#include <Wire.h>
#include <Keypad_I2C.h>
// Pantalla LCD
#include <LiquidCrystal_I2C.h>
LiquidCrystal_I2C lcd(0x27, 2, 1, 0, 4, 5, 6, 7, 3, POSITIVE);
// LiquidCrystal_I2C lcd(0x3F, 2, 1, 0, 4, 5, 6, 7, 3, POSITIVE);

String clave = "";
String clave_old = "";

const byte ROWS = 4;
const byte COLS = 4;

char keys[ROWS][COLS] = {
  {'1', '2', '3', 'A'},
  {'4', '5', '6', 'B'},
  {'7', '8', '9', 'C'},
  {'*', '0', '#', 'D'}
};

byte rowPins[ROWS] = {0, 1, 2, 3};
byte colPins[COLS] = {4, 5, 6, 7};

int i2caddress = 0x20; // Module I2C Keyboard.

Keypad_I2C kpd = Keypad_I2C( makeKeymap(keys), rowPins, colPins, ROWS, COLS, i2caddress);

void setup() {
  Serial.begin(9600);
  kpd.begin();
  lcd.begin(16,2);// Columnas y filas de LCD.

}

void loop() {
  char key = kpd.getKey();
  clave = clave + (String) key;
  if (key == '#') {
    clave = clave.substring(0, clave.length() - 1); // Delete last char #
    lcd.clear();
    lcd.setCursor(0,0);
    lcd.print(clave);
    lcd.setCursor(0,1);
    lcd.print(clave_old);
    clave_old = clave;
    Serial.println(clave);
    clave = "";
  }
  delay(100);
}
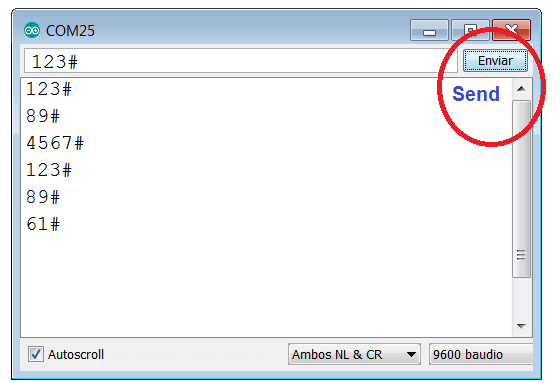
18.- Poor man’s circuit.
// Juan A. Villalpando
// http://kio4.com/appinventor/9BA_bluetooth_teclado_LCD.htm

char key = 0;
String clave = "";

void setup() {
Serial.begin(9600);
}

void loop() {
if (Serial.available() > 0) {
  key = Serial.read();
  clave = clave + key;
      if (key == '#') {
        Serial.print(clave);
        // Example sends: 123#
        clave = "";
      }
  }
}
19.- Arduino Interrupts sends data to App.
p9A01_bluetooth_interrupt.aia (2.3 KB)
Arduino UNO has two pins for interruptions (pin2 and pin3). ESP32 has 32 interrupt pins).
Arduino interrupts: https://www.arduino.cc/reference/en/language/functions/external-interrupts/attachinterrupt/
When pin2 RISING causes an interrupt and calls function on_13
When pin3 RISING causes an interrupt and calls function off_13
// Juan A. Villalpando
// http://kio4.com/appinventor/9A0_Resumen_Bluetooth.htm

#define LED13 13

void setup()
{
  Serial.begin(9600);
  attachInterrupt(digitalPinToInterrupt(2), on_13, RISING);
  attachInterrupt(digitalPinToInterrupt(3), off_13, RISING);
  pinMode(LED13, OUTPUT);
}

void loop()
{
  //
}

 // Interruptions ISR.
void on_13() // When pin2 RISING...
{
   digitalWrite(LED13, HIGH);
   Serial.print(1);
}

void off_13()  // When pin3 RISING...
{
   digitalWrite(LED13, LOW);
   Serial.print(0);
}
20.- Get message when Bluetooth has disconnection failure.
p9A01_bluetooth_faliure.aia (4.0 KB)
// Juan A. Villalpando
// http://kio4.com/appinventor/9A0_Resumen_Bluetooth.htm

int aleatorio;

void setup() {
  Serial.begin(9600);
}

void loop() {
    aleatorio = random(0,100);
    Serial.println(aleatorio);
    delay(400); // Clock.Interval < delay Arduino
}
App receives those numbers and shows.
Disconnect the power cable from the Arduino.
You will get the approximate time of that disconnection.
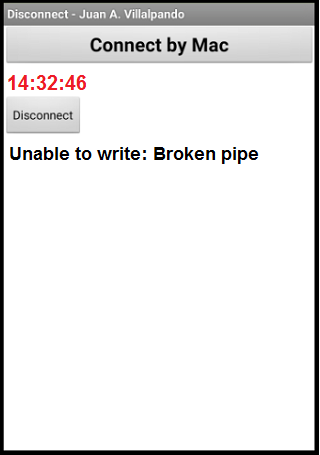
In the previous blocks observe SendText = 3, this is dumb number, when that number is sent and the Bluetooth does not receive it, we get error 516: Unable to write: Broken pipe.
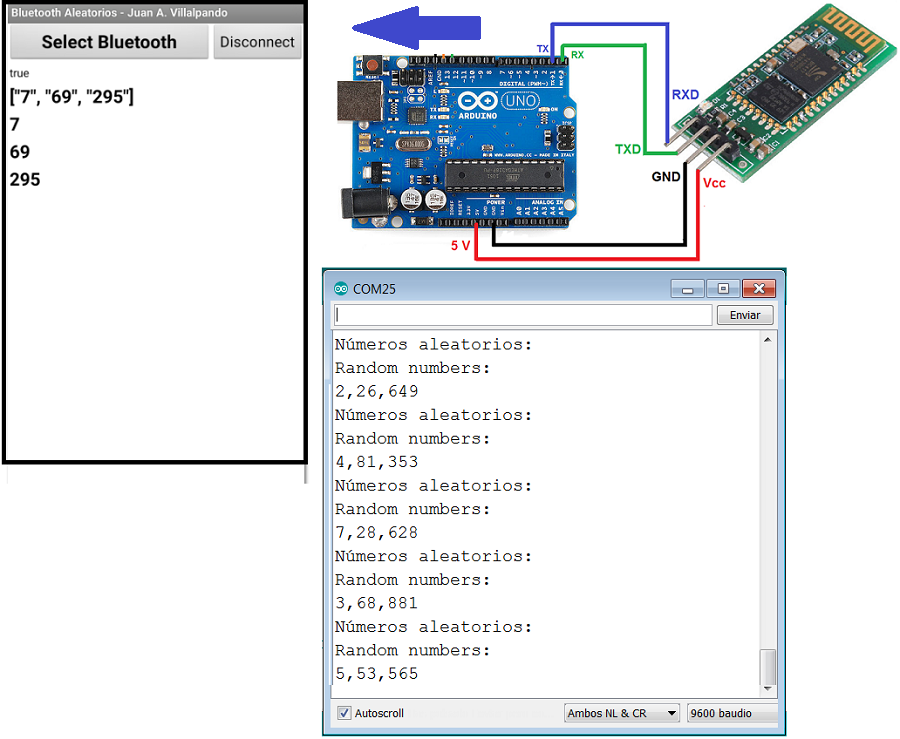
21.- Arduino sends three random numbers to App.
p9A0i_bluetooth_aleatorios.aia (3.9 KB)
// Juan A. Villalpando
// http://kio4.com/appinventor/9A0_Resumen_Bluetooth.htm

int x;
int y;
int z;
String datos;

void setup() {
 Serial.begin(9600);
}

void loop() {
x = random(0, 10);
y = random(10, 100);
z = random(100,1000);
datos = (String) x + "," + (String) y + "," + (String) z;
Serial.println("Números aleatorios:");
Serial.println("Random numbers:");
Serial.println(datos);

delay(800);
}
Note that it only shows up when a list of 3 items arrives. Not shown:
Serial.println(“Números aleatorios:”);
Serial.println(“Random numbers:”);
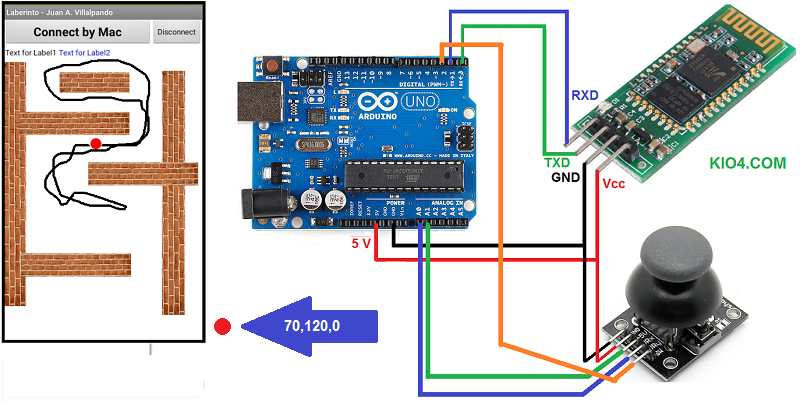
22.- JoyStick in Arduino sends values. Move a ball.
p9A0_bluetooth_laberinto.aia (115.7 KB)
// Juan A. Villalpando
// http://kio4.com/appinventor/9A0_Resumen_Bluetooth.htm

int x;
int y;
int c;
String datos;

void setup() {
 Serial.begin(9600);
 pinMode(2,INPUT_PULLUP);
}

void loop() {
  x = analogRead(A0);
  y = analogRead(A1);
  if (digitalRead(2) == HIGH){c=0;} else {c=1;}
  datos = (String) x + "," + (String) y + "," + (String) c;
  Serial.println(datos);
  delay(100);
}
Variables x,y: Ball.MoveTo and DrawLine.
Variable c: Canvas.Clear (when press JoyStick)
23.- Arduino sends random numbers every second and every two seconds.
p9A0i_bluetooth_aleatorio2.aia (3.4 KB)
// Juan A. Villalpando
// http://kio4.com/appinventor/9A0_Resumen_Bluetooth.htm

int alea_1;
int alea_2;
unsigned long tiempo_actual_1 = 0;
unsigned long tiempo_actual_2 = 0;

void setup() {
  Serial.begin(9600);
}

void loop() {
  if((millis()-tiempo_actual_1)>= 1000){
          int alea_1 = random(0,100);
          tiempo_actual_1 = millis();
          Serial.println(String(alea_1));
  }
  if((millis()-tiempo_actual_2)>= 2000){
          int alea_2 = random(200,300);
          tiempo_actual_2 = millis();
          Serial.println(String(alea_2));
  }
}
24.- Press a button continuously and send a character.
In this topic @Povilas_Kasparas, @Taifun and @ABG discuss how to send a character continuously while pressing a button.
char caracter;

 void setup(){
  Serial.begin(9600);
 }

 void loop() {
 if(Serial.available()) {
  caracter = Serial.read();
  Serial.println(caracter);
  }
}
Thank you a lot saved me 
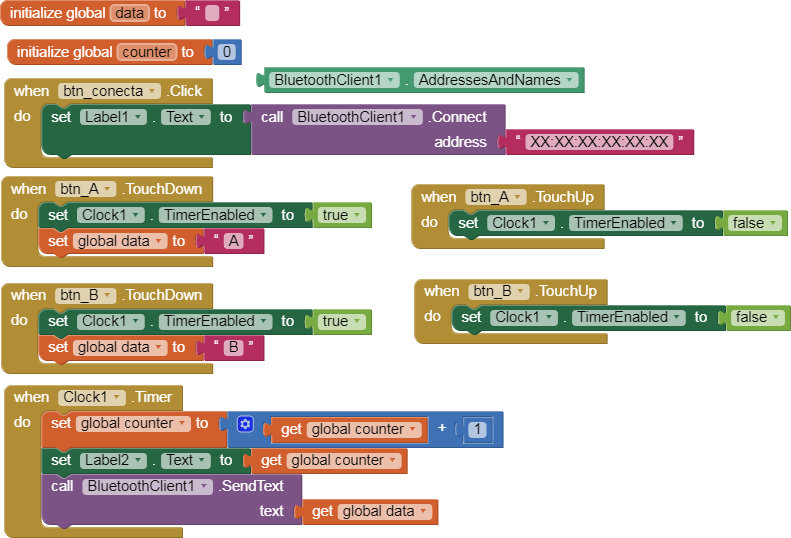
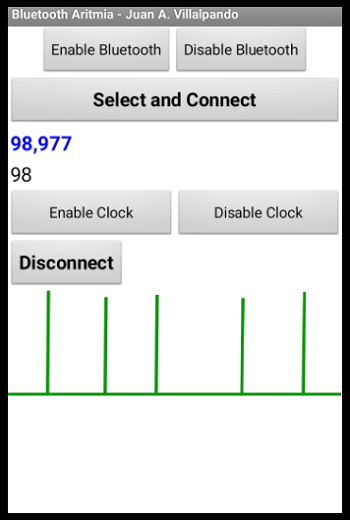
25.- Simulation of an arithmia.
p9BC_Bluetooth_ECGi.aia (12.4 KB)
Arduino sends a random level (90...100), with a random delay (400...1600)
void setup(){
  Serial.begin(9600);
}

void loop(){
      int nivel = random(90,100);
      int ritmo = random(400,1600);
      delay(ritmo);
      String mensaje = (String) nivel + "," + (String) ritmo;
      Serial.println(mensaje);
}
App Receives Text (98,977), gets the level (98) and draws it on a Canvas.
For a more realistic process, use the module AD8232
Here in Spanish:
http://kio4.com/appinventor/9BC_bluetooth_corazon.htm
26.- App sends text. readStringUntil. readString.
p9A1_bluetooth_textoi.aia (2.2 KB)
1.- readStringUntil
char end_char = '\n';
String texto;

void setup() {
Serial.begin(9600);
}

void loop() {
  if(Serial.available()) {
    texto = Serial.readStringUntil(end_char);
    Serial.println(texto);
  }
}
ooooooooooooooOOOOOoooooooooooooo
2.- readString
String texto;

void setup() {
Serial.begin(9600);
Serial.setTimeout(100);
}

void loop() {
  if(Serial.available()) {
    texto = Serial.readString();
    Serial.println(texto);
  }
}
26B.- Example with readString. Return.
[Module Bluetooth in pin 2 and 3 of Arduino]
p9A1_bluetooth_textoi_2.aia (3.0 KB)
#include <SoftwareSerial.h>
SoftwareSerial Bluetooth(2,3);
String texto;

void setup() {
Serial.begin(9600);
Bluetooth.begin(9600);
Bluetooth.setTimeout(100);
}

void loop() {
  if(Bluetooth.available()) {
    // texto = Bluetooth.readStringUntil('\n');
    texto = Bluetooth.readString();
    Serial.println(texto);
    Bluetooth.println(texto);
  }
}
27.- App sends two values separated by commas. Arduino adds them up and returns the sum.
p40i_bluetooth_deslizador.aia (3.5 KB)
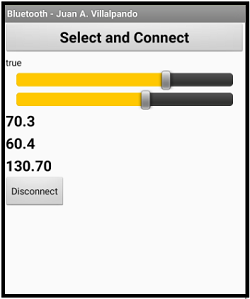
70.3,60.4
130.70
String texto;
String a ;
String b;
float suma = 0.0;

void setup() {
 Serial.begin(9600);
 Serial.setTimeout(200);
}

void loop() {
  if(Serial.available()) {
    // texto = Serial.readString();
    // Serial.println(texto);
    a =  Serial.readStringUntil(',');
    b =  Serial.readStringUntil('\n');
    suma = a.toFloat() + b.toFloat();
   // Serial.println(a);
   // Serial.println(b);
    Serial.println(suma);
  }
}
Clock1.TimerInterval = 100 and Serial.setTimeout (200) are important;
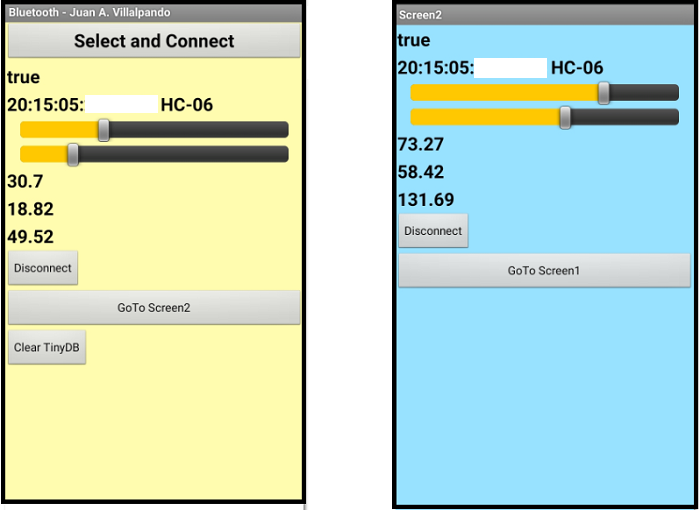
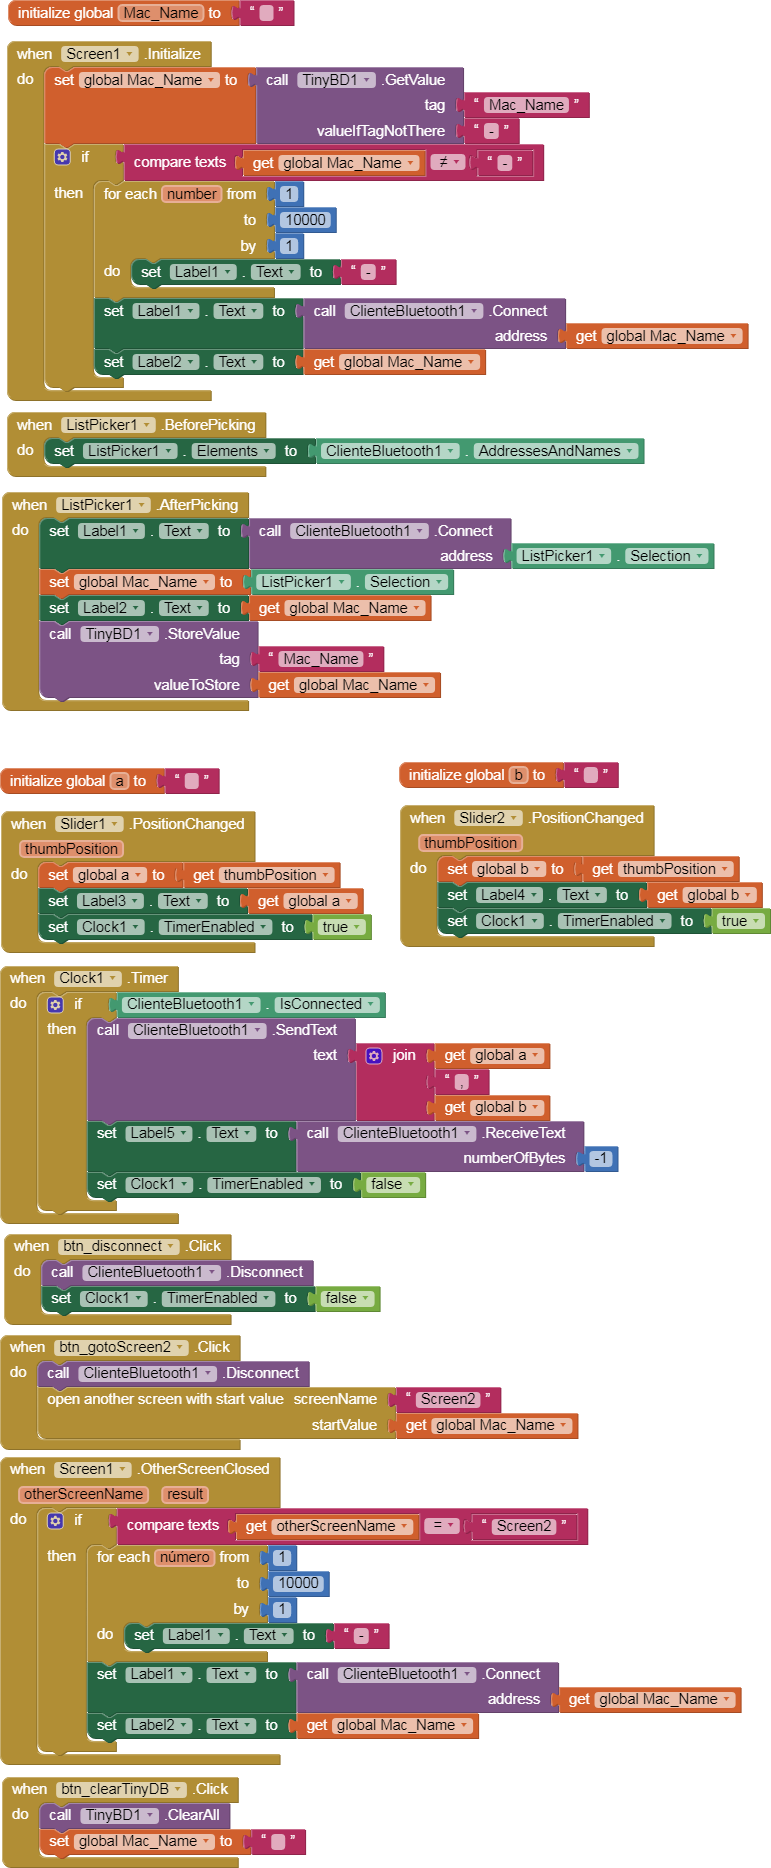
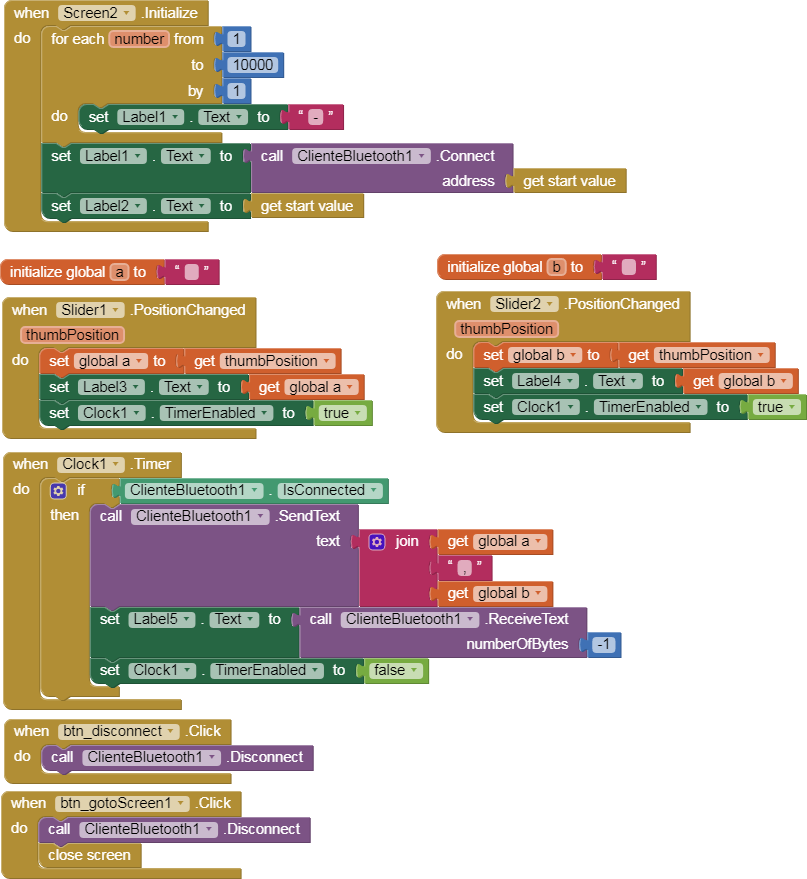
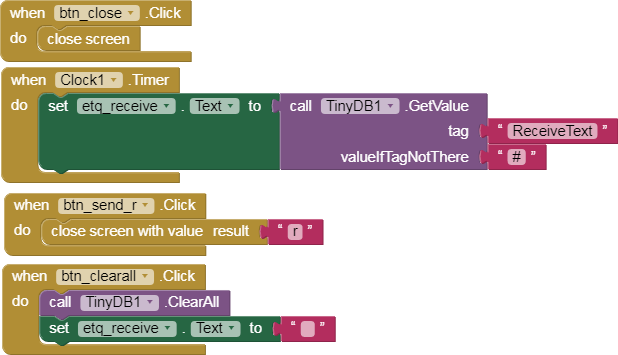
28. Bluetooth in Screen1 and Screen2.
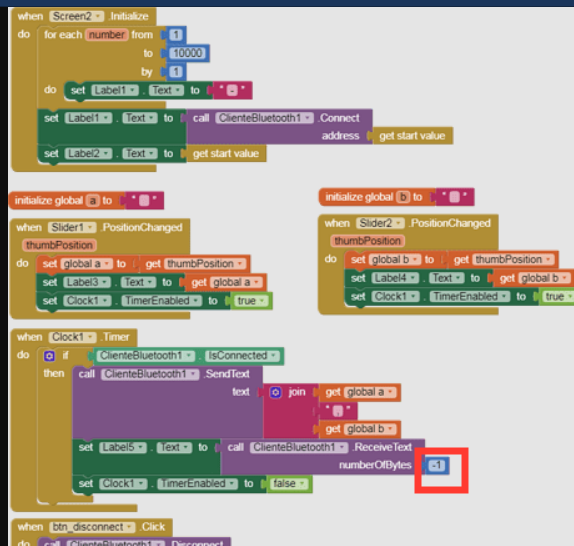
p9H4i_pantalla_real_BT.aia (8.7 KB)
When we change from Screen1 to Screen2, we lose the Bluetooth connection.
The proper method to avoid this is to use "virtual screens" with VerticalArrangement as we saw in the post: #12
Now let's see how we can go from Screen1 to Screen2 using the disconnection and connection in the new Screen.
To go from one Screen to another, we disconnect the current connection, when we start the visible Screen we reconnect.
I've put a little delay (for each 1 ... 10000) to make the connection easier.
The app is similar to the previous example, two Sliders send two numbers to the Arduino, it adds them and returns the sum to the app.
Screen1
Screen2
Arduino code.
Excellent collection of tutorials!!
Could you please post how to use textboxes in example 27, instead of using 2 sliders?
For example, how do we enter two decimal numbers in two separate textboxes and that would be sent to the Arduino? But only one or both textboxes can be used at any time to change the corresponding values of the variables in Arduino, with a single "Send" button in app for both textboxes.
Thank you for all your amazing work!
Hi, your tutorials are very useful. I was able to finish a lot of projects thanks to this!
Now I'm stuck with my current project. I'm trying to analogRead from my ESP32, send that data via Bluetooth, and graph that signal in mitAppInventor. I need a sample frequency of around 500 samples per second. Is this possible with ESP32?
I checked your real time graph example, but I don't think it meets my time requirements. Maybe I should save the data to a .csv and then graph from there?
Once again, thank you so much for all your tutorials. They are super helpful!
I don't think App Inventor can take that data rate and draw it in real time.
ESP32 works with Bluetooth classic (uses the Bluetooth client component) and BLE (uses the BLE extension).
Try sending a Base 64 image and see how long it takes.
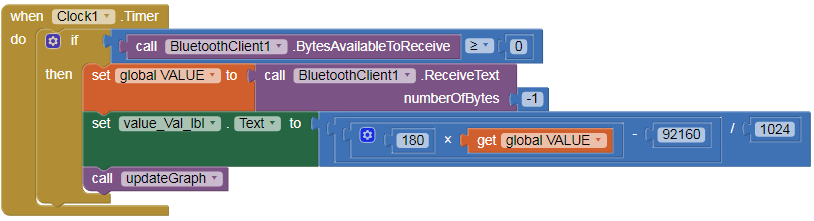
http://ai2.appinventor.mit.edu/reference/components/connectivity.html#BluetoothClient
ReceiveText(numberOfBytes)
Reads a number of bytes from the input stream and converts them to text.
If numberOfBytes is negative, read until a delimiter byte value is read.
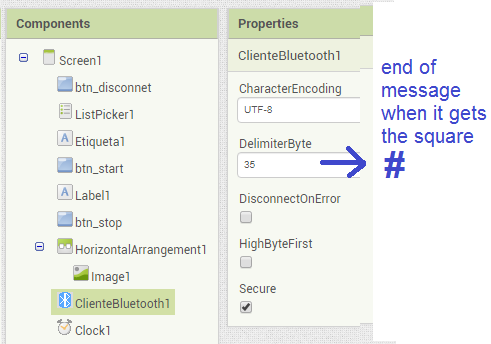
In Design. Properties BluetoothClient. DelimiterByte = 10
ASCII 10 is \n, New Line, NL.
In Arduino:
Serial.println("Hello");
ln sends \n
(really \r\n)
So Arduino sends Hello\n
Bluetooth receive Hello\n
\n here means end message because DelimiterByte is 10 and numberOfBytes is -1.
Thank you.
Yeah, I think I'll try to buffer that data in the ESP32, and then send it to the app and make a graph with that.
It definitely can't handle the "real time" part.
Hey Juan, thanks for this potentiometer app. I am trying to modify it such that the Y axis should vary between -90 to 90 and the variable will fluctuate between +ve and -ve along the X-axis. This would be similar to your p91C_grafico_amortiguacion app. But how to do this? I am kinda lost with the complexity of the graphing app. Also, how to add labels to the axes?
I don't know which example of potentiometers you mean, if you mean
9.- A potentiometer in Arduino sends values to the App. Dynamic graph. Shift left.
you can change the value of y, but the value of x is time, you cannot change it between + ve and -ve.
To change the value of y between +90 and -90, change the following label.
if you mean the example:
7.- App gets the value of two potentiometers.
It would not be a dynamic left shift chart, it would be a static chart.
I think it's better if i post this question in a new topic. I would rather avoid cluttering this thread.
Hi, I have posted here too some Tutorials about AppInventor and Arduino, maybe can help you. There are analog and digital values
Have you ever been able to get this to work with apple ISO?
Sorry, in Apple ISO I have not tested it.
I have read somewhere else that Bluetooth is not supported yet in Appinventor :confused
App Inventor works with classic Bluetooth (Bluetooth components) and BLE (extension).
Can you change the sliders by a picture or drawing and then let the servos draw the picture or drawing like a draw robot
You can create a Canvas, slide your finger across the screen and send the coordinates via BT.
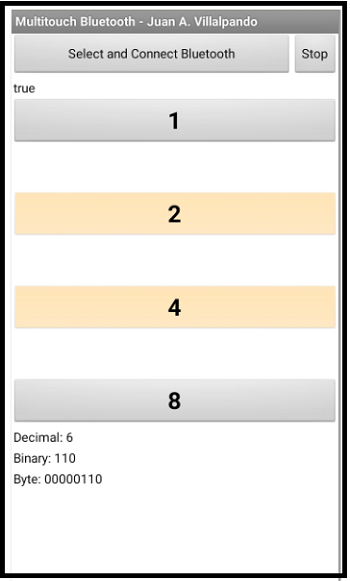
30A.- Multitouch with Clock. Press several buttons at the same time.
p9A0i_bluetooth_multitouch.aia (5.8 KB)
In this topic we can see several examples of Multitouch:
Let's take the idea from @TIMAI2, using the TouchDown, TouchUp events, and a Clock.
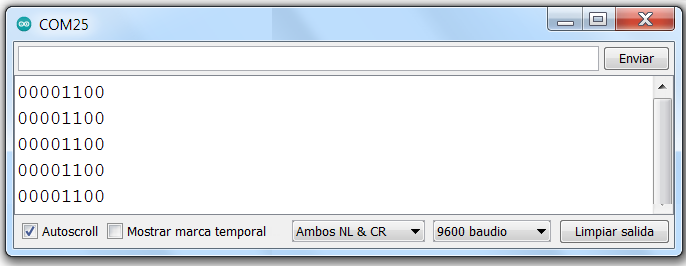
Touch btn_2 and btn_4, add and get 6 decimal, this is 110 binary or 00000110 Byte.
Send this Byte by Bluetooth.
// Juan A. Villalpando
// http://kio4.com/appinventor/9A0_Resumen_Bluetooth.htm

byte byte_received;
String motor;

void setup() {
 Serial.begin(9600);
}

void loop() {
  if(Serial.available()) {
    byte_received = Serial.read();
   // Serial.println(byte_received, BIN);
   // Serial.println(byte_received, DEC);
    motores();
  }
}

void motores(){
if (bitRead(byte_received, 0)){Serial.print("Motor0: RUN  ");} else {Serial.print("Motor0: ---  ");}
if (bitRead(byte_received, 1)){Serial.print("Motor1: RUN  ");} else {Serial.print("Motor1: ---  ");}
if (bitRead(byte_received, 2)){Serial.print("Motor2: RUN  ");} else {Serial.print("Motor2: ---  ");}
if (bitRead(byte_received, 3)){Serial.print("Motor3: RUN  ");} else {Serial.print("Motor3: ---  ");}
Serial.println();
}
oooooooooooooooo000000000000000000oooooooooooooooooo
30B.- Multitouch without Clock.
p9A0i_bluetooth_multitouch_noclock.aia (6.1 KB)
Olá gostaria de saber se teria como informar no app, a medição de um contador de fluxo de água.
Teria como me ajudar?
@Felipe_Carvalho
Open a new topic and show your work, code, drawings, devices used ...
Check example:
8.- App receives data from Arduino. Clock.Interval. Arduino delay. Buffer.
Estou precisando fazer com que no aplicativo comunique com o arduino a partir dessa programação:
#include <LiquidCrystal.h>
float vazao; //Variável para armazenar o valor em L/min
float media = 0; //Variável para fazer a média
int contaPulso; //Variável para a quantidade de pulsos
int i = 0; //Variável para segundos
int Min = 00; //Variável para minutos
float Litros = 0; //Variável para Quantidade de agua
float MiliLitros = 0; //Variavel para Conversão
LiquidCrystal lcd(8, 7, 6, 5, 4, 3);
void setup() {
Serial.begin(9600);
lcd.begin(16, 2);
lcd.setCursor( 0, 0);
lcd.print("Sensoriamento de");
lcd.setCursor( 0, 1);
lcd.print(" fluxo de Agua ");
delay(3000);
lcd.clear();
pinMode(2, INPUT);
attachInterrupt(0, incpulso, RISING); //Configura o pino 2(Interrupção 0) interrupção
}
void loop () {
contaPulso = 0;//Zera a variável
sei(); //Habilita interrupção
delay (1000); //Aguarda 1 segundo
cli(); //Desabilita interrupção
vazao = contaPulso / 5.5; //Converte para L/min
media = media + vazao; //Soma a vazão para o calculo da media
i++;
lcd.setCursor(0, 0);
lcd.print(vazao); //Escreve no display o valor da vazão
lcd.print(" L/min "); //Escreve L/min
lcd.setCursor(0, 1);
lcd.print(Min);
lcd.print(":"); //Escreve :
lcd.print(i); //Escreve a contagem i (segundos)
lcd.print("Min "); //Escreve :
MiliLitros = vazao / 60;
Litros = Litros + MiliLitros;
lcd.print(Litros);
lcd.print("L ");
// Neste conjunto de linhas fizemos a média das leituras obtidas a cada 1 minuto
if (i == 60) {
Min++;
lcd.print(Min);
if (Min >= 60) {
Min = 0;
}
media = media / 60; //faz a média
Serial.print("nMedia por minuto = "); //Imprime a frase Media por minuto =
Serial.print(media); //Imprime o valor da media
Serial.println(" L/min - "); //Imprime L/min
media = 0; //Zera a variável media para uma nova contagem
i = 0; //Zera a variável i para uma nova contagem
}
}
void incpulso () {
contaPulso++; //Incrementa a variável de pulsos
}
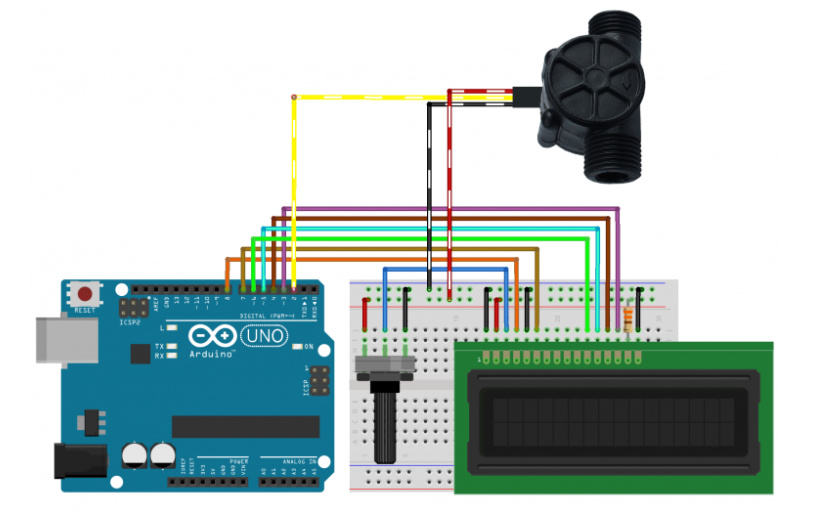
a onde a montagem do circuito é a seguinte
não precisa do LCD, só preciso com que as informações do sensor de fluxo consiga passar a quantidade de litros para o aplicativo
O sensor usado foi o [Sensor de Fluxo de Água G 1/2 1-30 l/min]
E o site usado como base foi o https://www.usinainfo.com.br/blog/sensor-de-fluxo-de-agua-para-arduino-1-30-lmin/
Por enquanto eu fiz esse aplicativo:
Você teria outra solução ou alteração no meu trabalho?
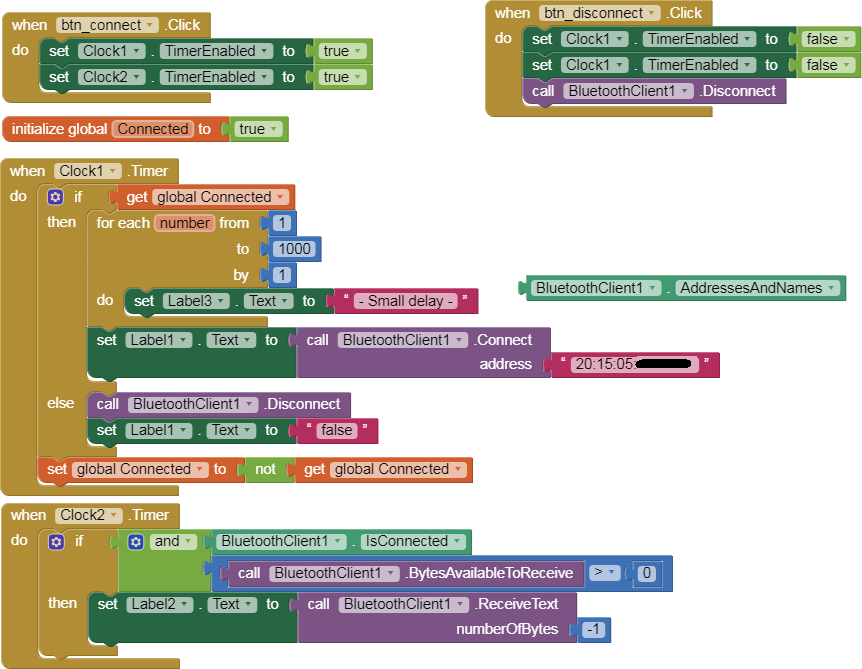
31.- Automatic connection and disconnection cycle of Bluetooth.
p9A01_bluetooth_conec_desco.aia (3.2 KB)
// Juan A. Villalpando
// http://kio4.com/appinventor/9A01_Bluetooth_Conec_Desco.htm
int value_pot0;
void setup() {
Serial.begin(9600);
}
void loop() {
// value_pot0 = analogRead(A0);
value_pot0 = (int) random(0,500);
Serial.println(value_pot0);
delay(100); // It should be slower than the Clock Interval.
}
Clock1.TimerInterval: 5000
Clock2.TimerInterval: 50
BluetoothClient1.DelimiterByte: 10
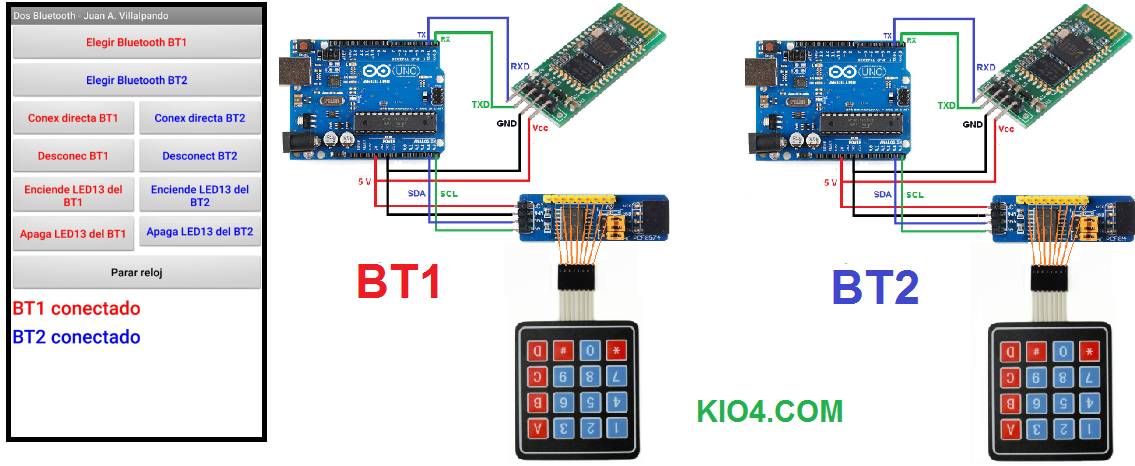
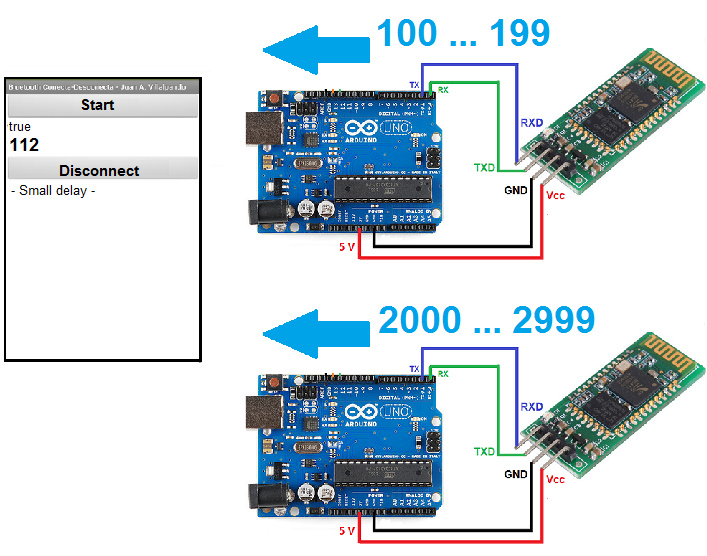
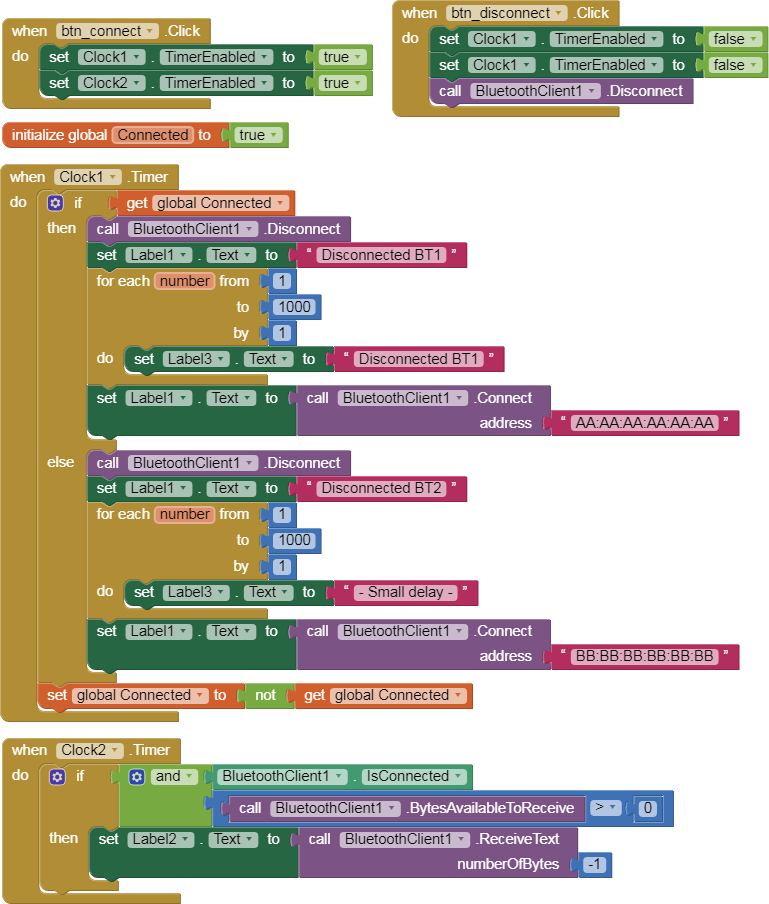
32.- Two Bluetooths alternately connect and disconnect cyclically.
p9A01_bluetooth_conec_desco_2.aia (3.4 KB)
In these tutorials we saw how to connect two Bluetooth devices at the same time to the same application, for this we use two components, BluetoothClient1 and BluetoothClient2.
https://groups.google.com/g/mitappinventortest/c/tsUYqkXNZ3U/m/__y8bPk3BwAJ
http://kio4.com/appinventor/9X_bluetooth_dos_arduino.htm
We will use a single BluetoothClient1.
The two Bluetooth are sending numbers continuously. Look at the Arduino codes. Just change the range of the random numbers.
Code for Arduino 1. (100...199)
// Juan A. Villalpando
// http://kio4.com/appinventor/9A01_Bluetoot_Conec_Desco.htm
int value_pot0;
void setup() {
Serial.begin(9600);
}
void loop() {
// value_pot0 = analogRead(A0);
value_pot0 = (int) random(100,199);
Serial.println(value_pot0);
delay(100); // It should be slower than the Clock Interval.
}
Code for Arduino 2. (2000...2999)
// Juan A. Villalpando
// http://kio4.com/appinventor/9A01_Bluetoot_Conec_Desco.htm
int value_pot0;
void setup() {
Serial.begin(9600);
}
void loop() {
// value_pot0 = analogRead(A0);
value_pot0 = (int) random(2000,2999);
Serial.println(value_pot0);
delay(100); // It should be slower than the Clock Interval.
}
Clock1.TimerInterval: 5000
Clock2.TimerInterval: 50
BluetoothClient1.DelimiterByte: 10
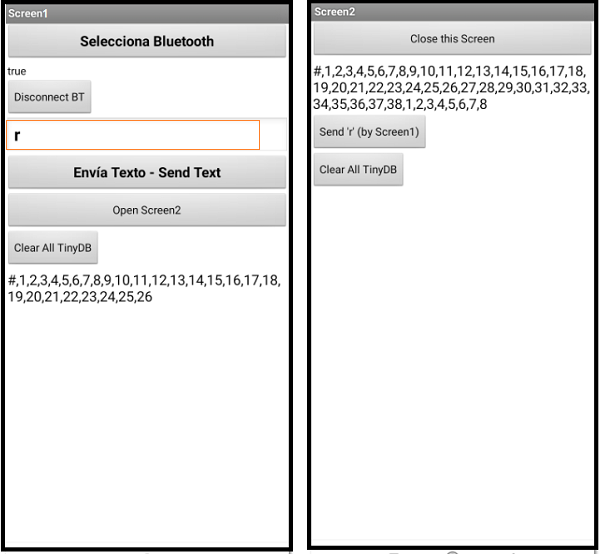
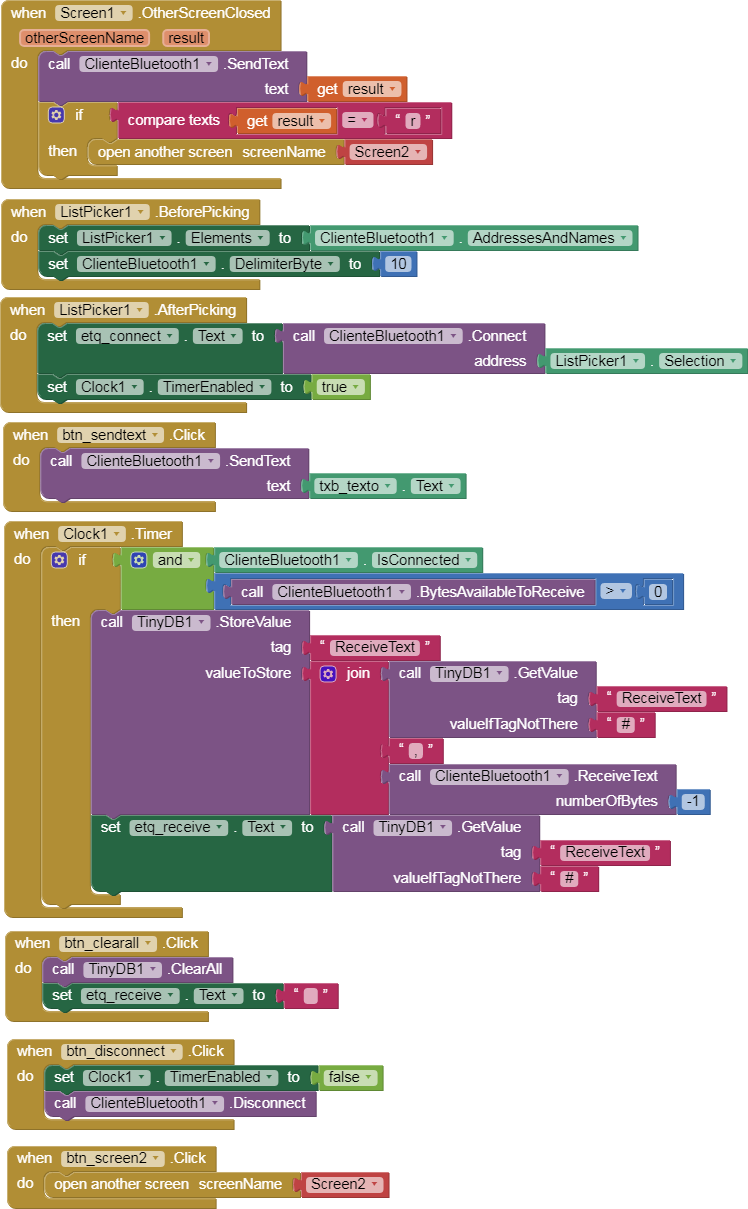
33.- Two Screens. Screen1 to Connect. Screen2 to view data.
p9A02_bluetooth_dospantallas.aia (5.5 KB)
 For the app to work it must be installed.
// Juan A. Villalpando
// http://kio4.com/appinventor/9A02_Bluetooth_Dos_pantallas.htm

#include <SoftwareSerial.h>
SoftwareSerial BT(2,3);

int number = 0;
String numberS = "0";
char caracter = '0';

void setup(){
 BT.begin(9600);
 Serial.begin(9600);
}

void loop(){
  // Send number every 800 ms.
  delay(800);
  number = number + 1;
  if(number == 1000){number = 0;}
  Serial.println(number);
  numberS = (String) number + '\n';
  BT.write(numberS.c_str());

  // If receive char 'r' by BT, restart number.
  if(BT.available()) {
    caracter = BT.read();
    Serial.println(caracter);
    if(caracter == 'r'){number = 0;}
    }
}
ooooooooooooooooooooooooooooooooooooooooooooooooooo
oooooooooooooooooooooooooooooooooooooooooooooooo
ooooooooooooooooooooooooooooooooo
Similar to this topic: [Extension] Dynamic graph. Shift left graph. Sinusoidal wave. Bluetooth
hello super tutorial YES !!!, a question: Is it possible to transmit a csv file from the arduino / esp8266 to the mobile? if so what are the constraints?
Thanks for reading.
Happy holidays to you
Hello,
I just try to get data (voltage) from Arduino. voltage from the photo resistor.
void loop()
{
int Volt = analogRead(A0);
Serial.print(Volt);
delay(500);
}
I can't see any data in MitappInvertor
Serial.print(Volt);
to
Serial.println(Volt);
if BluetClient.Is Connected...... in a ClockTimer
Clock Timerinterval : 400
BluetoothClient.DelymiterByte: 10
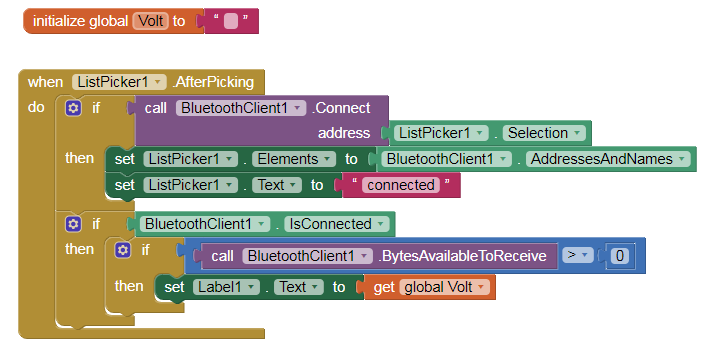
Take a look at the examples in this topic.
It would also help to set global Volt to Bluetooth.ReadText inside that if/then before announcing Volt in a Label.
34.- App sends a number as text via Bluetooth and Arduino converts it to binary. Return.
p9A2_ConvertirBinario.aia (9.5 KB)
a) It converts it to binary with 8 bits.
void setup() {
  Serial.begin(9600);
}

void loop() {
  if (Serial.available()) {
    int num = Serial.parseInt(); // Read number received as text

    String binary = String(num, BIN); // To binary
    while (binary.length() < 8) {
      binary = "0" + binary; // Fill 0 left
    }

    Serial.println(binary); // Print binary number and return.
  }
}
oooooooooooooooooooooooooooooooooooooooooooooooooo
b) Binary Positional.
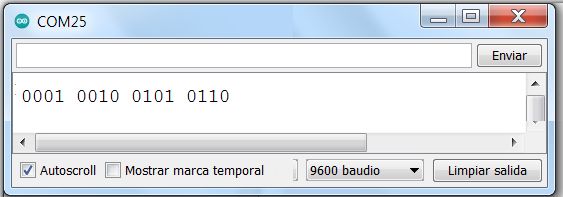
[Start in position 0]
void setup() {
  Serial.begin(9600);
}

void loop() {
  if (Serial.available()) {
    int num = Serial.parseInt(); // Read number received as text

    String binary = "";
    for (int i = 0; i < 48; i++) {
      if (i == num) {
        binary += "1"; // Agregar "1" en la posición correspondiente al número
      } else {
        binary += "0"; // Agregar "0" en las demás posiciones
      }
    }

    Serial.println(binary); // Print binary number and return.
  }
}
oooooooooooooooooooooooooooooooooooooooooooooooooo
c) It converts it to BCD (Binary-Coded Decimal).
[It is necessary that the input has 4 digits: 1256]
void setup() {
  Serial.begin(9600);
}

void loop() {
  if (Serial.available()) {
    String textReceived = Serial.readStringUntil('\n');

    if (textReceived.length() == 4) {
      for (int i = 0; i < 4; i++) {
        int num = textReceived.charAt(i) - '0';  // Get numeric value.
        String bcd = String(num, BIN);  // To BCD
        bcd = ("0000" + bcd).substring(bcd.length());  //  BCD with 4 bits
        Serial.print(bcd + " ");  // Print binary number and return.
      }
      Serial.println();
    }
  }
}
35.- Arduino sends two random numbers with decimals, separated by commas.
pA0_Bluetooth_Arduino_envia.aia (10.7 KB)
float temperature = 0.0;
float humidity = 0.0;
String tempera_humidity;

void setup() {
  Serial.begin(9600);
}

void loop() {
  temperature = random(20, 40) * 5.555;
  humidity = random(50, 95) * 3.333;

  tempera_humidity = String(temperature, 3) + "," + String(humidity, 3);
  Serial.println(tempera_humidity);
  delay(1000);
}
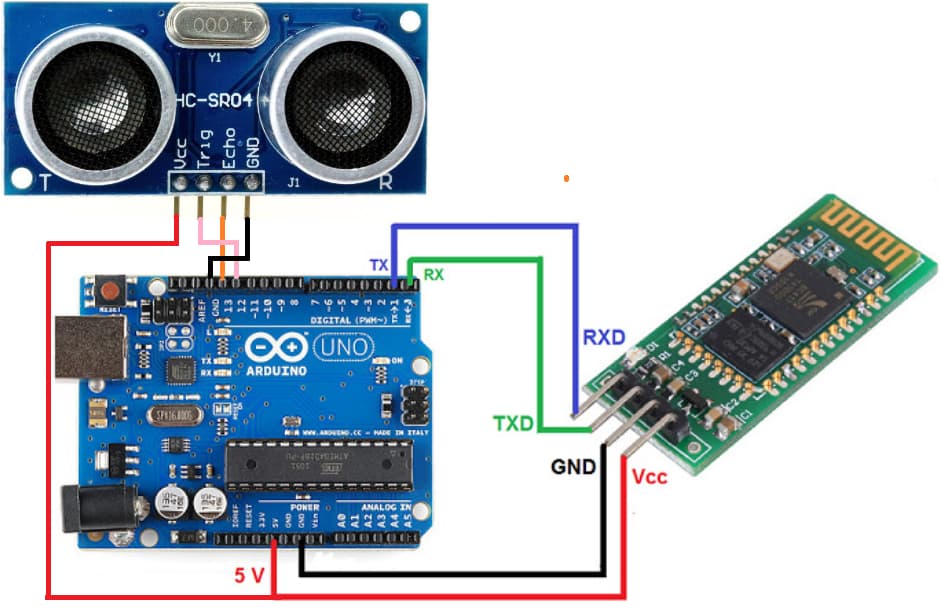
36.- Ultrasound SR04 sends distance to App by Bluetooth.
pA0_Bluetooth_Arduino_Ultrasonido.aia (3.0 KB)
Arduino Library Ultrasonic.zip:
http://kio4.com/appinventor/9A0_Resumen_Bluetooth.htm#ultrasonido
#include <Ultrasonic.h>
Ultrasonic ultrasonic(12,13); // (Trig PIN, Echo PIN)

void setup() {
  Serial.begin(9600);
}

void loop(){
  Serial.println(ultrasonic.Ranging(CM));
  delay(500);
}
Hello, I tried this and it's not working, when connecting to HC-05 Bluetooth module it works but on the Check Temperature button when I click it it just freeze. Any help? thanks
I already set the DelimiterByte the value 10, still not working
Not working on me
Well, now it's working, after extensive research and checking the hardware parts I used, the app was not the issue, the problem was the power supply, the wire I use was longer, then I try shorter wire, now it works, the problem was power supply shortage.
Maybe you should save the result in a variable first and then print it to the screen
Привет., сделал приложение по вашему подобию. Только я получаю не 2 переменные с ардуино, а 4 штуки. Но получается, что при первых 8 нажатиях приходит предыдущие значения другой переменной и только на 8 нажатие отображается та переменная какая нужна. как пофиксить?
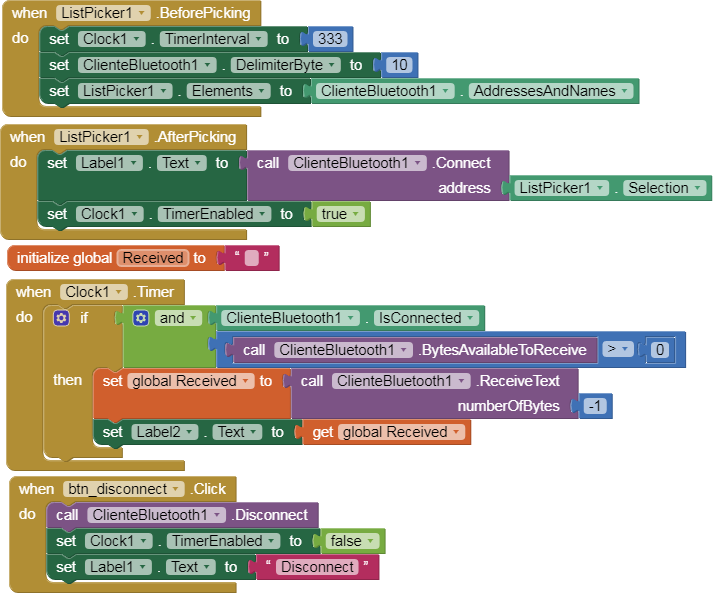
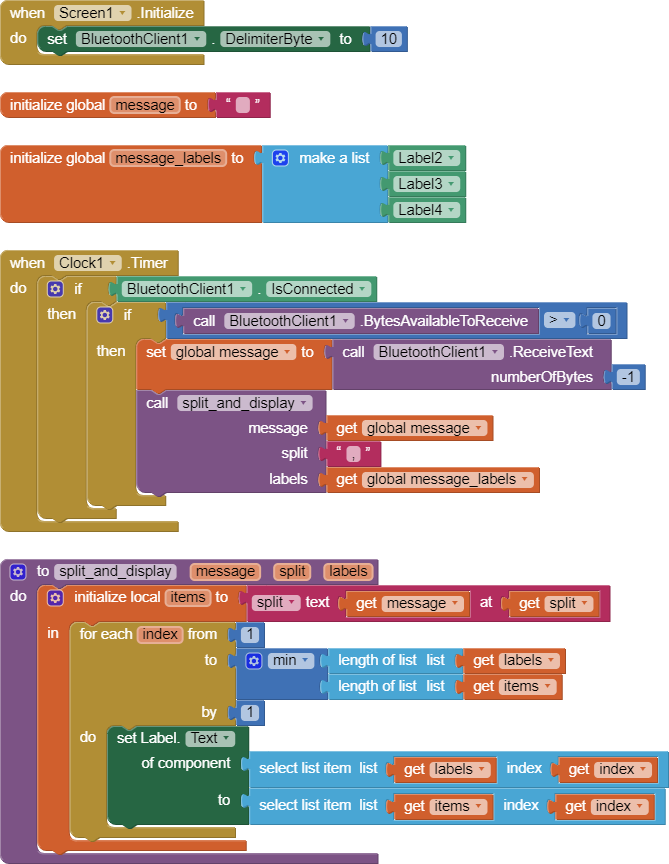
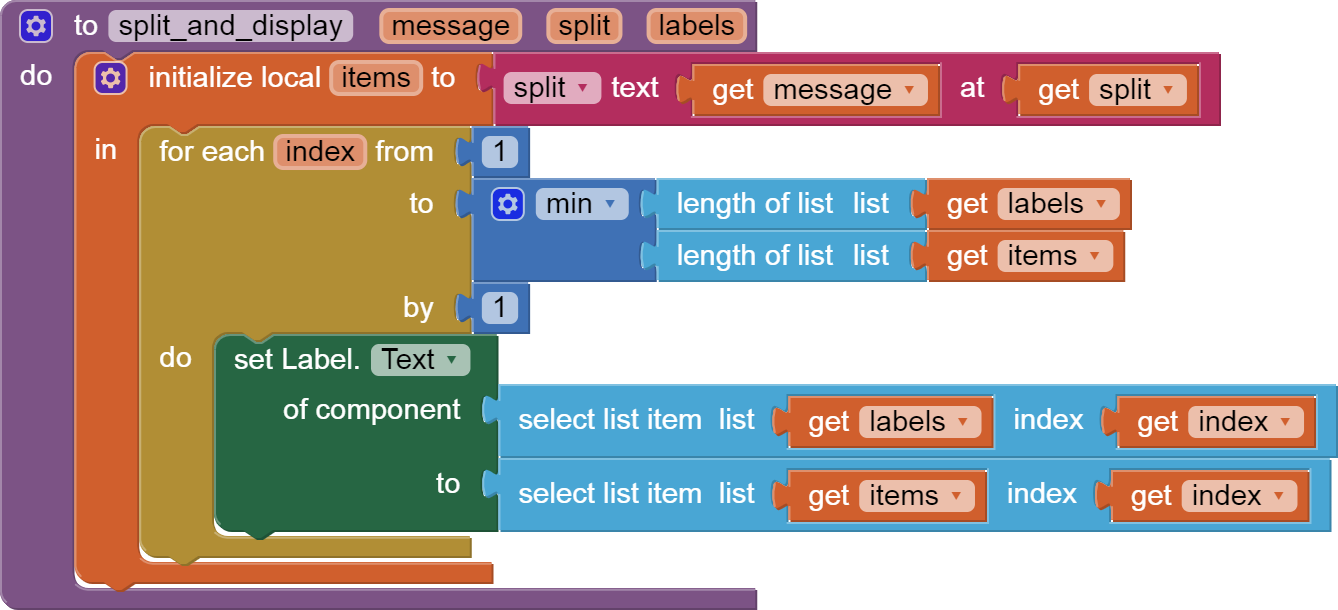
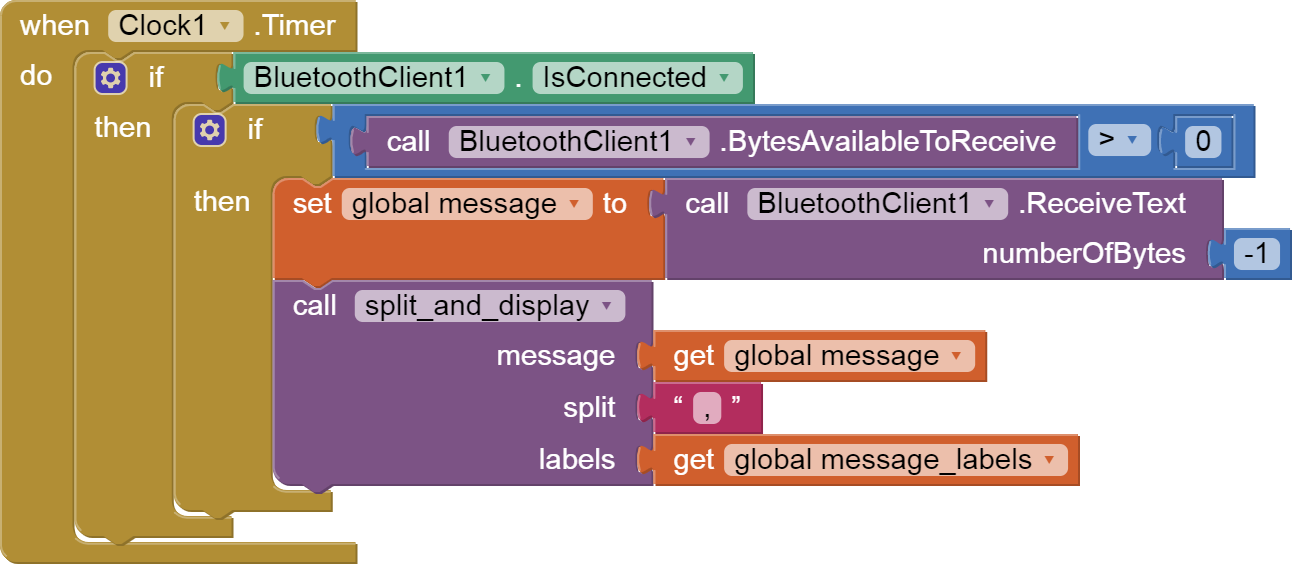
Here is an updated blocks sample illustrating these ideas ...
BlueTooth_delimiter_sample.aia(3.4 KB) 
... Here is an updated blocks sample illustrating these ideas ...
BlueTooth_delimiter_sample.aia(3.4 KB)
...
HelloI kindly need urgent help. Thank you for this it worked, however can you share a way that generates the actual readings of the environment instead of random generated numbers in the given ranges