App Inventor - Arduino

I provide 15 tutorial links about App Inventor communicating with Arduino Uno. The tutorials start with a Bluetooth connection and they are developed ending with a monitor for 2 potentiometers, leds, buttons and small supervisory using procedure blocks, canvas, etc

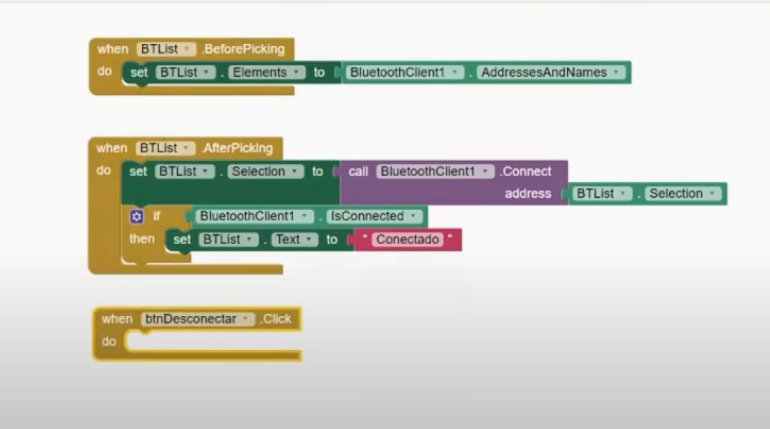
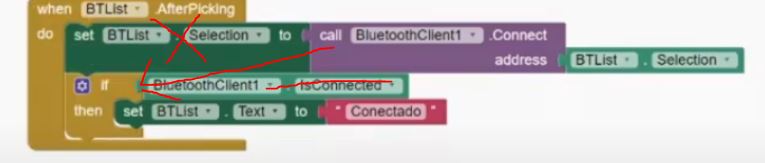
Tutorial 1/15: connecting with bluetooth

Tutorial 2/15: Led ON / OFF

Tutorial 3/15: Led ON / OFF - Changing Button Color

Tutorial 4/15: Led ON/OFF - Using a single button on App Inventor

Tutorial 5/15: Slider changes LED intensity

Tutorial 6/15: Joining Slider / Button in App Inventor and Leds Arduino

Tutorial 7/15: Checking Status of an Arduino Pushbutton (button) in App Inventor

Tutorial 8/15: Monitoring 02 Potentiometers

Tutorial 9/15: now monitoring the status of 02 Potentiometers and 01 Pushbutton

Tutorial 10/15: Complete Project - Bt, Pot, Button, Slider, Leds

Tutorial 11/15: 8Leds 8 Buttons - Mode1

Tutorial 12/15: 8Leds 8 Buttons - Mode1: Using Procedure Block

Tutorial 13/15: Small Supervisory using Canvas - Part 1

Tutorial 14/15 : small supervisory using Canvas - Part 2

Tutorial 15/15: two ways to install the HC-05 module on Arduino and communicate to AppInventor

In the BTList.AfterSelecting event, what is the purpose of setting the Selection value? If BTList is a List Picker, the Selection happened when the user opened the List Picker and selected an item from its Elements list. So what's the point?

2 Likes

In Brazil, when they start talking to someone, we use "good afternoon", "hi", "how are you", it is more polite. I will answer your question with another question. Have you seen the other tutorials? This belongs to a playlist (which is why it is called "playlist") of 15 tutorials on Arduino and AppInventor, from connecting to Bluetooth to making an HMI (do you know what supervisory is?).

Good afternoon Nilton,

thank you for your tutorial. However there is one question: why do you assign the return value of the bluetooth connection (which is true or false) again to the selection? This does not make sense. You probably might want to fix this in your example. Thank you.

else
set BTList.Text to "Connection failed"

Keep up the good work!
Greetings from Costa Rica! Pura Vida!
Taifun


Trying to push the limits! Snippets, Tutorials and Extensions from Pura Vida Apps by Taifun.

Thank you, Taifun (Gracias). The important part of these tutorials is not a communication. It works my way and everyone can do it another way. The other 14 tutorials are much more important, communicating digital and analog signals and using Canvas Image to do a small monitor (HMI) for Arduino.

I like it!!

can you also provide a solution for i want to read 3 sensor values and send it trough bluetooth and receive it with my app

also i need arduino code of 9/15

@kaushik Hi, how r u? This is the link where you can find all codes (App Inventor and Arduino) of the tutorials:
https://drive.google.com/drive/folders/1UO5DpqmZWLikAud0fdxDPTCpXYMCI61h?usp=sharing

@kaushik Hi, tomorrow, I think, I can deliver the code App Inventor and Arduino for 3 sensors.

@kaushik it follows video with 3 potentiometers that simulate 3 sensors.


Until Sunday, I will do a tutorial with 3 real sensors: temperature / humidity, proximity and current.

@Taifun In my last tutorial (16) That I posted above I used your bluetooth tip

1 Like

Hello Nilton. What is important to us in a tutorial is that it teaches best practice.

@ChrisWard Hello, it took you almost two months to answer. Well, as you noticed, I'm not an expert on APP Inventor, what I'm doing, or I think I am, is trying to arouse interest in those who know Arduino, and use APP Inventor.
If my videos don't show the best practices, you can remove them.
Tks,

?
I only saw your videos for the first time last night (UK time) Nilton, that was because Kaushik put in a request post. I have proposed publishing guidelines and an approval mechanism for tutorials but MIT always have more work than they can handle.

@ChrisWard Well, if Kaushik posted a request, you have to talk to him, I was trying to help him.
Now, you commented on my videos about not being in accordance with good practices, in this case, as I said, someone should have commented this before these 2 months and as I mentioned if they are not in agreement, you can delete them. I think you could have commented in private. See, I just wanted to show the powerful tool that is App Inventor com o Arduino. I was excited to do a multimeter and a remote control with APP Inventor and Arduino, but you get me discouraged.

Nilton, I commented on your remarks which were out of turn in response to friendly advice by Taifun and ABG, both of whom are App Inventor experts and long-established Power Users, concerning your code error. There are around 400,000 Users of App Inventor per month and we (The Power Users) keep things going as unpaid volunteers. So I hope you can understand our position. We welcome Users helping other Users, but if we spot mistakes that could affect many, of course we are concerned and make comments. There is nothing wrong in wanting the best for everyone is there?

@ChrisWard, I think, you did not see my comments? "@Taifun In my last tutorial (16) That I posted above I used your bluetooth tip". I mean, I understood, I fixed, and your comment was delayed. That is the point. The Taifun and ABG comments was before. You are going back to the beginning. Look, my videos that are here, they are not according to the best practice, them, please, delete them, I think 1 person less between 400,000 will not make the difference for you. tks

I think overall your videos are great Nilton and will help others for sure. The software development industry is very tough, very demanding and often rather direct and practical. We are a friendly bunch here, don't take offence where none is intended.

If we need to perform a certain function and the return value is not needed for anything, we can use this block: