Serial OTG. Arduino CH340. FTDI. rkl099's Extension

4.- OTG and FTDI.

p10A_OTG_FTDI.aia (186.6 KB)

When we connect the Arduino to the mobile, we cannot see the information in the Serial Monitor of the Arduino IDE in PC.

We are going to use an FTDI module (USB <> RX/TX converter). We will connect FTDI module to the mobile.
We will connect the Arduino to the PC to see the information in the Serial Monitor. (Look image)

  • For the FTDI connection we will use the SoftwareSerial library. We will use terminals 10 and 11 of the Arduino.
    In this example Arduino will create a random number and send it to the Arduino IDE on the PC via its USB cable and to the mobile via the FTDI module.
#include <SoftwareSerial.h>
SoftwareSerial FTDI(10,11);
// El TX del módulo FTDI va al pin 10 del Arduino
// El RX del módulo FTDI va al pin 11 del Arduino
// El GND del módulo FTDI va al GND del Arduino

char caracter;
int aleatorio;

void setup(){
  FTDI.begin(9600);
  Serial.begin(9600);
}

void loop (){
// Lee del Android y escribe Monitor Serie.
  if (FTDI.available() > 0) {
    caracter = FTDI.read();
    Serial.print(caracter);
  }
  
// Crea un número aleatorio y lo envía a Android
      aleatorio = random(33,126);
      FTDI.write(aleatorio);
      
  delay(500);   
}


5.- Other USB <> UART Rx/Tx converters.

- Cable OTG.
cable_otg

- Settings / Additional settings / OTG / Enable OTG.
otg26

5B.- Example with CP2102.

  • Android sends a text to Arduino, it is displayed in the Serial Monitor.

  • Arduino Serial Monitor sends a text to Android.

// Juan A. Villalpando
// kio4.com

#include <SoftwareSerial.h>
SoftwareSerial FTDI(10,11);
// El TX del módulo FTDI va al pin 10 del Arduino
// El RX del módulo FTDI va al pin 11 del Arduino
// El GND del módulo FTDI va al GND del Arduino

String de_android;
String a_arduino;

void setup(){
  FTDI.begin(9600);
  Serial.begin(9600);
}

void loop (){
// Lee del Android y escribe Monitor Serie.
  if(FTDI.available()) {
    de_android = FTDI.readStringUntil('\n');
    Serial.println(de_android);
  }
  
// Lee Monitor Serie y envía a Android.
  if(Serial.available()) {
     a_arduino = Serial.readStringUntil('\n');
     FTDI.print(a_arduino);
     Serial.println(a_arduino);
    }
  delay(5);   
}

p10A_OTG_CP2102.aia (186.6 KB)

5C.- Similar example with Serialevent.

About Serialevent:
https://docs.arduino.cc/built-in-examples/communication/SerialEvent

#include <SoftwareSerial.h>
SoftwareSerial FTDI(10,11);
// El TX del módulo FTDI va al pin 10 del Arduino
// El RX del módulo FTDI va al pin 11 del Arduino
// El GND del módulo FTDI va al GND del Arduino

String de_android;
String a_arduino;

String inputString = "";       // a String to hold incoming data
bool stringComplete = false;  // whether the string is complete

void setup() {
   FTDI.begin(9600);
  // initialize serial:
  Serial.begin(9600);
  // reserve 200 bytes for the inputString:
  inputString.reserve(200);
}

void loop() {
  // Lee del Android y escribe Monitor Serie.
  if(FTDI.available()) {
    de_android = FTDI.readStringUntil('\n');
    Serial.println(de_android);
  }
  
  // print the string when a newline arrives:
  if (stringComplete) {
    FTDI.print(inputString);
    Serial.println(inputString);
    // clear the string:
    inputString = "";
    stringComplete = false;
  }
}

/*
  SerialEvent occurs whenever a new data comes in the hardware serial RX. This
  routine is run between each time loop() runs, so using delay inside loop can
  delay response. Multiple bytes of data may be available.
*/
void serialEvent() {
  while (Serial.available()) {
    // get the new byte:
    char inChar = (char)Serial.read();
    // add it to the inputString:
    inputString += inChar;
    // if the incoming character is a newline, set a flag so the main loop can
    // do something about it:
    if (inChar == '\n') {
      stringComplete = true;
    }
  }
}

Where is the aix file?

That is the third request for the same thing.
Please do not spam the forum like this.

https://community.appinventor.mit.edu/t/serial-usb-connection/3162/28
https://community.appinventor.mit.edu/t/using-serial-with-ftdi/14136/76

Im sorry sir

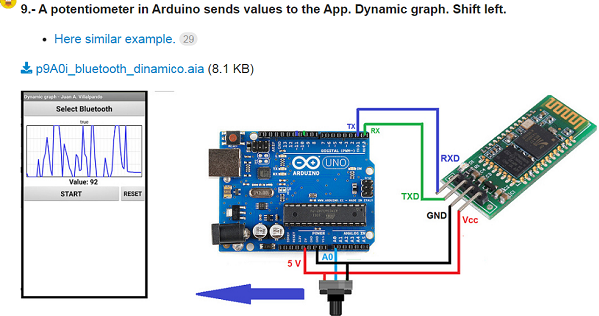
6.- A potentiometer in Arduino sends values ​​to the App. Dynamic graph. Shift left.

p10A_OTG_potenciometro.aia (198.8 KB)

In this topic we saw how to send information via Bluetooth and display it in a dynamic graph:
otg28

Now we are going to carry out the same practice but sending the data by a module UART:

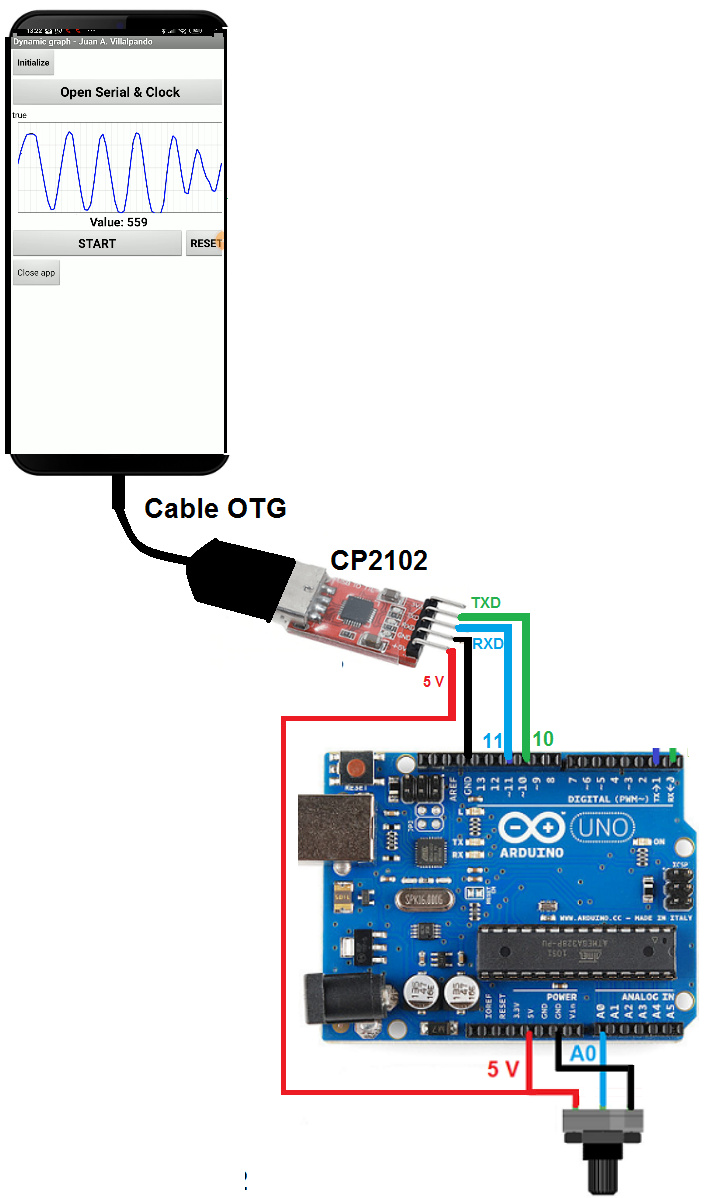
I will use CP2102 and an OTG cable.

The version of the SerialOTG extension used is: Data Built: 2021-02-03
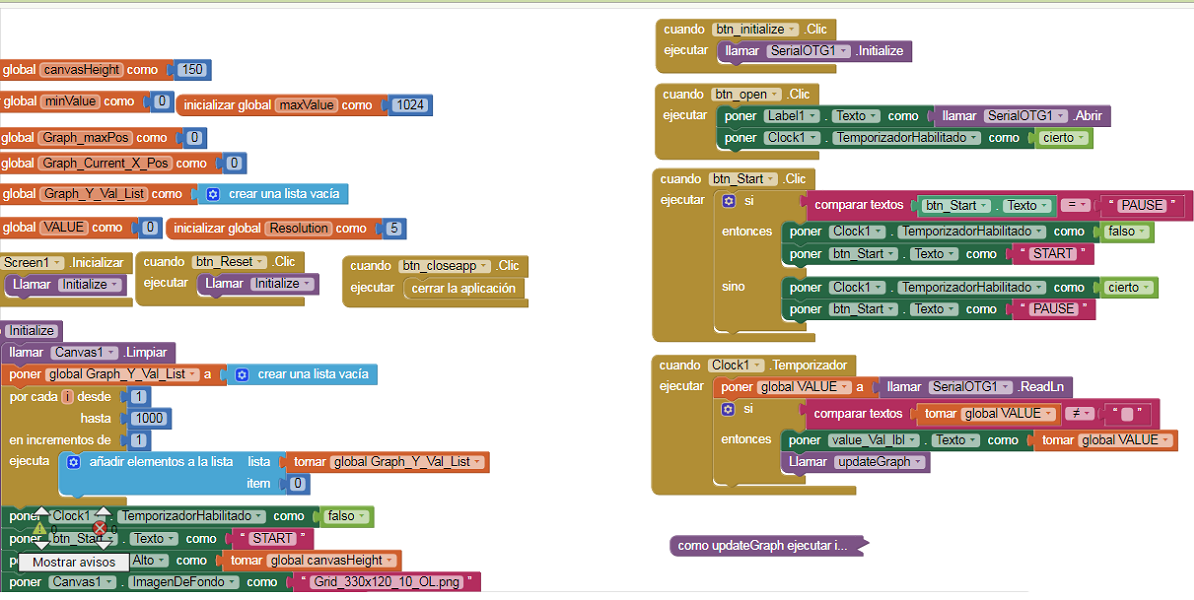
- Arduino code:

// Juan A. Villalpando
// http://kio4.com/appinventor/10A_OTG_LCD.htm

#include <SoftwareSerial.h> 
#include <Wire.h> 

SoftwareSerial UART(10, 11) ; // UART(TX,RX)

int value_pot0;

void setup() { 
  Serial.begin(9600);
  UART.begin(9600); 
  Wire.begin();
}

void loop() { 
    value_pot0 = analogRead(A0);
    Serial.println(value_pot0);
    UART.println(value_pot0);
    delay(100); // Debe ser más lento que el Reloj.
} 

Why don't you just answer the request. Where is the .aix file ?

Get com.SerialOTG.aix:

7.- Testing version 2022-10-19.

p10A_OTG_Add.aia (190.4 KB)

https://github.com/rkl099/Appinventor_Debug

  • Arduino UNO (CH340). Cable OTG. Cable USB.

otg17b

  • Settings / Additional settings / OTG / Enable OTG.
    otg26

  • Android 9. MIT Companion and installed.

  • Arduino UNO (CH340)
String a;
String b;
int c;
int d;

void setup() { 
  Serial.begin(9600);
}

void loop() { 
  if(Serial.available()) {
    a = Serial.readStringUntil(',');
    b = Serial.readStringUntil('\n');
    c = a.toInt() + b.toInt();
    d = a.toInt() * b.toInt();
    Serial.print(c);
    Serial.print(",");
    Serial.println(d);
}
}
  • App sends two numbers separated by commas.
  • Arduino receives them via Serial.
  • Separate the two numbers.
  • Add them and multiply them.
  • Returns the addition and multiplication separated by commas.
  • App receives the data, converts it into a list and displays it.

otg_5

otg_6

This version of aix is working fine for me , the others updated NO.

can you send me that old AIX ?

That example uses Date Built 2020-11-21

com.SerialOTG_201121.aix (185.4 KB)
For more security, contact the author of the extension @rkl099

1 Like

thank you !

What is not working?

actually , I want to replace the bluetooth conexion with OTG..
I'm searching how to replace the blocs.

Ok, you are using an old version with the suffix “serial” in the names. This has been removed since it’s redundant, and only makes the names longer. See the documentation for the extension.
With this extension, it should be possible to use serial, BT or TCP/IP in the same way, except for timing.

I checked the extension for the ability to send ANSI characters (А,Б,В,Г,Д,Е,Ж,З,И,Й,К,Л,М,Н,О,П,Р,С,Т,У,Ф,Х,Ц,Ч,Ш,Щ,Ъ,Ы,Ь,Э,Ю,Я,а,б,в,г,д,е,ж,з,и,й,к,л,м,н,о,п,р,с,т,у,ф,х,ц,ч,ш,щ,ъ,ы,ь,э,ю,я)
This extension couldn't help me.
Are there any other extensions that can send and receive ANSI characters?

Tell us what you want to receive by sending these characters and what you are getting now.

I need to manage a JDY-41 module.
JDY-41 transmits and receives ANSI table characters,
from "\0" to "я"
For example, the standard extension ai2 "BluetoothClient" ,
supports transmission of all ANSI characters (255 pcs.).
Standard component ai2. "Serial" (as well as "SerialOTG" views here),
only half of the ANSI character table (127 pieces) is transmitted.
I need the transmission to be characters (like "µ,¶, ,ё,№,є,",ј,S,ѕ,ї,А,Б,В....."),
the JDY-41 module then responds to the commands.

Here is a picture from my terminal

as you can see byte exchange
happens not .hex numbers, but characters from "\0" to "я"
Here I want to ask the experts
is it possible
expand the range of transmitted characters for "SerialOTG"?

Appinventor uses UTF8 encoding for strings/characters. It’s not compatible with ANSI.
ANSI encoding is normally associated with Microsoft and uses code pages to define characters with hex codes 0x80 – 0xff. Characters 0X00 – 0x7f are the same for ASCII, ANSI, UTF8 and can be used without problems in Appinventor to communicate with Arduino etc.
If you need access to characters 0x80 – 0xff you have to use bytes, that allows you to send/receive all 256 values. That was one reason for implementing SerialOTG.

Appinventor can work well with ANSI encoding as well.
Here is an example of how I set the encoding,
for the standard "BluetoothClient" component.


With such settings, the "BluetoothClient" component
successfully broadcast
hex code "0xff" as character "я".