 How to broadcast a GPS location and share the information on a map in real time.
Two similar apps explore the basics of how to share a location using a single screen and a real time database. One app user beacons, the others monitor (view his/her) location map using the same app.
Share Your Location is a basic app to share a map of your location with others who have installed your app. The example tracks a single user who beacons his/her location. Provide separate Tags for other users and similar code will monitor the whereabouts of a group of individuals simultaneously. Provide code to track multiple individuals simultaneously to the basic app.
Share Your Location listening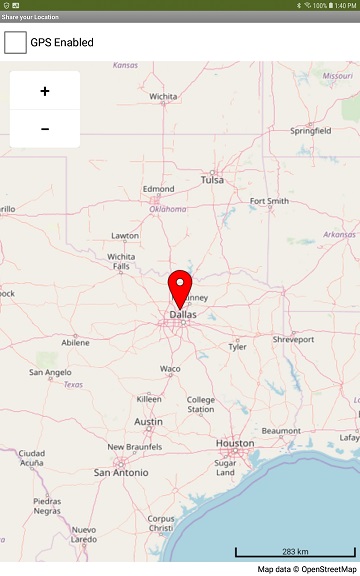
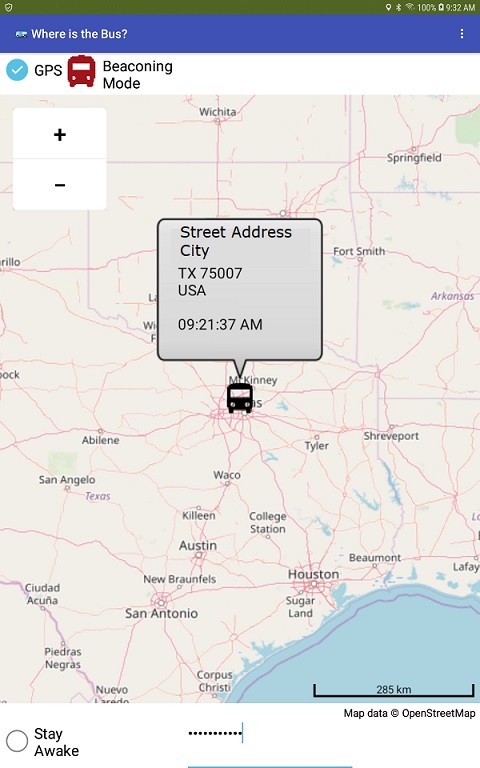
Where is the Bus? ![]() is a similar, more complex version of Share Your Location. Where is the Bus?
is a similar, more complex version of Share Your Location. Where is the Bus? ![]() monitors progress of a bus on its route in real time. The bus operator continually 'broadcasts' his/her location if he/she keeps the device from sleeping while en-route. Touch the bus icon to display the bus's current address and the posting time in a bubble.
monitors progress of a bus on its route in real time. The bus operator continually 'broadcasts' his/her location if he/she keeps the device from sleeping while en-route. Touch the bus icon to display the bus's current address and the posting time in a bubble.

Where is the Bus? Beaconing & displaying information *** Where is the Bus? Listening and Monitoring
The app examples are a framework for a sophisticated 'tracking'/location reporting app but work perfectly well on their own. Add the ability to post tracks (a graphic history of previous locations also known as traks ). Developers can use the techniques shown here: LineString to draw a track - #3 by Frederic_Blanchard and Redirecting to Google Groups. Capture a tally of all the previous locations/times etc. in a database List (either on the device [TinyDB] or within the CloudDB under another Tag).
The real time tracking examples use the MIT CloudDB. They display real time reporting maps. Alternatively, a FirebaseDB control can substitute for the CloudDB control. You can, in most instances, substitute comparable named controls FirebaseDB controls for CloudDB controls. Don't mix and match. Use the default CloudDB server for testing and just to have some fun. Please use your own Redis server to host the database if you build an app for lots of users or for commercial purposes. Otherwise, use the FirebaseDB an Google's server instead of the CloudDB.
Both apps use a CloudDB (or FirebaseDB), the MIT Map component, a design time Marker, a LocationSensor a Notifier. *Where is the Bus?*![]() uses a second Notifier to use in a StayAwake routine and a few standard controls.
uses a second Notifier to use in a StayAwake routine and a few standard controls.
LocationSensor.
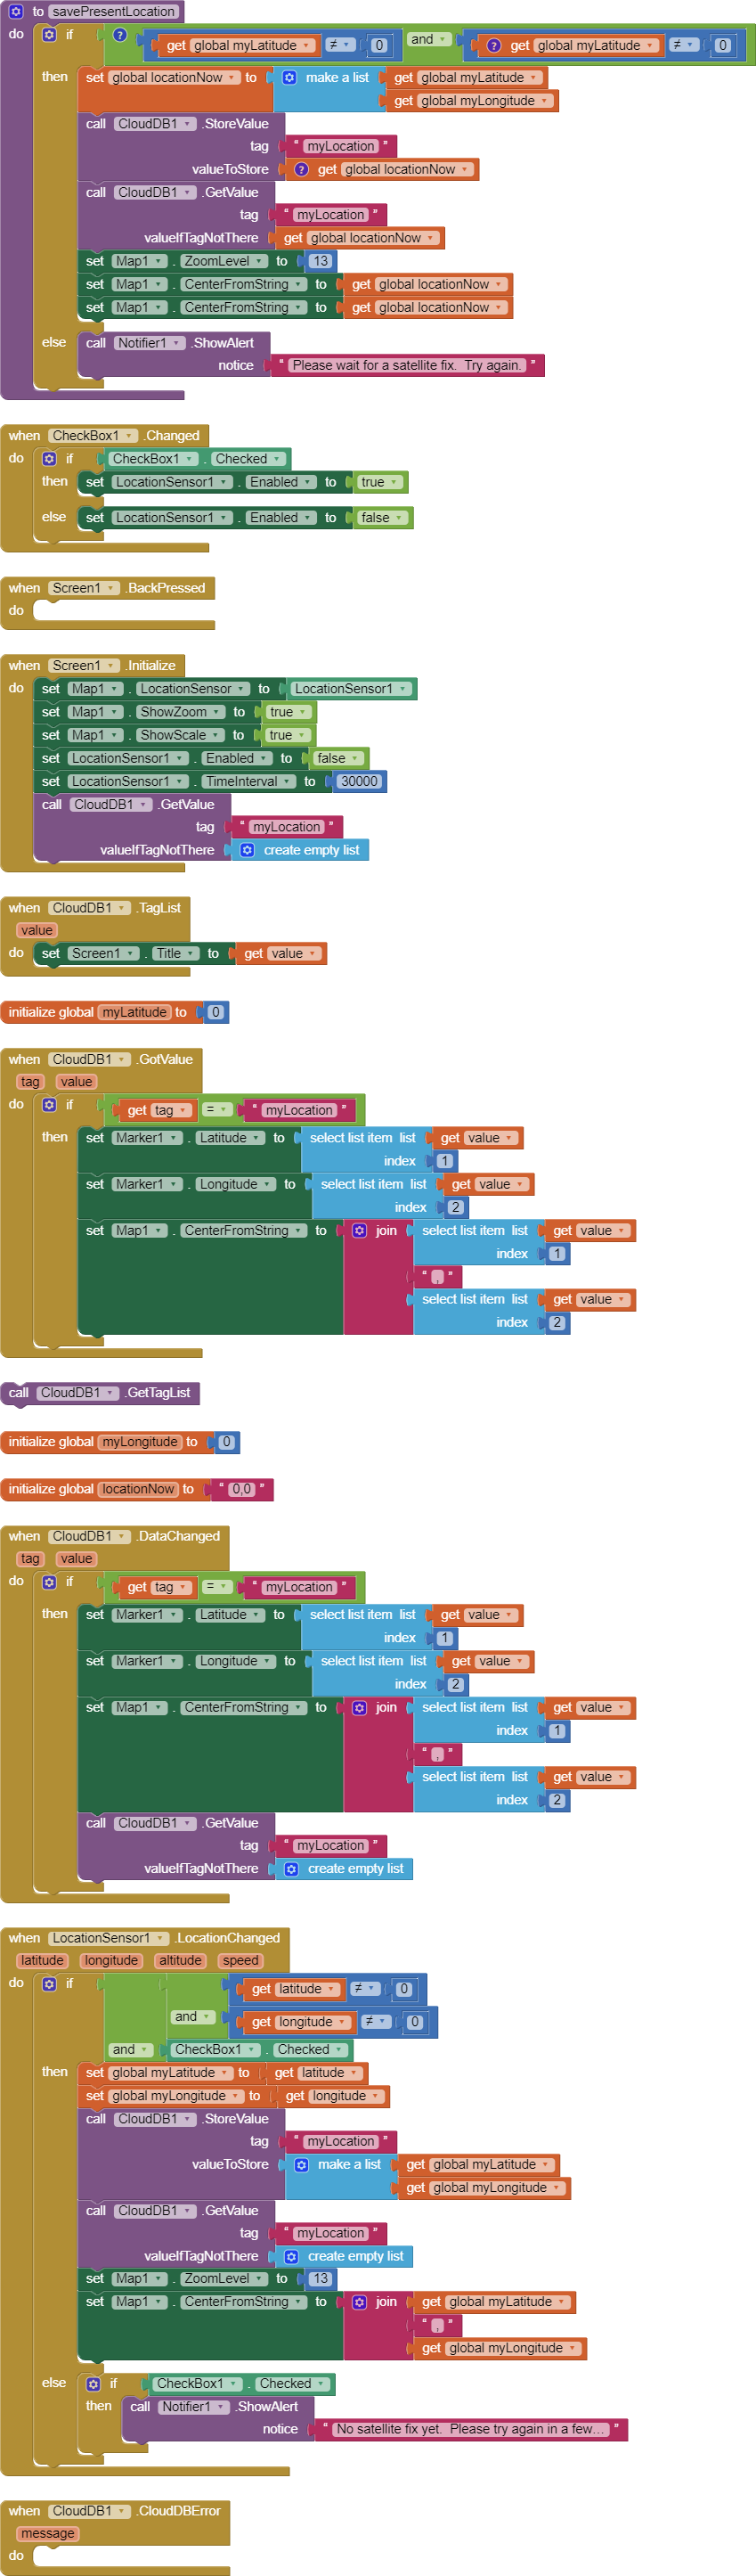
Set the TimeInterval to 30000 ms (30 seconds). The gps hardware can only realize a satellite fix and resolve a location change consistently using that advice. Attempting more rapid location reporting results in errors in most instances. See LocationSensor and Using the Location Sensor
The LocationChanged block has code to prevent the app from transmitting the LocationSensor default coordinates (latitude 0, longitude 0 ; located in the Atlantic Ocean). If an initial satellite fix has not been achieved when the app starts, a Notifier lets the user know. The app adds the location to the CloudDB and Map when a valid satellite fix is achieved. It may take a minute for the GPS receiver to realize where it is and the initial location to appear on the map. Be aware, the device requires somewhere from 40 to 60 seconds for the LocationSensor to decide it knows where the Android is. There is a slight lag in reporting location immediately following app initialization while the LocationSensor / GPs determine where the beaconer is at.
The apps reports the beaconing of the user's location information 'automatically' to the database. Location is reported every time the LocationSensor provides a LocationChanged event and the map is updated. A Button could be used in place of the LocationChanged event handler instead if you want to report location periodically or only at set intervals.
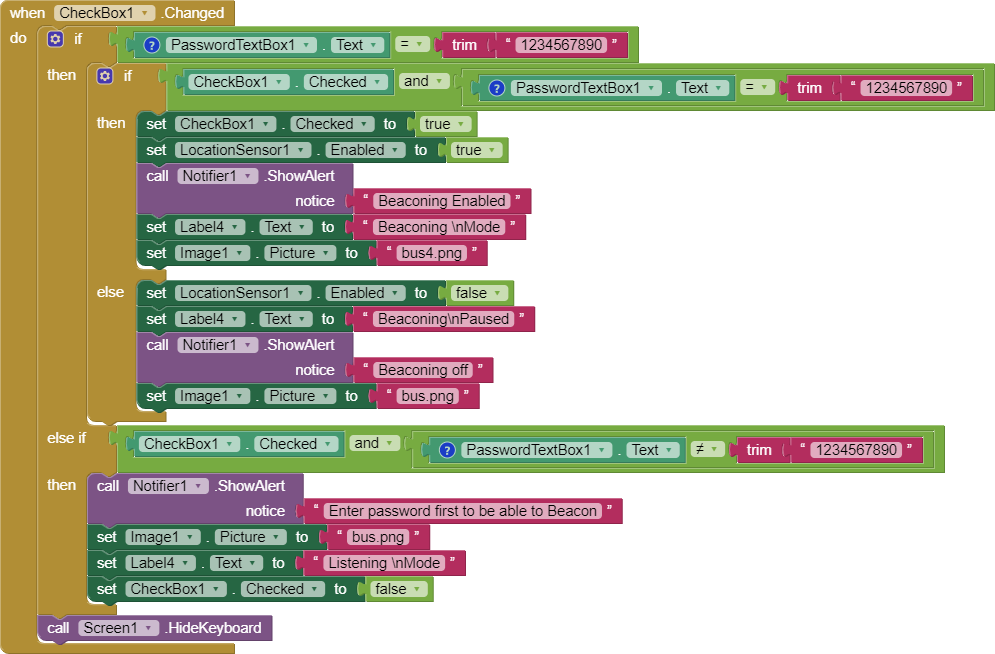
When you build your own version of the app, un-check the LocationSensor.Enabled Property in the Designer. The initial LocationSensor state is set to disabled using Blocks in Screen1.Initialize in the app,. Checking it to Enabled in the Designer may defeat this coding on some Android versions. Checking it in the Designer seems to automatically enable the GPS hardware for those viewing the map. You do not want the viewer's GPS enabled; an enabled GPS allows the monitoring users' locations to post too. This can happen even without enabling the GPS switch if you check enabled in the Designer - a LocationSensor quirk if the Designer is not set appropriately.
The *Where is the Bus?*![]() app reports the bus's street address with the CurrentAddress Block. Sometimes, No address available appears in place of the address if there is no corresponding address for the geocoordinates available in Google's database.
app reports the bus's street address with the CurrentAddress Block. Sometimes, No address available appears in place of the address if there is no corresponding address for the geocoordinates available in Google's database.
CheckBox as a 'switch'.
The CheckBox is used as a switch to enables/disables the device hardware GPS receiver. The person who wants to be tracked (the beaconer) checks the GPS box to turn on the GPS and periodically update his/her location. The lurkers (those monitoring the person's whereabouts) should not check the box. If they check, they too will broadcast their whereabouts. Share Your Location does not have a method to ensure on a single beaconer. A developer should devise a method to inhibit 'lurkers' from checking the box and prevent enabling the GPS on their device. Password protect the switch so the GPS can only be engaged by the person beaconing or the bus driver. The bus app shows a simple method, the Share Your Location app does not have this feature.
A single screen spots the current location of the person or bus on a map with a Marker. The screen can be used by multiple beaconing users sharing the map display if you provide code. The Where is the Bus? example only allows the person who is broadcasting their location to change the GPS. A simple way to ensure only one person is beaconing is to create a log in password to enable the switch on the device actively broadcasting. How to password control is shown in the Where is the Bus? example code.
Only one person should broadcast his/her location at a time (unless you want chaos or intentionally want to track multiple individuals). To allow multiple broadcasters and track multiple individuals either singly or several on the same screen, provide separate database Tags for each user. Provide code to monitor only a certain person or multiple users.
Map
Some features of the Map component are set in code; other options are set with the Designer. The map uses the OpenStreetMap tile set. OSM requires the attribution as part of their terms of service so please provide on your map screen a Label that indicates Map data © OpenStreetMap (or something similar).
The LocationSensor works in combination with the Map. Be sure to set Map1.LocationSensor to LocationSensor1 in Screen1.Initialize to provide the link.
A design time Marker shows the location of the device on the map. The Where is the Bus? ![]() app uses a Custom icon (of a bus) as its Marker. If either app is modified to accommodate the tracking of multiple individuals the app will either require additional design time markers (one for each user) or the use of run time markers.
app uses a Custom icon (of a bus) as its Marker. If either app is modified to accommodate the tracking of multiple individuals the app will either require additional design time markers (one for each user) or the use of run time markers.
Touching the bus icon in Where is the Bus? ![]() displays an address (if one is available in Google's database for its present coordinates) and a time stamp in a bubble. The code below retrieves the CurrentAddress and parses the provided csv so information displays in a column.
displays an address (if one is available in Google's database for its present coordinates) and a time stamp in a bubble. The code below retrieves the CurrentAddress and parses the provided csv so information displays in a column.
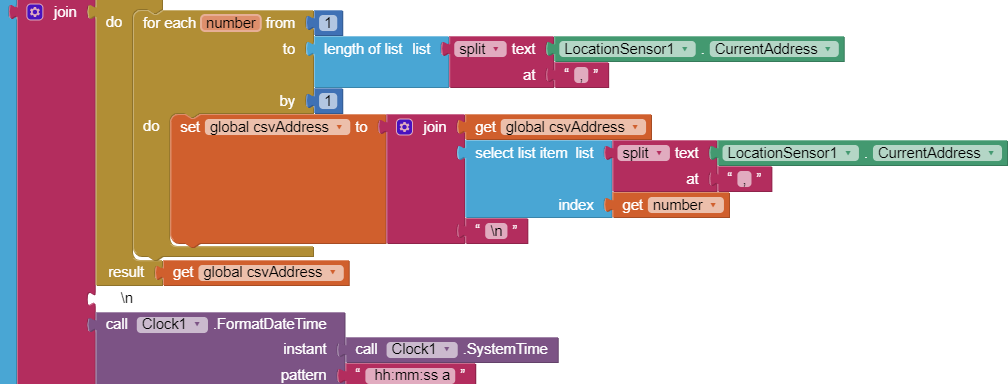
The code adds a timestamp. Developers may add additional to the bubble column using a linefeed \n following the Clock block.
The Map1.CenterFromString Block re-centers the map as the tracking subject moves. I discovered the CenterFromString Block is preferable to using the PanTo Block (which often creates graphics issues).
Screen1.Initialize
CloudDB1.ClearTag (currently grayed out in the source code) should be enabled to reset the database (if needed). Un-enabled and the CloudDB will contain the last valid location provided when the app is first turned on. You determine whether the app 'restarts' every time the app is turned on or whether it will start with the last broadcast location automatically. Enable theCloudDB1.ClearTag Block to start with a clean slate every time the broadcasting app is initialized. Do not enable it and the start location will be the last known location (which will quickly be replaced with the current location). Clearing the Tag resets the myLocation Tag. When the CloudDB1.GetValue for myLocation is checked the app will either provide the latest location or an empty List. The ability to determine the initial map state is not user selected. The developer provides specific code.
Clock
The Clock component and SystemTime Block provides a timestamp for Where is the Bus?. When you program using the Designer, Un-tick the Clock.TimerAlwaysFires and Clock.TimerEnabled boxes in the Clock Properties.
CloudDB
The current device location is saved in the database under the Tag myLocation. myLocation is a two element List in Share Your Location (the List contains the latitude and longitude as separate items). Where is the Bus? also saves its location under myLocation . In this version the Tag is a three element List containing the latitude, longitude and CurrentAddress plus the beaconing time. This third item is used to provide additional information in the Marker bubble. Add what annotation you want to the third item in the List (currentaddress\ntime) to (currentaddress\ntime\n(your additional annotation). The third item in the List is a csv table.
Password
The Where is the Bus? ![]() app has simple password control to enable the GPS. The password is set in code to 1234567890 in the Blocks. Hard code the password as by setting the PasswordTextBox1.Text in it's Designer properties. For example 1234567890 .
app has simple password control to enable the GPS. The password is set in code to 1234567890 in the Blocks. Hard code the password as by setting the PasswordTextBox1.Text in it's Designer properties. For example 1234567890 .
or provide your own code to set the password to use a user list sign-in or whatever. Enter the password and check GPS to set the app to beaconing. You enter the password prior in order to be permitted to check the GPS box. No password, the GPS enabling box cannot be checked. The Share Your Location app does not require a password.
Running the app in the Background.
Sorry, you can not run the app as a Service (in the background). App Inventor 2 apps cannot 'run in the background'. When the controlling device (the one with the GPS box checked) goes to sleep, the app ceases reporting the current location from the broadcasting user.
Developers can provide 'continuous' location activity reporting with App Inventor. Use a StayAwake routine to force the Android to stay awake. If the beaconing user's device goes to sleep, it will stop updating its location in the CloudDB. The StayAwake technique results in battery drain higher than what would occur if the app could run in the background.
Options to keep the app from sleeping:
- include StayAwake; set a Notifier2.Text to none in the Designer; set the BackgroundColor also to none and use the following code
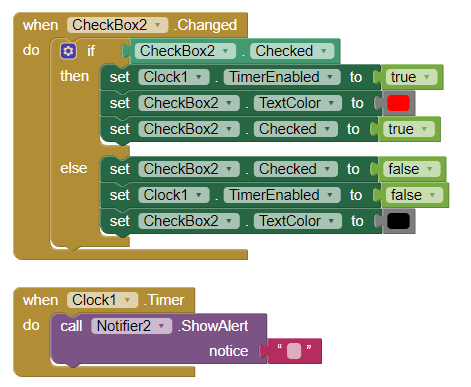
with a Clock set with a TimeInterval to 10000 ms or so. The StayAwake code is implemented in Where is the Bus?; it can be coded in Share Your Location. Copy and paste.
- touch the device screen occasionally to keep the app from falling asleep.
Testing
Run a copy of the app using Companion on your Android. Create an apk and install the compiled version in a second real Android device. Check the GPS box in app you want to beacon. Do not check the GPS in both versions simultaneously. One at a time please. Watch the location marker change in the other device as the first device beacons its location. You need a minimum of two devices to test whether the app works for you.
The Share Your Location and Where is the Bus? ![]() apps have minor error control. Add what Blocks you need. The examples provide the minimum of code necessary to build an app to share location using a Map.
apps have minor error control. Add what Blocks you need. The examples provide the minimum of code necessary to build an app to share location using a Map.
Issues
The app is designed using Sizing as Fixed and the Theme Device Default. To fit your device screen you may need to change these Screen Properties to Sizing as Responsive and a Classic Theme.
The MIT CloudDB Server
The default server is intended for testing. The MIT CloudDB server sometimes has issues during periods of heavy usage and needs to be reset. To ensure reliable service, consider creating your own Redis server.
Requirements:
- Your Android must be connected by WIFI or network to access the CloudDB server.
- The beaconing and monitoring apps must be connected to the Internet via WIFI or a network connection.
- Users must all install the same compiled apk on the devices used to view the location posted from the beaconing device.
The devices must be connected using the same CloudDB Token.
All the Blocks in Share Your Location are shown below. These blocks, with some additional blocks are used in Where is the Bus? ![]()
Documentation:
- CloudDB CloudDB
- Map Map components
- FirebaseDB FirebaseDB
- LocationSensor Using the Location Sensor and LocationSensor
- 🟥 HOWTO: Setup Redis Server with SSL for use with AI2 by Tim
**WheresTheBus.aia (14.9 KB) ShareYourLocation.aia (6.9 KB) **
Do you have questions about how to use the example apps or to make specific changes? Please start a separate discussion topic. Please do not post your questions in this topic, only report issues. Thanks.
Best regards,
Steve ![]()