Hello friends,
In this topic I am going to show some examples of Arduino UNO with the Bluetooth HC-06 module.
I will start with simple examples and later I will put some more complicated codes.
Hello friends,
In this topic I am going to show some examples of Arduino UNO with the Bluetooth HC-06 module.
I will start with simple examples and later I will put some more complicated codes.
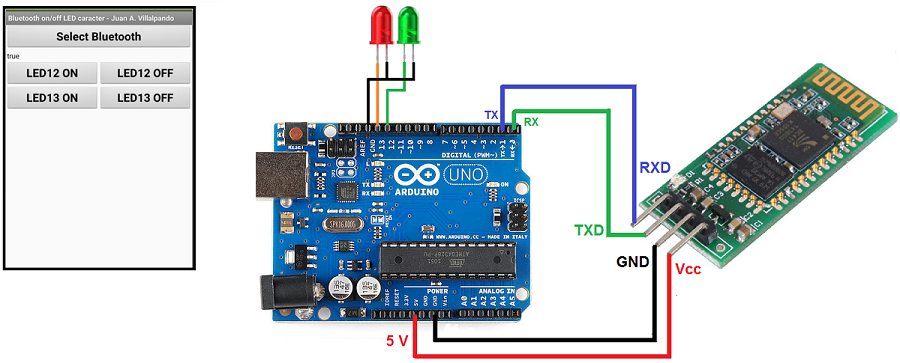
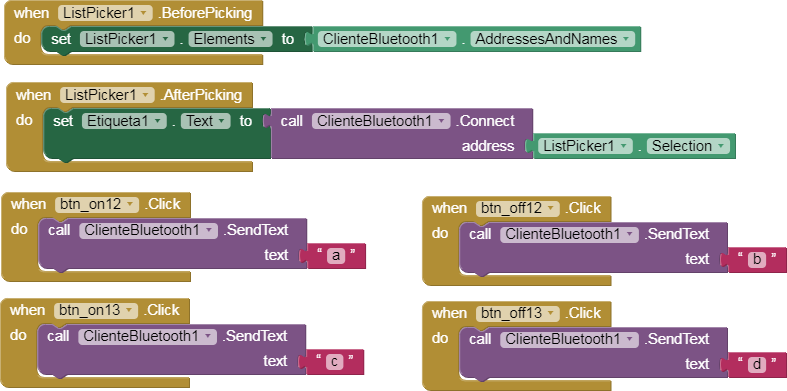
1.- App sends simple char. Arduino on-off LED12 and LED13.
p9A0i_bluetooth_caracter.aia (2.4 KB)
// Juan A. Villalpando
// http://kio4.com/appinventor/9A0_Resumen_Bluetooth.htm

#define Pin12  12
#define Pin13  13
char caracter;

void setup() {
  Serial.begin(9600);
  pinMode(Pin12, OUTPUT);
  pinMode(Pin13, OUTPUT);
}

void loop() {
  if(Serial.available()) {
  caracter = Serial.read();

    if(caracter == 'a'){ digitalWrite(Pin12, HIGH);}
    if(caracter == 'b'){ digitalWrite(Pin12, LOW);}
    if(caracter == 'c'){ digitalWrite(Pin13, HIGH);}
    if(caracter == 'd'){ digitalWrite(Pin13, LOW);}
  }

}
Instead of using LEDs you can put Relays.
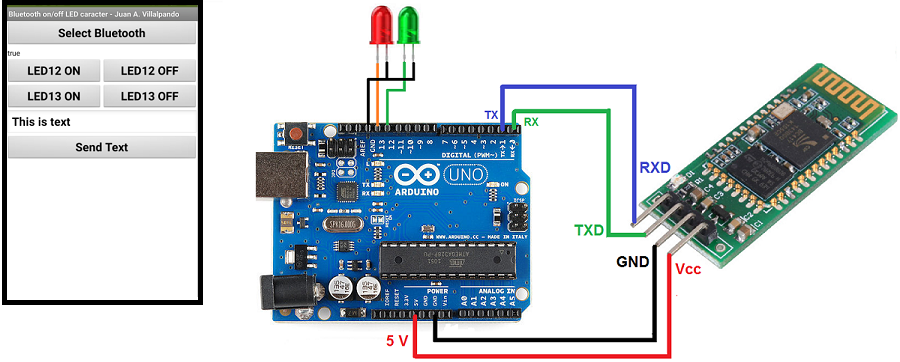
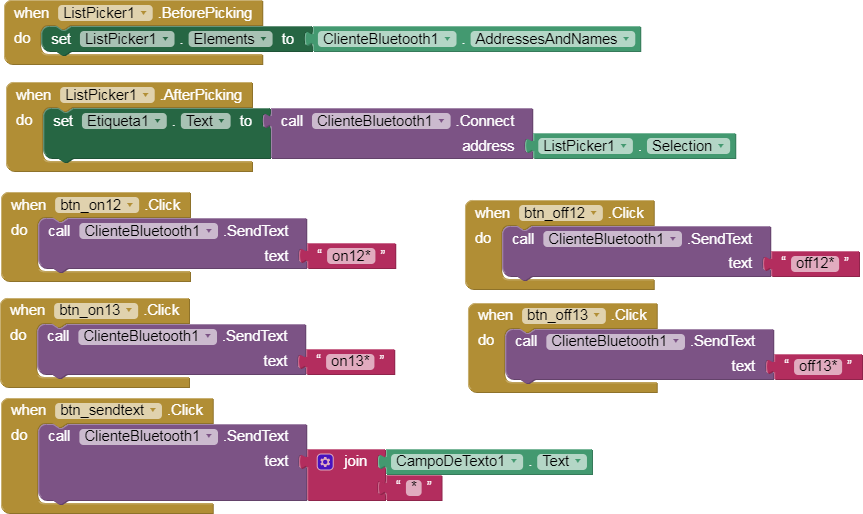
2A.- App sends text. Arduino on-off LED12 and LED13. Serial Monitor. With asterisk.
p9A0i_bluetooth_texto.aia (2.6 KB)
// Juan A. Villalpando
// http://kio4.com/appinventor/9A0_Resumen_Bluetooth.htm

#define Pin12  12
#define Pin13  13
char caracter;
String palabra;

void setup() {
  Serial.begin(9600);
  pinMode(Pin12, OUTPUT);
  pinMode(Pin13, OUTPUT);
}

void loop() {
  if(Serial.available()) {
  caracter = Serial.read();
  palabra = palabra + caracter;

   if(caracter == '*') {
    palabra = palabra.substring(0, palabra.length() - 1); // Delete last char *
    Serial.println(palabra);
     if (palabra == "on12"){digitalWrite(Pin12, HIGH);}
     if (palabra == "off12"){digitalWrite(Pin12, LOW);}
     if (palabra == "on13"){digitalWrite(Pin13, HIGH);}
     if (palabra == "off13"){digitalWrite(Pin13, LOW);}
     palabra = "";
     delay(100);
   }
  }
}
oooooooooooooooo0000000000000000ooooooooooooooooooo
2B.- App sends text. Arduino on-off LED12 and LED13. Serial Monitor. Without asterisk.
p9A0i_bluetooth_texto_2.aia (2.6 KB)
// Juan A. Villalpando
// http://kio4.com/appinventor/9A0_Resumen_Bluetooth.htm

#define Pin12  12
#define Pin13  13
char caracter;
String palabra;

void setup() {
  Serial.begin(9600);
  pinMode(Pin12, OUTPUT);
  pinMode(Pin13, OUTPUT);
}

void loop() {
  if(Serial.available()) {
  caracter = Serial.read();
  palabra = palabra + caracter;

     Serial.println(palabra);
     if (palabra.indexOf("on12")>= 0){digitalWrite(Pin12, HIGH); palabra = "";}
     if (palabra.indexOf("off12")>= 0){digitalWrite(Pin12, LOW); palabra = "";}
     if (palabra.indexOf("on13")>= 0){digitalWrite(Pin13, HIGH); palabra = "";}
     if (palabra.indexOf("off13")>= 0){digitalWrite(Pin13, LOW); palabra = "";}
     delay(100);
  }
}
3.- App sends several information at the same time.
In this example we will use the same App as in the previous example.
Suppose we want to send two information at the same time, for example we want to turn on LED12 and turn off LED13.
We write in the TextBox: on12, off13 [the asterisk will be added automatically at the end of this text]

The Arduino code will check if the text sent contains the string: on12, off12, on13, off13
To check if a substring is in a text we use indexOf: if(palabra.indexOf("on12")>= 0)
We can also put the text in another order: off13, on12
// Juan A. Villalpando
// http://kio4.com/appinventor/9A0_Resumen_Bluetooth.htm

#define Pin12  12
#define Pin13  13
char caracter;
String palabra;

void setup() {
  Serial.begin(9600);
  pinMode(Pin12, OUTPUT);
  pinMode(Pin13, OUTPUT);
}

void loop() {
  if(Serial.available()) {
  caracter = Serial.read();
  palabra = palabra + caracter;

   if(caracter == '*') {
    palabra = palabra.substring(0, palabra.length() - 1); // Delete last char *
    Serial.println(palabra);
     if(palabra.indexOf("on12")>= 0){digitalWrite(Pin12, HIGH);}
     if(palabra.indexOf("off12")>= 0){digitalWrite(Pin12, LOW);}
     if(palabra.indexOf("on13")>= 0){digitalWrite(Pin13, HIGH);}
     if(palabra.indexOf("off13")>= 0){digitalWrite(Pin13, LOW);}
     palabra = "";
     delay(100);
   }
  }
}
4.- App sends three values separated by comma. Arduino receives them and separates them.
In this example we will use the same App as in the previous example.
We assume that the App wants to send these numbers separated by commas to the Arduino: 126,3,58

An asterisk will be added indicating end of message. [126,3,58*]
In this case it is necessary to indicate the end of the message (example with asterisk) since we can send any number.
Arduino will receive that text and separate it by the comma.
Check Serial Monitor.
// Juan A. Villalpando
// http://kio4.com/appinventor/9A0_Resumen_Bluetooth.htm

char caracter;
String palabra;

String red;
String green;
String blue;
int ind1;
int ind2;
int ind3;

void setup() {
  Serial.begin(9600);
}

void loop() {
  if(Serial.available()) {
  caracter = Serial.read();
  palabra = palabra + caracter;

   if(caracter == '*') {
    palabra = palabra.substring(0, palabra.length() - 1); // Delete last char *
        Serial.println(palabra);
        ind1 = palabra.indexOf(',');
        red = palabra.substring(0, ind1);
        ind2 = palabra.indexOf(',', ind1+1 );
        green = palabra.substring(ind1+1, ind2);
        ind3 = palabra.indexOf(',', ind2+1 );
        blue = palabra.substring(ind2+1);

        Serial.print("red = ");
        Serial.println(red);
        Serial.print("green = ");
        Serial.println(green);
        Serial.print("blue = ");
        Serial.println(blue);
        Serial.println();
     palabra = "";
     delay(10);
   }
  }
}

ooooooooooooooo000000o000000ooooooooooooooo
Another way to split the data in with this getValue function:
Serial.println(palabra);
red = getValue(palabra,',',0);
green = getValue(palabra,',',1);
blue = getValue(palabra,',',2);
(...)
///////////////// Function Split by char ////////////////
String getValue(String data, char separator, int index)
{
int found = 0;
int strIndex[] = {0, -1};
int maxIndex = data.length()-1;
for(int i=0; i<=maxIndex && found<=index; i++){
if(data.charAt(i)==separator || i==maxIndex){
found++;
strIndex[0] = strIndex[1]+1;
strIndex[1] = (i == maxIndex) ? i+1 : i;
}
}
return found>index ? data.substring(strIndex[0], strIndex[1]) : "";
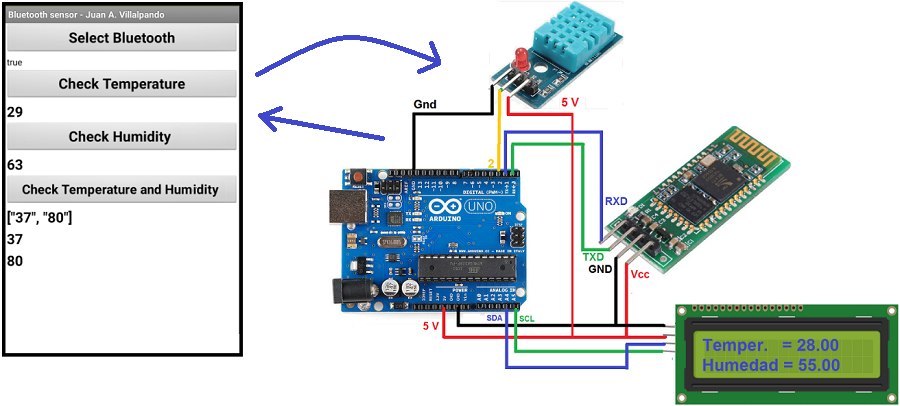
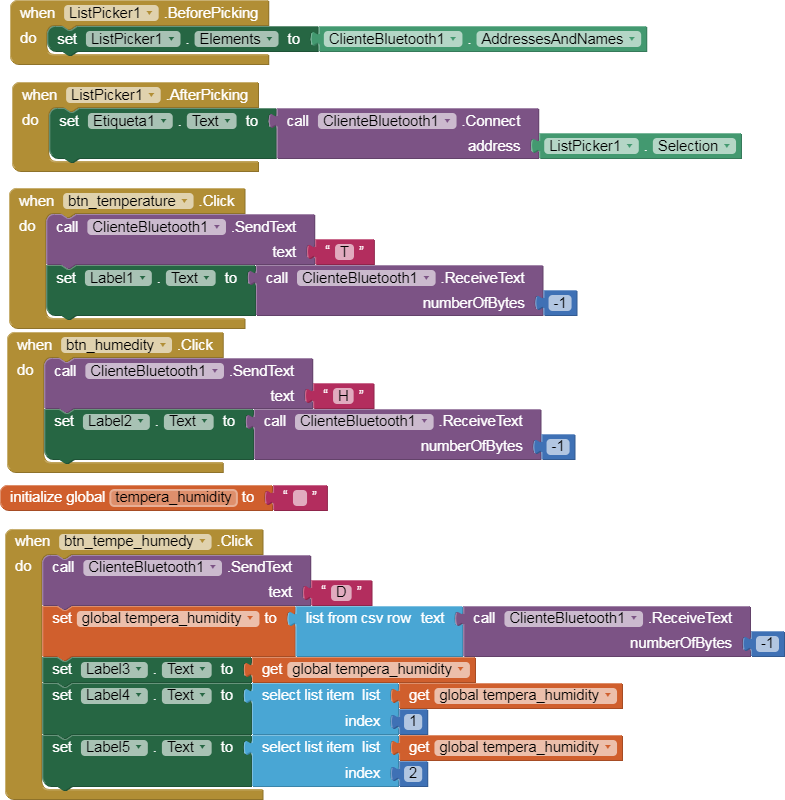
}5.- App requests temperature and humidity to the Arduino. The Arduino sends values.
p9A0i_bluetooth_temperatura.aia (3.3 KB)
When Click in tempe_humidity Button, App sends the character “D”.
Arduino concatenates the temperature and humidity Strings separated by a comma:
37,80
App ReceiveText 37,80 converts it to a list and separates the values.
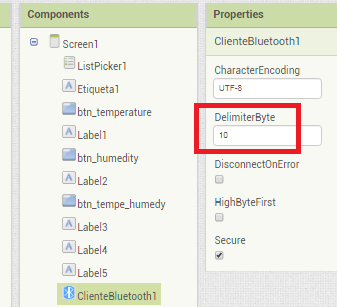
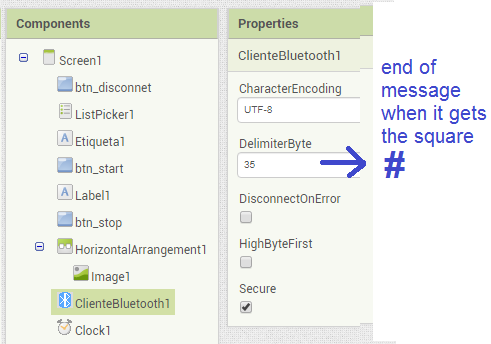
Note: the DelimiterByte must have the value 10. [10 is ASCII New Line, LF. Arduino \n]
In this Arduino code I do not use the sensor or the I2C LCD to simplify its content.
Here you can see the code with the sensor and the I2C LCD
// Juan A. Villalpando
// http://kio4.com/appinventor/9A0_Resumen_Bluetooth.htm

char caracter;
int temperature = 0;
int humidity = 0;
String tempera_humidity;

void setup() {
  Serial.begin(9600);
}

void loop() {
  temperature = random(20,40);
  humidity = random(50,95);
  delay(500);

  if(Serial.available()) {
  caracter = Serial.read();

    if(caracter == 'T'){Serial.println(temperature);}
    if(caracter == 'H'){Serial.println(humidity);}
    if(caracter == 'D'){
    tempera_humidity = (String) temperature + "," + (String) humidity;
    Serial.println(tempera_humidity);
    }
  }

}
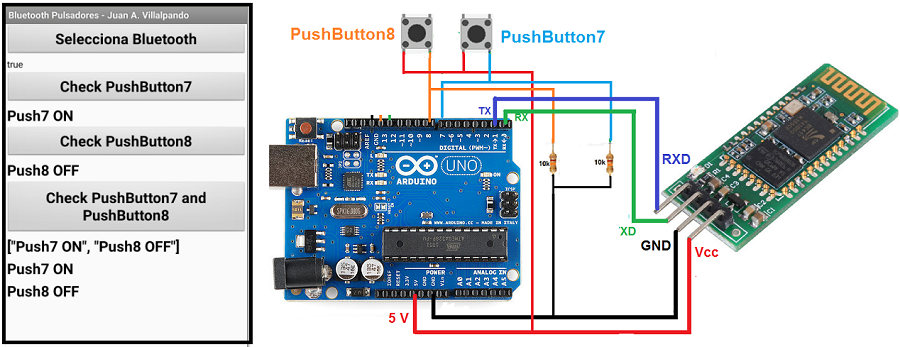
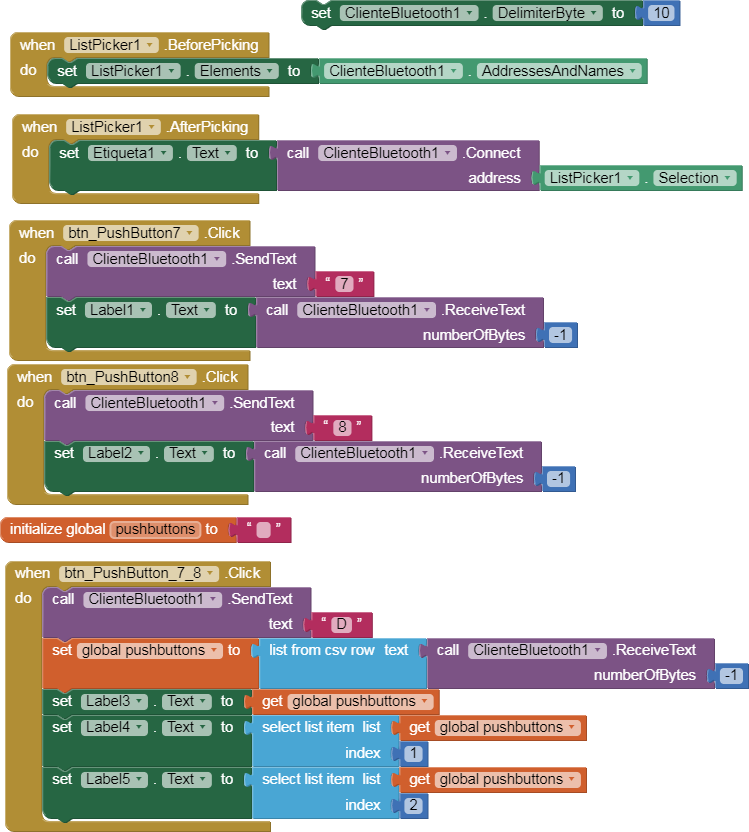
6.- App checks status 2 PushButtons.
p9A0i_bluetooth_pulsadores.aia (3.4 KB)
// Juan A. Villalpando
// http://kio4.com/appinventor/9A0_Resumen_Bluetooth.htm

char caracter;

#define push7 7   // PushButton 7.
#define push8 8   // PushButton 8.
String status_push7;
String status_push8;
String status;


void setup() {
  Serial.begin(9600);
  pinMode(push7, INPUT);
  pinMode(push8, INPUT);
}

void loop() {
  delay(50);

  if(Serial.available()) {
  caracter = Serial.read();
  if (digitalRead(push7) == HIGH) {status_push7 = "Push7 ON";} else {status_push7 = "Push7 OFF";}
  if (digitalRead(push8) == HIGH) {status_push8 = "Push8 ON";} else {status_push8 = "Push8 OFF";}
  status = status_push7 + "," + status_push8;

    if(caracter == '7'){Serial.println(status_push7);}
    if(caracter == '8'){Serial.println(status_push8);}
    if(caracter == 'D'){Serial.println(status);}
  }
}
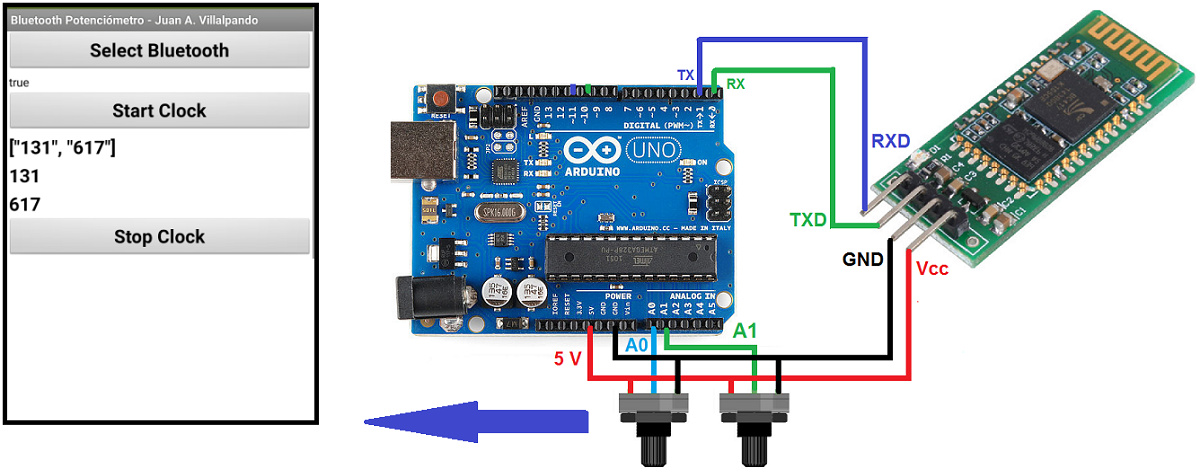
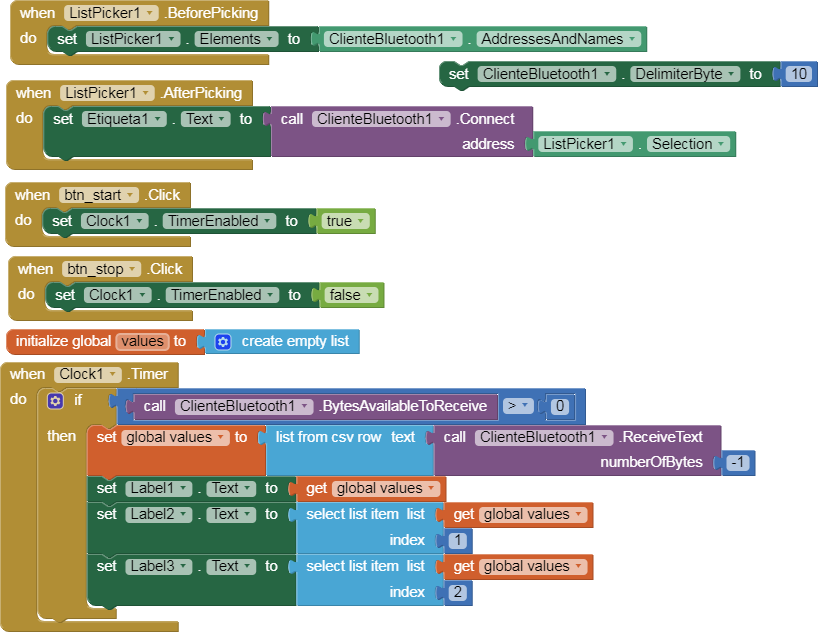
7.- App gets the value of two potentiometers.
p9A0i_bluetooth_potenciometro.aia (3.3 KB)
// Juan A. Villalpando
// http://kio4.com/appinventor/9A0_Resumen_Bluetooth.htm

int value_pot0;
int value_pot1;
String value;


void setup() {
  Serial.begin(9600);
}

void loop() {
    value_pot0 = analogRead(A0);
    value_pot1 = analogRead(A1);
    value = (String) value_pot0 + "," + (String) value_pot1;
    Serial.println(value);
    delay(200); // It should be slower than the Clock Interval.
}
8.- App receives data from Arduino. Clock.Interval. Arduino delay. Buffer.
p9A0i_bluetooth_aleatorio.aia (2.9 KB)
a)
Clock.Interval = 300
Arduino delay = 200
App cannot process the information because the Clock "is slower" than the Arduino.
The buffer is being filled, values that arrive and have not yet been processed.
When the Buffer reaches a certain value, for example 120, you remove power to the Arduino. What happens with buffer?
b) Change Clock.Interval
Clock.Interval = 100
Arduino delay = 200
Therefore, Clock.Interval < delay Arduino
// Juan A. Villalpando
// http://kio4.com/appinventor/9A0_Resumen_Bluetooth.htm

int aleatorio;

void setup() {
  Serial.begin(9600);
}

void loop() {
    aleatorio = random(0,100);
    Serial.println(aleatorio);
    delay(200); // Clock.Interval < delay Arduino
}
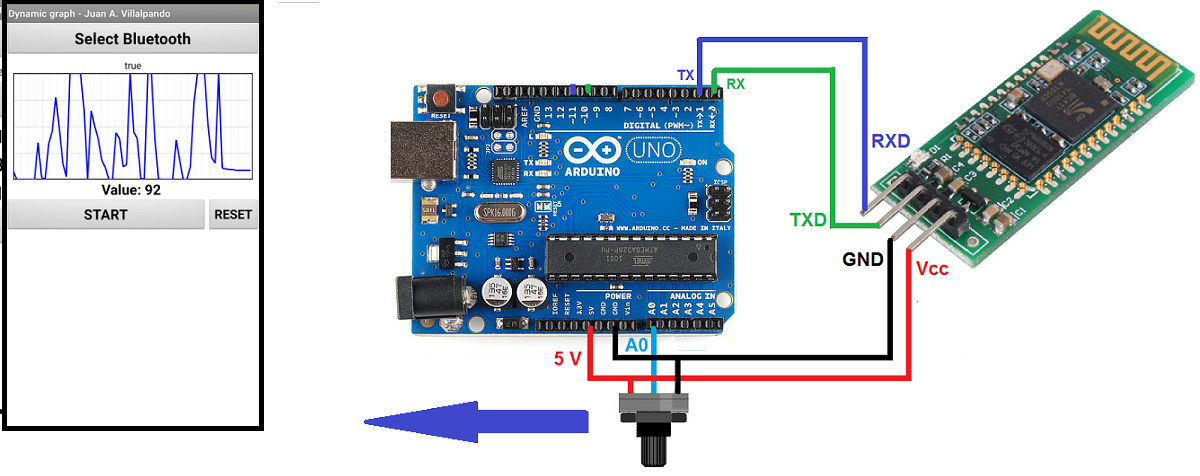
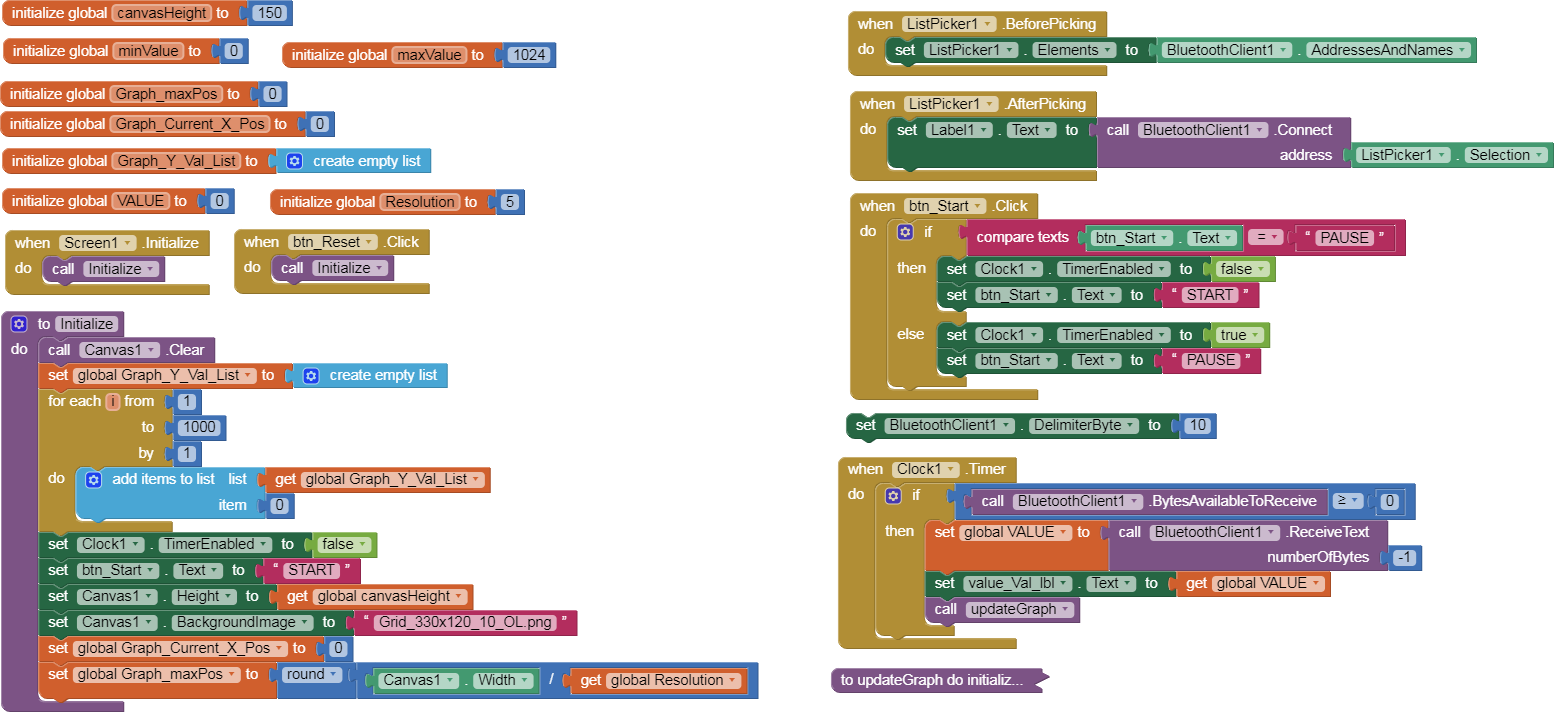
9.- A potentiometer in Arduino sends values to the App. Dynamic graph. Shift left.
p9A0i_bluetooth_dinamico.aia (8.1 KB)
// Juan A. Villalpando
// http://kio4.com/appinventor/9A0_Resumen_Bluetooth.htm

int value_pot0;

void setup() {
  Serial.begin(9600);
}

void loop() {
    value_pot0 = analogRead(A0);
    Serial.println(value_pot0);
    delay(100); // It should be slower than the Clock Interval.
}
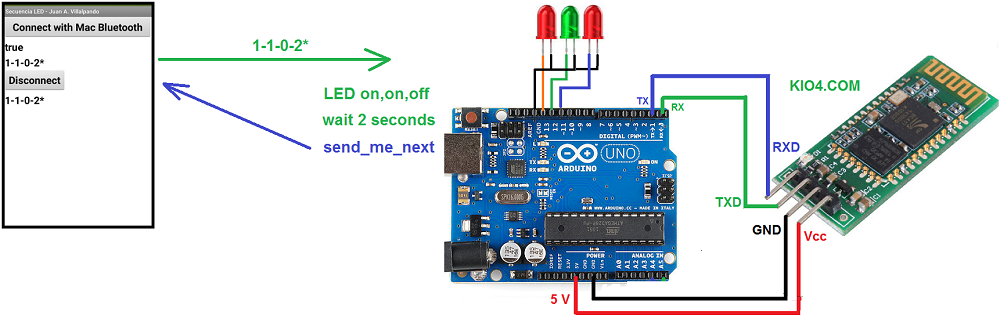
10.- Three LEDS on-off according to a sequence saved in a file.
p9A0i_bluetooth_secuencia3LED.aia (5.0 KB)
In file rutina2.csv this content:
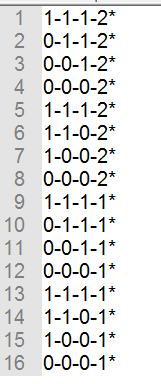
Levels of: LED11 - LED12 - LED13 - Time in seconds of this combination.
App sends 1-1-0-2*
Arduino set LEDs on, on, off
and wait 2 seconds.
then Arduino sends to App “send_me_next”
When App receives “send_me_next”
App “send_next” combination: 1-0-0-2*
// Juan A. Villalpando
// http://kio4.com/appinventor/9A0_Resumen_Bluetooth.htm

char caracter;
String palabra;
int LED11 = 11;
int LED12 = 12;
int LED13 = 13;
int valor11;
int valor12;
int valor13;

int Tiempo = 1000000;
unsigned long currentMillis;
unsigned long previousMillis = currentMillis;

int k1;
int k2;
int k3;
int k4;

void setup() {
  Serial.begin(9600);
  pinMode(LED11, OUTPUT);
  pinMode(LED12, OUTPUT);
  pinMode(LED13, OUTPUT);
}

void loop() {
  if(Serial.available()) {
  caracter = Serial.read();
  palabra = palabra + caracter;
        Serial.println(palabra);

  if(caracter == '*') {
      palabra = palabra.substring(0, palabra.length() - 1); // Delete last char *
      k1 = palabra.indexOf('-');
      valor11 = palabra.substring(0, k1).toInt();
      k2 = palabra.indexOf('-', k1+1);
      valor12 = palabra.substring(k1+1, k2).toInt();
      k3 = palabra.indexOf('-', k2+1);
      valor13 = palabra.substring(k2+1, k3).toInt();
      k4 = palabra.indexOf('-', k3+1);
      Tiempo = 1000 * palabra.substring(k3+1, k4).toInt();
      palabra = "";
      digitalWrite(LED11, valor11);
      digitalWrite(LED12, valor12);
      digitalWrite(LED13, valor13);
  }

    previousMillis = currentMillis;
} // =>Fin del available
      tiempo();
} // =>Fin del loop

void tiempo() {
  currentMillis = millis();
  if (currentMillis >= (previousMillis + Tiempo)) {
    previousMillis = currentMillis;
    Serial.println("send_me_next"); // Envíame el siguiente.
  }
  }
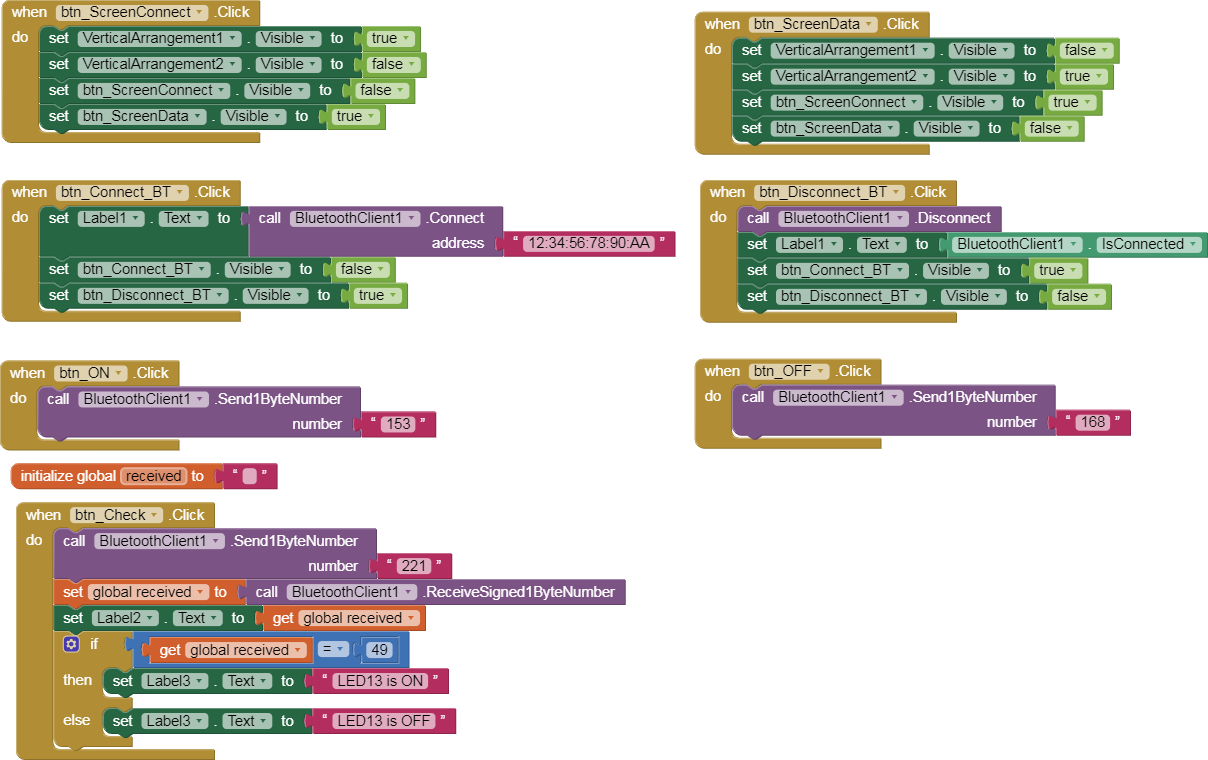
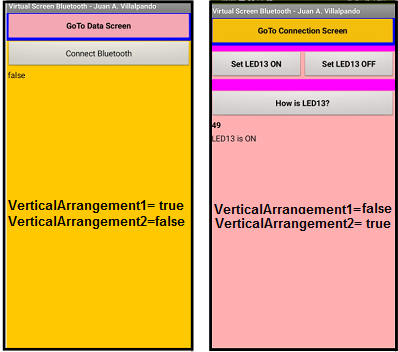
11.- Virtual Screen with two VerticalArrangement.
p9A0i_bluetooth_virtual.aia (4.1 KB)
// Juan A. Villalpando
// http://kio4.com/appinventor/9A0_Resumen_Bluetooth.htm

#define LED13 13
byte StatusLED13;

void setup()
{
  Serial.begin(9600);
  pinMode(LED13, OUTPUT);
}

void loop() {
  if(Serial.available())
  {
    int dato = Serial.read();
    if(dato == 153){digitalWrite(LED13, HIGH);}
    if(dato == 168){digitalWrite(LED13, LOW);}
    if(dato == 221){
      StatusLED13 = digitalRead(LED13);
      Serial.print(StatusLED13); // Sends 48 or 49
      }
   }
}
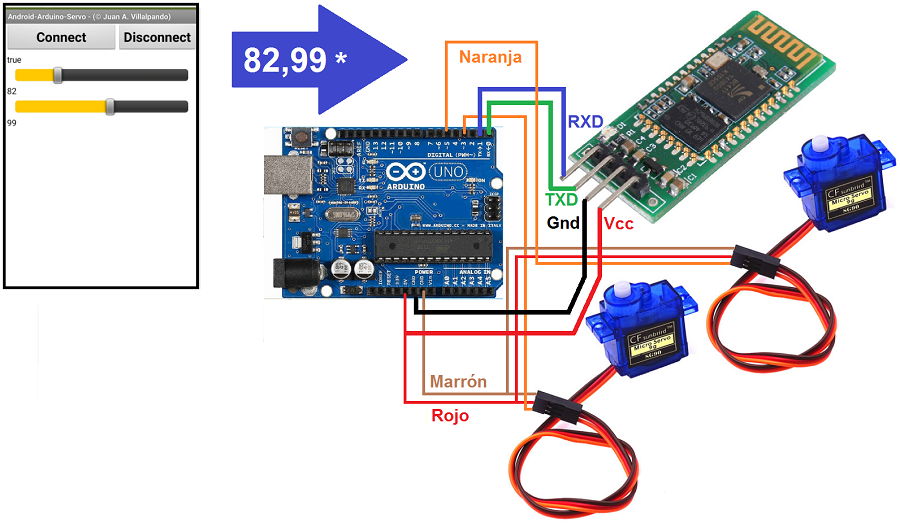
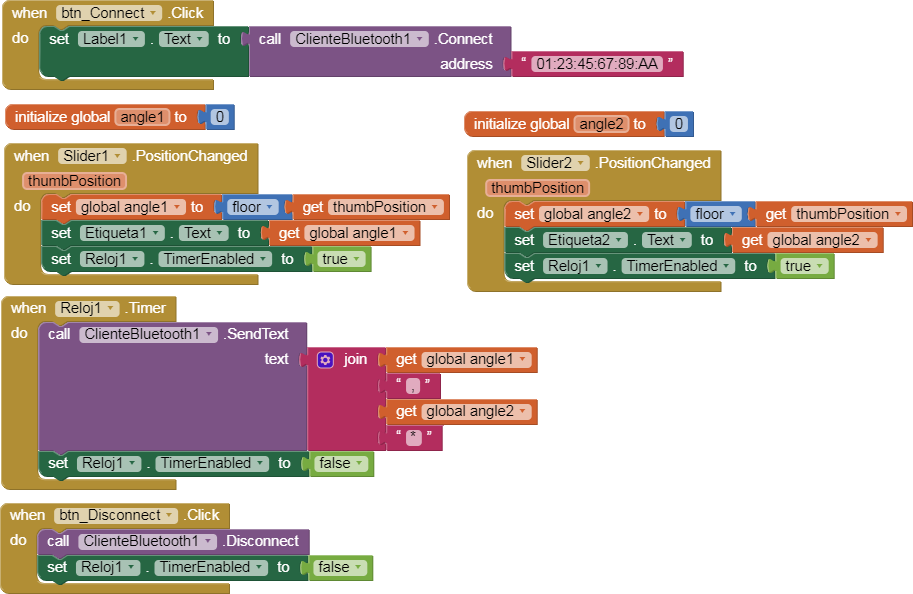
12.- App moves two Servos by Sliders.
p9A0i_bluetooth_servos.aia (3.2 KB)
// Juan A. Villalpando
// http://kio4.com/appinventor/9A0_Resumen_Bluetooth.htm

#include <Servo.h>
Servo servo3;
Servo servo5;
const int pwmPin3 = 3; // Servo3 pin3 PWM
const int pwmPin5 = 5; // Servo5 pin5 PWM

char caracter;
String palabra;
String angulo_1;
String angulo_2;

int k1;

void setup() {
Serial.begin(9600);
pinMode (pwmPin3, OUTPUT);
pinMode (pwmPin5, OUTPUT);
servo3.attach(pwmPin3);
servo5.attach(pwmPin5);
}

void loop() {

  if(Serial.available())
  {
    caracter = Serial.read();
    palabra = palabra + caracter;

if (caracter == '*') {
      Serial.println(palabra);
      palabra = palabra.substring(0, palabra.length() - 1); // Delete last char *
      k1 = palabra.indexOf(',');
      angulo_1 = palabra.substring(0, k1);
      angulo_2 = palabra.substring(k1+1, -1);

      servo3.write(angulo_1.toInt());
      servo5.write(angulo_2.toInt());
      palabra = "";
  }
      }
} // => Fin Loop
Note: if you use more than 2 servos you will need to power them with an external power source. Video: Each servo needs about 400 mA.
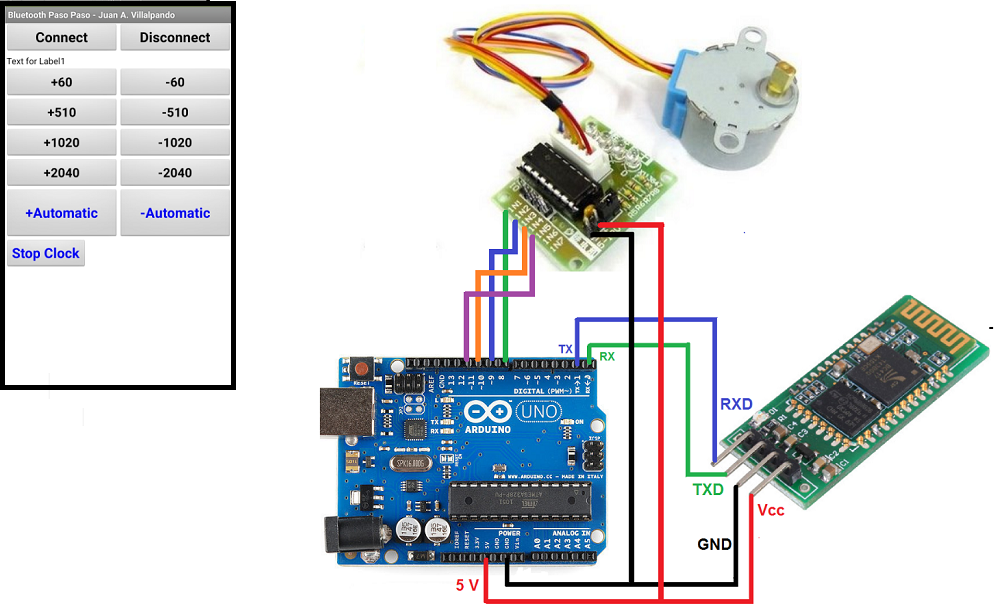
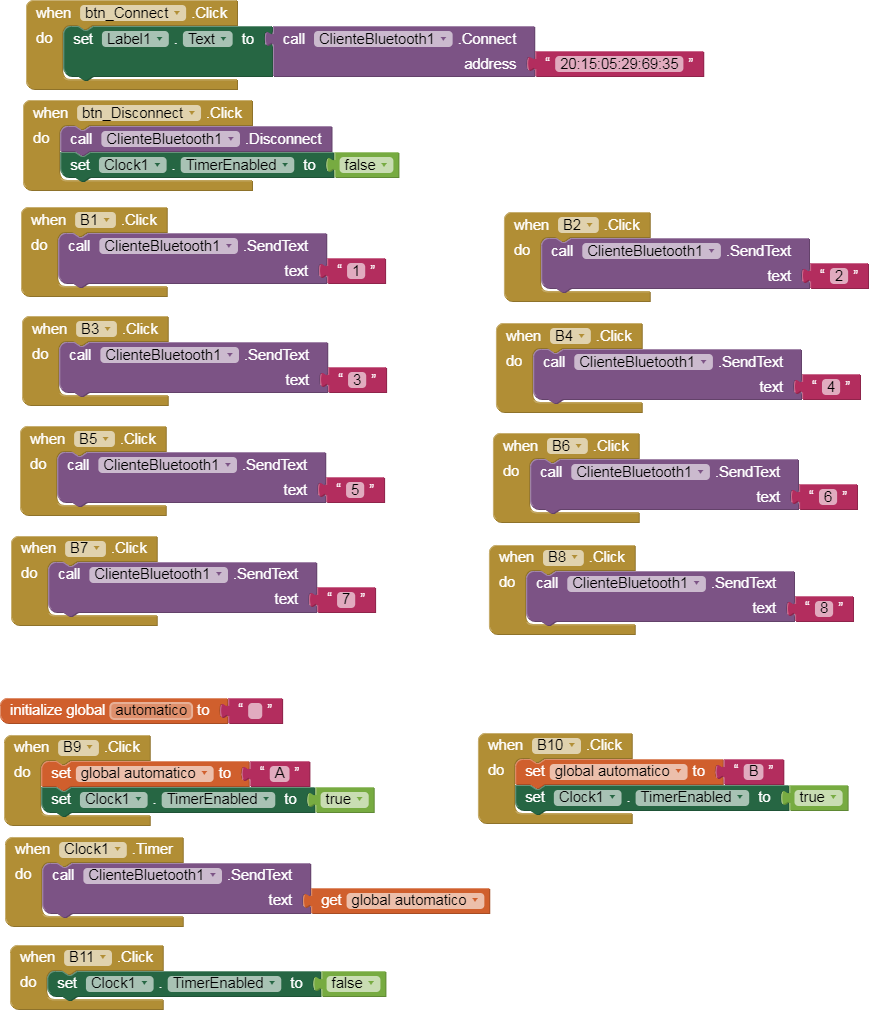
13.- App moves a Stepper motor.
p9A0i_bluetooth_pasopaso.aia (3.1 KB)
In a servo you order:
set 34º
set 12º
set 96º, it is not necessary to know the previous position.
In a stepper motor, you order:
set 20 step clockwise
set 80 step anticlockwise, it is necessary to know the previous position to place it in a new position.
I will use: Stepper motor 28BYJ-48 ULN2003
It is convenient to power this motor through an external source, in this experimental example I will feed it with the 5 V of Arduino.
// Juan A. Villalpando
// http://kio4.com/appinventor/9A0_Resumen_Bluetooth.htm

#include <Stepper.h>
#define STEPS 64

// Secuencia 1-3-2-4
Stepper motor(STEPS, 8, 10, 9, 11);

char caracter;
void setup() {
Serial.begin(9600);
motor.setSpeed(200);
}

void loop() {
if( Serial.available() ) {
  caracter = Serial.read();
  Serial.print(caracter);
  if(caracter == '1'){motor.step(60);}
  if(caracter == '2'){motor.step(-60);}
  if(caracter == '3'){motor.step(510);}
  if(caracter == '4'){motor.step(-510);}
  if(caracter == '5'){motor.step(1020);}
  if(caracter == '6'){motor.step(-1020);}
  if(caracter == '7'){motor.step(2040);}
  if(caracter == '8'){motor.step(-2040);}

  if(caracter == 'A'){motor.step(100);}
  if(caracter == 'B'){motor.step(-100);}
  }
}
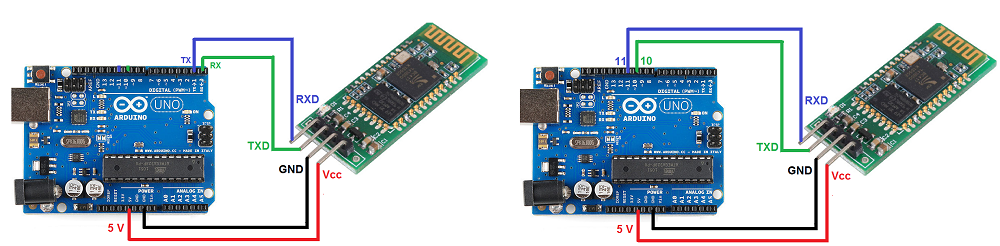
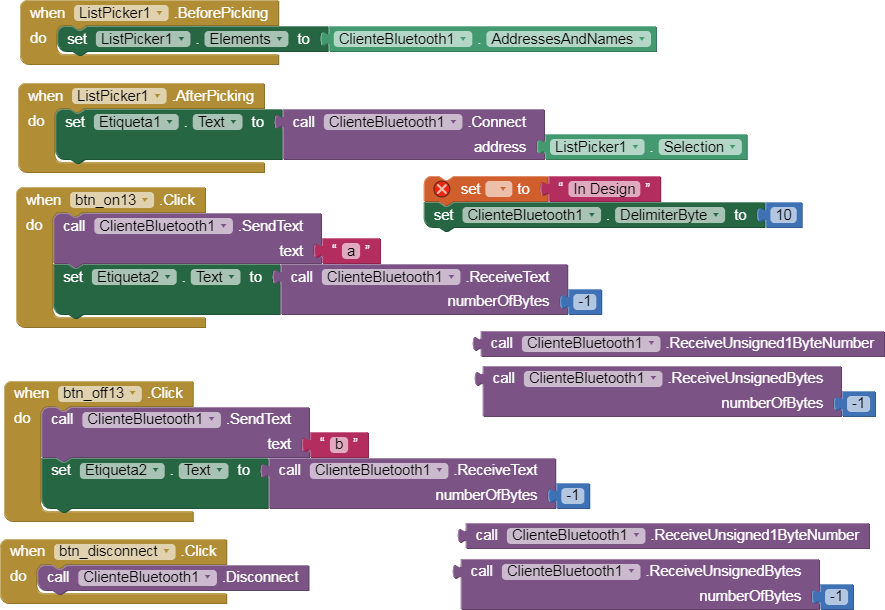
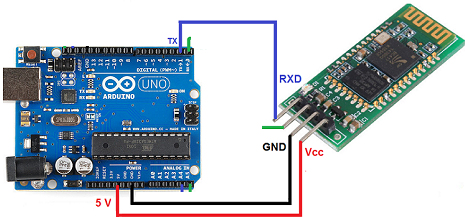
14. Where do we connect the Bluetooth module in Arduino UNO?
p9A0i_bluetooth_Serial.aia (2.9 KB)
Terminals 0 (RX) and 1 (TX) are used by Arduino as the default Serial RX/TX. Use it to upload sketch, Serial Monitor, Bluetooth. So when we are going to upload a sketch for Bluetooth we must disconnect the RX cable from the Arduino.
We can use other terminals to connect the Bluetooth module, for example 10 and 11, in this case we need the “SoftwareSerial” library. Now when we upload a sketch it is not necessary to remove the RX cable.
- CODE FOR MODULE IN default RX/TX pin 0 and 1 of Arduino.
// Juan A. Villalpando
// http://kio4.com/appinventor/9A0_Resumen_Bluetooth.htm

#define Pin13  13
char caracter;

void setup() {
  Serial.begin(9600);
  pinMode(Pin13, OUTPUT);
}

void loop() {
  if(Serial.available()) {
    caracter = Serial.read();
    if(caracter == 'a'){ digitalWrite(Pin13, HIGH);}
    if(caracter == 'b'){ digitalWrite(Pin13, LOW);}
    Serial.println(caracter);
  }
}
- CODE FOR MODULE IN pin10 and pin11 with SoftwareSerial library.
// Juan A. Villalpando
// http://kio4.com/appinventor/9A0_Resumen_Bluetooth.htm

#include <SoftwareSerial.h>
SoftwareSerial I2CBT(10,11);
// El TX del módulo BT va al pin10 del Arduino
// El RX del módulo BT va al pin11 del Arduino

#define Pin13  13
char caracter;

void setup() {
  I2CBT.begin(9600); // To read and write Bluetooth
  Serial.begin(9600); // To print in Serial Monitor
  pinMode(Pin13, OUTPUT);
}

void loop() {
  if(I2CBT.available()) {
    caracter = I2CBT.read();
    if(caracter == 'a'){ digitalWrite(Pin13, HIGH);}
    if(caracter == 'b'){ digitalWrite(Pin13, LOW);}
    Serial.println(caracter); // Serial Monitor
    I2CBT.println(caracter);  // return Bluetooth
    //  I2CBT.write(caracter);  // return Bluetooth
  }
}
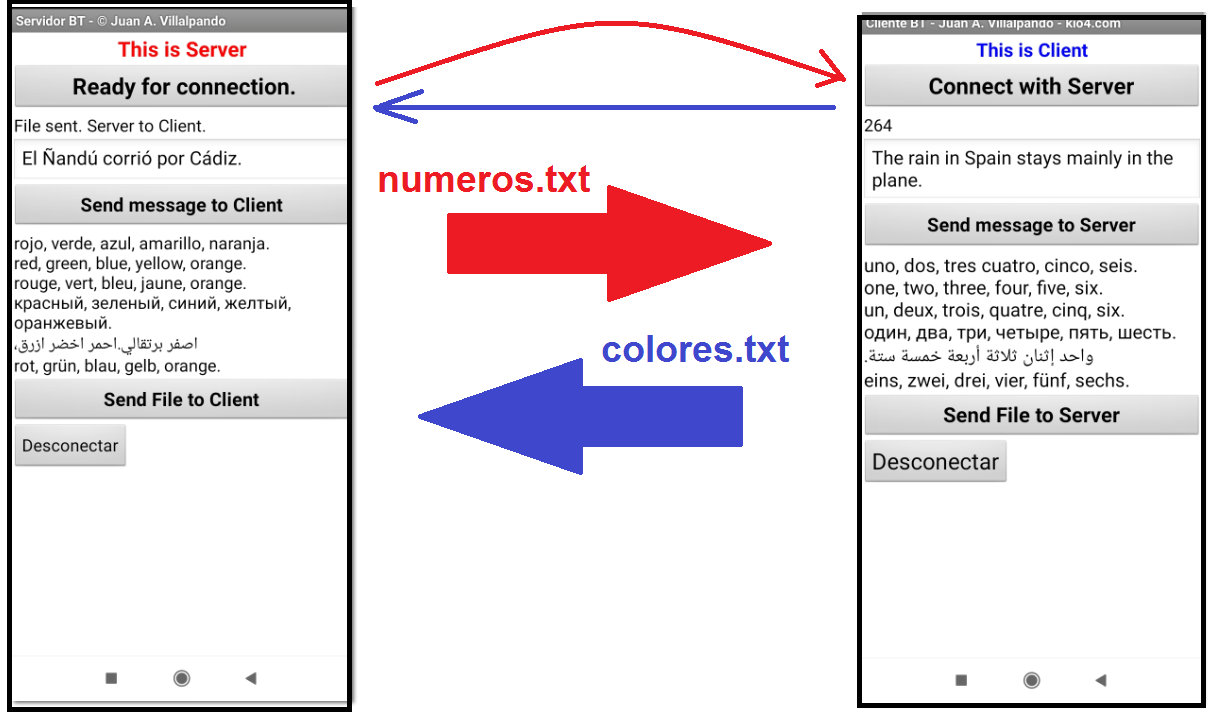
15.- Send text file from Server to Client and from Client to Server. Message Mobile to Mobile by Bluetooth.
p9A0i_BT_Server_File.aia (3.3 KB)
p9A0i_BT_Client_File.aia (3.4 KB)
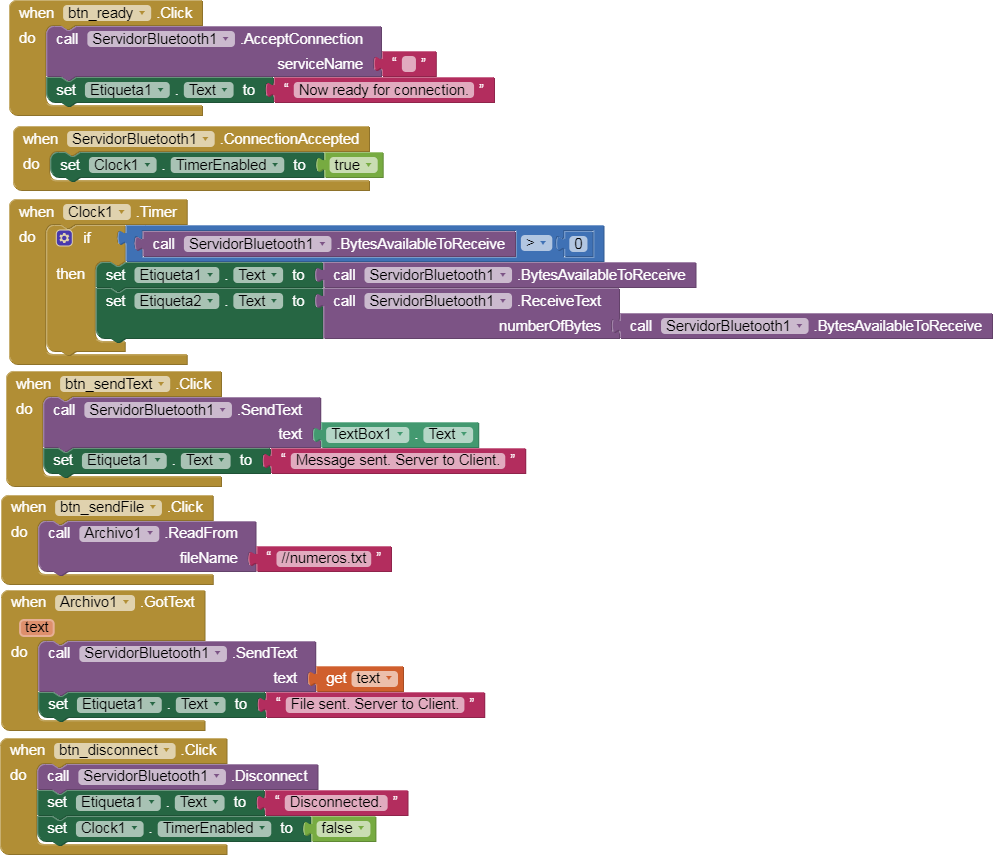
- Blocks Server.
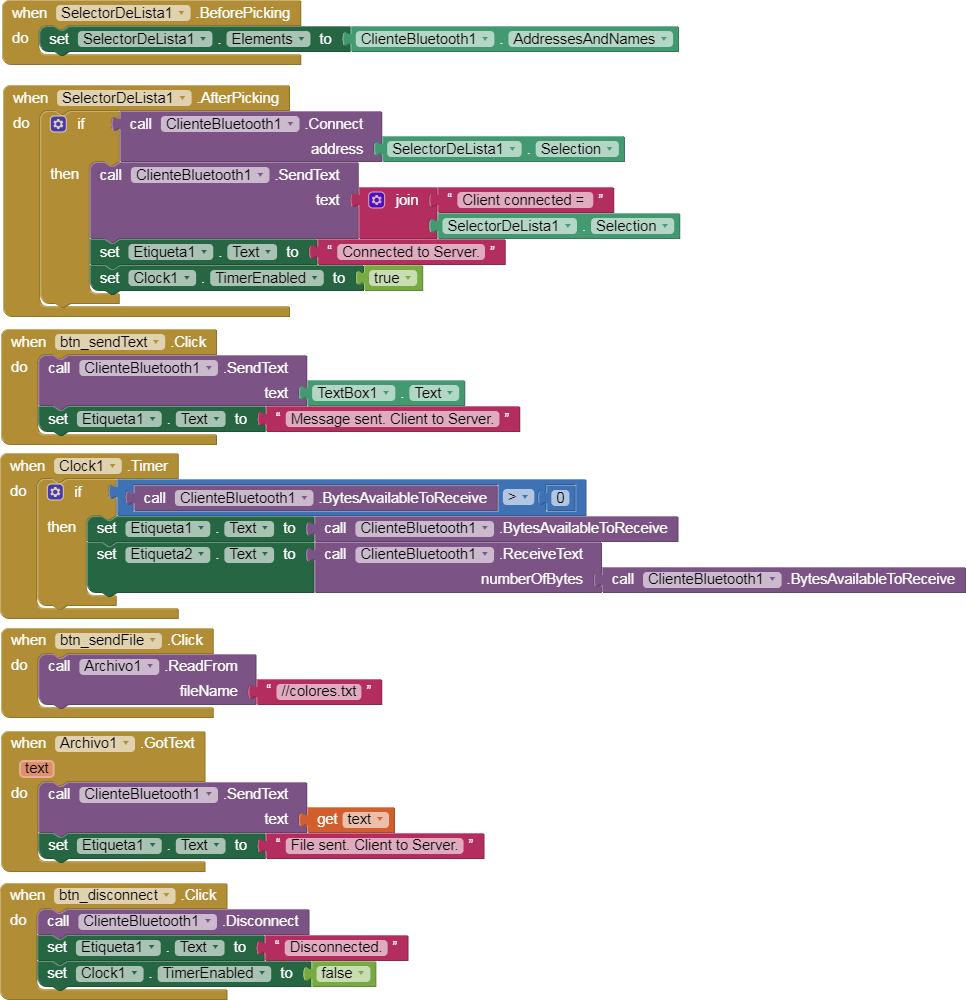
- Blocks Client.
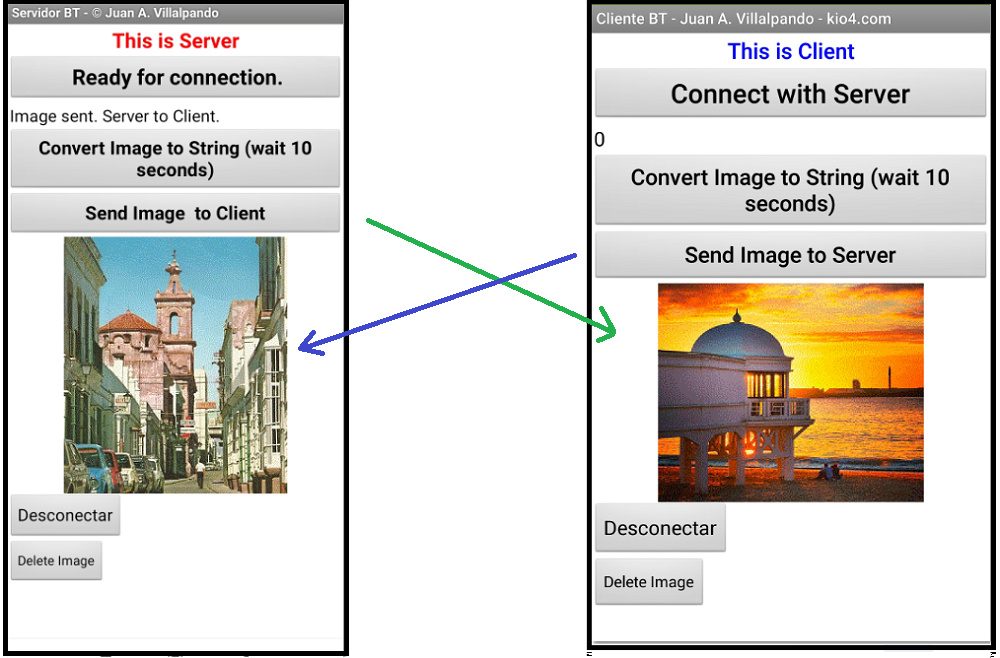
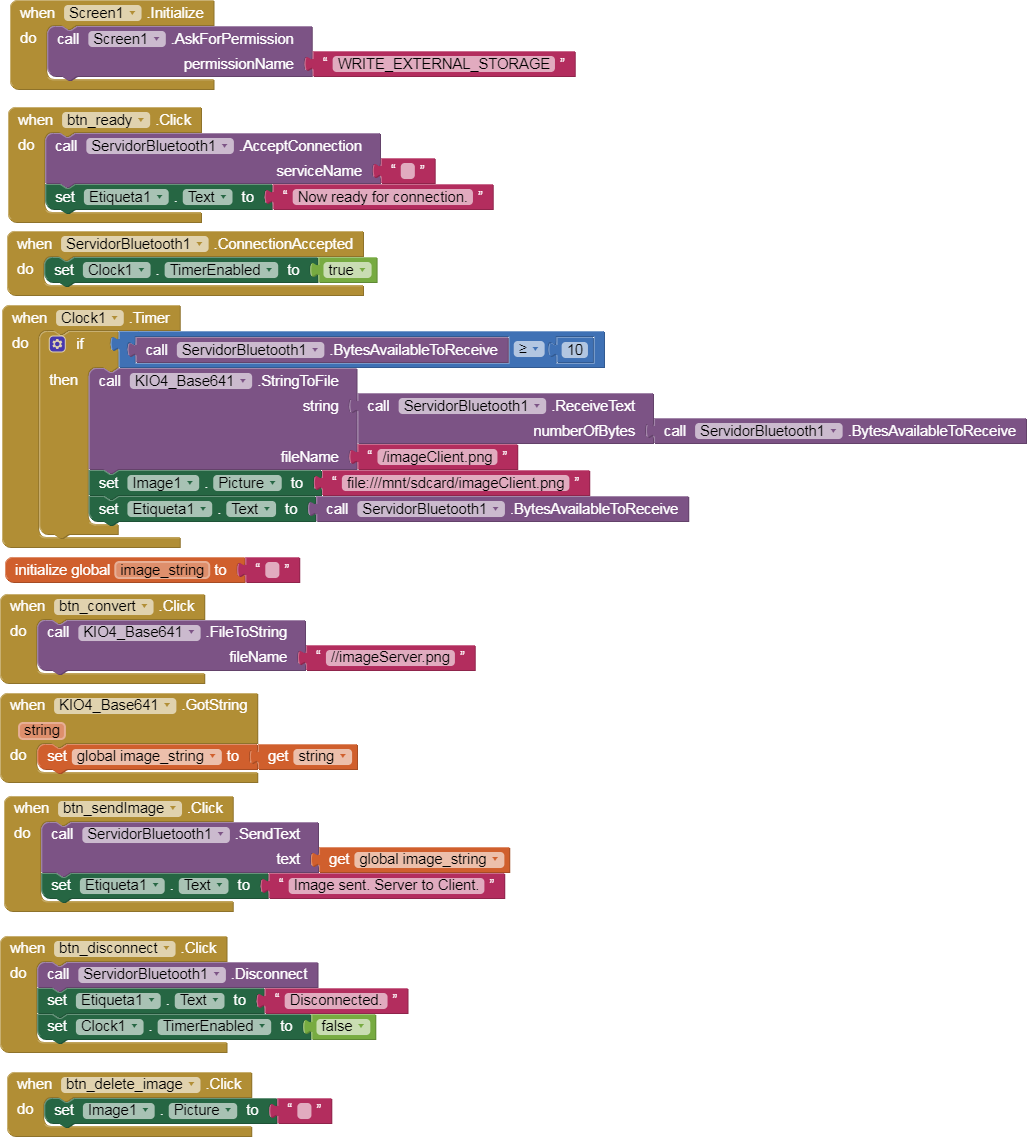
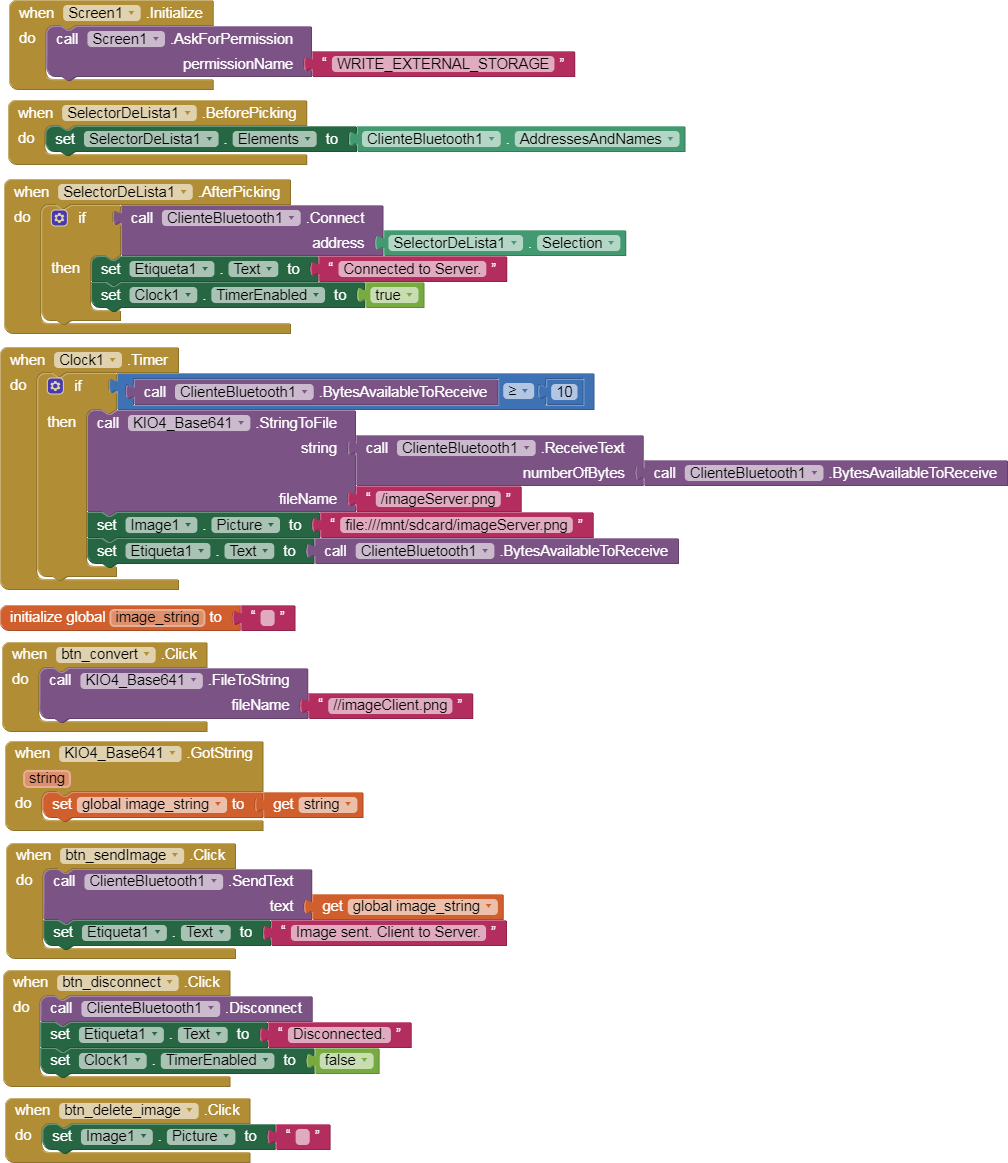
16.- Send Image file from Server to Client and from Client to Server.
This example is only experimental, there are problems with file size, clock interval, conversion … Try.
p9A0i_BT_Server_Image.aia (41.9 KB)
p9A0i_BT_Client_Image.aia (55.6 KB)
- Blocks Server.
- Blocks Client.
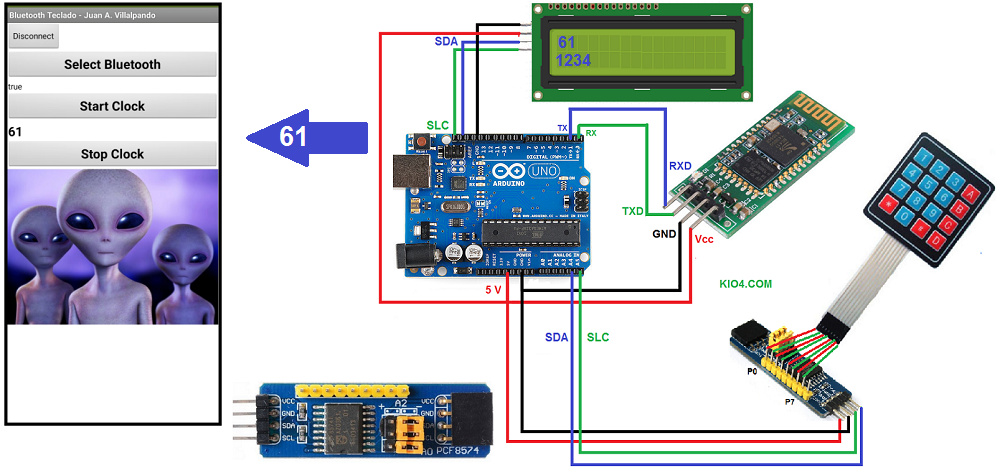
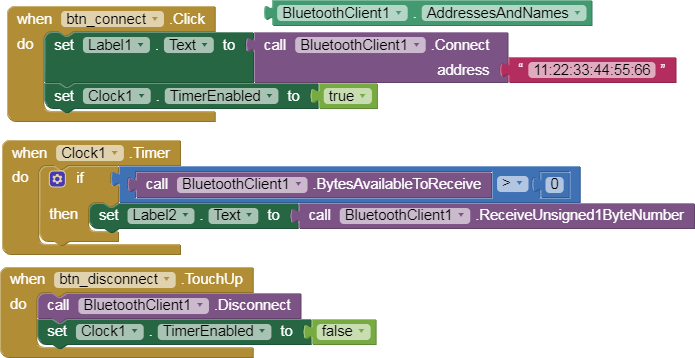
17.- Write number with KeyPad in Arduino and sends to App by Bluetooth. LCD I2C.
p9A0i_bluetooth_teclado.aia (1.8 MB)
// Juan A. Villalpando
// http://kio4.com/appinventor/9BA_bluetooth_teclado_LCD.htm

#include <Wire.h>
#include <Keypad_I2C.h>
// Pantalla LCD
#include <LiquidCrystal_I2C.h>
LiquidCrystal_I2C lcd(0x27, 2, 1, 0, 4, 5, 6, 7, 3, POSITIVE);
// LiquidCrystal_I2C lcd(0x3F, 2, 1, 0, 4, 5, 6, 7, 3, POSITIVE);

String clave = "";
String clave_old = "";

const byte ROWS = 4;
const byte COLS = 4;

char keys[ROWS][COLS] = {
  {'1', '2', '3', 'A'},
  {'4', '5', '6', 'B'},
  {'7', '8', '9', 'C'},
  {'*', '0', '#', 'D'}
};

byte rowPins[ROWS] = {0, 1, 2, 3};
byte colPins[COLS] = {4, 5, 6, 7};

int i2caddress = 0x20; // Module I2C Keyboard.

Keypad_I2C kpd = Keypad_I2C( makeKeymap(keys), rowPins, colPins, ROWS, COLS, i2caddress);

void setup() {
  Serial.begin(9600);
  kpd.begin();
  lcd.begin(16,2);// Columnas y filas de LCD.

}

void loop() {
  char key = kpd.getKey();
  clave = clave + (String) key;
  if (key == '#') {
    clave = clave.substring(0, clave.length() - 1); // Delete last char #
    lcd.clear();
    lcd.setCursor(0,0);
    lcd.print(clave);
    lcd.setCursor(0,1);
    lcd.print(clave_old);
    clave_old = clave;
    Serial.println(clave);
    clave = "";
  }
  delay(100);
}
18.- Poor man’s circuit.
// Juan A. Villalpando
// http://kio4.com/appinventor/9BA_bluetooth_teclado_LCD.htm
char key = 0;
String clave = "";
void setup() {
Serial.begin(9600);
}
void loop() {
if (Serial.available() > 0) {
key = Serial.read();
clave = clave + key;
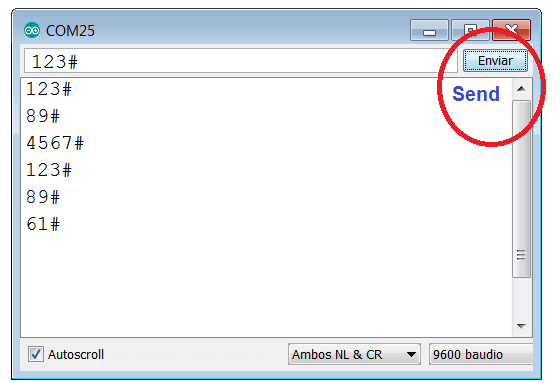
if (key == '#') {
Serial.print(clave);
// Example sends: 123#
clave = "";
}
}
}
19.- Arduino Interrupts sends data to App.
p9A01_bluetooth_interrupt.aia (2.3 KB)
Arduino UNO has two pins for interruptions (pin2 and pin3). ESP32 has 32 interrupt pins).
Arduino interrupts: https://www.arduino.cc/reference/en/language/functions/external-interrupts/attachinterrupt/
When pin2 RISING causes an interrupt and calls function on_13
When pin3 RISING causes an interrupt and calls function off_13
// Juan A. Villalpando
// http://kio4.com/appinventor/9A0_Resumen_Bluetooth.htm

#define LED13 13

void setup()
{
  Serial.begin(9600);
  attachInterrupt(digitalPinToInterrupt(2), on_13, RISING);
  attachInterrupt(digitalPinToInterrupt(3), off_13, RISING);
  pinMode(LED13, OUTPUT);
}

void loop()
{
  //
}

 // Interruptions ISR.
void on_13() // When pin2 RISING...
{
   digitalWrite(LED13, HIGH);
   Serial.print(1);
}

void off_13()  // When pin3 RISING...
{
   digitalWrite(LED13, LOW);
   Serial.print(0);
}