HM-10. BLE. Arduino UNO. Notify. Bluetooth. AT. iBeacon. Arrhythmia

Hello friends,

I bought a wonderful HM-10 module with BLE for only $ 2.

I have written my experiences on this Spanish website (http://kio4.com/arduino/161_HM10_BLE.htm) and I would like to share a summary in this Community.

CurieBLE.h is for Arduino 101 (Curie).

ArduinoBLE is for Arduino MKR WiFi 1010, Arduino UNO WiFi Rev .2, Arduino Nano 33 IoT, y Arduino Nano 33 BLE

BLEPeripheral is for Arduino Nano BLE and chips nRF8001, nRF51822.

Therefore, we will work without libraries. :sunglasses:

3 Likes

1.- Get UUID Service and UUID Characteristic.

  • We install the nRF Connect app that we find in the Google Play Store on our mobile.

Service: 0000ffe0-0000-1000-8000-00805f9b34fb
Characteristic: 0000ffe1-0000-1000-8000-00805f9b34fb

  • Notify. Read. Write. WriteNoResponse (therefore we will not be able to use the WriteWithResponse block, we will get the response through RegisterForStrings - Notify.)

...but...wait...wait...Name?...MLT-BT05...not an HM-10...it's a fake...it's a clon...it's a clon of a clon, in Spanish this means "emosido engañados".

but it doesn't matter, we continue.

2 Likes

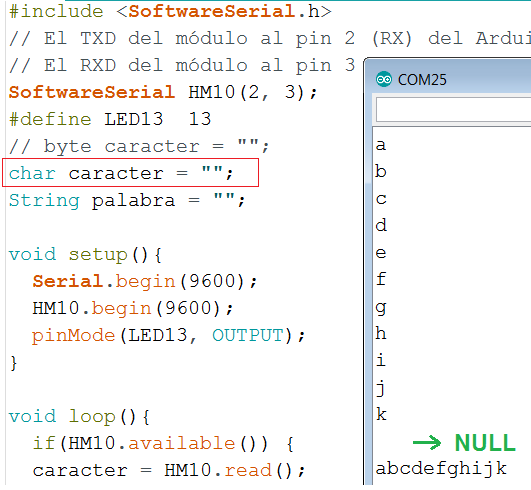
2.- Final character of a message is NULL.

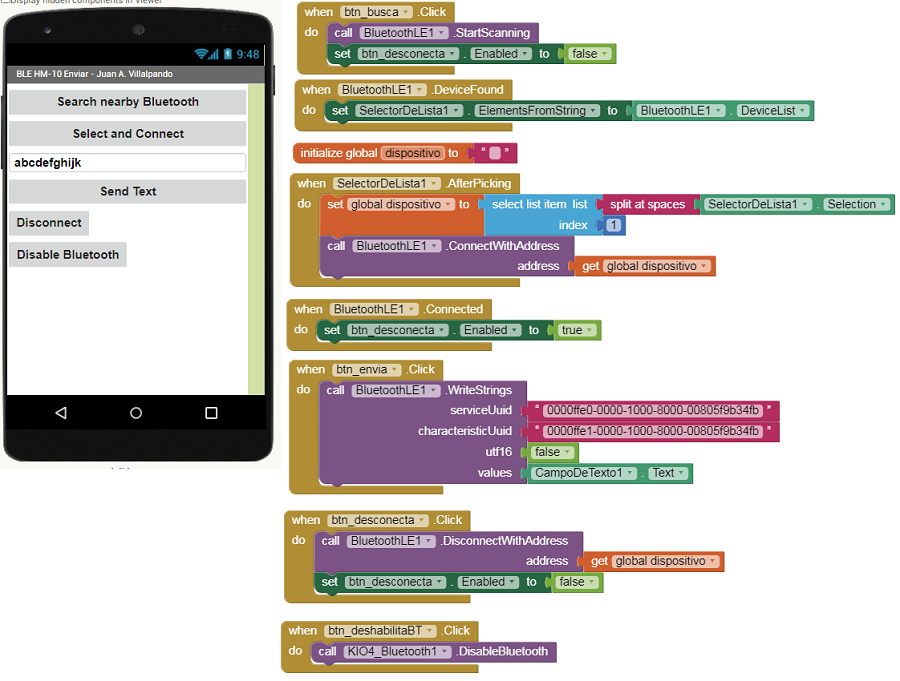
p110i_UNO_HM10_ble_enviar.aia (183.8 KB)

  • We are going to send a message (abcdefghijk) and get the bytes obtained in Arduino UNO.

// http://kio4.com/arduino/161_HM10_BLE.htm

#include <SoftwareSerial.h>
// El TXD del módulo al pin 2 (RX) del Arduino.
// El RXD del módulo al pin 3 (TX) del Arduino.
SoftwareSerial HM10(2, 3);

#define LED13  13
byte caracter = "";  
// char caracter = "";  
String mensaje = "";

void setup(){
  Serial.begin(9600);
  HM10.begin(9600);
  pinMode(LED13, OUTPUT);
}

void loop(){
  if(HM10.available()) { 
  caracter = HM10.read();
  Serial.println(caracter);
  mensaje = mensaje + caracter;

  if(caracter == NULL ) { 
     Serial.println(mensaje); 
     if (mensaje.indexOf("on13")>= 0){digitalWrite(LED13, HIGH);}
     if (mensaje.indexOf("off13")>= 0){digitalWrite(LED13, LOW);}   
     mensaje = "";
     delay(100);
     }
  } 
}
  • Look
    byte caracter = "";

  • The extension sends the message and at the end the NULL character.

  • To obtain the characters we change these lines.
    // byte caracter = "";
    char caracter = "";

hm10_6

  • BluetoothLE extension adds a NULL character by default
    hm10_29

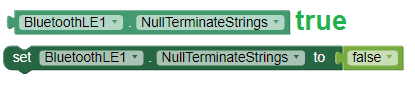
We can remove this feature using the block NullTerminateStrings = false

2 Likes

3.- Turn on-off 3 LEDs. Check LEDs Status.

p110i_UNO_HM10_3LED.aia (186.6 KB)

// http://kio4.com/arduino/161_HM10_BLE.htm

#include <SoftwareSerial.h>
// El TXD del módulo al pin 2 (RX) del Arduino.
// El RXD del módulo al pin 3 (TX) del Arduino.
SoftwareSerial HM10(2, 3);

#define LED11  11
#define LED12  12
#define LED13  13

char caracter = "";  
String mensaje = "";
String estado = "";

void setup() {
  Serial.begin(9600);
  HM10.begin(9600);
  pinMode(LED11, OUTPUT);
  pinMode(LED12, OUTPUT);
  pinMode(LED13, OUTPUT);
}

void loop(){
  if(HM10.available()) { 
  caracter = HM10.read();
  // Serial.println(caracter);
  mensaje = mensaje + caracter;

  if(caracter == NULL ) { 
     Serial.println(mensaje); 
     if (mensaje == "on11") {digitalWrite(LED11,HIGH); estado = "LED11 ON";}
     if (mensaje == "off11"){digitalWrite(LED11,LOW); estado = "LED11 OFF";}
     if (mensaje == "on12") {digitalWrite(LED12,HIGH); estado = "LED12 ON";}
     if (mensaje == "off12"){digitalWrite(LED12,LOW); estado = "LED12 OFF";} 
     if (mensaje.indexOf("on13") >= 0){digitalWrite(LED13, HIGH); estado = "LED13 ON";}
     if (mensaje.indexOf("off13") >= 0){digitalWrite(LED13, LOW); estado = "LED13 OFF";}
     if (mensaje == "check"){
     estado ="";
     if (digitalRead(LED11) == HIGH) {estado = "on11,";} else {estado = "off11,";}
     if (digitalRead(LED12) == HIGH) {estado = estado + "on12,";} else {estado = estado + "off12,";}
     if (digitalRead(LED13) == HIGH) {estado = estado + "on13";} else {estado = estado + "off13";}
    }
     HM10.print(estado.c_str()); 
     mensaje = "";
     delay(100);
     }
  } 
}
  • Two ways:

if (mensaje == "on11") this means if message is equal to "on11"

if (mensaje.indexOf("on13") >= 0) this means if message contains "on13"

  • RegisterForString (Notifiy), when the HM10.print...
HM10.print(estado.c_str()); 

... variable "estado" is automatically sent to the app, note that Clock is not required.

  • Be careful, the MTU of the HM-10 is 20 bytes (package), the messages must be less than 19 bytes + NULL
2 Likes

4.- Arrhythmia. Demo.

p110_UNO_HM10_corazon.aia (186.2 KB)

Arrhythmia is a problem with the rate or rhythm of your heartbeat. It means that your heart beats with a very irregular pattern.

This Arduino code:

// http://kio4.com/arduino/161_HM10_BLE.htm

#include <SoftwareSerial.h>
// El TXD del módulo al pin 2 (RX) del Arduino.
// El RXD del módulo al pin 3 (TX) del Arduino.
SoftwareSerial HM10(2, 3);

void setup(){
  Serial.begin(9600);
  HM10.begin(9600);
}

void loop(){
      String nivel = (String) random(90,100);
      int ritmo = random(400,1600);
      delay(ritmo);
      String mensaje = nivel + "," + (String) ritmo;
      Serial.println(mensaje);
      HM10.print(mensaje.c_str());
}

create two random numbers, level (height) and rhythm, this is a variable delay.
delay(ritmo);

  • We use RegisterForStrings (Notify).
2 Likes

5.- Floats numbers.

p110_UNO_HM10_float.aia (184.6 KB)

Sometimes we want to work with float numbers, in this example I perform the operation with float numbers and then convert it to String and send it as String.

  • It receives number (mensaje) as String, converts it toFloat, performs the operation on float, converts the result and send String.

flotante = 7.101031f * mensaje.toFloat() / 3.303071f;

// Juan A. Villalpando
// http://kio4.com/arduino/161_HM10_BLE.htm

#include <SoftwareSerial.h>
// El TXD del módulo al pin 2 (RX) del Arduino.
// El RXD del módulo al pin 3 (TX) del Arduino.
SoftwareSerial HM10(2, 3);

char caracter = "";  
String mensaje = "";
float flotante = 1.0f;

void setup(){
  Serial.begin(9600);
  HM10.begin(9600);
}

void loop(){
  if(HM10.available()) { 
  caracter = HM10.read();
  mensaje = mensaje + caracter;
 
  if(caracter == NULL ) { 
     Serial.println(mensaje); 
     flotante = 7.101031f * mensaje.toFloat() / 3.303071f;
     Serial.println(flotante,7); // Muestra con 7 decimales.
     HM10.print(flotante,7); // Envía con 7 decimales.
     mensaje = "";
     delay(100);
     }
  } 
} 

This lines:

Serial.println(flotante,7); // Shows in Serial Monitor with 7 decimals.
HM10.print(flotante,7); // Sends with 7 decimals.

Convert flotante to String with 7 decimals.

2 Likes

6.- AT commands.

Only accept AT Command when Bluetooth device is not connected with remote device.

Arduino code:

// Juan A. Villalpando
// http://kio4.com/arduino/161_HM10_BLE.htm

#include <SoftwareSerial.h>
// El TXD del módulo al pin 2 (RX) del Arduino.
// El RXD del módulo al pin 3 (TX) del Arduino.
SoftwareSerial HM10(2, 3);

void setup(){
  Serial.begin(9600);
  HM10.begin(9600);
}
 
void loop(){
  if(HM10.available()){Serial.write(HM10.read());}
 
  if(Serial.available()) {HM10.write(Serial.read());}
}

Serial Monitor (9600 bauds)

hm10_15


  • Command Description *
  • ---------------------------------------------------------------- *
  • AT Check if the command terminal work normally *
  • AT+RESET Software reboot *
  • AT+VERSION Get firmware, bluetooth, HCI and LMP version *
  • AT+HELP List all the commands *
  • AT+NAME Get/Set local device name *
  • AT+PIN Get/Set pin code for pairing *
  • AT+PASS Get/Set pin code for pairing *
  • AT+BAUD Get/Set baud rate *
  • AT+LADDR Get local bluetooth address *
  • AT+ADDR Get local bluetooth address *
  • AT+DEFAULT Restore factory default *
  • AT+RENEW Restore factory default *
  • AT+STATE Get current state *
  • AT+PWRM Get/Set power on mode(low power) *
  • AT+POWE Get/Set RF transmit power *
  • AT+SLEEP Sleep mode *
  • AT+ROLE Get/Set current role. *
  • AT+PARI Get/Set UART parity bit. *
  • AT+STOP Get/Set UART stop bit. *
  • AT+START System start working. *
  • AT+IMME System wait for command when power on. *
  • AT+IBEA Switch iBeacon mode. *
  • AT+IBE0 Set iBeacon UUID 0. *
  • AT+IBE1 Set iBeacon UUID 1. *
  • AT+IBE2 Set iBeacon UUID 2. *
  • AT+IBE3 Set iBeacon UUID 3. *
  • AT+MARJ Set iBeacon MARJ . *
  • AT+MINO Set iBeacon MINO . *
  • AT+MEA Set iBeacon MEA . *
  • AT+NOTI Notify connection event . *
  • AT+UUID Get/Set system SERVER_UUID . *
  • AT+CHAR Get/Set system CHAR_UUID . *
  • -----------------------------------------------------------------*
  • Note: (M) = The command support slave mode only. *

AT+ADVI Intervalo de Advertiser
AT
OK
AT+HELP
AT+VERSION
MLT-BT05-V4.1
AT+NAMEMLT-BT05
+NAME=MLT-BT05
AT+PIN
+PIN=123456
AT+PASS
+PASS=123456
AT+BAUD
+BAUD=4 (4---------9600)
AT+LADDR
+LADDR=88:25:83:F1:04:B4
AT+ADDR?
+ADDR=88:25:83:F1:04:B4
AT+STATE
+STATE=2
AT+PWRM
+PWRM=1 (1:don’t auto sleep)
AT+POWE
+POWE=2 (2: 0dbm)
AT+SLEEP (To awake send +80 random chars)
AT+ROLE
+ROLE=0 (0: Peripheral)
AT+NOTI
+NOTI=0 (Permitir o no notificaciones)
AT+UUID (Set or Get UUID)
+UUID=0xFFE0
AT+CHAR
+CHAR=0xFFE1
AT+ADVI
+ADVI=0 (0--- 100 ms) (Interval Advertiser)

Valors default:
+MARJ=0xFFE0
+MINO=0xFFE1
+ADVI=0 [Tiempo de Advertisen modo iBeacon]
+IBEA=0 [Establecer/Quitar/Consultar modo iBeacon]
+NOTI=0
+PWRM=1

ooooooooooooooooooo000oooooooooooooooooooooo

- We can change UUID with AT commands

AT+UUIDxxxxyyxxzzzz Service: 0000xxxx-0000-1000-8000-00805-F9B34FB
Characteristic Read: 0000yyyy-0000-1000-8000-00805-F9B34FB
Characteristic Write: 0000zzzz-0000-1000-8000-00805-F9B34FB

Default: FFE0, FFE1, FFE2

Service: 0000FFE0-0000-1000-8000-00805-F9B34FB
Characteristic Read: 0000FFE1-0000-1000-8000-00805-F9B34FB
Characteristic Write: 0000FFE2-0000-1000-8000-00805-F9B34FB

2 Likes

7.- iBeacon.

iBeacon did not work for me with App Inventor, but we will see it with another application.

- Set iBeacon in module HM-10 with AT commands.

AT+MARJ0x1A2B Set major number: 0x1A2B (hexadecimal) (Desde: 0x0001~0xFFFE, Default: 0x FFE0)

AT+MINO0xF1E2 Set minor number: 0xF1E2 (hexadecimal) (Desde: 0x0001~0xFFFE, Default: 0x FFE1)

AT+ADVI5 Advertisement interval: 5 (5 is 546.25 miliseconds)

AT+IBEA1 Set iBeacon MODE [default AT+IBEA0]

AT+PWRM0 [auto-sleep. (default AT+PWRM1]

  • We go to the Google Play Store and install the app on our mobile

hm10_32

  • Look distance in meters, major, minor, UUID, 0x004C is Apple.

  • El UUID of this iBeacon is: 74278BDA-B644-4520-8F0C-720EAF059935

  • We can change UUID iBeacon:

AT+IBE074278BDA
AT+IBE1B6444520
AT+IBE28F0C720E
AT+IBE3AF059935

  • Check:

AT+IBE0
AT+IBE1
AT+IBE2
AT+IBE3

oooooooo0000ooooooo

I tried iBeacon with App Inventor, but it didn't work.

2 Likes

Superb Juan :sunglasses:

2 Likes

8.- PIO (Programed Input Output). Stand-alone

PIO terminals do not work in this model MLT-BT05

But on the genuine HM-10 they do work. We can use the HM-10 Stand-alone module, that is, without connecting to the Arduino, independently.

  • Look this Martyn Currey tutorial, he uses the genuine HM-10 in stand-alone mode, he can take the input and output signals from the HM-10's PIO terminals

http://www.martyncurrey.com/hm-10-bluetooth-4ble-modules/

1 Like

9.- Flash the Firmware on Clone HM-10 BLE Module using Arduino Uno.

1 Like

10.- Two HM-10 connected to an Arduino UNO.

p110_UNO_dos_HM10.aia (186.9 KB)

The code for BLE1 creates three random numbers:
TemperatureBLE1 (10...60.000) with 3 decimals
HumidityBLE1 (5...99.000) with 3 decimals
interval_BLE1 (500...1000)

The code for BLE2 creates three random numbers:
TemperatureBLE2 (10...60.000) with 3 decimals
HumidityBLE2 (5...99.000) with 3 decimals
interval_BLE2 (500...2000)

In the variable intervals it sends the information to the application through "RegisterForStrings"

// Juan A. Villalpando
// http://kio4.com/arduino/161_HM10_BLE.htm

#include <SoftwareSerial.h>
// El TXD del módulo al pin 2 (RX) del Arduino.
// El RXD del módulo al pin 3 (TX) del Arduino.
SoftwareSerial BLE1(2, 3);
// El TXD del módulo al pin 4 (RX) del Arduino.
// El RXD del módulo al pin 5 (TX) del Arduino.
SoftwareSerial BLE2(4, 5);

long previousMillis_BLE1 = 0;
long previousMillis_BLE2 = 0;
int interval_BLE1 = 1000;
int interval_BLE2 = 1000;

void setup(){
  Serial.begin(9600);
  BLE1.begin(9600);
  BLE2.begin(9600);
}

void loop(){
  unsigned long currentMillis = millis();

  if(currentMillis - previousMillis_BLE1 > interval_BLE1) {
  previousMillis_BLE1 = currentMillis;  
  SendTo_BLE1();
  interval_BLE1 = random(500,1000);
  }

  if(currentMillis - previousMillis_BLE2 > interval_BLE2) {
  previousMillis_BLE2 = currentMillis;  
  SendTo_BLE2();
  interval_BLE2 = random(500,2000);
  }
}

void SendTo_BLE1(){
  float TemperatureBLE1 = random(10,60000)/1000.0; // 3 decimals
  float HumidityBLE1 = random(5,99000)/1000.0;

  Serial.print(TemperatureBLE1,3);
  Serial.print(",");
  Serial.println(HumidityBLE1,3);
  BLE1.print(TemperatureBLE1,3);
  BLE1.print(",");
  BLE1.print(HumidityBLE1,3);  
}

void SendTo_BLE2(){
  float TemperatureBLE2 = random(10,60000)/1000.0; // 3 decimals
  float HumidityBLE2 = random(5,99000)/1000.0;
  
  String temperatureBLE2 = String(TemperatureBLE2,3);
  String humidityBLE2 = String(HumidityBLE2,3);

  String mensajeBLE2 = temperatureBLE2 + "," + humidityBLE2;
  Serial.println(mensajeBLE2);
  BLE2.print(mensajeBLE2.c_str());  
}
  • Note that the send intervals are NOT made using the delay function.
  • I have used two ways of sending information.
  • In the Blocks code, notice that I have used the same UUIDs for the two modules.

1 Like

11.- WriteBytes and WriteStrings.

p110i_UNO_hm10_WriteBytes.aia (199.2 KB)

  • We convert text list
    ["65","66","67","68","69","70"]
    to number list_n.
    [65,66,67,68,69,70]

Send this list_n with "WriteBytes".

We can also send with "WriteStrings".

  • Notice that WriteStrings adds the NULL character. If you want to avoid it, use the NullTerminateStrings block.
// Juan A. Villalpando
// http://kio4.com/arduino/161_HM10_BLE.htm

#include <SoftwareSerial.h>
// El TXD del módulo al pin 2 (RX) del Arduino.
// El RXD del módulo al pin 3 (TX) del Arduino.
SoftwareSerial HM10(2, 3);

byte caracter = "";  
// char caracter = ' ';  

void setup(){
  Serial.begin(9600);
  HM10.begin(9600);
}

void loop(){
  if(HM10.available()) { 
  caracter = HM10.read();
  Serial.println(caracter); 
   }
} 

1 Like

12.- Keypad in App sends number to Arduino & HM-10, show in LCD-I2C.

p110i_UNO_hm10_LCD.aia (192.5 KB)

This example is based on this topic.

A keypad sends a number of less than 5 digits by BLE HM-10 to Arduino UNO and is displayed on an LCD-I2C

// http://kio4.com/arduino/161_HM10_BLE.htm

#include <Wire.h>
// Pantalla LCD
#include <LiquidCrystal_I2C.h>
LiquidCrystal_I2C lcd(0x27, 2, 1, 0, 4, 5, 6, 7, 3, POSITIVE);
// LiquidCrystal_I2C lcd(0x3F, 2, 1, 0, 4, 5, 6, 7, 3, POSITIVE);

#include <SoftwareSerial.h>
// El TXD del módulo al pin 2 (RX) del Arduino.
// El RXD del módulo al pin 3 (TX) del Arduino.
SoftwareSerial HM10(2, 3);

// byte caracter = "";  
char caracter = "";  
String mensaje = "";

void setup(){
  Serial.begin(9600);
  HM10.begin(9600);
  lcd.begin(16,2);// Columnas y filas de LCD.
}

void loop(){
  if(HM10.available()) { 
  caracter = HM10.read();
  // Serial.println(caracter);
  mensaje = mensaje + caracter;

  if(caracter == NULL ) { 
     Serial.println(mensaje); 
     mensaje = mensaje.substring(0, mensaje.length() - 1); // Delete last char   
     lcd.clear();
     lcd.setCursor(0,0);
     lcd.print(mensaje);
     mensaje = "";
     delay(100);
     }
  } 
}

1 Like

My Bluetooth app display component error, Bluetooth le1 connection error, calling registerforstrings of Bluetooth le1 failed

Are you using Arduino UNO and HM-10? Does the second example of this topic (LED) work for you?

1 Like

13.- HM-10 sends a long text to app.

p110_UNO_HM10_TextoLargo.aia (185.3 KB)

  • HM-10 sends five random numbers with decimals, each random delay (500 - 1000 ms)
  • It sends the data separated by commas and ends the message with the '#' character.
// Juan A. Villalpando
// http://kio4.com/arduino/161_HM10_BLE.htm

#include <SoftwareSerial.h>
// El TXD del módulo al pin 2 (RX) del Arduino.
// El RXD del módulo al pin 3 (TX) del Arduino.
SoftwareSerial BLE1(2, 3);

long previousMillis_BLE1 = 0;
int interval_BLE1 = 1000;

void setup(){
  Serial.begin(9600);
  BLE1.begin(9600);
}

void loop(){
  unsigned long currentMillis = millis();
  if(currentMillis - previousMillis_BLE1 > interval_BLE1) {
  previousMillis_BLE1 = currentMillis;  
  SendTo_BLE1();
  interval_BLE1 = random(500,1000);
  }
}

void SendTo_BLE1(){
  float x1 = random(10,60000)/1000.0; // 3 decimals
  float x2 = random(5,99000)/100.0; // 2 decimals
  float x3 = random(5,99000)/10.0; // 1 decimal
  float x4 = random(50,990000)/1000.0; // 3 decimals
  float x5 = random(500,990000)/1000.0; // 3 decimals

  BLE1.print(x1,3);
  BLE1.print(",");
  BLE1.print(x2,2);
  BLE1.print(",");
  BLE1.print(x3,1);
  BLE1.print(",");
  BLE1.print(x4,3);
  BLE1.print(",");
  BLE1.print(x5,3);
  BLE1.print(",");
  BLE1.print("#"); // End Of Message.
}
  • App receives this information in packets of 20 characters in stringValues, for example:

(19.650,729.62,4154.3)(,584.019,279.315,#)

  • The total variable accumulates the information until it contains the character '#'

  • Cleans the information and makes it list.

19.650,729.62,4154.3,584.019,279.315, #

(19.650 729.62 4154.3 584.019 279.315 #)

(*)
Another way, send the last number using println()

BLE1.println(x5,3); 
// BLE1.print(","); 
// BLE1.print("#"); // End Of Message.

and modify the block piece: \n

1 Like

14.- App sends a long text to HM-10.

p110_UNO_HM10_TextoLargo_2.aia (184.6 KB)


  • Clock1.TimeInterval: 10

// Juan A. Villalpando
// http://kio4.com/arduino/161_HM10_BLE.htm

#include <SoftwareSerial.h>
// El TXD del módulo al pin 2 (RX) del Arduino.
// El RXD del módulo al pin 3 (TX) del Arduino.
SoftwareSerial HM10(2, 3);

String texto;

void setup(){
  Serial.begin(9600);
  BLE1.begin(9600);
}

void loop(){
if(BLE1.available()) {
    texto = BLE1.readString();
    Serial.print(texto);
  }
}
3 Likes

15.- Pushbutton in Arduino sends (1) or (0) to App.

p110_UNO_boton_HM10.aia (184.2 KB)

  • When you press the Pushbutton7, (1) or (0) is sent to the app.
    As it receives (1) or (0) it will change the color of the btn_color to green or red.
    Notification (RegisterForString) is used.
// Juan A. Villalpando
// http://kio4.com/arduino/161_HM10_BLE.htm

#include <SoftwareSerial.h>
// El TXD del módulo al pin 2 (RX) del Arduino.
// El RXD del módulo al pin 3 (TX) del Arduino.
SoftwareSerial BLE1(2, 3);

int valor = HIGH;
int valor_anterior = HIGH;

void setup(){
  Serial.begin(9600);
  BLE1.begin(9600);
  pinMode(7,INPUT);
}

void loop(){
  valor = digitalRead(7);
  if (valor == HIGH &&  valor_anterior != HIGH) { 
   Serial.println("Pulsado");
   valor_anterior = valor;
   BLE1.print("1");
   delay(10);
   } 
   if (valor == LOW && valor_anterior != LOW) { 
   Serial.println("NO");
   valor_anterior = valor;
   BLE1.print("0");
   delay(10);
   }   
}

1 Like

(added to FAQ)