Bluetooth HC-06. Arduino. Send. Receive. Send text file. Multitouch. Image

7.- App gets the value of two potentiometers.

p9A0i_bluetooth_potenciometro.aia (3.3 KB)

// Juan A. Villalpando
// http://kio4.com/appinventor/9A0_Resumen_Bluetooth.htm

int value_pot0;
int value_pot1;
String value;


void setup() { 
  Serial.begin(9600);
}

void loop() { 
    value_pot0 = analogRead(A0);
    value_pot1 = analogRead(A1);
    value = (String) value_pot0 + "," + (String) value_pot1;
    Serial.println(value);
    delay(200); // It should be slower than the Clock Interval.
} 
  • Values from 0 to 1023.
4 Likes

8.- App receives data from Arduino. Clock.Interval. Arduino delay. Buffer.

p9A0i_bluetooth_aleatorio.aia (2.9 KB)

a)
Clock.Interval = 300
Arduino delay = 200

  • App cannot process the information because the Clock "is slower" than the Arduino.
    The buffer is being filled, values ​​that arrive and have not yet been processed.

  • When the Buffer reaches a certain value, for example 120, you remove power to the Arduino. What happens with buffer?

b) Change Clock.Interval
Clock.Interval = 100
Arduino delay = 200

  • Now the Clock "is faster" than the Arduino.
    Buffer = 0

Therefore, Clock.Interval < delay Arduino

// Juan A. Villalpando
// http://kio4.com/appinventor/9A0_Resumen_Bluetooth.htm

int aleatorio;

void setup() { 
  Serial.begin(9600);
}

void loop() { 
    aleatorio = random(0,100);
    Serial.println(aleatorio);
    delay(200); // Clock.Interval < delay Arduino
} 
4 Likes

9.- A potentiometer in Arduino sends values ​​to the App. Dynamic graph. Shift left.

p9A0i_bluetooth_dinamico.aia (8.1 KB)

// Juan A. Villalpando
// http://kio4.com/appinventor/9A0_Resumen_Bluetooth.htm

int value_pot0;

void setup() { 
  Serial.begin(9600);
}

void loop() { 
    value_pot0 = analogRead(A0);
    Serial.println(value_pot0);
    delay(100); // It should be slower than the Clock Interval.
}			
2 Likes

10.- Three LEDS on-off according to a sequence saved in a file.

p9A0i_bluetooth_secuencia3LED.aia (5.0 KB)

  • In file rutina2.csv this content:
    bt_28

  • Levels of: LED11 - LED12 - LED13 - Time in seconds of this combination.

  • App sends 1-1-0-2*

  • Arduino set LEDs on, on, off

  • and wait 2 seconds.

  • then Arduino sends to App “send_me_next”

  • When App receives “send_me_next”

  • App “send_next” combination: 1-0-0-2*

// Juan A. Villalpando
// http://kio4.com/appinventor/9A0_Resumen_Bluetooth.htm

char caracter;
String palabra;
int LED11 = 11;
int LED12 = 12;
int LED13 = 13;
int valor11;
int valor12;
int valor13;

int Tiempo = 1000000;
unsigned long currentMillis;
unsigned long previousMillis = currentMillis; 
  
int k1;
int k2;
int k3;
int k4;

void setup() { 
  Serial.begin(9600);
  pinMode(LED11, OUTPUT); 
  pinMode(LED12, OUTPUT); 
  pinMode(LED13, OUTPUT); 
}

void loop() { 
  if(Serial.available()) {
  caracter = Serial.read();
  palabra = palabra + caracter;
        Serial.println(palabra);

  if(caracter == '*') {
      palabra = palabra.substring(0, palabra.length() - 1); // Delete last char *     
      k1 = palabra.indexOf('-');
      valor11 = palabra.substring(0, k1).toInt();
      k2 = palabra.indexOf('-', k1+1);
      valor12 = palabra.substring(k1+1, k2).toInt();
      k3 = palabra.indexOf('-', k2+1);
      valor13 = palabra.substring(k2+1, k3).toInt();
      k4 = palabra.indexOf('-', k3+1);
      Tiempo = 1000 * palabra.substring(k3+1, k4).toInt();
      palabra = "";
      digitalWrite(LED11, valor11);
      digitalWrite(LED12, valor12);
      digitalWrite(LED13, valor13); 
  }

    previousMillis = currentMillis;
} // =>Fin del available
      tiempo();
} // =>Fin del loop

void tiempo() {
  currentMillis = millis();
  if (currentMillis >= (previousMillis + Tiempo)) {
    previousMillis = currentMillis;
    Serial.println("send_me_next"); // Envíame el siguiente.
  }
  }
3 Likes

11.- Virtual Screen with two VerticalArrangement.

p9A0i_bluetooth_virtual.aia (4.1 KB)

bt_29

  • In this example I have used Send1ByteNumber, I have arbitrarily chosen the numbers 153,168,221.
  • Arduino returns a byte 48 or 49.

// Juan A. Villalpando
// http://kio4.com/appinventor/9A0_Resumen_Bluetooth.htm

#define LED13 13
byte StatusLED13;

void setup()
{
  Serial.begin(9600);
  pinMode(LED13, OUTPUT);
}

void loop() { 
  if(Serial.available())
  {
    int dato = Serial.read();
    if(dato == 153){digitalWrite(LED13, HIGH);}
    if(dato == 168){digitalWrite(LED13, LOW);}
    if(dato == 221){
      StatusLED13 = digitalRead(LED13);
      Serial.print(StatusLED13); // Sends 48 or 49
      }
   }
}
4 Likes

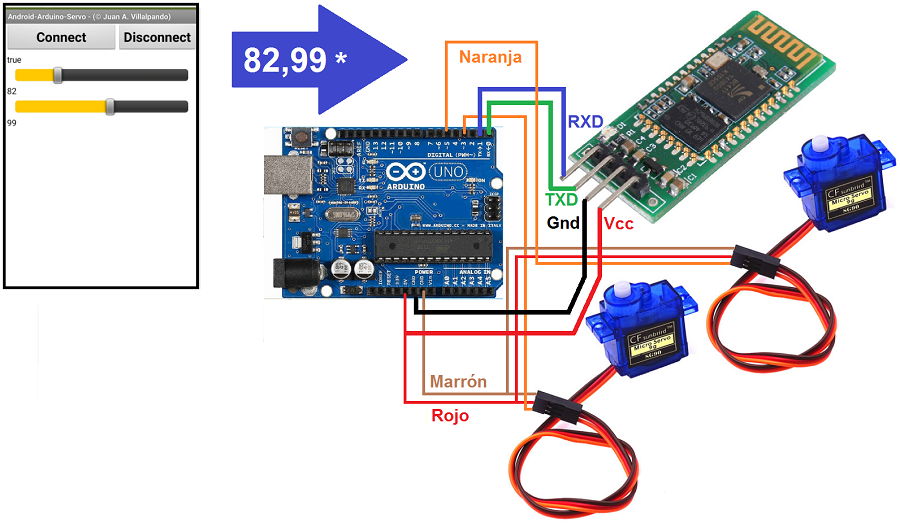
12.- App moves two Servos by Sliders.

p9A0i_bluetooth_servos.aia (3.2 KB)

// Juan A. Villalpando
// http://kio4.com/appinventor/9A0_Resumen_Bluetooth.htm

#include <Servo.h>
Servo servo3;
Servo servo5;
const int pwmPin3 = 3; // Servo3 pin3 PWM
const int pwmPin5 = 5; // Servo5 pin5 PWM

char caracter;
String palabra;
String angulo_1;
String angulo_2;

int k1;

void setup() {
Serial.begin(9600);
pinMode (pwmPin3, OUTPUT); 
pinMode (pwmPin5, OUTPUT);
servo3.attach(pwmPin3);
servo5.attach(pwmPin5);
}

void loop() {

  if(Serial.available())
  {
    caracter = Serial.read();  
    palabra = palabra + caracter; 

if (caracter == '*') {
      Serial.println(palabra);
      palabra = palabra.substring(0, palabra.length() - 1); // Delete last char *
      k1 = palabra.indexOf(',');
      angulo_1 = palabra.substring(0, k1);
      angulo_2 = palabra.substring(k1+1, -1);

      servo3.write(angulo_1.toInt());
      servo5.write(angulo_2.toInt());
      palabra = "";   
  }
      }
} // => Fin Loop

Note: if you use more than 2 servos you will need to power them with an external power source. Video: Each servo needs about 400 mA.

5 Likes

13.- App moves a Stepper motor.

p9A0i_bluetooth_pasopaso.aia (3.1 KB)

  • In a servo you order:
    set 34º
    set 12º
    set 96º, it is not necessary to know the previous position.

  • In a stepper motor, you order:
    set 20 step clockwise
    set 80 step anticlockwise, it is necessary to know the previous position to place it in a new position.

  • I will use: Stepper motor 28BYJ-48 ULN2003

  • It is convenient to power this motor through an external source, in this experimental example I will feed it with the 5 V of Arduino.

// Juan A. Villalpando
// http://kio4.com/appinventor/9A0_Resumen_Bluetooth.htm

#include <Stepper.h>
#define STEPS 64

// Secuencia 1-3-2-4
Stepper motor(STEPS, 8, 10, 9, 11); 

char caracter;
void setup() { 
Serial.begin(9600);
motor.setSpeed(200);
}

void loop() { 
if( Serial.available() ) {
  caracter = Serial.read();
  Serial.print(caracter);
  if(caracter == '1'){motor.step(60);}
  if(caracter == '2'){motor.step(-60);}
  if(caracter == '3'){motor.step(510);}
  if(caracter == '4'){motor.step(-510);}
  if(caracter == '5'){motor.step(1020);}
  if(caracter == '6'){motor.step(-1020);}
  if(caracter == '7'){motor.step(2040);}
  if(caracter == '8'){motor.step(-2040);}
  
  if(caracter == 'A'){motor.step(100);}
  if(caracter == 'B'){motor.step(-100);}
  }
}
1 Like

14. Where do we connect the Bluetooth module in Arduino UNO?

p9A0i_bluetooth_Serial.aia (2.9 KB)

  • Terminals 0 (RX) and 1 (TX) are used by Arduino as the default Serial RX/TX. Use it to upload sketch, Serial Monitor, Bluetooth. So when we are going to upload a sketch for Bluetooth we must disconnect the RX cable from the Arduino.

  • We can use other terminals to connect the Bluetooth module, for example 10 and 11, in this case we need the “SoftwareSerial” library. Now when we upload a sketch it is not necessary to remove the RX cable.

- CODE FOR MODULE IN default RX/TX pin 0 and 1 of Arduino.

// Juan A. Villalpando
// http://kio4.com/appinventor/9A0_Resumen_Bluetooth.htm

#define Pin13  13
char caracter;

void setup() { 
  Serial.begin(9600);
  pinMode(Pin13, OUTPUT); 
}

void loop() { 
  if(Serial.available()) {
    caracter = Serial.read();
    if(caracter == 'a'){ digitalWrite(Pin13, HIGH);}
    if(caracter == 'b'){ digitalWrite(Pin13, LOW);}
    Serial.println(caracter);
  } 
} 

- CODE FOR MODULE IN pin10 and pin11 with SoftwareSerial library.

// Juan A. Villalpando
// http://kio4.com/appinventor/9A0_Resumen_Bluetooth.htm

#include <SoftwareSerial.h>
SoftwareSerial I2CBT(10,11);
// El TX del módulo BT va al pin10 del Arduino
// El RX del módulo BT va al pin11 del Arduino

#define Pin13  13
char caracter;

void setup() { 
  I2CBT.begin(9600); // To read and write Bluetooth
  Serial.begin(9600); // To print in Serial Monitor
  pinMode(Pin13, OUTPUT); 
}

void loop() { 
  if(I2CBT.available()) {
    caracter = I2CBT.read();
    if(caracter == 'a'){ digitalWrite(Pin13, HIGH);}
    if(caracter == 'b'){ digitalWrite(Pin13, LOW);}
    Serial.println(caracter); // Serial Monitor
    I2CBT.println(caracter);  // return Bluetooth
    //  I2CBT.write(caracter);  // return Bluetooth
  } 
} 
2 Likes

15.- Send text file from Server to Client and from Client to Server. Message Mobile to Mobile by Bluetooth.

p9A0i_BT_Server_File.aia (3.3 KB)

p9A0i_BT_Client_File.aia (3.4 KB)

- Blocks Server.

- Blocks Client.

2 Likes

16.- Send Image file from Server to Client and from Client to Server.

This example is only experimental, there are problems with file size, clock interval, conversion … Try.

p9A0i_BT_Server_Image.aia (41.9 KB)

p9A0i_BT_Client_Image.aia (55.6 KB)

- Blocks Server.

- Blocks Client.

1 Like

17.- Write number with KeyPad in Arduino and sends to App by Bluetooth. LCD I2C.

p9A0i_bluetooth_teclado.aia (1.8 MB)

  • Write number with KeyPad + I2C: 123, 4567, 89, 61 then write # (as ENTER)
  • That number is displayed on the I2C LCD and is sent via Bluetooth.
  • Depending on the number sent, the image of a monkey, lion, bear or martians will be displayed in App.

// Juan A. Villalpando
// http://kio4.com/appinventor/9BA_bluetooth_teclado_LCD.htm

#include <Wire.h>
#include <Keypad_I2C.h>
// Pantalla LCD
#include <LiquidCrystal_I2C.h>
LiquidCrystal_I2C lcd(0x27, 2, 1, 0, 4, 5, 6, 7, 3, POSITIVE);
// LiquidCrystal_I2C lcd(0x3F, 2, 1, 0, 4, 5, 6, 7, 3, POSITIVE);

String clave = "";
String clave_old = "";

const byte ROWS = 4;
const byte COLS = 4;

char keys[ROWS][COLS] = {
  {'1', '2', '3', 'A'},
  {'4', '5', '6', 'B'},
  {'7', '8', '9', 'C'},
  {'*', '0', '#', 'D'}
};

byte rowPins[ROWS] = {0, 1, 2, 3};
byte colPins[COLS] = {4, 5, 6, 7};

int i2caddress = 0x20; // Module I2C Keyboard.

Keypad_I2C kpd = Keypad_I2C( makeKeymap(keys), rowPins, colPins, ROWS, COLS, i2caddress);

void setup() {
  Serial.begin(9600);
  kpd.begin();
  lcd.begin(16,2);// Columnas y filas de LCD.
 
}

void loop() {
  char key = kpd.getKey();
  clave = clave + (String) key;
  if (key == '#') {
    clave = clave.substring(0, clave.length() - 1); // Delete last char #   
    lcd.clear();
    lcd.setCursor(0,0);
    lcd.print(clave);
    lcd.setCursor(0,1);
    lcd.print(clave_old);
    clave_old = clave;
    Serial.println(clave);
    clave = "";
  }
  delay(100);
}

1 Like

18.- Poor man’s circuit.

  • In the example above, the poor man has no LCD, no I2C module, and no KeyPad.
  • Remove the wire from terminal 0 of the Arduino.

bt_48

  • In Design, DelimiterByte = 35 (it is #)
    bt_46
// Juan A. Villalpando
// http://kio4.com/appinventor/9BA_bluetooth_teclado_LCD.htm

char key = 0;
String clave = "";

void setup() {
Serial.begin(9600);
}

void loop() {
if (Serial.available() > 0) {
  key = Serial.read();
  clave = clave + key;
      if (key == '#') {
        Serial.print(clave);
        // Example sends: 123#
        clave = ""; 
      }
  }
}
  • Now in Serial Monitor write number, 123#

bt_47

2 Likes

19.- Arduino Interrupts sends data to App.

p9A01_bluetooth_interrupt.aia (2.3 KB)


// Juan A. Villalpando
// http://kio4.com/appinventor/9A0_Resumen_Bluetooth.htm

#define LED13 13

void setup()
{
  Serial.begin(9600);
  attachInterrupt(digitalPinToInterrupt(2), on_13, RISING);
  attachInterrupt(digitalPinToInterrupt(3), off_13, RISING);
  pinMode(LED13, OUTPUT);
}

void loop()
{
  // 
}

 // Interruptions ISR.
void on_13() // When pin2 RISING...
{
   digitalWrite(LED13, HIGH);
   Serial.print(1);
}

void off_13()  // When pin3 RISING...
{
   digitalWrite(LED13, LOW);
   Serial.print(0);
}
1 Like

20.- Get message when Bluetooth has disconnection failure.

p9A01_bluetooth_faliure.aia (4.0 KB)

  • Arduino sends random numbers to App:
// Juan A. Villalpando
// http://kio4.com/appinventor/9A0_Resumen_Bluetooth.htm

int aleatorio;

void setup() { 
  Serial.begin(9600);
}

void loop() { 
    aleatorio = random(0,100);
    Serial.println(aleatorio);
    delay(400); // Clock.Interval < delay Arduino
}
  • App receives those numbers and shows.

  • Disconnect the power cable from the Arduino.

  • You will get the approximate time of that disconnection.
    bt_52

  • In the previous blocks observe SendText = 3, this is dumb number, when that number is sent and the Bluetooth does not receive it, we get error 516: Unable to write: Broken pipe.

1 Like

21.- Arduino sends three random numbers to App.

p9A0i_bluetooth_aleatorios.aia (3.9 KB)

// Juan A. Villalpando
// http://kio4.com/appinventor/9A0_Resumen_Bluetooth.htm

int x;
int y;
int z;
String datos;

void setup() {
 Serial.begin(9600);
}

void loop() {
x = random(0, 10);
y = random(10, 100);
z = random(100,1000);
datos = (String) x + "," + (String) y + "," + (String) z;
Serial.println("Números aleatorios:");
Serial.println("Random numbers:");
Serial.println(datos);

delay(800);
}

Note that it only shows up when a list of 3 items arrives. Not shown:
Serial.println(“Números aleatorios:”);
Serial.println(“Random numbers:”);

22.- JoyStick in Arduino sends values. Move a ball.

p9A0_bluetooth_laberinto.aia (115.7 KB)

JoyStick Arduino.

// Juan A. Villalpando
// http://kio4.com/appinventor/9A0_Resumen_Bluetooth.htm

int x;
int y;
int c;
String datos;

void setup() {
 Serial.begin(9600);
 pinMode(2,INPUT_PULLUP);
}

void loop() {
  x = analogRead(A0);
  y = analogRead(A1);
  if (digitalRead(2) == HIGH){c=0;} else {c=1;}
  datos = (String) x + "," + (String) y + "," + (String) c;
  Serial.println(datos);
  delay(100);
}

Variables x,y: Ball.MoveTo and DrawLine.
Variable c: Canvas.Clear (when press JoyStick)

23.- Arduino sends random numbers every second and every two seconds.

p9A0i_bluetooth_aleatorio2.aia (3.4 KB)

// Juan A. Villalpando
// http://kio4.com/appinventor/9A0_Resumen_Bluetooth.htm

int alea_1;
int alea_2;
unsigned long tiempo_actual_1 = 0;
unsigned long tiempo_actual_2 = 0;

void setup() { 
  Serial.begin(9600);
}

void loop() {
  if((millis()-tiempo_actual_1)>= 1000){
          int alea_1 = random(0,100);
          tiempo_actual_1 = millis();
          Serial.println(String(alea_1));
  }
  if((millis()-tiempo_actual_2)>= 2000){
          int alea_2 = random(200,300);
          tiempo_actual_2 = millis();
          Serial.println(String(alea_2));
  }
} 

3 Likes

24.- Press a button continuously and send a character.

In this topic @Povilas_Kasparas, @Taifun and @ABG discuss how to send a character continuously while pressing a button.

char caracter;

 void setup(){  
  Serial.begin(9600);  
 } 
  
 void loop() { 
 if(Serial.available()) {
  caracter = Serial.read();
  Serial.println(caracter);
  }
}
1 Like

Thank you a lot saved me :slight_smile:

25.- Simulation of an arithmia.

p9BC_Bluetooth_ECGi.aia (12.4 KB)

Arduino sends a random level (90...100), with a random delay (400...1600)
appinventor_ECG

void setup(){
  Serial.begin(9600);
}

void loop(){
      int nivel = random(90,100);
      int ritmo = random(400,1600);
      delay(ritmo);
      String mensaje = (String) nivel + "," + (String) ritmo;
      Serial.println(mensaje);
}

App Receives Text (98,977), gets the level (98) and draws it on a Canvas.

For a more realistic process, use the module AD8232

Here in Spanish:
http://kio4.com/appinventor/9BC_bluetooth_corazon.htm