Custom Map Overlay using a FeatureCollection
... uses the online OpenStreetMap geojson.io web site tool to create a detailed FeatureCollection map overlay.
This is a two part tutorial. Part I explains how to use an online tool to create an overlay. Part II explains how to load the overlay into an app that contains a Map component.
Requirements for Part I
- Either a WIFI or network connection to access the Internet to display the map.
- a created FeatureCollection map overlay
- no extensions required
- intermediate to advanced App Inventor coding skills
Part I Create the Map component Overlay
The process:
Create the Map Overlay
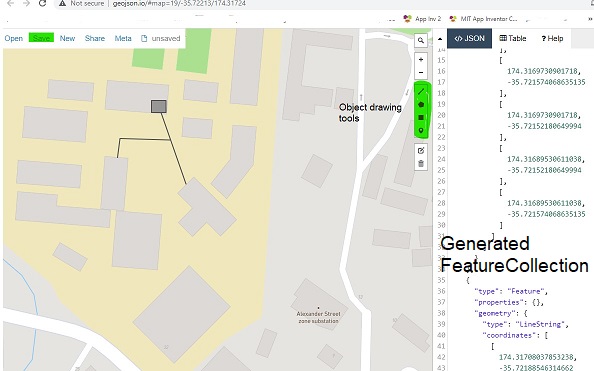
- Use the Web tool developed by the OpenStreetMap organization at geojson.io to create the overlay. Click the link and locate your campus or other place that requires more map detail. You can move the map around and use the + icon (item #1 on the image below) to zoom in on the map. Item #2 is the tool's drawing controls.

- Draw the detailed features on the interactive map you want to display as an overlay. Use a polyline control to create LineStrings for paths and roadways. Use a polygon for Polygons to simulate buildings or rooms in a building. Use a rectangle for a Rectangle or use marker for a Marker or series of Markers. This is a simple drafting tool. See the Resources below for additional information about how to use the tool. Once you load the FeatureCollection into your Map object, the App Inventor 2 Designer is used to modify the objects (change the color of a Polygon, change line width etc. ). Do do not worry about your simple display; later, the tools in App Inventor can make the map 'pretty'. See Part II to this tutorial.
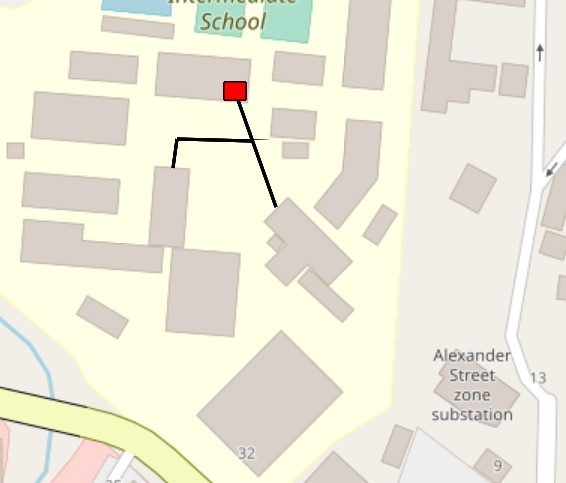
When later viewed on your device, the overlay will look like this:
-
Save and download the overlay file (the geojson default name is map.geojson). Use Save> GeoJSON from the drop down to download the map overlay to your desktop. You will later load the file into your Project.
-
Rename the map.geojson FeatureCollection file you just downloaded to your PC (perhaps myCampus.geojson or campusDetail.geojson). The name must contain .geojson .
Load the Map Overlay to your Project
- Start your map Project. Add a Map Component to your Project. Set the Map Properties Height and Width to Fill parent. Other properties will be set in Part II of the tutorial.

- Add a FeatureCollection object to the MIT Map component. Drag the FeatureCollection from the Maps Palette on to the Map display in the Designer.

-
Load the file that contains your feature overlay (myCampus.geojson or map.geosjson etc.) to Media (sometimes called Assets).
-
Set the FeatureCollection Source in the Properties using the Designer to the geojson file. A few seconds after you set the source, the Components panel will display FeatureCollection1 and under it the objects created when you made the overlay. What you see will depend on the geojson overlay you created.
-
Alternatively, set the FeatureCollection source using a File control when the geogson file resides in a different location than Media. This process is not described here.
-
The FeatureCollection does not automatically center in the Designer display. To view the FeatureCollection map features you just loaded in the Designer, enter latitude, longitude coordinates of the Feature Collection in the Properties CenterFromString. Revisit item #1, in this example those coordinates are: -35.72213,174.31724; your coordinates are determined by the location of the map overlay. You must provide the coordinates.
-
Forget to add a map object? Use the Designer to supplement the polygons and lines you placed with the geojson overlay as separate objects. See Maps .
A simple way to update your overlay is to load a previously created geojson (Open > File ) on the geojson web page; select the file to continue working on it. Save the modified FeatureCollection with a different name so you have a copy; then reload the new geojson into Media, replacing the existing file.
. Polygon1 and LineString1 and 2 are part of the overlay. Polygon2 was added using the Designer.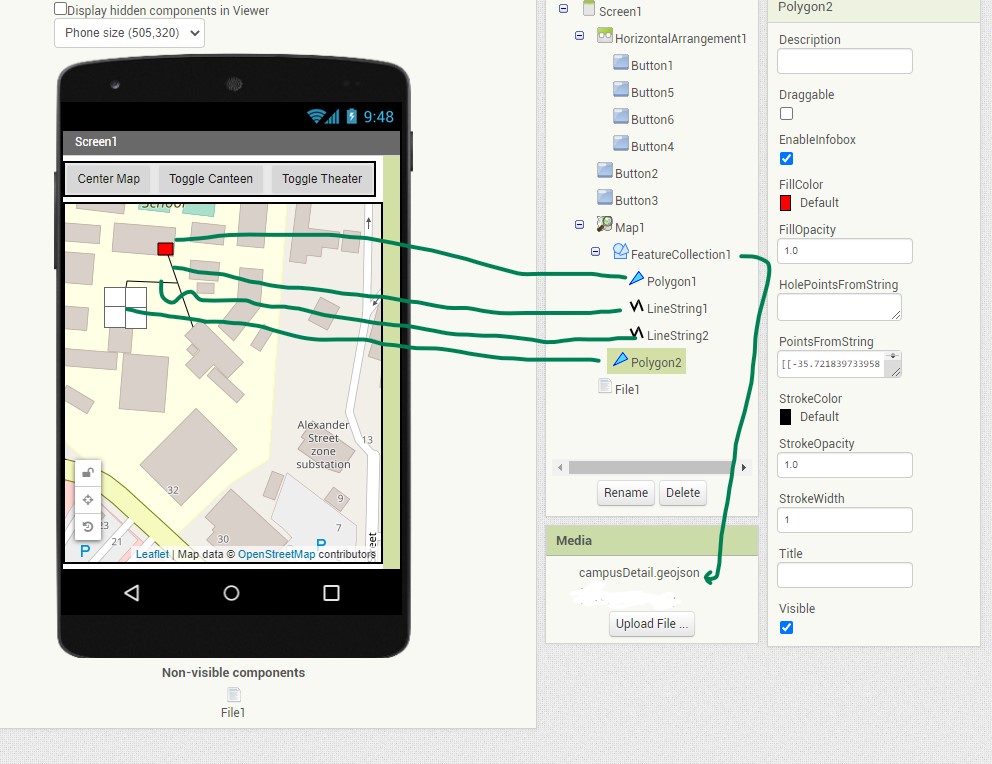
What next?
Part II Custom Map Overlay .. Show the user on a Custom Map Overlay and add map information to the Display
Requirements for Part II
- Your app will need either a WIFI or network connection to access the Internet to display the map and the user's location.
- gps hardware in the device
- a LocationSensor component
- no extensions required
- intermediate to advanced App Inventor coding skills
Reality check:
-
Navigating to display your location if your FeatureCollection polygons are inside a building with your Android device may not be possible. The GPS might not know where it is at while inside the building. Expect reduced gps Accuracy or the inability to achieve a satellite fix when inside a building unless the room has windows.
-
the Map control works using the server at OpenStreetMaps. This means the app requires either a WIFI connection or a cell network connection to access the Internet and the map.
-
during busy periods, the OSM server may be slow to render on your device. Sometimes the InfoBox pop up fails to display when an object is touched.
Just try again.
Resources:
FeatureCollection creation tool geojson.io is a tool for editing GeoJSON data on the internet. It enables editing through a map interface, raw GeoJSON. See the
About
How to know if your device is located within the bounds of a polygon.
Creating Feature Collection with the tool
Some neat tricks using the OSM overlay tool.
I hope you find this tutorial useful. Part II describes a small app to demonstrate the technique. The community has lots of posts to help you learn to use the Map tools.
Best regards and great coding, ![]()
--Steve
=====================================================