Bluetooth HC-06. Arduino. Send. Receive. Send text file. Multitouch. Image

13.- App moves a Stepper motor.

p9A0i_bluetooth_pasopaso.aia (3.1 KB)

  • In a servo you order:
    set 34º
    set 12º
    set 96º, it is not necessary to know the previous position.

  • In a stepper motor, you order:
    set 20 step clockwise
    set 80 step anticlockwise, it is necessary to know the previous position to place it in a new position.

  • I will use: Stepper motor 28BYJ-48 ULN2003

  • It is convenient to power this motor through an external source, in this experimental example I will feed it with the 5 V of Arduino.

// Juan A. Villalpando
// http://kio4.com/appinventor/9A0_Resumen_Bluetooth.htm

#include <Stepper.h>
#define STEPS 64

// Secuencia 1-3-2-4
Stepper motor(STEPS, 8, 10, 9, 11); 

char caracter;
void setup() { 
Serial.begin(9600);
motor.setSpeed(200);
}

void loop() { 
if( Serial.available() ) {
  caracter = Serial.read();
  Serial.print(caracter);
  if(caracter == '1'){motor.step(60);}
  if(caracter == '2'){motor.step(-60);}
  if(caracter == '3'){motor.step(510);}
  if(caracter == '4'){motor.step(-510);}
  if(caracter == '5'){motor.step(1020);}
  if(caracter == '6'){motor.step(-1020);}
  if(caracter == '7'){motor.step(2040);}
  if(caracter == '8'){motor.step(-2040);}
  
  if(caracter == 'A'){motor.step(100);}
  if(caracter == 'B'){motor.step(-100);}
  }
}
1 Like

14. Where do we connect the Bluetooth module in Arduino UNO?

p9A0i_bluetooth_Serial.aia (2.9 KB)

  • Terminals 0 (RX) and 1 (TX) are used by Arduino as the default Serial RX/TX. Use it to upload sketch, Serial Monitor, Bluetooth. So when we are going to upload a sketch for Bluetooth we must disconnect the RX cable from the Arduino.

  • We can use other terminals to connect the Bluetooth module, for example 10 and 11, in this case we need the “SoftwareSerial” library. Now when we upload a sketch it is not necessary to remove the RX cable.

- CODE FOR MODULE IN default RX/TX pin 0 and 1 of Arduino.

// Juan A. Villalpando
// http://kio4.com/appinventor/9A0_Resumen_Bluetooth.htm

#define Pin13  13
char caracter;

void setup() { 
  Serial.begin(9600);
  pinMode(Pin13, OUTPUT); 
}

void loop() { 
  if(Serial.available()) {
    caracter = Serial.read();
    if(caracter == 'a'){ digitalWrite(Pin13, HIGH);}
    if(caracter == 'b'){ digitalWrite(Pin13, LOW);}
    Serial.println(caracter);
  } 
} 

- CODE FOR MODULE IN pin10 and pin11 with SoftwareSerial library.

// Juan A. Villalpando
// http://kio4.com/appinventor/9A0_Resumen_Bluetooth.htm

#include <SoftwareSerial.h>
SoftwareSerial I2CBT(10,11);
// El TX del módulo BT va al pin10 del Arduino
// El RX del módulo BT va al pin11 del Arduino

#define Pin13  13
char caracter;

void setup() { 
  I2CBT.begin(9600); // To read and write Bluetooth
  Serial.begin(9600); // To print in Serial Monitor
  pinMode(Pin13, OUTPUT); 
}

void loop() { 
  if(I2CBT.available()) {
    caracter = I2CBT.read();
    if(caracter == 'a'){ digitalWrite(Pin13, HIGH);}
    if(caracter == 'b'){ digitalWrite(Pin13, LOW);}
    Serial.println(caracter); // Serial Monitor
    I2CBT.println(caracter);  // return Bluetooth
    //  I2CBT.write(caracter);  // return Bluetooth
  } 
} 
2 Likes

15.- Send text file from Server to Client and from Client to Server. Message Mobile to Mobile by Bluetooth.

p9A0i_BT_Server_File.aia (3.3 KB)

p9A0i_BT_Client_File.aia (3.4 KB)

- Blocks Server.

- Blocks Client.

2 Likes

16.- Send Image file from Server to Client and from Client to Server.

This example is only experimental, there are problems with file size, clock interval, conversion … Try.

p9A0i_BT_Server_Image.aia (41.9 KB)

p9A0i_BT_Client_Image.aia (55.6 KB)

- Blocks Server.

- Blocks Client.

1 Like

17.- Write number with KeyPad in Arduino and sends to App by Bluetooth. LCD I2C.

p9A0i_bluetooth_teclado.aia (1.8 MB)

  • Write number with KeyPad + I2C: 123, 4567, 89, 61 then write # (as ENTER)
  • That number is displayed on the I2C LCD and is sent via Bluetooth.
  • Depending on the number sent, the image of a monkey, lion, bear or martians will be displayed in App.

// Juan A. Villalpando
// http://kio4.com/appinventor/9BA_bluetooth_teclado_LCD.htm

#include <Wire.h>
#include <Keypad_I2C.h>
// Pantalla LCD
#include <LiquidCrystal_I2C.h>
LiquidCrystal_I2C lcd(0x27, 2, 1, 0, 4, 5, 6, 7, 3, POSITIVE);
// LiquidCrystal_I2C lcd(0x3F, 2, 1, 0, 4, 5, 6, 7, 3, POSITIVE);

String clave = "";
String clave_old = "";

const byte ROWS = 4;
const byte COLS = 4;

char keys[ROWS][COLS] = {
  {'1', '2', '3', 'A'},
  {'4', '5', '6', 'B'},
  {'7', '8', '9', 'C'},
  {'*', '0', '#', 'D'}
};

byte rowPins[ROWS] = {0, 1, 2, 3};
byte colPins[COLS] = {4, 5, 6, 7};

int i2caddress = 0x20; // Module I2C Keyboard.

Keypad_I2C kpd = Keypad_I2C( makeKeymap(keys), rowPins, colPins, ROWS, COLS, i2caddress);

void setup() {
  Serial.begin(9600);
  kpd.begin();
  lcd.begin(16,2);// Columnas y filas de LCD.
 
}

void loop() {
  char key = kpd.getKey();
  clave = clave + (String) key;
  if (key == '#') {
    clave = clave.substring(0, clave.length() - 1); // Delete last char #   
    lcd.clear();
    lcd.setCursor(0,0);
    lcd.print(clave);
    lcd.setCursor(0,1);
    lcd.print(clave_old);
    clave_old = clave;
    Serial.println(clave);
    clave = "";
  }
  delay(100);
}

1 Like

18.- Poor man’s circuit.

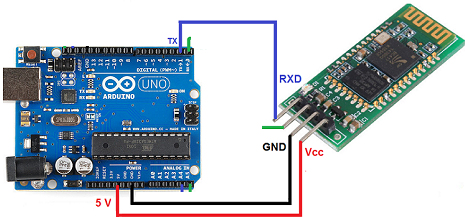
  • In the example above, the poor man has no LCD, no I2C module, and no KeyPad.
  • Remove the wire from terminal 0 of the Arduino.

bt_48

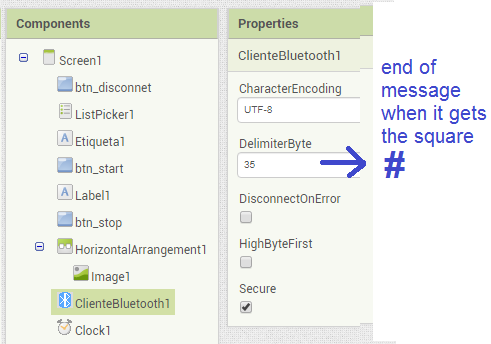
  • In Design, DelimiterByte = 35 (it is #)
    bt_46
// Juan A. Villalpando
// http://kio4.com/appinventor/9BA_bluetooth_teclado_LCD.htm

char key = 0;
String clave = "";

void setup() {
Serial.begin(9600);
}

void loop() {
if (Serial.available() > 0) {
  key = Serial.read();
  clave = clave + key;
      if (key == '#') {
        Serial.print(clave);
        // Example sends: 123#
        clave = ""; 
      }
  }
}
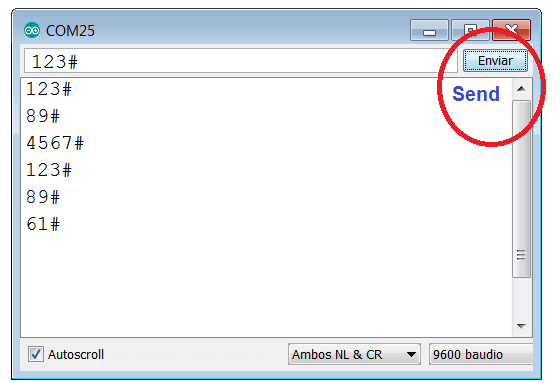
  • Now in Serial Monitor write number, 123#

bt_47

2 Likes

19.- Arduino Interrupts sends data to App.

p9A01_bluetooth_interrupt.aia (2.3 KB)


// Juan A. Villalpando
// http://kio4.com/appinventor/9A0_Resumen_Bluetooth.htm

#define LED13 13

void setup()
{
  Serial.begin(9600);
  attachInterrupt(digitalPinToInterrupt(2), on_13, RISING);
  attachInterrupt(digitalPinToInterrupt(3), off_13, RISING);
  pinMode(LED13, OUTPUT);
}

void loop()
{
  // 
}

 // Interruptions ISR.
void on_13() // When pin2 RISING...
{
   digitalWrite(LED13, HIGH);
   Serial.print(1);
}

void off_13()  // When pin3 RISING...
{
   digitalWrite(LED13, LOW);
   Serial.print(0);
}
1 Like

20.- Get message when Bluetooth has disconnection failure.

p9A01_bluetooth_faliure.aia (4.0 KB)

  • Arduino sends random numbers to App:
// Juan A. Villalpando
// http://kio4.com/appinventor/9A0_Resumen_Bluetooth.htm

int aleatorio;

void setup() { 
  Serial.begin(9600);
}

void loop() { 
    aleatorio = random(0,100);
    Serial.println(aleatorio);
    delay(400); // Clock.Interval < delay Arduino
}
  • App receives those numbers and shows.

  • Disconnect the power cable from the Arduino.

  • You will get the approximate time of that disconnection.
    bt_52

  • In the previous blocks observe SendText = 3, this is dumb number, when that number is sent and the Bluetooth does not receive it, we get error 516: Unable to write: Broken pipe.

1 Like

21.- Arduino sends three random numbers to App.

p9A0i_bluetooth_aleatorios.aia (3.9 KB)

// Juan A. Villalpando
// http://kio4.com/appinventor/9A0_Resumen_Bluetooth.htm

int x;
int y;
int z;
String datos;

void setup() {
 Serial.begin(9600);
}

void loop() {
x = random(0, 10);
y = random(10, 100);
z = random(100,1000);
datos = (String) x + "," + (String) y + "," + (String) z;
Serial.println("Números aleatorios:");
Serial.println("Random numbers:");
Serial.println(datos);

delay(800);
}

Note that it only shows up when a list of 3 items arrives. Not shown:
Serial.println(“Números aleatorios:”);
Serial.println(“Random numbers:”);

22.- JoyStick in Arduino sends values. Move a ball.

p9A0_bluetooth_laberinto.aia (115.7 KB)

JoyStick Arduino.

// Juan A. Villalpando
// http://kio4.com/appinventor/9A0_Resumen_Bluetooth.htm

int x;
int y;
int c;
String datos;

void setup() {
 Serial.begin(9600);
 pinMode(2,INPUT_PULLUP);
}

void loop() {
  x = analogRead(A0);
  y = analogRead(A1);
  if (digitalRead(2) == HIGH){c=0;} else {c=1;}
  datos = (String) x + "," + (String) y + "," + (String) c;
  Serial.println(datos);
  delay(100);
}

Variables x,y: Ball.MoveTo and DrawLine.
Variable c: Canvas.Clear (when press JoyStick)

23.- Arduino sends random numbers every second and every two seconds.

p9A0i_bluetooth_aleatorio2.aia (3.4 KB)

// Juan A. Villalpando
// http://kio4.com/appinventor/9A0_Resumen_Bluetooth.htm

int alea_1;
int alea_2;
unsigned long tiempo_actual_1 = 0;
unsigned long tiempo_actual_2 = 0;

void setup() { 
  Serial.begin(9600);
}

void loop() {
  if((millis()-tiempo_actual_1)>= 1000){
          int alea_1 = random(0,100);
          tiempo_actual_1 = millis();
          Serial.println(String(alea_1));
  }
  if((millis()-tiempo_actual_2)>= 2000){
          int alea_2 = random(200,300);
          tiempo_actual_2 = millis();
          Serial.println(String(alea_2));
  }
} 

3 Likes

24.- Press a button continuously and send a character.

In this topic @Povilas_Kasparas, @Taifun and @ABG discuss how to send a character continuously while pressing a button.

char caracter;

 void setup(){  
  Serial.begin(9600);  
 } 
  
 void loop() { 
 if(Serial.available()) {
  caracter = Serial.read();
  Serial.println(caracter);
  }
}
1 Like

Thank you a lot saved me :slight_smile:

25.- Simulation of an arithmia.

p9BC_Bluetooth_ECGi.aia (12.4 KB)

Arduino sends a random level (90...100), with a random delay (400...1600)
appinventor_ECG

void setup(){
  Serial.begin(9600);
}

void loop(){
      int nivel = random(90,100);
      int ritmo = random(400,1600);
      delay(ritmo);
      String mensaje = (String) nivel + "," + (String) ritmo;
      Serial.println(mensaje);
}

App Receives Text (98,977), gets the level (98) and draws it on a Canvas.

For a more realistic process, use the module AD8232

Here in Spanish:
http://kio4.com/appinventor/9BC_bluetooth_corazon.htm

26.- App sends text. readStringUntil. readString.

p9A1_bluetooth_textoi.aia (2.2 KB)

bluetooth_enviartexto1

1.- readStringUntil

char end_char = '\n';
String texto;

void setup() { 
Serial.begin(9600);
}

void loop() { 
  if(Serial.available()) {
    texto = Serial.readStringUntil(end_char);
    Serial.println(texto);
  }
}

ooooooooooooooOOOOOoooooooooooooo

2.- readString

String texto;

void setup() { 
Serial.begin(9600);
Serial.setTimeout(100);
}

void loop() { 
  if(Serial.available()) {
    texto = Serial.readString();
    Serial.println(texto);
  }
}

26B.- Example with readString. Return.
[Module Bluetooth in pin 2 and 3 of Arduino]

p9A1_bluetooth_textoi_2.aia (3.0 KB)

#include <SoftwareSerial.h>
SoftwareSerial Bluetooth(2,3);
String texto;

void setup() { 
Serial.begin(9600);
Bluetooth.begin(9600);
Bluetooth.setTimeout(100);
}

void loop() { 
  if(Bluetooth.available()) {
    // texto = Bluetooth.readStringUntil('\n');
    texto = Bluetooth.readString();
    Serial.println(texto);
    Bluetooth.println(texto);
  }
}

27.- App sends two values ​​separated by commas. Arduino adds them up and returns the sum.

p40i_bluetooth_deslizador.aia (3.5 KB)

bluetooth_deslizador12

  • App sends two comma separated values ​​created by two Sliders.

70.3,60.4

  • Arduino receives those values, separates them by comma, and adds them up.
    Using Serial.println(addition) returns the sum

130.70

String texto;
String a ;
String b;
float suma = 0.0;

void setup() { 
 Serial.begin(9600);
 Serial.setTimeout(200);
}

void loop() { 
  if(Serial.available()) {
    // texto = Serial.readString();
    // Serial.println(texto);
    a =  Serial.readStringUntil(',');
    b =  Serial.readStringUntil('\n');
    suma = a.toFloat() + b.toFloat();
   // Serial.println(a);
   // Serial.println(b);
    Serial.println(suma);
  }
} 
1 Like

28. Bluetooth in Screen1 and Screen2.

p9H4i_pantalla_real_BT.aia (8.7 KB)

When we change from Screen1 to Screen2, we lose the Bluetooth connection.
The proper method to avoid this is to use "virtual screens" with VerticalArrangement as we saw in the post: #12

Now let's see how we can go from Screen1 to Screen2 using the disconnection and connection in the new Screen.

To go from one Screen to another, we disconnect the current connection, when we start the visible Screen we reconnect.

I've put a little delay (for each 1 ... 10000) to make the connection easier.

The app is similar to the previous example, two Sliders send two numbers to the Arduino, it adds them and returns the sum to the app.

Screen1

Screen2

Arduino code.

  • The same from the previous post.
1 Like

Excellent collection of tutorials!!
Could you please post how to use textboxes in example 27, instead of using 2 sliders?
For example, how do we enter two decimal numbers in two separate textboxes and that would be sent to the Arduino? But only one or both textboxes can be used at any time to change the corresponding values of the variables in Arduino, with a single "Send" button in app for both textboxes.
Thank you for all your amazing work!

1 Like

29.- Send text from two TextBox.

p9A0i_bluetooth_TextBox2.aia (3.6 KB)

1 Like

Hi, your tutorials are very useful. I was able to finish a lot of projects thanks to this!

Now I'm stuck with my current project. I'm trying to analogRead from my ESP32, send that data via Bluetooth, and graph that signal in mitAppInventor. I need a sample frequency of around 500 samples per second. Is this possible with ESP32?

I checked your real time graph example, but I don't think it meets my time requirements. Maybe I should save the data to a .csv and then graph from there?

Once again, thank you so much for all your tutorials. They are super helpful!