(edit finished, linked to from FAQs on Javascript and Webview. - ABG...)
WebView Javascript Processor for App Inventor
This tutorial was originally written by Rich Interdonato, MIT Master Trainer and posted to https://appinventor.mit.edu/explore/ai2/webview-javascript
This revision uses the newer WebViewer.WebViewStringChange event and new (November 2020) Media file addressing for the webViewer component for simplicity. - ABG
App Inventor allows users to write powerful programs using blocks instead of traditional programming languages. It also allows advanced users to include traditional Java code in their apps by means of its new Extensions feature. What you might not know is that there is another, even older way for you to incorporate traditional programming into your apps. The technique involves using the WebViewer component as a javascript processor, and this blog post will show you how it can be done using a simple example. In it, an HTML file is sent input text from an App Inventor program, it reverses the text using javascript, and then it sends the result back to the App Inventor program as output that the app can use (show to the user in a Message Dialog). Our example requires an HTML file that includes javascript that can reverse text. The file is included below, and the javascript command that reverses the text is highlighted in yellow. The javascript in this file is like the other javascript you might find on the Web, except in one way. It includes two special App Inventor Only functions, window.AppInventor.getWebViewString() and window.AppInventor.setWebViewString(). It is these two, App Inventor Only functions that allow your apps to communicate with the javascript that runs inside the WebViewer component. By using them creatively, you can leverage the vast number of javascript programs that are freely available on the Web, and some of them can be really useful. For now, lets keep things simple and create a text file called javascriptWebViewProcessor.html. The complete text of the file follows:
HTML file (included as media/asset: javascriptWebViewProcessor.html)
<!doctype html>
 <head> <title>WebView Javascript Processor</title> </head>
 <body onload="processJavascript();">
<b>This page includes a javascript function that reverses text.</b>
<p>The javascript function incorporates a special App Inventor feature called
 <i>window.AppInventor.getWebViewString()</i>,
which allows App Inventor apps to communicate with
the WebViewer component's internal processing of javascript.
<p>This simple example shows how to use the
<i>window.AppInventor.getWebViewString()</i>
 function to pass data to and from the WebViewer component,
and thereby an App Inventor app.
<script> var result = new Date().toString();
 var appInventorInput = window.AppInventor.getWebViewString();
 function processJavascript() {
  if (appInventorInput.length > 0) {
    document.write( "WebView InputString received FROM app: " + appInventorInput );
    result = appInventorInput.split("").reverse().join("");
   document.write( "<p/>WebView InputString sending BACK TO app:<br/>" + result ); }
 else {
  document.write( "No WebView InputString set by app at: <br/>" + result ); }
 window.AppInventor.setWebViewString( result ); }
 </script>
</body>
</html>
javascriptWebViewProcessor.html.txt (1.2 KB) (drop the trailing .txt after downloading this and before uploading it to the Media folder. I had to add the .txt file name suffix to satisfy this board's file naming restrictions - ABG)
Once the javascriptWebViewProcessor.html has been created, make a new App Inventor app called SimpleWebviewerJavascriptProcessor, and upload the HTML file as an app media asset.
Designer
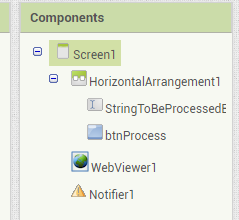
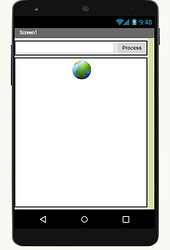
Add a HorizontalArrangement with a:
-
TextBox named StringToBeProcessedByJavascriptFile
-
Button named btnProcess
Also, using the default names and properties for each, add a:
- WebViewer component
- Notifier component
Blocks Overview
As you can see, the blocks for this app are quite simple. There are no variables and 2 event handlers. Each will be explained in individual sections.
Variables
With the availability of the WebViewer.WebViewStringChange event, there is no need for a Clock to poll for a change in the WebViewString value, or for variables to track the elapsed time. In the interest of simplicity, I have removed the Clock entirely, at the expense of removing the timeout capability of the original tutorial.
If you want timeout detection, add a Clock, set it to disabled and nonrepeating, and name it Timeout Clock, with duration equal to your patience in milliseconds. Have that Clock.Timer announce the timeout.
Also missing from this tutorial is the global debugMode variable, which was needed to address the html file in both the Companion and in Built apps. (Thanks to @TimAI2 for the new URI)
Initialization
This version leaves out the Screen1.Initialize block, with its former initialization of WebViewer1.HomeURL, deferring that to the btnProcess Click event. I did this because I noticed the WebViewer1.WebViewStringChange event firing at app startup, and wanted an easy way to avoid that.
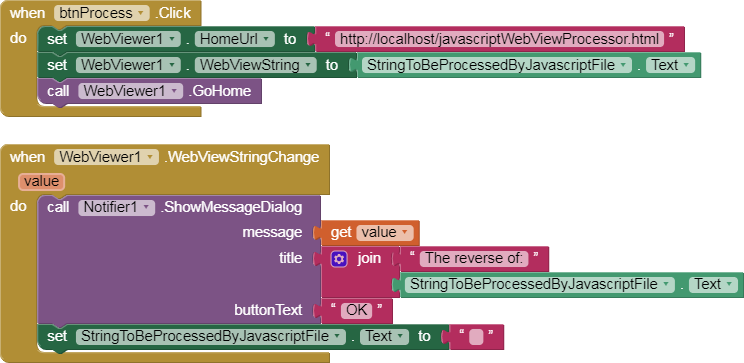
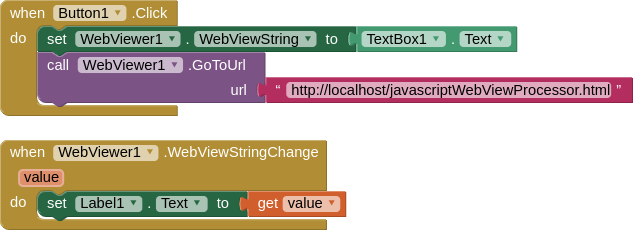
when btnProcess.Click
This block sets the
WebViewer1.HomeUrl property to
http://localhost/javascriptWebViewProcessor.html
The
javascriptWebViewProcessor.html file processing begins once the user activates the app. This activation is captured by the
btnProcess.Click event handler block, which sets the
WebViewer1.WebViewString component to the value of the
StringToBeProcessedByJavascriptFile.Text . Then the
WebViewer1.GoHome block is called, which causes the WebViewer to load the javascriptWebViewProcessor.html page, thereby starting the javascript processing.
when WebViewer1.WebViewStringChange
When the result is available from the WebViewer, the when WebViewer1.WebViewStringChange event will fire, to display a message to the user in a Message Dialog that includes the result of the javascript processing. The output of the processing is available to the app in the WebViewer1.WebViewString property, which is set inside the javascript processing file. Inside the event block, there is a variable value available with that value, for convenience.
The app will reset the StringToBeProcessedByJavascriptFile.Text to an empty string () to be ready for the next input
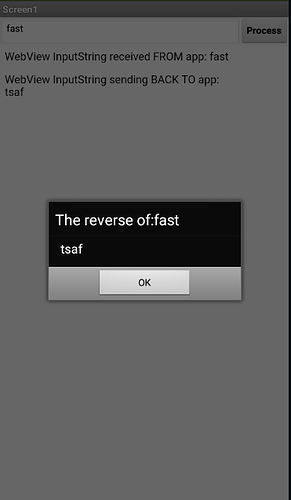
Test Runs
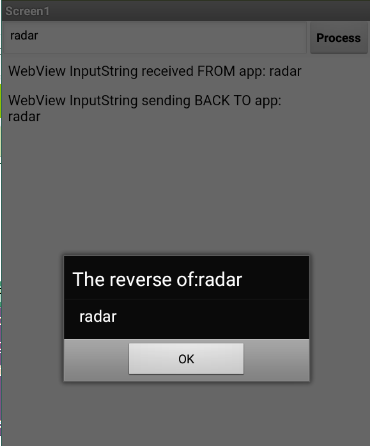
Conclusion
In this article, we have explored how the WebViewer component can be used to process javascript in your App Inventor apps. Our example was simple, but it demonstrated the fact that App Inventor can communicate with running javascript, and this provides you with a foundation for more advanced and useful javascript processing. There is a LOT of javascript code available on the web, and some of it can be used immediately by you to implement advanced features in your apps. In my next blog post, I will explore an advanced application of WebView javascript processing that you can use right away to freely make your apps much more secure. Until then, keep inventing!

 I had the same question in mind.
