/***********
Juan A. Villalpando
KIO4.COM
25/11/22
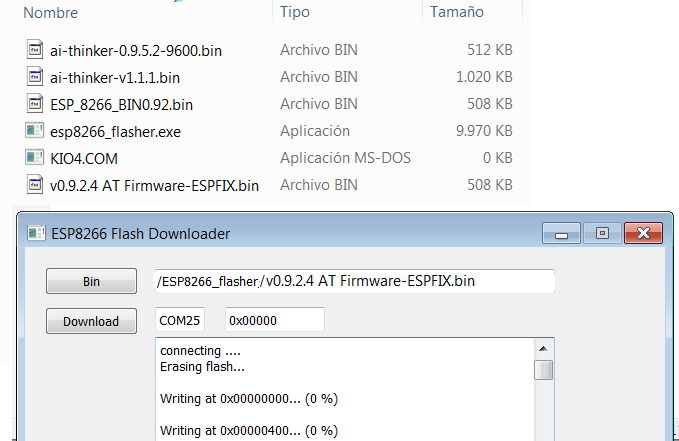
Version del módulo 9.2.4
Velocidad 9600
Carga el programa. Ve al Serial Monitor.
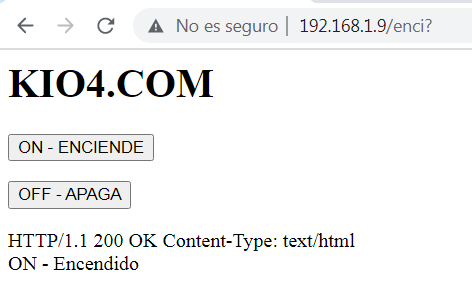
Escribe en un navegador 192.168.1.5
Pulsa los botones para encender o apagar el LED13 del Arduino.
***********/
#include <SoftwareSerial.h>
#define DEBUG true
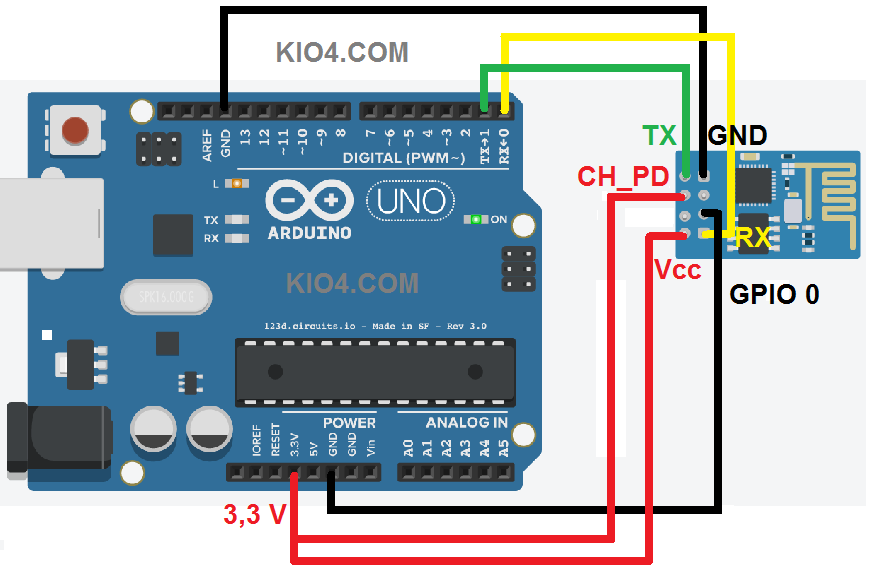
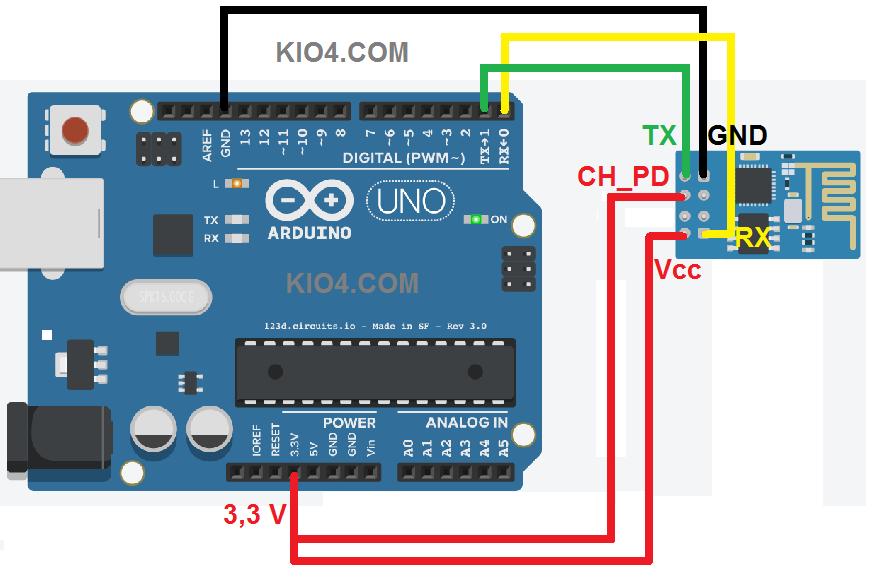
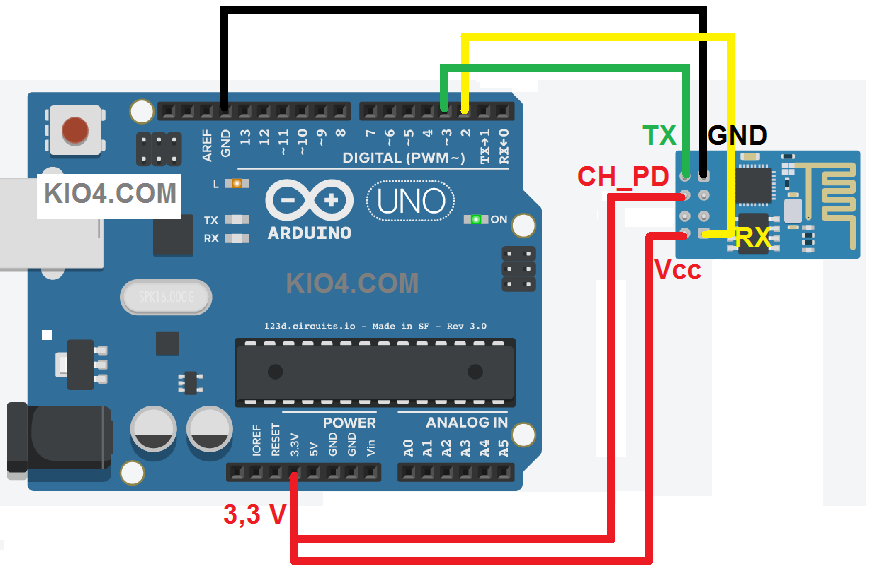
SoftwareSerial esp8266(3,2);
// El TX del módulo al terminal 3 del Arduino.
// El RX del módulo al terminal 2 del Arduino.
void setup()
{
pinMode(13,OUTPUT);
Serial.begin(9600);
esp8266.begin(9600); // Importante la velocidad del módulo.
sendData("AT+RST\r\n",2000,DEBUG); // Borra la configuración que tenía el módulo
sendData("AT+CWJAP=\"Nombre_de_tu_WiFi\",\"Clave_de_tu_WiFi\"\r\n", 2000, DEBUG);
delay(5000); // Espera un poco que conecte con el Router.
sendData("AT+CWMODE=3\r\n",1000,DEBUG); // Modo de cliente y servidor.
sendData("AT+CIFSR\r\n",1000,DEBUG); // En el Serial Monitor aparece la IP de cliente y servidor.
sendData("AT+CIPMUX=1\r\n",1000,DEBUG); // Multiples conexiones.
sendData("AT+CIPSERVER=1,80\r\n",1000,DEBUG); // El Puerto web es el 80
}
void loop(){
if(esp8266.available()) // Consulta si el módulo está enviando algún mensaje
{
if(esp8266.find("+IPD,"))
{
delay(500);
int connectionId = esp8266.read()-48;
// Aquí las construcción de la PAGINA WEB.
String webpage = "HTTP/1.1 200 OK\r\n Content-Type: text/html\r\n\r\n\r\n";
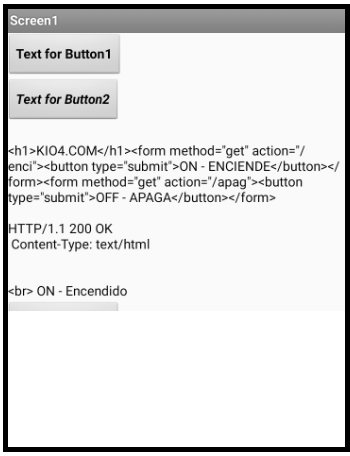
webpage += "<h1>KIO4.COM</h1>";
webpage += "<form method=\"get\" action=\"/enci\">";
webpage += "<button type=\"submit\">ON - ENCIENDE</button></form>";
webpage += "<form method=\"get\" action=\"/apag\">";
webpage += "<button type=\"submit\">OFF - APAGA</button></form>\r\n\r\n";
String cipSend = "AT+CIPSEND=";
cipSend += connectionId;
cipSend += ",";
cipSend +=webpage.length();
cipSend +="\r\n";
sendData(cipSend,500,DEBUG);
sendData(webpage,500,DEBUG);
// Lee el pin 13
int pin13 = digitalRead(13);
// Retorno de la lectura.
String retorno = "HTTP/1.1 200 OK\r\n Content-Type: text/html\r\n\r\n\r\n";
if (pin13 == 1) {retorno += "<br> ON - Encendido";}
if (pin13 == 0) {retorno += "<br> OFF - Apagado";}
// ResponseCode App Inventor
cipSend = "AT+CIPSEND=";
cipSend += connectionId;
cipSend += ",";
cipSend += retorno.length();
cipSend +="\r\n";
sendData(cipSend,500,DEBUG);
sendData(retorno,500,DEBUG);
// Cierra la conexión
String closeCommand = "AT+CIPCLOSE=";
closeCommand+=connectionId;
closeCommand+="\r\n";
sendData(closeCommand,500,DEBUG);
}
}
}
// Función para Enviar datos al Servidor.
String sendData(String command, const int timeout, boolean debug){
String response = "";
esp8266.print(command); // Envía la información de command al servidor
long int time = millis();
while( (time+timeout) > millis())
{
while(esp8266.available())
{
// A response van los datos que regresan al servidor.
char c = esp8266.read(); // Va leyendo caracter a caracter.
response+=c;
// Consulta si en la información que regresa al servidor
// viene "GET /enci" o "GET /apag"
// Encenderá o apagará el LED13 del Arduino
if(response.indexOf("GET /enci") >0){
// Serial.print("enciende");
digitalWrite(13,HIGH);
}
if(response.indexOf("GET /apag") >0){
//Serial.print("apaga");
digitalWrite(13,LOW);
}
}
}
if(debug)
{
Serial.print(response);
}
return response;
}
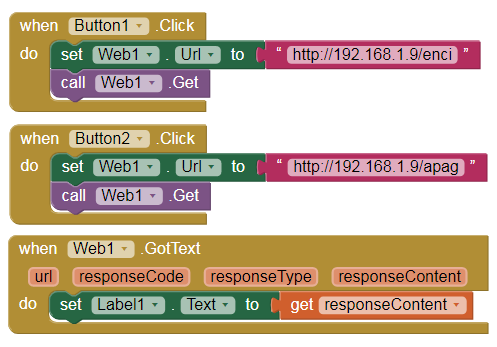
We can turn on/off the LED13 of the Arduino through an app with the Web component or through a web page.
In order for the Web component's GotText event to recognize the responseContent, Sketch needs to send an HTTP header.
The Sketch shown is didactic, note that the HTTP header is sent twice, also note that the app receives the source code of the web page, you can modify and improve it.
In this example, the ESP8266-01 works as a client of a local WiFi network.
Note that the Sketch has several delays of 500 ms, so we must wait about 6 seconds to make the changes.
// http://kio4.com/arduino/57modulowifi_2.htm
// Juan A. Villalpando
#include <SoftwareSerial.h>
SoftwareSerial esp8266(3,2);
// El TX del módulo al terminal 3 del Arduino.
// El RX del módulo al terminal 2 del Arduino.
int random_1 = 10;
int random_2 = 50;
String random_out = "0,0";
String input_data = "";
String fin = "";
void setup(){
randomSeed(analogRead(A0));
Serial.begin(9600);
esp8266.begin(9600);
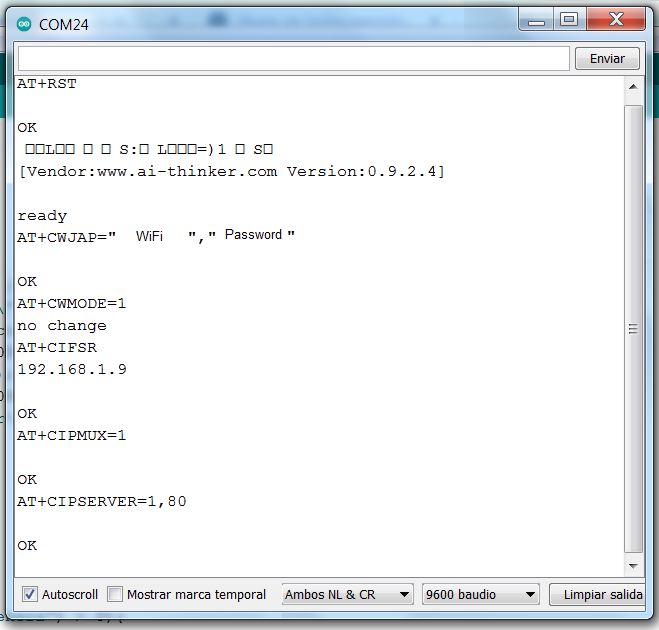
sendData("AT+RST\r\n",2000); // Borra la configuración que tenía el módulo
sendData("AT+CWJAP=\"Nombre_de_tu_WiFi\",\"Clave_de_tu_WiFi\"\r\n", 2000);
delay(10000); // Espera un poco que conecte con el Router.
sendData("AT+CWMODE=1\r\n",1000); // Modo de cliente del Router.
sendData("AT+CIFSR\r\n",1000); // En el Serial Monitor aparece la IP del Servidor Web.
sendData("AT+CIPMUX=1\r\n",1000); // Multiples conexiones.
sendData("AT+CIPSERVER=1,80\r\n",1000); // Crea Servidor Web, puerto 80
}
void loop(){
if(esp8266.available()){
while(esp8266.available()){
char c = esp8266.read();
input_data += c;
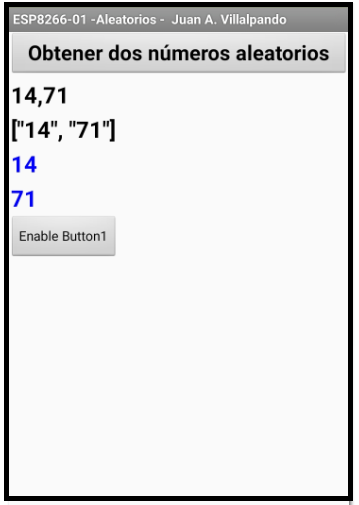
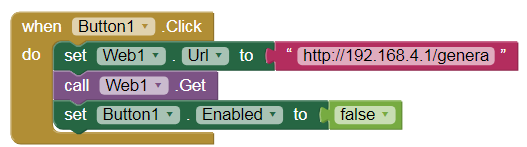
if(input_data.indexOf("genera") > 0){
random_1 = random(10,50);
random_2 = random(50,99);
random_out = (String) random_1 + "," + (String) random_2;
input_data = "";
fin = "finalizado";
}
}
}
// Return responseContent
if(fin == "finalizado"){
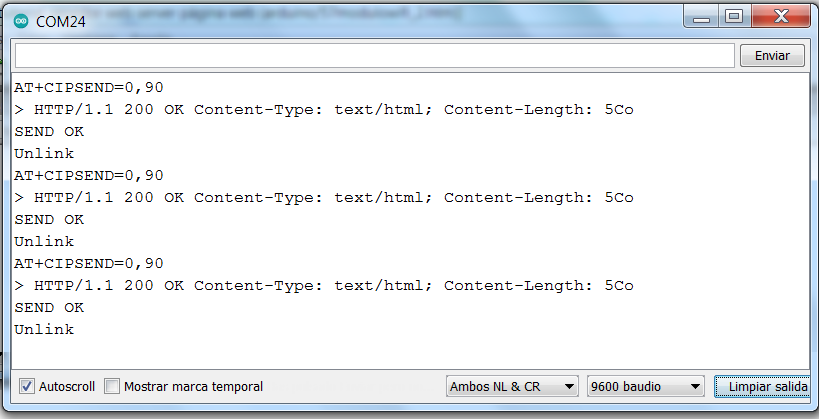
String header = "HTTP/1.1 200 OK\r\n Content-Type: text/html; \r\n";
header += "Content-Length: ";
header += random_out.length();
header += "\r\nConnection: close\r\n\r\n";
header += random_out;
sendData("AT+CIPSEND=" + String(0) + "," + header.length() + "\r\n", 500);
sendData(header,1000);
// sendData ("AT+CIPCLOSE=" + String(0) + "\r\n", 1000);
fin = "";
}
}
// Envia datos al servidor y recibe la respuesta de los AT.
String sendData(String command, const int timeout){
String response = "";
esp8266.print(command); // Envía la información de command al servidor
long int time = millis();
while( (time+timeout) > millis()){
while(esp8266.available()){
// A response van los datos que regresan al servidor.
char c = esp8266.read(); // Va leyendo caracter a caracter.
response+=c;
}
}
Serial.print(response);
return response; // Devuelve la respuesta del AT
}
It took me a while to figure out how the web server "knew" to work off IP address 192.168.1.9, but then I saw it in the COM24 log as the result of the AT+CIFSR command, and I imagine you read that output to get the IP address hard coded into the AI2 app.
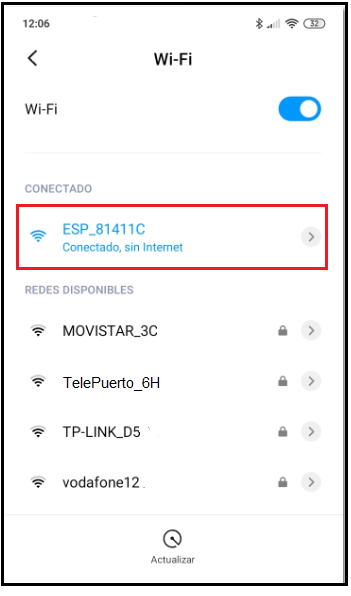
Now we are going to carry out the previous example but we will create an Access Point (SoftAP - Soft Access Point), that is, the module will create a network independent from the Router, it will not be connected to the Router.
The code will create a network called ESP_81411C and the Web Server will have as IP: 192.168.4.1
For this we will change these lines...
void setup(){
  randomSeed(analogRead(A0));
  Serial.begin(9600);
  esp8266.begin(9600);

  sendData("AT+RST\r\n",2000); // Borra la configuración que tenía el módulo
  // sendData("AT+CWJAP=\"Nombre_de_tu_WiFi\",\"Clave_de_tu_WiFi\"\r\n", 2000);
  // delay(10000); // Espera un poco que conecte con el Router.
  sendData("AT+CWMODE=2\r\n",1000); // NOW IS A SOFT ACCESS POINT, MODE = 2
  sendData("AT+CIFSR\r\n",1000); // En el Serial Monitor aparece la IP del Servidor Web. (192.168.4.1)
  sendData("AT+CIPMUX=1\r\n",1000); // Multiples conexiones.
  sendData("AT+CIPSERVER=1,80\r\n",1000); // Crea Servidor Web, puerto 80
}
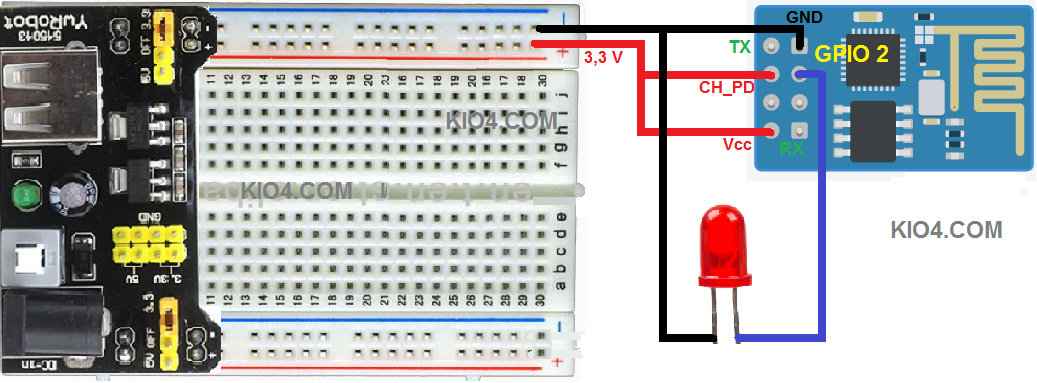
8.- Standalone (without Arduino). Turn LED on/off.
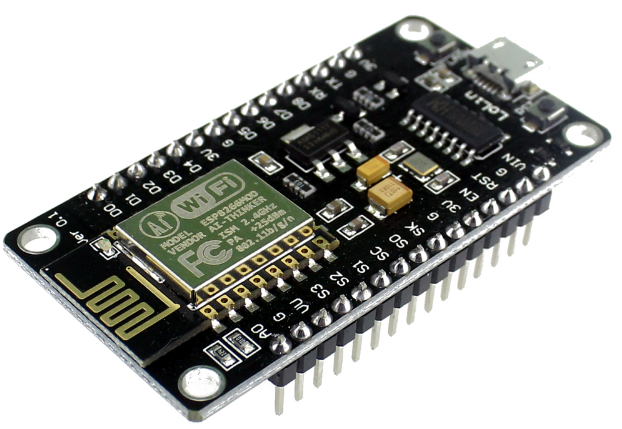
The ESP8266-01 can work without being connected to the Arduino, this is called standalone.
We are going to create a Web Server that will be a client of a Router, for this we will not use the AT commands that we have seen previously, but the "<ESP8266WiFi.h>" library.
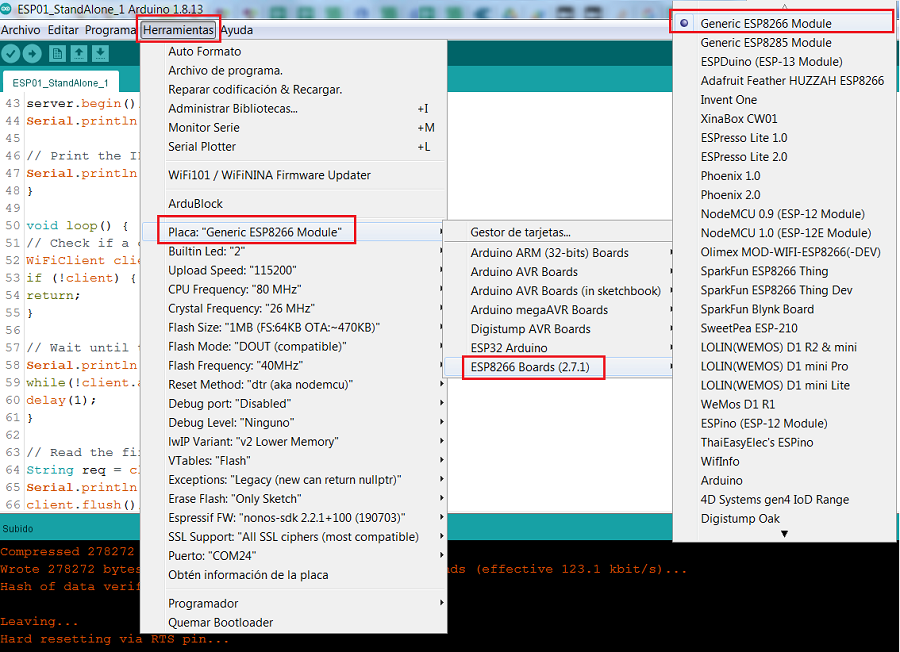
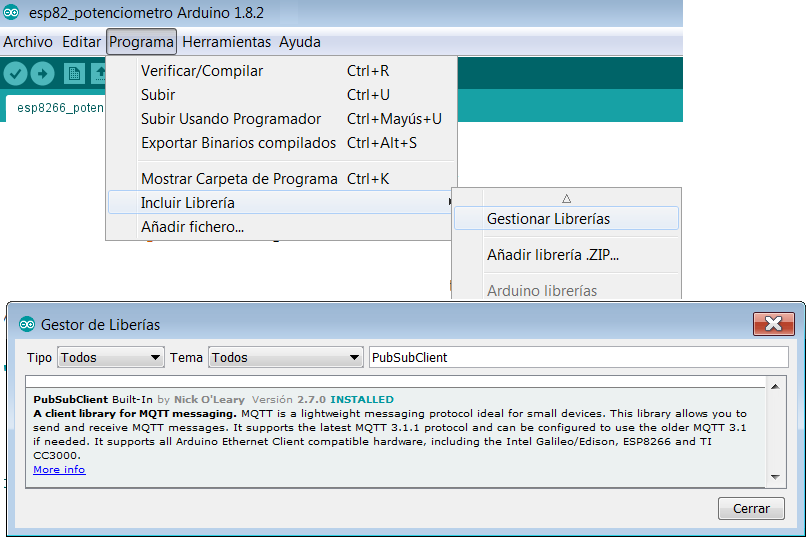
To load the Sketch in the ESP8266-01 we will use the Arduino
3.- Remove the Serial Monitor, in case you have it open.
4.- We load this sketch in the IDE and upload it...
It is convenient from time to time to remove the power from the ESP8266 and put it back if it does not load well.
Summary
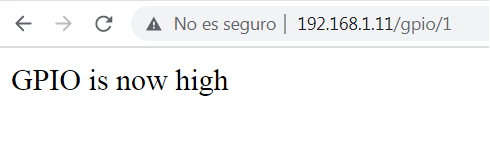
/*
 *  This sketch demonstrates how to set up a simple HTTP-like server.
 *  The server will set a GPIO pin depending on the request
 *    http://server_ip/gpio/0 will set the GPIO2 low,
 *    http://server_ip/gpio/1 will set the GPIO2 high
 *  server_ip is the IP address of the ESP8266 module, will be
 *  printed to Serial when the module is connected.
 */

#include <ESP8266WiFi.h>

const char* ssid = "nombredemirouter";
const char* password = "contraseñadelrouter";

// Create an instance of the server
// specify the port to listen on as an argument
WiFiServer server(80);

void setup() {
Serial.begin(9600);
delay(1500);

// prepare GPIO2
pinMode(2, OUTPUT);
digitalWrite(2, LOW);

// Connect to WiFi network
Serial.println();
Serial.println();
Serial.print("Connecting to ");
Serial.println(ssid);

WiFi.begin(ssid, password);

while (WiFi.status() != WL_CONNECTED) {
delay(500);
Serial.print(".");
}
Serial.println("");
Serial.println("WiFi connected");

// Start the server
server.begin();
Serial.println("Server started");

// Print the IP address
Serial.println(WiFi.localIP());
}

void loop() {
// Check if a client has connected
WiFiClient client = server.available();
if (!client) {
return;
}

// Wait until the client sends some data
Serial.println("new client");
while(!client.available()){
delay(1);
}

// Read the first line of the request
String req = client.readStringUntil('\r');
Serial.println(req);
client.flush();

// Match the request
int val;
if (req.indexOf("/gpio/0") != -1)
val = 0;
else if (req.indexOf("/gpio/1") != -1)
val = 1;
else {
Serial.println("invalid request");
client.stop();
return;
}

// Set GPIO2 according to the request
digitalWrite(2, val);

client.flush();

// Prepare the response
String s = "HTTP/1.1 200 OK\r\nContent-Type: text/html\r\n\r\n<!DOCTYPE HTML>\r\n<html>\r\nGPIO is now ";
s += (val)?"high":"low";
s += "</html>\n";

// Send the response to the client
client.print(s);
delay(1);
Serial.println("Client disonnected");

// The client will actually be disconnected
// when the function returns and 'client' object is detroyed
}
5.- When there is upload, remove the GPIO 0 to GND cable and open the Serial Monitor. Restart.
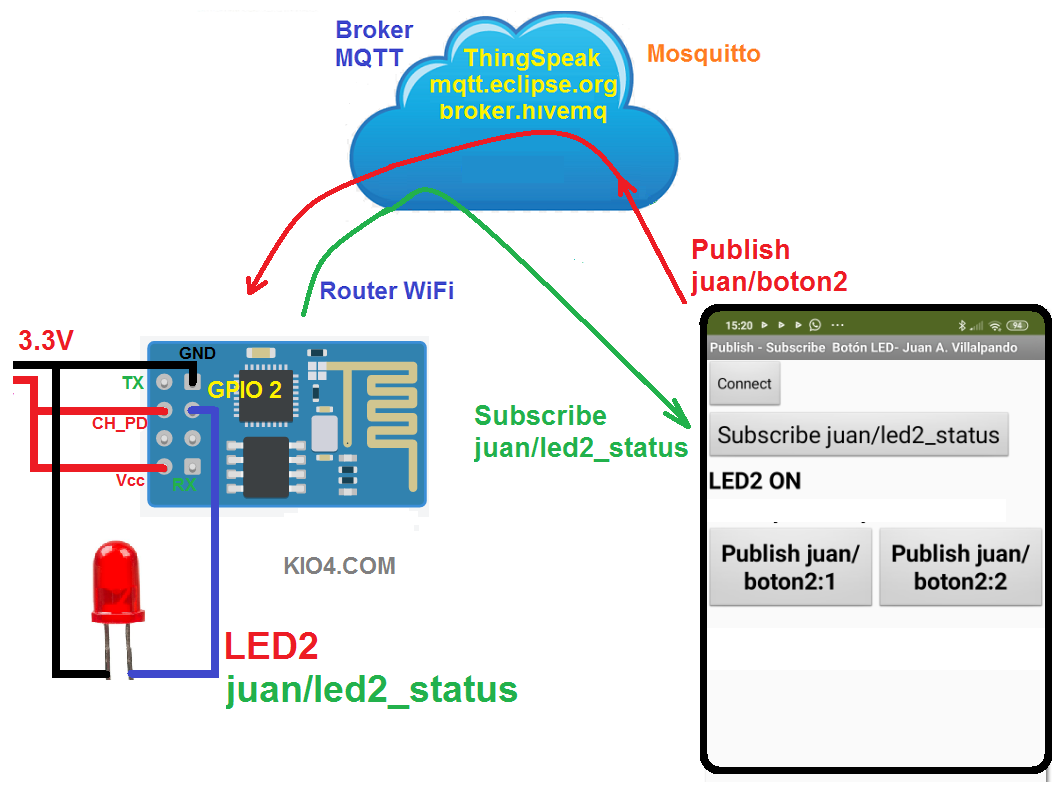
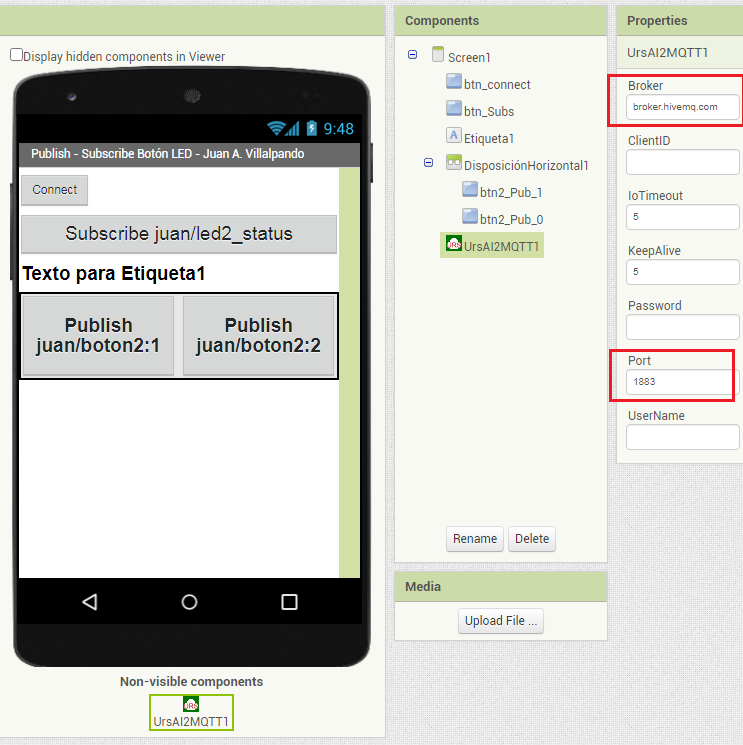
10.- Turn on/off a LED from the Internet. MQTT. Standalone.
MQTT is a protocol used in IOT to control a device from the Internet.
In this example we will turn LED2 on/off from our mobile connected to the Internet. We can also check the status.
For this you need a server on the internet, in the cloud, this server is called a Broker, there are many paid and free ones, we can also create our own on a Raspberry Pi with Mosquitto.
In this example we will use the free broker broker.hivemq.com and port 1883, no registration is required.