Hello friends,
In this topic I discussed some radio frequency devices:
https://community.appinventor.mit.edu/t/radio-frequency-modules-arduino-bluetooth-hc-06-fm/24346
I am now going to use two HC-12 modules with various updated codes.
HC-12 works with radio frequencies but is not Bluetooth.
With these modules it is possible to send information to more than 1600 meters (1 mile).
- 433 MHz
- Maximum transmit power: 20 dBm (100 mW), receive sensitivity: -129 dBm.
- 100 channels spaced 400 kHz.
- Range, about 1000 m, outdoor.
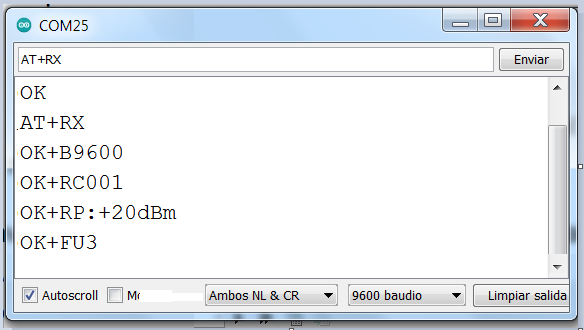
- Its parameters can be changed using AT commands:
AT
AT+RX
AT+V
AT+C021
AT+B9600
AT+FU3
4 modes of operation:
FU1
FU2
FU3 (default, 1200bps ~ 1000 m, 115200bps ~ 100 m)
FU4 (only small packets can be sent: max 60 bytes with the interval of 2 seconds. In this mode, range is increased to 1800m.)
You can find many tutorials on this module on the internet:
https://quadmeup.com/hc-12-433mhz-wireless-serial-communication-module-configuration/
DataSheet.
In this test they achieve a range of more than a mile: https://www.youtube.com/watch?v=awOPJK5He28
In these examples we will use the FU3 mode and default settings.
Let's go!
1 Like
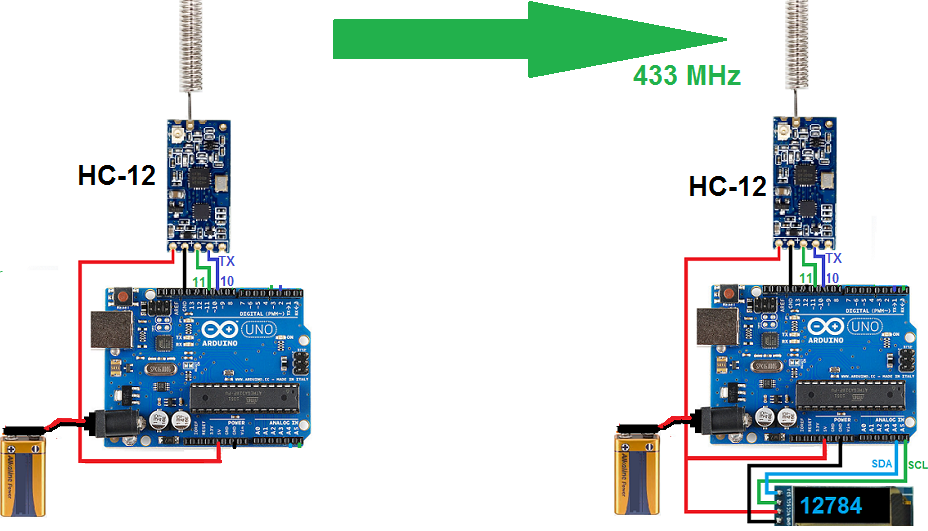
1.- With two Arduinos.
- Arduino_sender sends a continuous sequence of numbers to Arduino_receiver.
- We can see the information received on the Serial Monitor or on an OLED screen.
- U8g2 OLED Library.
arduino_sender.ino
#include <SoftwareSerial.h>
SoftwareSerial HC12(10,11); // TX to pin_10. RX to pin_11 of Arduino.

int x = 100;
unsigned long previousMillis = 0;
const long interval = 1000;

void setup() {
 HC12.begin(9600);
}

void loop() {
  unsigned long currentMillis = millis();
  if (currentMillis - previousMillis >= interval) {
      previousMillis = currentMillis;
      x = x + 1;
      HC12.println(x);
  }
}
arduino_receiver.ino
#include <SoftwareSerial.h>
SoftwareSerial HC12(10, 11); // TX to pin_10. RX to pin_11 of Arduino.

#include <U8g2lib.h>
U8G2_SSD1306_128X32_UNIVISION_F_HW_I2C u8g2(U8G2_R0);

void setup() {
 Serial.begin(9600);
 HC12.begin(9600);

 u8g2.begin();
 u8g2.clearBuffer();
 u8g2.setFont(u8g2_font_logisoso28_tr);
 u8g2.drawStr(30,31,"****");
 u8g2.sendBuffer();
}

void loop() {
  if(HC12.available()) {
  String texto = HC12.readStringUntil('\n');
  Serial.println(texto);

  u8g2.clearBuffer();
  u8g2.setFont(u8g2_font_logisoso28_tr);
  u8g2.drawStr(30,31,texto.c_str());
  u8g2.sendBuffer();
  }
 }
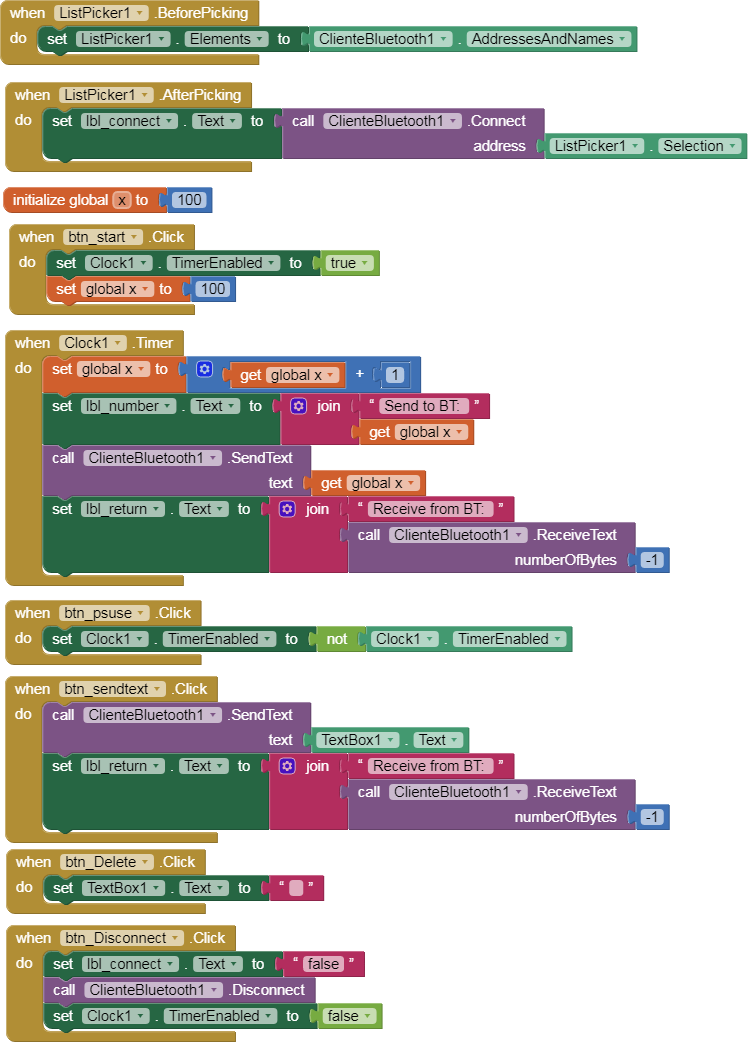
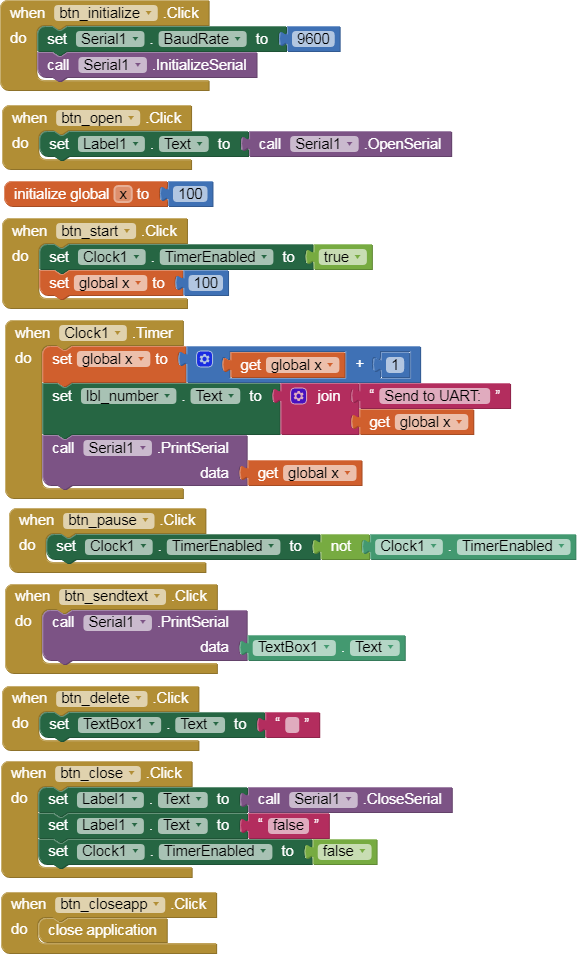
2.- App. Bluetooth. Arduino.
- App sends information via Bluetooth to the Arduino. Arduino transmits that information through the HC12.
- There is feedback from the Bluetooth module (but not from the receiving HC12).
arduino_bluetooth.ino
#include <SoftwareSerial.h>
SoftwareSerial HC12(10,11) ; // TX to pin_10. RX to pin_11 of Arduino.
SoftwareSerial BT(2,3) ; // TX to pin_2. RX to pin_3 of Arduino.

String texto;

void setup() {
 HC12.begin(9600);
 BT.begin(9600);
}

void loop() {
  if(BT.available()) {
    texto = BT.readStringUntil('\n');
    BT.println(texto); // Return to app
    HC12.println(texto); //  HC-12 sends texto.
  }
}
arduino_receiver.ino
[The same code from the previous post.]
- App Inventor.
p9AAi_bluetooth_radiofrecuencia_2.aia (3.7 KB)
1 Like
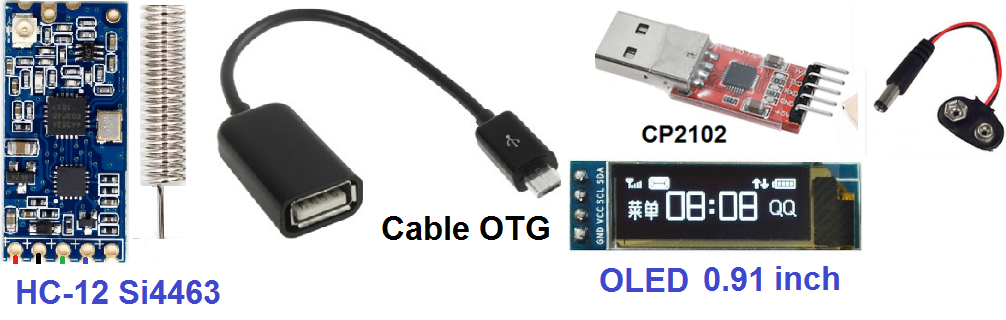
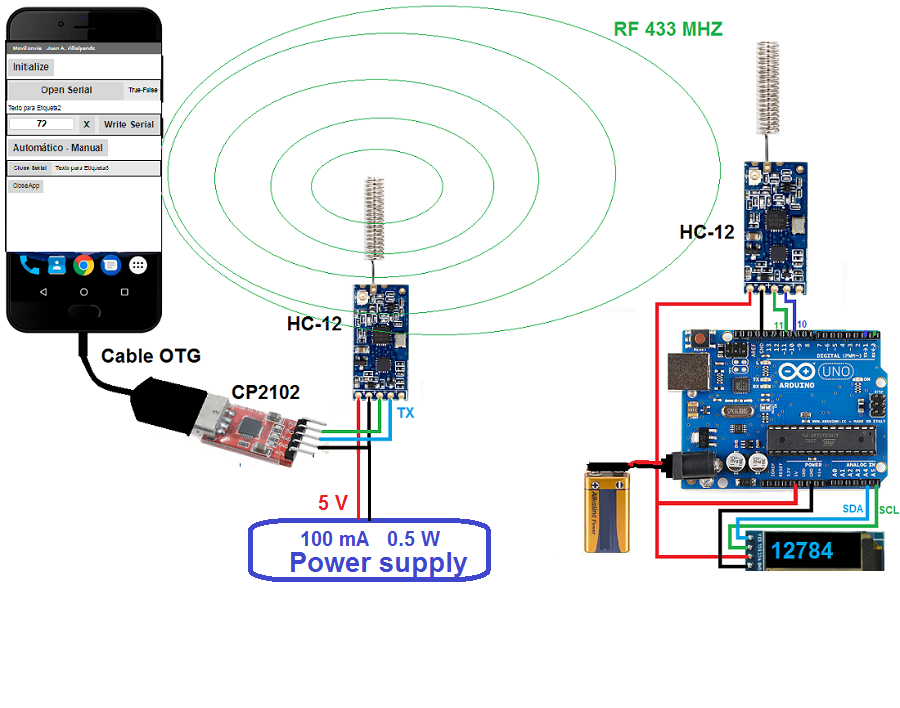
3.- App. OTG cable. UART CP2102. SerialOTG extension.
-
App sends information to the UART via the OTG cable. The UART passes the information to the HC-12 and the HC-12 transmits it.
-
We will use an OTG cable and a USB - UART (Rx/Tx) converter, CP2102.
-
I will use the Serial component (from Connectivity)
-
You can also use the extension: SerialOTG: https://github.com/rkl099/Appinventor-SerialOTG
- Note that the HC-12 module is powered by the phone, so it cannot reach a great distance, perhaps 100m.
- App Inventor.
p10A_OTG_CP2102_HC12_2.aia (192.2 KB)
arduino_receiver.ino
[The same code from the previous post.]
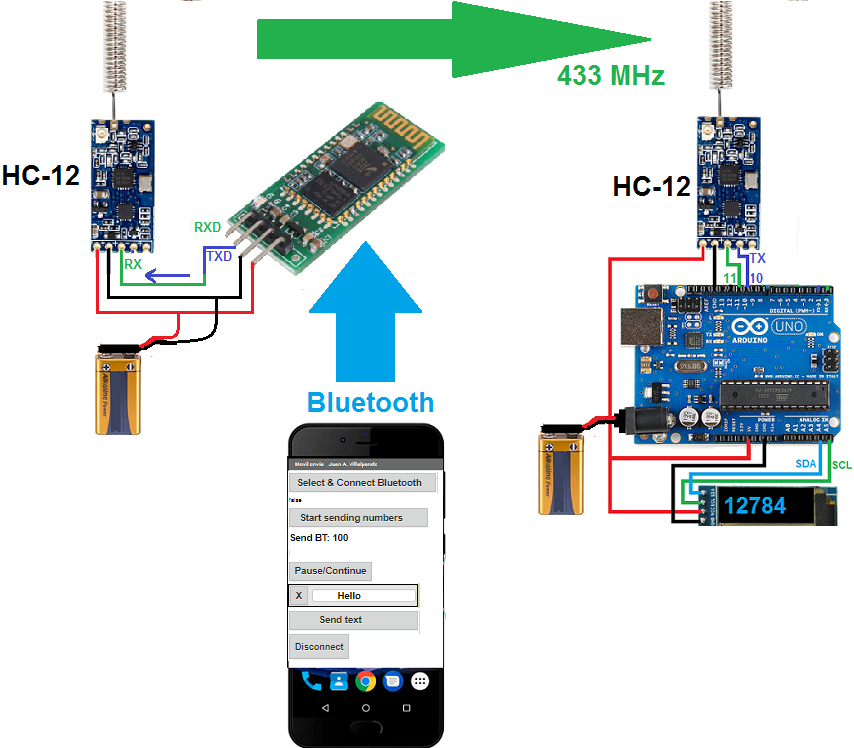
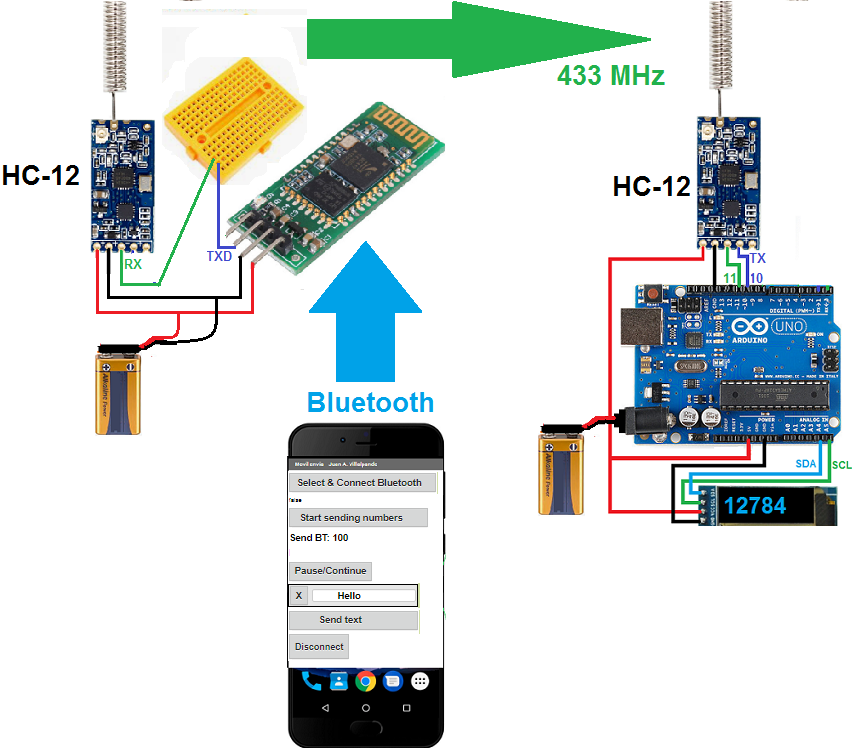
4.- Bluetooth module and HC-12 directly connected..
App sends information to the Bluetooth module, which passes it to the HC-12 that transmits it.
- App Inventor.
p9AAi_bluetooth_radiofrecuencia_3.aia (3.5 KB)
arduino_receiver.ino
[The same code from the previous post.]
-
Note in the schematic that only the information goes from the TXD of the Bluetooth module to the RX of the HC-12. There is no return of information, that's why I have not connected the RXD-TX cable.
-
The assembly of the schematic lost the connection after a few seconds, curiously it was fixed by connecting the cables to the protoboard as indicated in the following image, perhaps it is due to a capacitive coupling problem.
5.- Power supply. Power bank.
- To obtain a good range, it is convenient to power the HC-12 with an external voltage source that can supply 5 V and at least 0.5 W.
- Power bank it is a portable device that can store electricity for charging phones, cameras, laptop computers,
- I tried to power the HC-12 with a Power bank, but it shut down after a few seconds. Power banks have an auto-off system when they supply little current, that's why it turns off. There are tricks to avoid it.
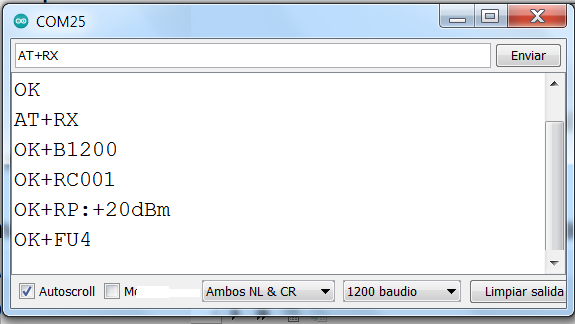
6.- More range. FU4 mode. AT commands.
- The greatest range 1800 m (1.1 mile) is obtained in FU4 mode.
To configure it in that mode, we connect the SET terminal to pin 9 of the Arduino and load the following code.
#include <SoftwareSerial.h>
SoftwareSerial HC12(10,11); // TX to pin_10. RX to pin_11 of Arduino.

void setup() {
  Serial.begin(9600); // 9600 viene por defecto. 1200 en modo FU4
  HC12.begin(9600);   // 9600 viene por defecto. 1200 en modo FU4
  pinMode(9, OUTPUT); // SET to pin_9 of Arduino.
}

void loop() {
    if(Serial.available()) {
    String command = Serial.readStringUntil('\n');
    digitalWrite(9, LOW);
    Serial.println(command);
    HC12.print(command);
    digitalWrite(9, HIGH);
    }

   if (HC12.available()){
   String retorno = HC12.readStringUntil('\n');
   Serial.println(retorno);
   }
}
AT
AT+RX
AT+FU4
AT+RX
7.- LORA. LONG RANGE. 15 km (9.3 miles).