Help Arduino Phone Connection

You could start by letting us know:

  1. The Make and exact Model of the Arduino;
  2. Since you are using the internet to communicate with the Admin phone, why not hook up the Arduino to receive via WiFi directly?

Thanks for the diagrams - it would be great to see more Forum Topics supported with diagrams, a picture paints a thousand words.

I'm using an Arduino Uno R3.

Regarding WiFi, I'm not opposed altogether, but I'm a newbie and I want to keep everything as simple as possible. I also didn't want to have to buy a WiFi module/shield. I already have the other components. And I was learning how to do just the user side before having to deal with figuring out how to connect via WiFi. Maybe it's just as simple a process as a cable?

Also, the Arduino and admin phone need to be able to communicate many miles apart.

Glad the diagrams are helpful. I tend to get lost with text descriptions alone.

Check information about ESP32, MQTT, CloudDB, ESP8266-01...

https://community.appinventor.mit.edu/t/esp32-wifi-webserver-led-on-off-static-ip-soft-access-point/9323

https://community.appinventor.mit.edu/t/esp32-mqtt-broker-publish-subscribe-thingspeak/10490

https://community.appinventor.mit.edu/t/examples-with-the-esp8266-01-wifi-led-on-off-arduino-standalone-mqtt/70751

1 Like

How far have got? Written an App to send and another to receive? Is the receiving phone permanently on the internet (could become costly) or is it connected to the premises WiFi?

Potentially you will need a power supplier for the receiving phone and of course for the Uno.

If you search the forum, there are plenty of Topics on how to send data to the Uno. Most use Bluetooth but you can use Serial USB and there are Topics on that too.

Not far at all. I created a GUI in Processing on my desktop that controlled a servo, but I wasn't able to make it compatible with Android. There are two buttons that output a character. When I started looking at the blocks in MIT, I didn't understand how to replicate that.

But my biggest concern is creating the functionality for the remote admin. And I have no idea in the slightest how to go about that, or what to search.

The receiving phone will be connected to the premises WiFi most of the time. Power supply is not a concern.

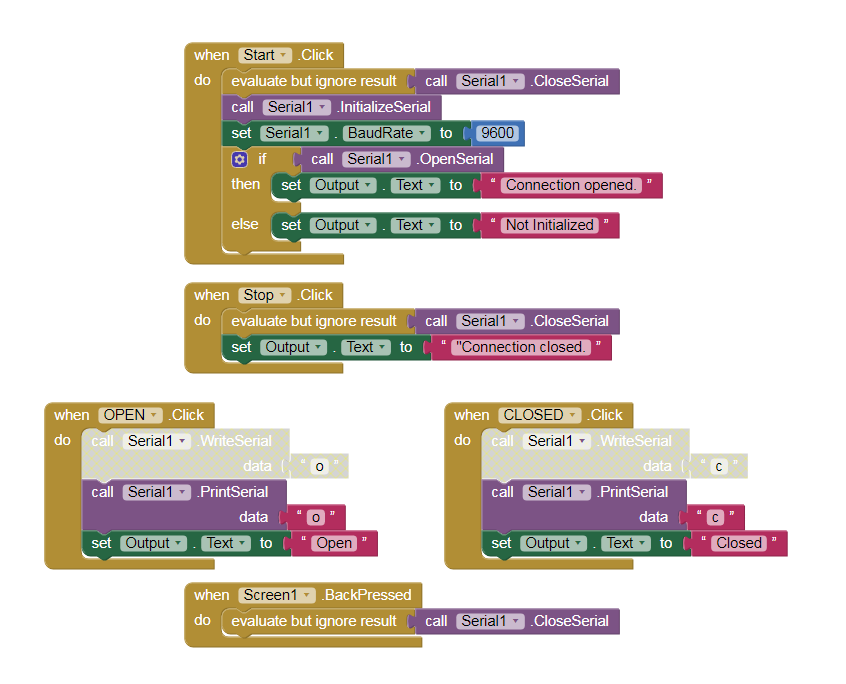
Here is my current progress. I have included the programming in the Arduino IDE and the GUI created in Processing. They worked together from my desktop. Now I'm trying to replicate that in MIT App Inventor. I've included a screenshot of my progress thus far. I'm a bit stumped at this point.

Arduino IDE:

#include <Servo.h>

Servo myservo;  // (Library) create servo object to control a servo
// twelve servo objects can be created on most boards

int pos = 0;    // variable to store the servo position


void setup() {
  myservo.attach(9);  // attaches the servo on pin 9 to the servo object
  
  Serial.begin(9600); // start serial communication @9600 bps
}

void loop() {

  if(Serial.available()) { // ID data is available to read

    char val = Serial.read();

    if (val == 'o') {     // if o recieved
      
        myservo.write(180);
        
         delay(1000);    // waits 1000ms (1 seconds) for the servo to reach the position

       
    }
    else if (val == 'c') {  // if c received
      
       myservo.write(0);
        
         delay(1000);    // waits 1000ms (1 seconds) for the servo to reach the position
    }
      
  }
}

Processing:

import controlP5.*; //import ControlP5 library
import processing.serial.*;

Serial port;

ControlP5 cp5; //create ControlP5 object
PFont font;

void setup(){ //same as arduino program

  size(300, 400); //window size WxH
  
  printArray(Serial.list()); //prints all available serial ports
  
  port = new Serial(this, "COM14", 9600); // Connection to Arduino on com14
  
  // Create Button
  cp5 = new ControlP5(this);
  font = createFont("Impact", 34); // font type and size on button

  
  cp5.addButton("OPEN") // "OPEN" is name of button
    .setPosition(100, 50) // X and Y coordinates of upper left corner of button
    .setSize(100, 60) // (Width, Height)
    .setFont(font) 
    .setColorForeground(color(134, 175, 28))
    .setColorActive(color(167, 165, 115))
    .setColorBackground(color(148, 182, 112))
    ;
    
     cp5.addButton("CLOSE") // "CLOSE" is name of button
    .setPosition(100, 140) // X and Y coordinates of upper left corner of button
    .setSize(100, 60) // (Width, Height)
    .setFont(font) 
    .setColorForeground(color(234, 111, 117))
    .setColorActive(color(182, 143, 111))
    .setColorBackground(color(205, 112, 112))
    ;
    
}

void draw(){ //same as loop in arduino
  
  background (143, 123, 100); //background color of window (R, G, B) or (0 to 255)
  
  //title for window
  fill(0, 255, 255);   // color of text (R, G, B)
  text(":P", 100, 30); // ("text", x coordinate, y coordinate)
}

// add functionality to buttons

void OPEN(){
  port.write('o');
}

void CLOSE(){
  port.write('c');
}

MIT App Inventor:
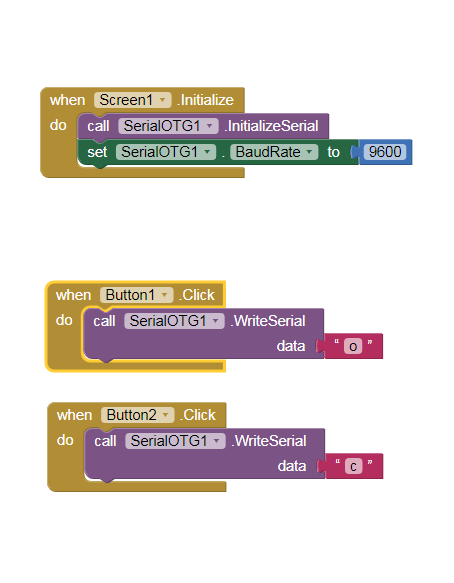
Here examples with OTG

https://community.appinventor.mit.edu/t/serial-otg-arduino-ch340-ftdi-rkl099s-extension/21156

1 Like

Just want to add that the suffix Serial to the function names have been deleted in later version of the extension (It just made the function name longer and did not add to code clarity).
Ex. InitializeSerial is just Initialize.

1 Like

I noticed that in some examples, but I didn't know where to find the extension. There were a lot of dead links.

Thanks. I have sucessfully created a connection from Android to Arduino as follows:

Now I just need help with the Admin to User portion.

How would I create a connection between two phones in the app? Would I have to create an admin login and a user login to distinguish the different controls for the two?

Technically the user only needs to be connected to the Arduino and relay the controls received from admin. Maybe that's easier.

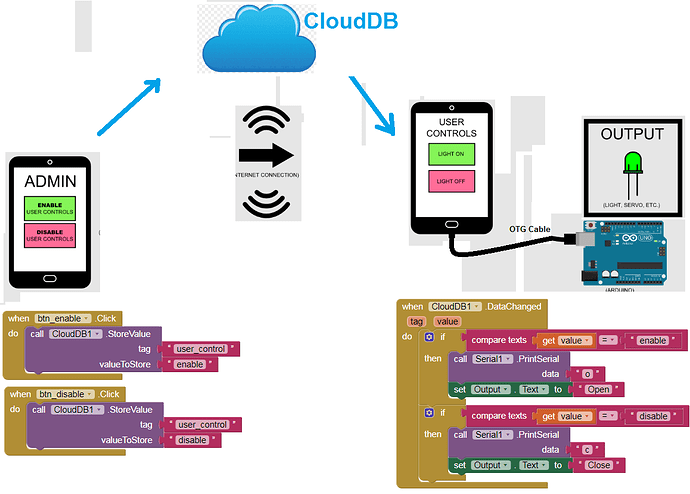
The easiest way may be with CloudDB.

ADMIN ---> CloudDB StoreValue tag,valuetostore -----> Cloud,Internet ----> USER CONTROL --> CloudDB DataChanged tag,value ----> Serial OTG

.......you could send a text message via the Texting component. From the MIT documentation:

A component that will, when the SendMessage method is called, send the text message specified in the Message property to the phone number specified in the PhoneNumber property.

If the ReceivingEnabled property is set to 1 messages will not be received. If ReceivingEnabled is set to 2 messages will be received only when the application is running. Finally if ReceivingEnabled is set to 3, messages will be received when the application is running and when the application is not running they will be queued and a notification displayed to the user.

When a message arrives, the MessageReceived event is raised and provides the sending number and message.

An app that includes this component will receive messages even when it is in the background (i.e. when it's not visible on the screen) and, moreso, even if the app is not running, so long as it's installed on the phone. If the phone receives a text message when the app is not in the foreground, the phone will show a notification in the notification bar. Selecting the notification will bring up the app. As an app developer, you'll probably want to give your users the ability to control ReceivingEnabled so that they can make the phone ignore text messages.

So if I understand correctly, the users phone could receive an SMS that could send the write or print function to the Arduino. Without the SMS text ever being displayed to the user? And without a notification?

I will look into this. Thank you

That's correct - but the receiving phone doesn't have a User?

Edit - note that the text messages are stored on the phone so whoever has access to the phone has access to the messages.

That seems like a viable solution then. The receiving phone doesn't technically require a user interface other than to make sure the android is connected to the Arduino. The button functionality was more so for convenience. Point is that the user should not be in charge of controlling the Arduino all the time if at all and only with functions determined by the admin. The user side should not be able to see any messages. I only would need the messages to be the mode of sending commands to the arduino.

Do you know of examples I can look into? I think I found some but they're for more complex projects.

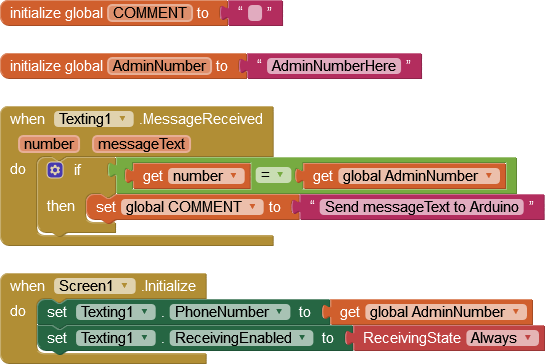
I don't know of any examples but, assuming you are not going to distribute your App via Google Play, you can use the 'SendMessageDirect' function. Have a play with the texting functions, they are very straight forward.

Send:
blocksSend

Receive:
blocksReceive

1 Like

It's just for personal use. I'll give it a try. Thanks

Dear @ArduingoAteYoBaby,
a couple of years ago I wrote a code to send SMS's between phones, and an Arduino. You can find annexed the .aia, the arduino code (.txt) and the documentation.
Perhaps they could give you some hint, help or idea.
Best wishes,
Ugo. :+1:

IOT_SMS-docx.pdf (337.3 KB)
SMS_BT_IOT_ino.txt (8.6 KB)
SMS_BT_Gateway.aia (1.7 MB)

2 Likes

If the two devices are connected to the Internet, as shown in your drawing, you can do it with CloudDB, I show you an example.
You must start the Serial and use an OTG cable to connect it to the Arduino.

1 Like

Thank you, but this is not working. I set the blocks up exactly as you have depicted with the addition of initializing the serial connection.

I would prefer this method because it would not require having phone service plans.

What do you get in the OutputText Label?