Radio Frequency modules. Arduino. Bluetooth HC-06. FM

Hello friends,

I would like to share my experience with some radio frequency modules.
These modules are very cheap, use ISM (Industrial, Scientific and Medical) frequency bands and can be programmed with Arduino.

Here I will just show basic codes, you can find more information on other websites.

I will follow this index:

1.- AM.
2.- FM Transmitter. KT0803K.
3.- FM kit. Solder electrical components.
4.- Remote Control, 6 channels.
5.- Radio Frequency 433 MHZ. ASK
6.- Radio Frequency standalone. LCD-I2C.
7.- Open-Smart 325 kHz.
8.- HC-12. Radio Frequency. 433 MHz. SI4463. STM8S003.
8B.- HC-12. Examples.
9.- Module with nRF24L01 and RFX2401C. 2.4 GHz. Modulation GFSK.
10.- nRF907
11.- ES32-TTL-100. 8 kilometres !

1.- AM. Amplitude Modulation.

The sound Signal, in this case a 3 kHz tone modulates (changes) the amplitude of another signal called: Carrier, in this example 600 kHz.

Here an AM Radio Transmitter with ESP32. Range (distance): 1 m :slightly_smiling_face:

https://bitluni.net/am-radio-transmitter

2.- FM Transmitter. KT0803K. Frequency Modulation.

The sound Signal, in this case a 3 kHz tone modulates (changes) the frequency of another signal called: Carrier, in this example 94 MHz.

I like this module, I recommend it! :eight_spoked_asterisk:

  • We connect our mobile, through a cable with a jack, to this FM transmitter module. Broadcast in Stereo. Range (distance): about 50 m.

  • We can listen to this transmission on an FM radio receiver or on a mobile with FM.

  • We only use the Arduino to set the frequency (70 MHz - 108 MHz), then only the 5 V supply is necessary.

  • App with App Inventor:

p53i_FM.aia (2.6 MB)

fm_bloques

1 Like

3.- FM transmitter kit. Solder electrical components.

I like this module, I recommend it! :eight_spoked_asterisk:

fm_kit

  • This is an interesting kit for a school project, it is an FM transmitter (88 MHz -108 MHz). By feeding it with 10 V we have managed to transmit 50 m away.
    Transmits in mono (not stereo).

  • It is very cheap, you can find it for less than $ 2.

  • You can connect a sound application to this module and transmit it by FM.

  • Search image of this kit.

  • Here in Spanish:
    http://kio4.com/arduino/53B_emisorayreceptorFM.htm

4.- Remote Control, 6 channels. 2.4 GHz.

I like this module, I recommend it! :eight_spoked_asterisk:

  • The transmitter module has 6 buttons, when you press any of them a LED lights up on the receiver module. This module does not need to be programmed. Power, Pair and Go.

  • We are going to carry out this project. Our application will send a letter (a,b,c,d,...) via Bluetooth to the Arduino with the HC-06 module. Arduino will HIGH/LOW one of its pins. The emitter module will send a signal to turn on/ off its corresponding LED.

  • Range, about 80 m.

p9A0i_bluetooth_controlremoto.aia (3.4 KB)

- Arduino code.

char caracter;

void setup() { 
  Serial.begin(9600);
  pinMode(4, OUTPUT); 
  pinMode(5, OUTPUT);
  pinMode(6, OUTPUT);
  pinMode(7, OUTPUT);
  pinMode(8, OUTPUT);
  pinMode(9, OUTPUT);
}

void loop() { 
  if(Serial.available()) {
  caracter = Serial.read();
  Serial.println(caracter);
    if(caracter == 'a'){ digitalWrite(4, LOW);}
    if(caracter == 'b'){ digitalWrite(4, HIGH);} 
    if(caracter == 'c'){ digitalWrite(5, LOW);}
    if(caracter == 'd'){ digitalWrite(5, HIGH);}
    if(caracter == 'e'){ digitalWrite(6, LOW);}
    if(caracter == 'f'){ digitalWrite(6, HIGH);} 
    if(caracter == 'g'){ digitalWrite(7, LOW);}
    if(caracter == 'h'){ digitalWrite(7, HIGH);}
    if(caracter == 'i'){ digitalWrite(8, LOW);}
    if(caracter == 'j'){ digitalWrite(8, HIGH);} 
    if(caracter == 'k'){ digitalWrite(9, LOW);}
    if(caracter == 'l'){ digitalWrite(9, HIGH);}        
  } 
} 
1 Like

5.- Radio Frequency 433 MHZ. ASK. OOK.

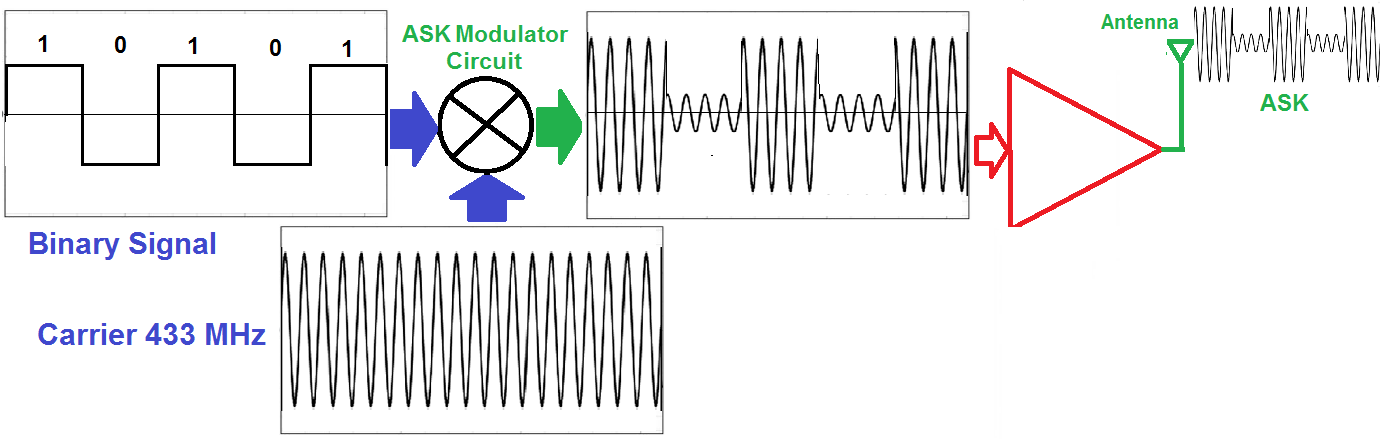
  • Modulation Digital ASK (Amplitude-Shift Keying).

  • To transmit a "1" use an Amplitude. To transmit a "0" use another Amplitude. The frequency of Carrier is the same in the two states.

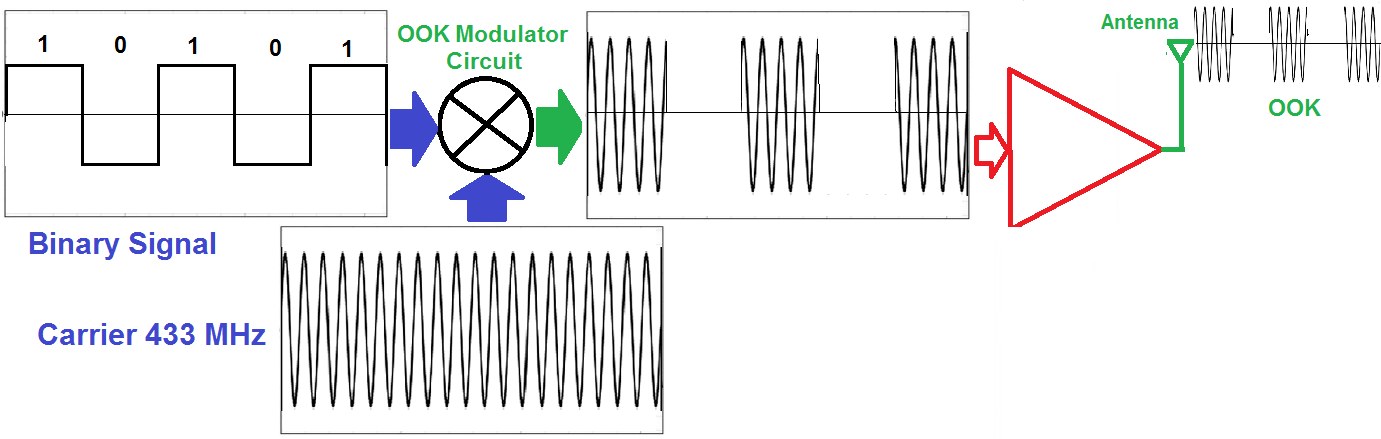
  • Modulation Digital OOK ( On-Off Keying).

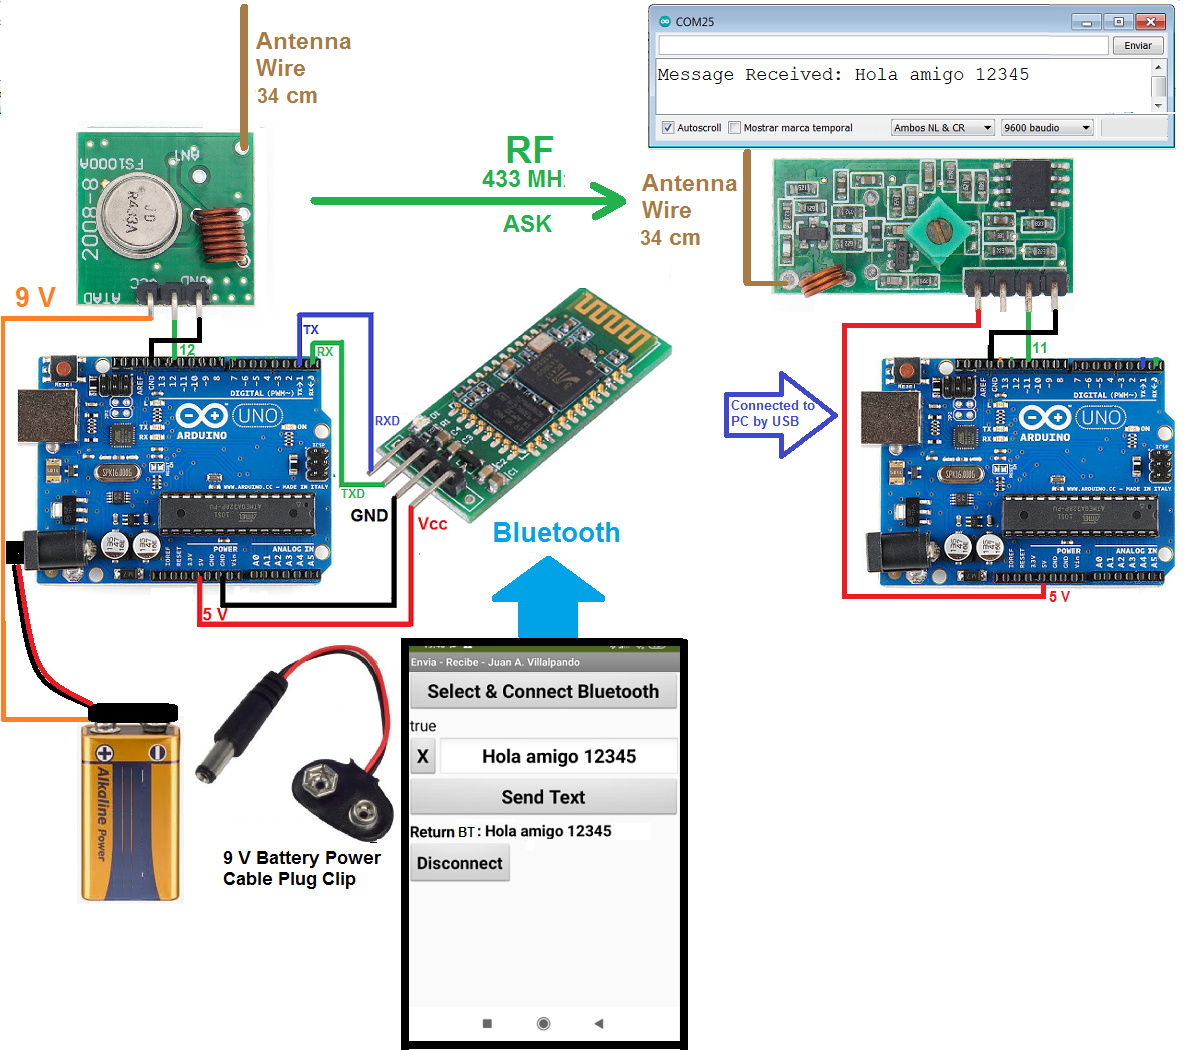
  • These are two old, classic and cheap modules: FS1000A and JY-JS03.

  • Frequency: 433 MHz. Modulation: ASK. Price: about $ 1.

  • Range: about 10 m indoor, 90 m outdoor.

  • In my example the antenna is a 34 cm wire.

- App.

p9AAi_bluetooth_radiofrecuencia.aia (4.3 KB)
[this application is common for the following modules.]

  • App sends by Bluetooth a message to Arduino with HC-06 BT module.

  • Arduino gets the message and passes it through terminal 12 to the RF emitter.

  • The RF receiver receives the message and passes it to another Arduino through terminal 11.
    The message is displayed on the Serial Monitor.

  • The first Arduino use a battery as a Power Supply, the second Arduino is connected to a PC.

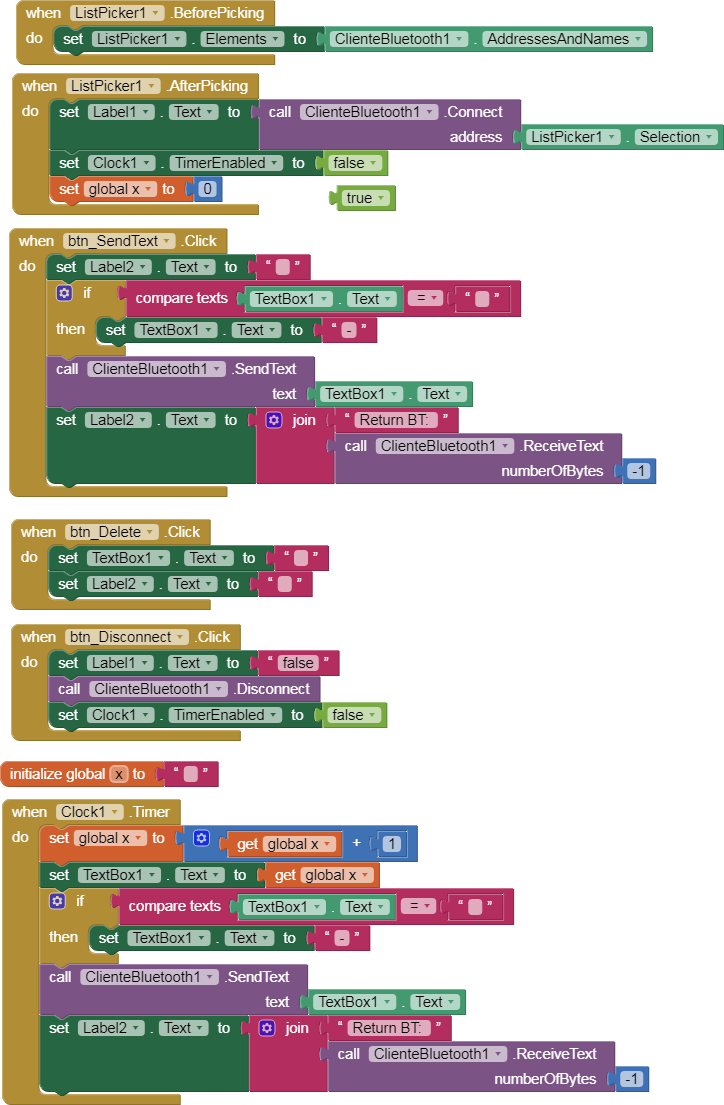
  • In this code, if TimerEnabled is false you can write and send a message.
  • If TimerEnabled is true, the timer automatically sends a sequence of numbers (1, 2, 3, 4,...)

- Arduino. Emitter code:

#include <RH_ASK.h>
#include <SPI.h> 

char caracterfinal = '\n';
String texto;
RH_ASK rf_driver;
// Conectar DATA al terminal 12 del Arduino. 

void setup(){ 
  Serial.begin(9600);
  rf_driver.init();
}

void loop() { 
  if(Serial.available()) {
    texto = Serial.readStringUntil(caracterfinal); // from App by Bluetooth
    Serial.println(texto);
    char *msg = texto.c_str();
    rf_driver.send((uint8_t *)msg, strlen(msg)); // FS1000A sends msg
    rf_driver.waitPacketSent();
  }
} 

- Arduino. Receiver code:

#include <RH_ASK.h>
#include <SPI.h> 
 
RH_ASK rf_driver;
// Conectar DATA al terminal 11 del Arduino.
 
void setup(){
    Serial.begin(9600);
    rf_driver.init();
}
 
void loop(){
    uint8_t buf[16] = {""}; // Size buffer 16.
    uint8_t buflen = sizeof(buf);
    if (rf_driver.recv(buf, &buflen)){
      Serial.print("Mensaje recibido: ");
      Serial.println((char*)buf);         
    }
}
  • Library: RadioHead. [it also works with the VirtualWire library.]
1 Like

6.- Radio Frequency 433 MHZ. Standalone.

  • To test these examples outdoors, it is better to use a display instead of the PC's Serial Monitor. In this example I use a LCD with I2C bus, you can also use other OLED type displays.

  • There are two very important elements in Radio Frequency: the antenna and the power supply.
    You can try other types of antennas, in this case the best are Yagi directional antennas.
    The power supply should be stable and has no noise, with a battery it will work better.

- Arduino. Receiver code. Display LCD with I2C.

#include <RH_ASK.h>
#include <SPI.h> 
#include <Wire.h>
#include <LiquidCrystal_I2C.h>
LiquidCrystal_I2C lcd(0x27, 2, 1, 0, 4, 5, 6, 7, 3, POSITIVE);
// LiquidCrystal_I2C lcd(0x3F, 2, 1, 0, 4, 5, 6, 7, 3, POSITIVE);
 
RH_ASK rf_driver;
 
void setup(){
    Serial.begin(9600);
    rf_driver.init();
    lcd.begin(16,2);// Columnas y filas de LCD.
}
 
void loop(){
    uint8_t buf[16] = {""}; // Size buffer 16.
    uint8_t buflen = sizeof(buf);
    if (rf_driver.recv(buf, &buflen)){
      // Serial.println((char*)buf);
      lcd.clear();
      lcd.setCursor(0,0);
      lcd.print((char*)buf);           
    }
}

7.- Open-Smart. 315 kHz.

8.- HC-12. Radio Frequency. 433 MHz. SI4463. STM8S003.

  • Maximum transmit power: 20 dBm (100 mW), receive sensitivity: -129 dBm.
  • 100 channels spaced 400 kHz.
  • Range, about 1000 m, outdoor.
  • Its parameters can be changed using AT commands:
    AT
    AT+RX
    AT+V
    AT+C021
    AT+B9600
    AT+FU3

4 modes of operation:
FU1
FU2
FU3 (default, 1200bps ~ 1000 m, 115200bps ~ 100 m)
FU4 (only small packets can be sent: max 60 bytes with the interval of 2 seconds. In this mode, range is increased to 1800m.)

- Arduino. Emitter code.

App --> Bluetooth Arduino HC-06 --> HC-12 RF.

#include <SoftwareSerial.h> 
#include <Wire.h> 

SoftwareSerial HC12(10, 11) ; // HC-12 TX Pin, HC-12 RX Pin

char caracterfinal = '\n';
String texto;

void setup() { 
 Serial.begin(9600);
 HC12.begin(9600); 
 Wire.begin();
}

void loop() { 
  if(Serial.available()) {
    texto = Serial.readStringUntil(caracterfinal); // from App by Bluetooth
    Serial.println(texto);
    HC12.println(texto); //  HC-12 sends texto.
  }
} 

- Arduino. Receiver code.

#include <SoftwareSerial.h>
SoftwareSerial HC12(10,11);  // HC12(TX,RX)
			
char rx_byte2 = 0;
String rx_str2 = "";

void setup() {
  Serial.begin(9600);
  HC12.begin(9600);
}

void loop() {
  if (HC12.available() > 0) {
  rx_byte2 = HC12.read();
  rx_str2 += rx_byte2;
    if (rx_byte2 == '\n') {    
    Serial.print(rx_str2); 
    rx_str2 = ""; 
    }
 }

}

Here more info. in Spanish.
http://kio4.com/arduino/27D_BT_HC-12_SI4463.htm
oooooooooooooooo0000000000ooooooooooooooooo

Be careful with this product, there are HC-12 clones that emit with little range.

9.- Module with nRF24L01 and RFX2401C. 2.4 GHz. Modulation GFSK.

I like this module, I recommend it! :eight_spoked_asterisk:

- Arduino. Emitter code.

App --> Bluetooth Arduino HC-06 --> nRF234L01.

#include <nRF24L01.h>
#include <RF24.h>
#include <SPI.h>
 
RF24 rf24(9,8); // (CE, CSN)
 
const byte identificacion[6] = "00005";
char caracterfinal = '\n';
String texto;
 
void setup(void){
   rf24.begin();
   rf24.openWritingPipe(identificacion);
   rf24.stopListening();
}
void loop(){
  if(Serial.available()) {
    texto = Serial.readStringUntil(caracterfinal); // from App by Bluetooth
    Serial.println(texto);
    char *msg = texto.c_str();
    rf24.write(&texto, sizeof(texto)); // nRF234L01 sends texto.
  }
}

- Arduino. Receiver code.

#include <nRF24L01.h>
#include <RF24.h>
#include <SPI.h>
 
RF24 rf24(9,8); // (CE, CSN)
 
const byte identificacion[6] = "00005";
 
void setup(void){
   Serial.begin(9600);
   rf24.begin();
   rf24.openReadingPipe(1,identificacion);
   rf24.startListening();
}
 
void loop(){
  if (rf24.available()){
    char texto[32] = {0};
    rf24.read(&texto, sizeof(texto));
    Serial.println(texto);
  }
}

- Modulation FSK (Frequency Shift Keying):

To transmit a "1" use a Frequency. To transmit a "0" use another Frequency. The amplitude of Carrier is the same in the two states.

- Modulation MSK (Minimum Shift Keying):

Similar to FSK but the frequency changes occur at the carrier zero crossing points.

- Gaussian Filter.

  • It is a Low-Pass filter, it is applied to the pulses so that their flanks are smoother, this improves the bandwidth.

- Modulations GFSK and GMSK:

  • Similar to FSK and MSK but a Gaussian filter is applied to the pulses.

10.- nRF907

11.- ES32-TTL-100. Long distance. 8 kilometres!

I have not tried these modules, but the distance they can reach is interesting. Depending on the model, they have a range between 3000 m and 8000 m, using a 5 dBi antenna, outdoor. Power Supply: 5 V.

Data sheet E32-TTL.

Search images E32-TTL-100.

12.- Omnidirectional and directional Antenna Yagi. nRF24L01. School project proposal.

- School project proposal.

Hola Juan Antonio, perdona mi curiosidad.
Nunca he usado LORA, pero se que la distancia que cubre es de DECENAS de km's.
Como se aplicaria en este caso, luego de Las Antenas Yagi.
Tampoco vi ninguna forma de generar blockes para un dispositivo LORA, ni siquiera vi el ejemplo, asi que mi comentario es MAS UNA DUDA SOBRE COMO BUSCAR INFORMACION SOBRE EL TEMA PARA USARLA CON MIT APP INVENTOR2.
Mil gracias desde YA!.

You can try this connection, send device data by OTG cable and CP2102 UART converter to RYLR896 module and in receiver take the signal and display it by Arduino.

https://github.com/sandeepmistry/arduino-LoRa/blob/master/API.md

https://www.youtube.com/watch?v=eQNy1-Hf1rI

  • Another idea, which I have not tried, is to connect the RYLR896 module directly to a Bluetooth module HC-06 to receive the information from the mobile.
1 Like
  • Example of connection with the HC-12 SI4463
  • An external power supply is convenient.