GPTAssistant Extension for MIT App Inventor
Overview
The GPTAssistant extension is engineered to transform MIT App Inventor projects into intelligent, next-generation applications. This powerful tool seamlessly integrates the complete capabilities of the OpenAI Assistants API directly into the no-code development environment. This integration facilitates the development of sophisticated AI-powered applications capable of comprehension, response, and complex task execution, all without necessitating backend code implementation. The GPTAssistant extension manages a spectrum of functionalities, including file management, vector stores, conversation threads, and advanced run management (encompassing polling and streaming), thereby rendering cutting-edge Artificial Intelligence accessible to all App Inventor developers. The extension empowers developers to implement advanced AI functionalities presently.
Why GPTAssistant is a Must-Have for App Inventor Developers
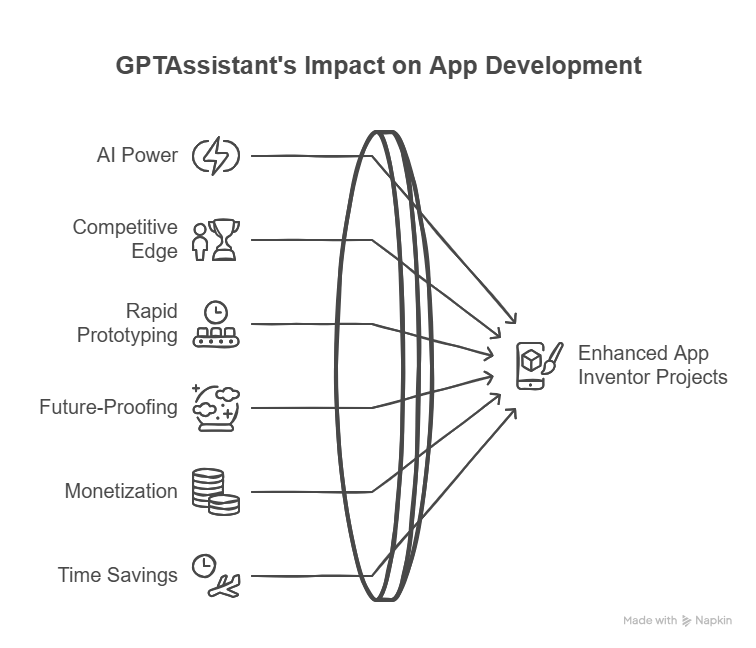
In today's competitive app landscape, standing out requires innovation and advanced functionality. The GPTAssistant extension is not just another tool; it's your gateway to building truly intelligent applications that can captivate users and solve real-world problems. Here’s why developers serious about elevating their App Inventor projects need this extension:
- Unlock Unprecedented AI Power, No Backend Hassle: Access the full might of OpenAI's Assistants API without the steep learning curve or complexity of managing servers, APIs, and backend infrastructure. Focus on your app's vision, not on boilerplate code.
- Gain a Significant Competitive Edge: Build apps that are smarter, more interactive, and more capable than ever before. Offer features that were previously out of reach for typical App Inventor projects, setting your creations apart.
- Rapidly Prototype and Deploy Sophisticated AI Solutions: Whether it's an intelligent tutor, a dynamic content generator, a smart customer service bot, or a data analysis tool, GPTAssistant allows you to bring these ideas to life with remarkable speed.
- Future-Proof Your Applications: AI is evolving rapidly. By leveraging the Assistants API through this extension, you ensure your apps can tap into the latest advancements from OpenAI, keeping them relevant and powerful.
- Monetize Smarter Apps: Create premium features and unique user experiences powered by AI, opening new avenues for app monetization and higher perceived value.
- Save Countless Hours of Development Time: What would take weeks or months to implement from scratch (if even possible within App Inventor alone) can be achieved in a fraction of the time using pre-built blocks and a streamlined workflow.
Key Benefits of Using the GPTAssistant Extension
- Effortless No-Code AI Integration: Seamlessly embed advanced AI and GPT-powered features into your App Inventor projects. Turn complex AI into simple blocks.
- Complete OpenAI Assistants API Mastery: Create, manage, and interact with OpenAI assistants, threads, and runs directly from your app. No compromises on functionality.
- Advanced File and Vector Store Management: Effortlessly upload files, manage vector stores, and enable powerful file search and code interpretation for your assistants, allowing them to work with your data.
- Real-Time Interaction with Streaming and Polling: Choose between getting instant, real-time streaming responses for dynamic chat experiences or using polling for completed results, supporting both simple and advanced workflows.
- Intuitive Event-Driven Design: Build highly interactive and responsive apps with instant feedback and results delivered through a comprehensive set of events.
- User-Friendly Configuration: Reduce errors and simplify setup with convenient dropdowns for selecting models and file purposes.
- Powerful Built-in Tooling: Activate sophisticated tools like code interpreter and file search for your assistants with just a few blocks, enabling them to perform complex tasks.
- Highly Scalable and Flexible: Perfect for a wide range of applications, from simple chatbots and educational tools to advanced AI assistants and enterprise-grade solutions.
- Open Source Foundation, Limitless Potential: While the extension is a premium product, it's built with clarity and extensibility in mind, encouraging learning and customization.
Setup Instructions
- Import the GPTAssistant extension (.aix) into your App Inventor project.
- Drag the GPTAssistant component from the palette into your app's design view.
- Crucially, call the
Initializefunction with your OpenAI API key. This is the first step before unlocking any other functionality.
Function Reference
The following functions provide you with granular control over every aspect of the OpenAI Assistants API, directly within App Inventor.

- Initialize
- Description: Securely sets your OpenAI API key. This is the mandatory first step to activate the extension's power.
- Usage: (Image shows block calling Initialize with an API key string)
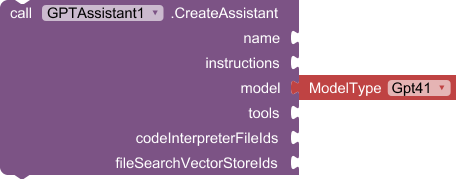
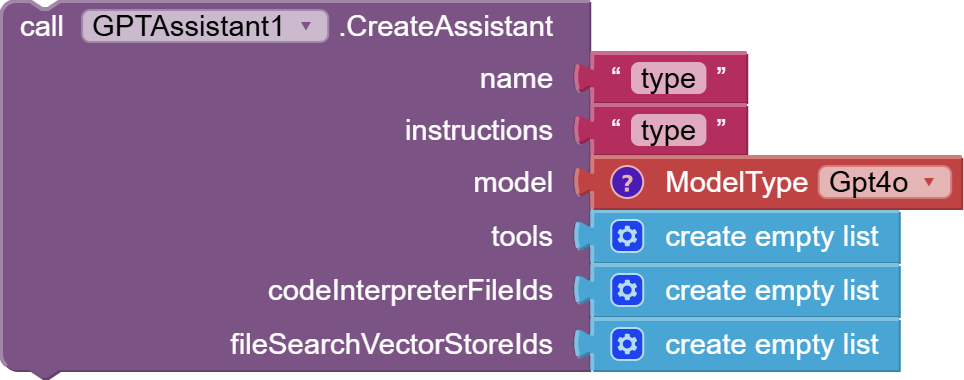
- CreateAssistant
- Description: Design and bring to life a new AI Assistant. Define its name, system instructions (its personality and goals), select a powerful model (via a convenient dropdown), and equip it with tools. You can also instantly attach files for the code interpreter or link vector stores for advanced file search capabilities.
- Parameters:
name: The unique name for your assistant.instructions: The core system instructions that guide the assistant's behavior and responses.model: Choose the optimal OpenAI model from an easy-to-use dropdown.tools: A list of tool names to enable (e.g., "code_interpreter", "file_search").codeInterpreterFileIds: (Optional) List of file IDs to make available to the code interpreter.fileSearchVectorStoreIds: (Optional) List of vector store IDs to enable file search.
- Usage: (Image shows block for CreateAssistant with various parameters)
![]()
- ValidateApiKey
- Description: Quickly confirm that your OpenAI API key is valid and active by attempting to list available models. Essential for troubleshooting.
- Usage: (Image shows block for ValidateApiKey)

- RetrieveAssistant
- Description: Fetch the details and configuration of an existing Assistant using its unique ID.
- Parameters:
assistantId: The ID of the assistant you want to retrieve.
- Usage: (Image shows block for RetrieveAssistant)
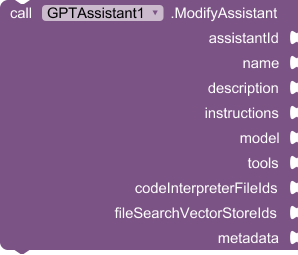
- ModifyAssistant
- Description: Update and refine an existing Assistant. Change its name, instructions, model, tools, or associated files and vector stores on the fly.
- Parameters: (all optional, only provide what you want to change)
assistantId: The ID of the assistant to modify.name: New name.description: New description.instructions: New system instructions.model: New model from the dropdown.tools: Updated list of tools.codeInterpreterFileIds: New list of file IDs for code interpreter.fileSearchVectorStoreIds: New list of vector store IDs for file search.metadata: Additional metadata.
- Usage: (Image shows block for ModifyAssistant with various parameters)
![]()
- CreateThread
- Description: Initiate a new conversation Thread. Each thread represents a distinct interaction or session with an assistant. This is the starting point for any user conversation.
- Usage: (Image shows block for CreateThread)
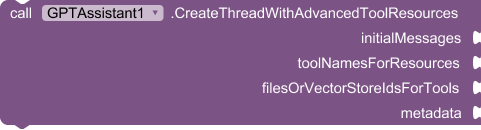
- CreateThreadWithAdvancedToolResources
- Description: Create a Thread with more granular control, allowing for optional initial messages, pre-configured tool resources, and metadata for advanced scenarios.
- Parameters:
initialMessages: (Optional) A list of initial messages to populate the thread.toolNamesForResources: (Optional) List of tool names to associate resources with.filesOrVectorStoreIdsForTools: (Optional) List of file or vector store IDs corresponding to the tools.metadata: (Optional) Additional metadata.
- Usage: (Image shows block for CreateThreadWithAdvancedToolResources)

- RetrieveThread
- Description: Get an existing Thread's details, including its conversation history, using its ID.
- Parameters:
threadId: The ID of the thread to retrieve.
- Usage: (Image shows block for RetrieveThread)

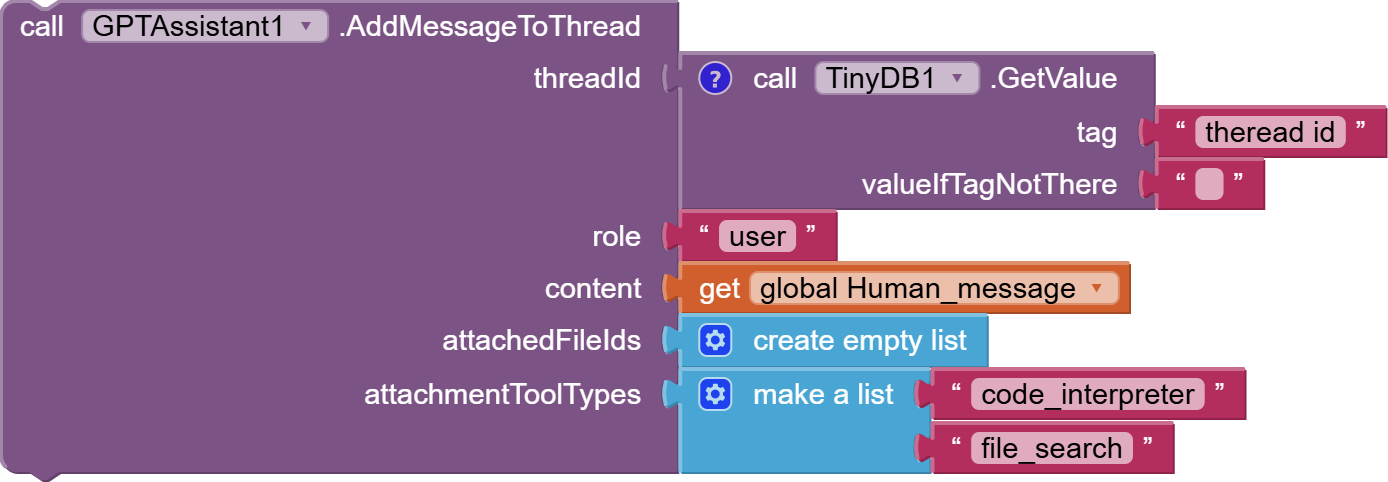
- AddMessageToThread
- Description: Add a user's plain text message to an ongoing conversation thread. You can optionally attach files and specify tool types for those attachments. The role must be 'user'.
- Parameters:
threadId: The ID of the target thread.role: Must be 'user'.content: The text of the user's message.attachedFileIds: (Optional) List of file IDs to attach to this message.attachmentToolTypes: (Optional) List of tool types relevant to the attachments.
- Usage: (Image shows block for AddMessageToThread)

- AddMessageWithContentBlocks
- Description: Add a message with rich content to a thread, including text, image URLs, or even image files. This allows for more complex interactions using OpenAI's content block structure.
- Parameters:
threadId: The ID of the thread.role: The role (must be 'user').contentBlocks: A list of content blocks (e.g., text blocks, image URL blocks, image file blocks).attachments: (Optional) List of attachments.
- Usage: (Image shows block for AddMessageWithContentBlocks)

- CreateRunAndPoll
- Description: Instruct an assistant to process a thread (create a run), then automatically poll for its completion and fetch the resulting messages. Ideal for scenarios where you need the complete response before proceeding (non-streaming).
- Parameters:
threadId: The ID of the thread to run.assistantId: The ID of the assistant to process the thread.instructionsOverride: (Optional) Override the assistant's default instructions for this specific run.pollingIntervalMillis: (Optional) How often (in milliseconds) to check for completion.maxPollingAttempts: (Optional) Maximum number of polling attempts before timing out.
- Usage: (Image shows block for CreateRunAndPoll)
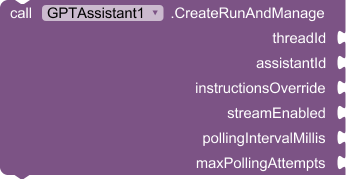
- CreateRunAndManage
- Description: Create a run for a thread with an assistant, offering fine-grained control over polling or enabling real-time streaming. This is the powerhouse for dynamic, interactive AI experiences.
- Parameters:
threadId: The ID of the thread.assistantId: The assistant to use.instructionsOverride: (Optional) Override instructions for this run.streamEnabled: Set totrueto enable streaming responses,falsefor polling.pollingIntervalMillis: (Optional, if streaming is false) Polling interval.maxPollingAttempts: (Optional, if streaming is false) Max polling attempts.
- Usage: (Image shows block for CreateRunAndManage)

- UploadFile
- Description: Upload a single file directly to OpenAI. These files can then be used by assistants (e.g., for code interpreter or to be added to vector stores) or for vision capabilities. Choose the file's purpose from a convenient dropdown.
- Parameters:
absoluteFilePath: The complete path to the file on the device.purpose: The intended use of the file (e.g., "assistants", "vision"), selected from a dropdown.
- Usage: (Image shows block for UploadFile)
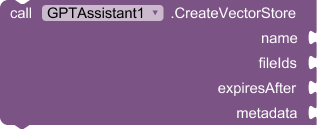
- CreateVectorStore
- Description: Establish a new Vector Store, which is essential for enabling the powerful "file_search" (Retrieval Augmented Generation - RAG) tool for your assistants. Optionally add files during creation, set an expiration policy, and include metadata.
- Parameters:
name: (Optional) A descriptive name for the vector store.fileIds: (Optional) A list of file IDs (from previously uploaded files) to add to this vector store.expiresAfter: (Optional) Define an expiration policy for the vector store.metadata: (Optional) Additional metadata.
- Usage: (Image shows block for CreateVectorStore)

- AddFilesToVectorStore (Note: Original doc has a typo, likely should be 15, but keeping user's numbering)
- Description: Efficiently add multiple files to an existing Vector Store in a single batch operation and poll for their processing completion.
- Parameters:
vectorStoreId: The ID of the target vector store.fileIds: A list of file IDs to add.pollingIntervalMillis: (Optional) Polling interval.maxPollingAttempts: (Optional) Max polling attempts.
- Usage: (Image shows block for AddFilesToVectorStore)

- RemoveFileFromVectorStore (Note: Original doc has a typo, likely should be 16)
- Description: Delete a specific file from a Vector Store using its ID.
- Parameters:
vectorStoreId: The ID of the vector store.fileId: The ID of the file to remove.
- Usage: (Image shows block for RemoveFileFromVectorStore)
Events
The GPTAssistant extension is event-driven, providing immediate feedback and results for all critical operations. This allows you to build responsive and dynamic UIs that react to the AI's activities in real-time.
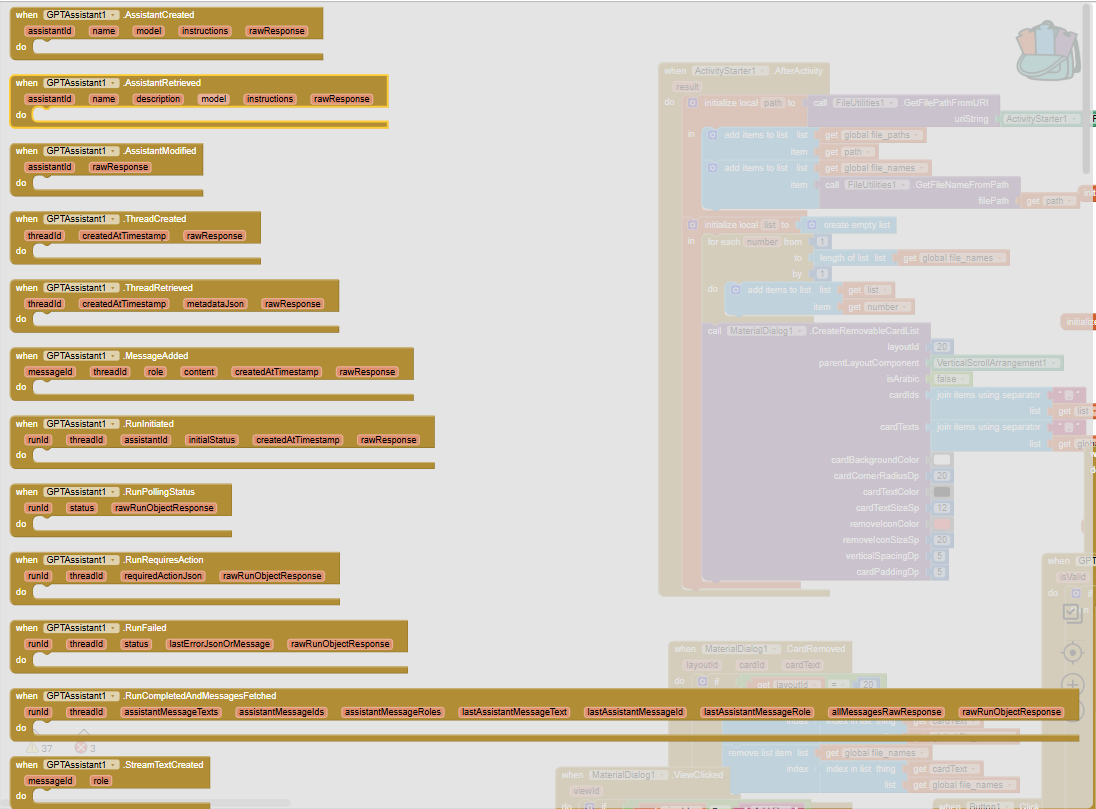
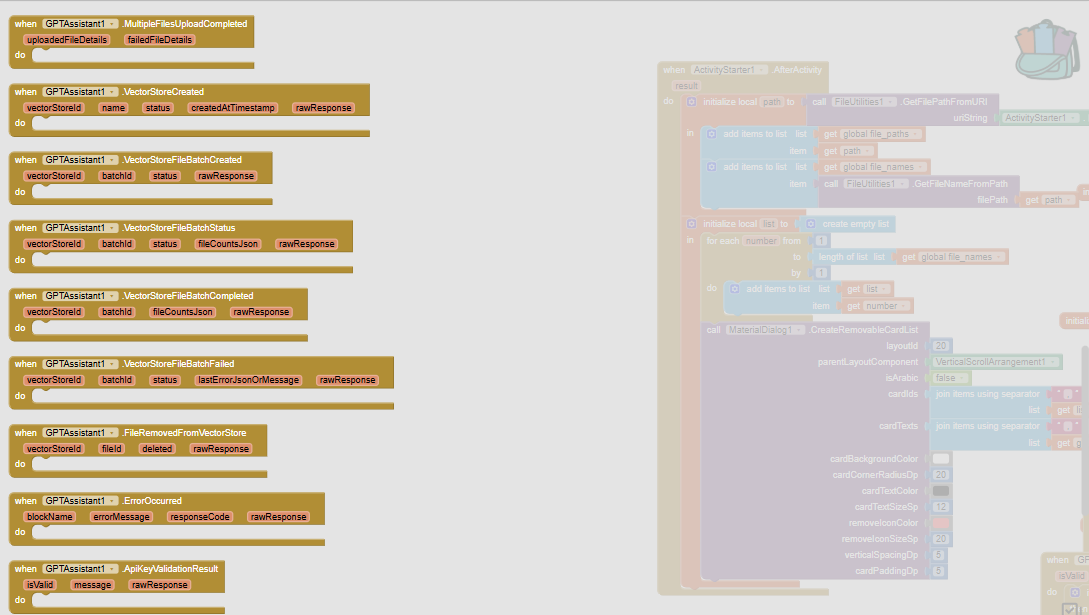
- The extension boasts a comprehensive suite of events (e.g.,
AssistantCreated,ThreadCreated,RunCompletedAndMessagesFetched,FileUploaded,ErrorOccurred,StreamTextDelta,StreamTextMessageCompleted, etc.). These events are your app's eyes and ears, notifying you instantly of successful operations, errors, and the progress of streaming responses. - Consult the blocks palette in App Inventor for a complete list of events and their specific parameters. Understanding and utilizing these events is key to creating truly interactive AI applications.
HOW TO USE: Building Your First AI Assistant - A Quick Start Guide
Follow these straightforward steps to integrate a powerful AI assistant into your App Inventor project. This will give you a taste of the capabilities you're about to unlock.
Step-by-Step: Creating an Assistant
Unleash the power of custom AI assistants in your App Inventor projects.
- Initialize the Extension: The First Command
- Use the
Initializeblock. Input your unique OpenAI API key. This step is non-negotiable and must be done once before any other AI operation.- Example:

- Define Your Assistant's Persona
- Decide on a clear
namefor your assistant.- Craft concise
instructions(the system prompt) that tell the assistant its role, personality, and how it should behave.- Example:
- Name: "AppInventorProHelper"
- Instructions: "You are an expert AI assistant specializing in MIT App Inventor development. Provide clear, concise, and helpful advice on blocks, components, and design."
- Select the Right AI Model
- Within the
CreateAssistantblock, use themodeldropdown. This provides a list of available OpenAI models (e.g., GPT-4o, GPT-4 Turbo). Choose one that fits your needs and budget.
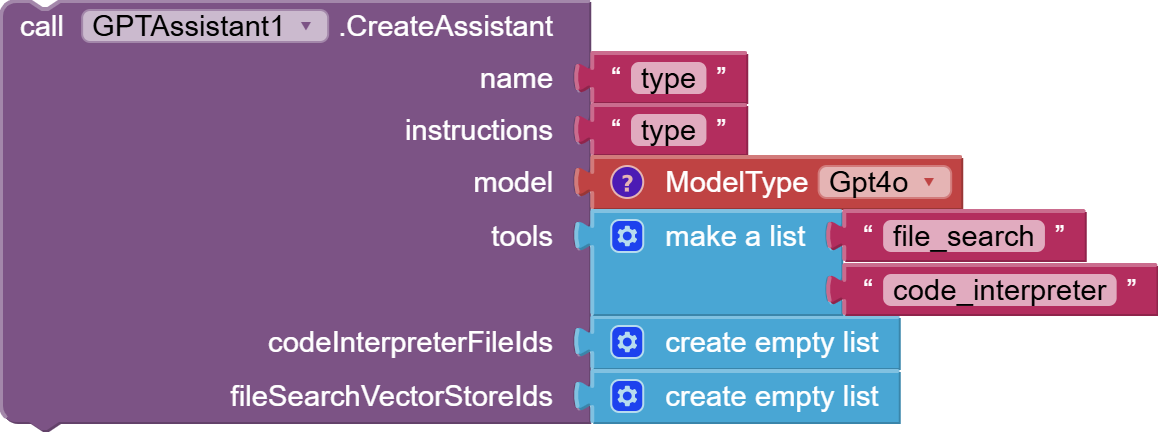
- Equip Your Assistant with Tools (Optional but Powerful)
- Determine if your assistant needs special capabilities like
code_interpreter(for running Python code, calculations, data analysis) orfile_search(for retrieving information from provided documents).- In App Inventor, use the "make a list" block to specify these tools. If no tools are needed initially, provide an empty list.
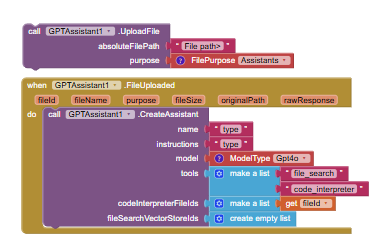
- Provide Files for Code Interpreter (If Using the Tool)
- If you've enabled
code_interpreterand want it to access specific files (e.g., data files, Python scripts), you'll need to upload these files first (usingUploadFile) and then provide theirfile IDsin a list to thecodeInterpreterFileIdsparameter.- If not applicable, use an empty list.
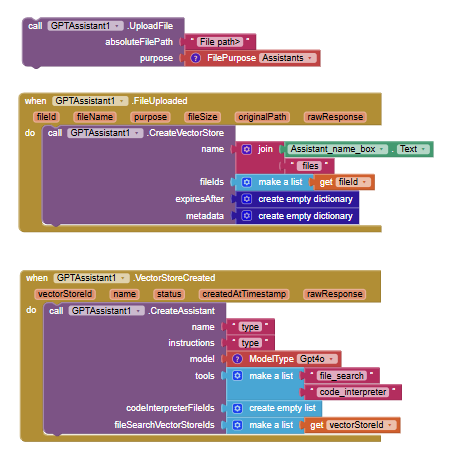
- Link Vector Stores for File Search (If Using the Tool)
- If you've enabled
file_search, you must create a Vector Store (CreateVectorStore), add files to it (AddFilesToVectorStore), and then provide thevector store IDin a list to thefileSearchVectorStoreIdsparameter. This allows your assistant to "read" and reference the content of those files.- If not applicable, use an empty list.
- Bring Your Assistant to Life: Call
CreateAssistant
- Drag out the
CreateAssistantblock and plug in all the details you've prepared:name,instructions, chosenmodel,toolslist, and optional file/vector store ID lists.- Example:
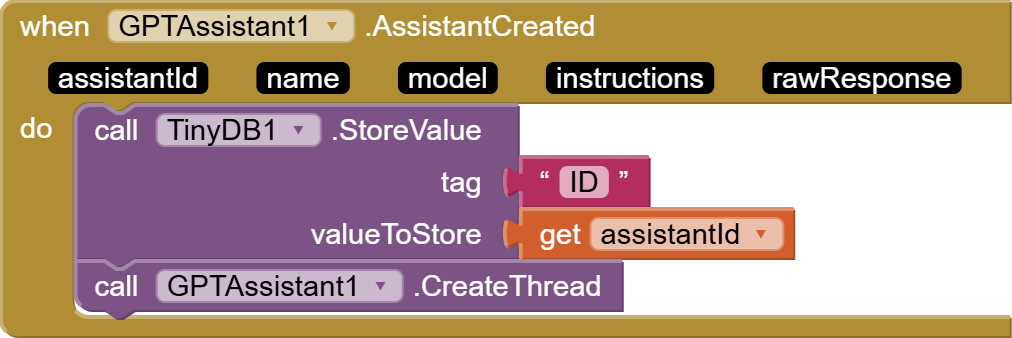
- Listen for Success: Handle the
AssistantCreatedEvent
- Use the
when GPTAssistant.AssistantCreatedevent block. This event will fire once OpenAI confirms your assistant has been successfully created.- Crucially, capture and store the
assistantIdprovided by this event. You'll need it for all future interactions with this specific assistant (like starting conversations).
Step-by-Step: Creating a Conversation Thread
Now that you have an assistant, let's start a conversation.
- Prerequisite: Assistant ID
- Ensure you have the
assistantIdfrom theAssistantCreatedevent. Without it, you can't specify which assistant should handle this conversation.
- Ensure you have the
- Initiate the Conversation: Call
CreateThread
- Use the
CreateThreadblock. This simple action creates a new, empty conversation container ready for messages.- Example (often triggered by a "Start New Chat" button in your app):
(Image is a duplicate from AssistantCreated event, ensure it's contextually correct for CreateThread if possible, or describe that it's a generic trigger)
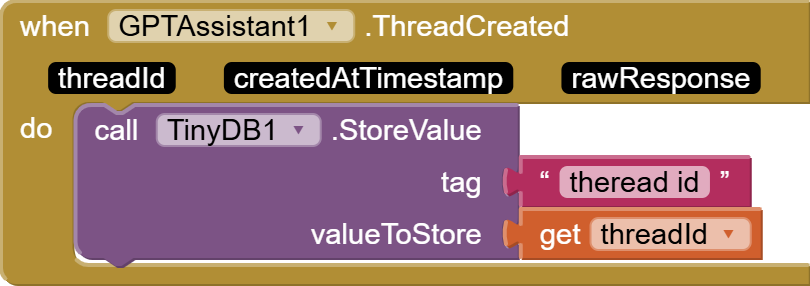
- Capture the Thread: Handle the
ThreadCreatedEvent
- Use the
when GPTAssistant.ThreadCreatedevent block. This fires when the thread is ready.- Store the
threadIdprovided by this event. This ID is essential for adding messages to this specific conversation and for telling the assistant to process it.
Step-by-Step: Adding a Message and Getting a Streaming Response
Let's make the conversation interactive with real-time responses.
- Prerequisites: Assistant and Thread IDs
- You must have both the
assistantIdand thethreadIdfrom the previous steps.
- You must have both the
- Send the User's Input: Add a Message to the Thread
- Use the
AddMessageToThreadblock.- Provide the current
threadId.- Set the
roleparameter to the text string"user".- Input the user's message (e.g., from a TextBox) into the
contentparameter.- Example (triggered when a user hits "Send"):
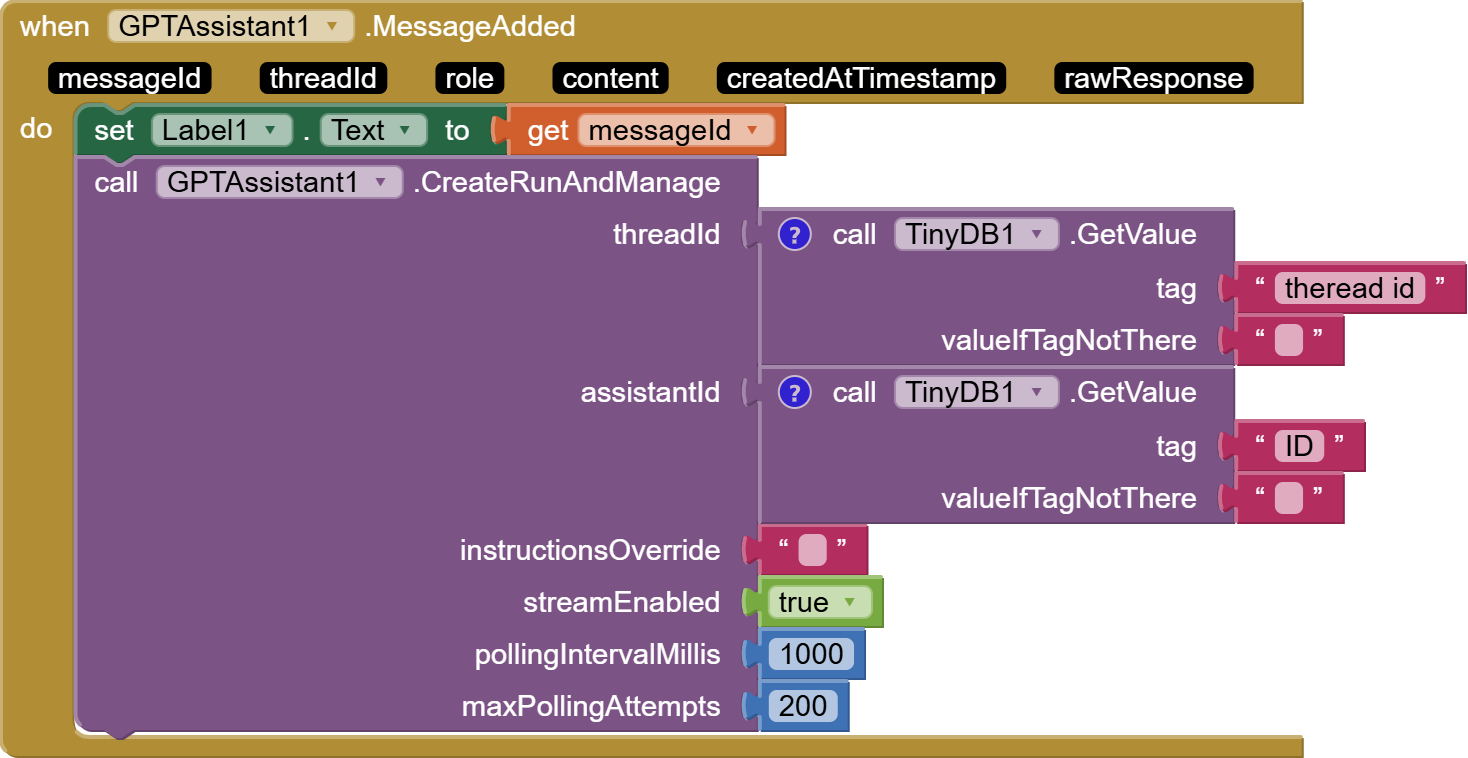
- Confirmation (Optional but Good Practice): Handle the
MessageAddedEvent
- The
when GPTAssistant.MessageAddedevent fires to confirm the user's message is successfully logged in the thread. You can get themessageIdhere if needed for advanced tracking.
- Engage the Assistant with Streaming: Call
CreateRunAndManage
- This is where the magic happens! Use the
CreateRunAndManageblock.- Provide the
threadIdandassistantId.- Crucially, set
streamEnabledtotrue(the boolean block).- Example:
- For basic streaming, you can leave
instructionsOverrideas an empty string and use0forpollingIntervalMillisandmaxPollingAttemptsas they are not used when streaming is enabled.
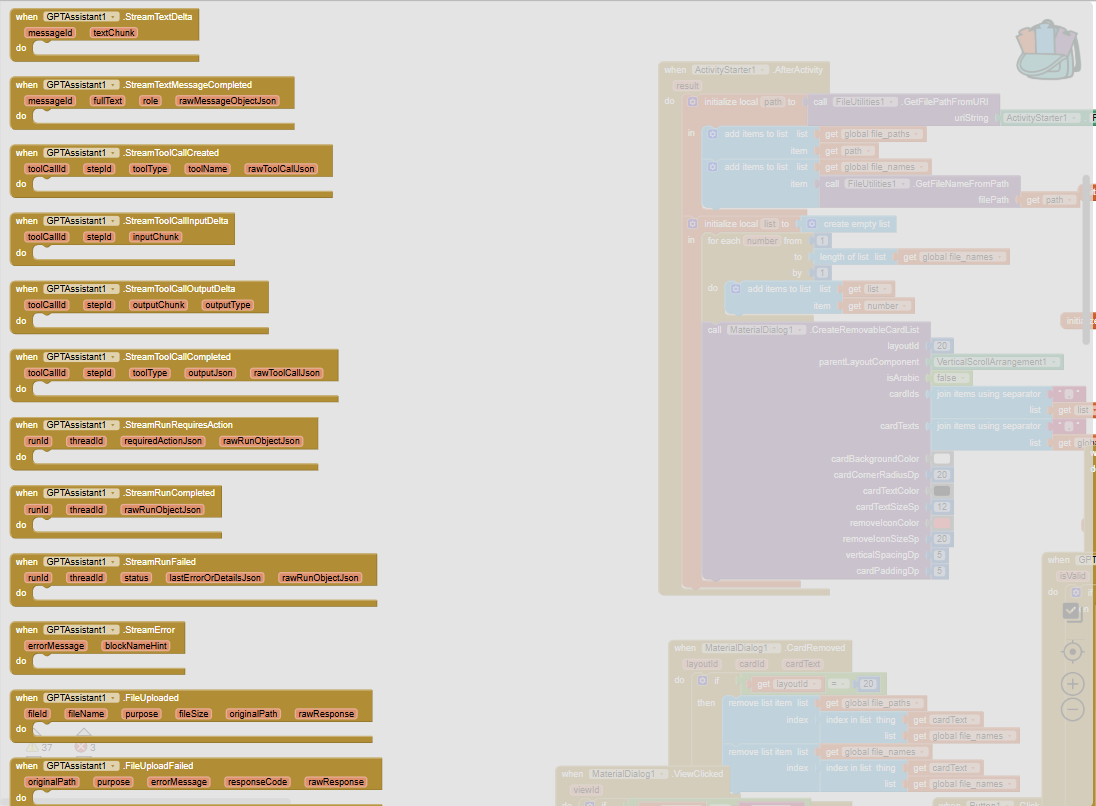
- Catch the AI's Response in Real-Time: Handle Streaming Events
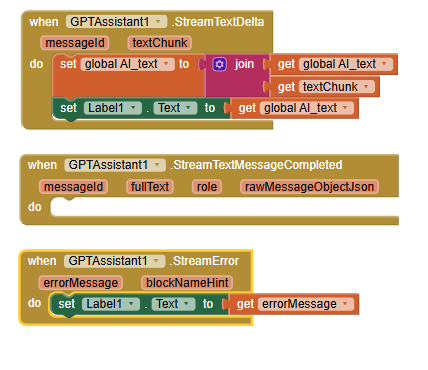
- This is key for a live chat feel. Implement handlers for these events:
when GPTAssistant.StreamTextCreated: Fires once when the assistant begins generating its response text.when GPTAssistant.StreamTextDelta: This is the core of streaming. It fires repeatedly, delivering small chunks (textDelta) of the assistant's message as they are generated. Append these chunks to a Label or TextBox in your UI to create that "live typing" effect.when GPTAssistant.StreamTextMessageCompleted: Fires when the complete assistant message for the current turn has been streamed. You'll get the fullmessageContent.when GPTAssistant.StreamRunCompleted: Fires when the entire run (which might include tool calls and other steps beyond just text generation) is fully complete.when GPTAssistant.StreamError: Catches any errors that occur during the streaming process.- Example Logic:
- On
StreamTextDelta, appendtextDeltato a global variable holding the current response, then update your display Label.- On
StreamTextMessageCompleted, you might finalize the display or log the full response.
Video preview for creating an assistant
Expert Tips for Maximizing GPTAssistant
- Always
InitializeFirst: Your API key is the entry point. No exceptions. - Leverage Dropdowns: Use the built-in dropdowns for
modeland filepurposeparameters. This minimizes errors and ensures compatibility. - Master the Events: The event blocks are your best friends for responsive UIs and robust error handling. Design your app logic around them.
- Explore Advanced Features Gradually: Start with basic chat, then delve into the power of Vector Stores for RAG, Code Interpreter for dynamic computation, and fine-tuned run management. The potential is vast.
- Secure Your API Key: While the extension helps you use the key, remember to manage it responsibly. Do not embed it directly in publicly shared AIA files if possible; consider more secure ways for users to input their own keys in final apps.
Invest in Your App Inventor Future: Get the GPTAssistant Extension Now!
Stop hitting the limits of traditional App Inventor development. It's time to build smarter, more engaging, and truly innovative applications that stand out. The GPTAssistant extension is your key to unlocking the full potential of OpenAI's cutting-edge AI, directly within the platform you already know and love.
For just $7, you're not just buying an extension; you're investing in:
- Rapid AI Integration: Save hundreds of hours of complex coding.
- Access to Powerful Features: Code Interpreter, File Search (RAG), Streaming, and more.
- A Competitive Edge: Build apps that can do more, understand better, and delight users.
- Future-Proof Technology: Stay aligned with OpenAI's evolving Assistant capabilities.
- A Pathway to More Sophisticated Apps: Elevate your projects from simple tools to intelligent solutions.
Ready to transform your App Inventor projects?
- Secure Purchase: Click here to buy with PayPal: Buy with PayPal
- Instant Access: After successful payment, you will be immediately redirected to a download page.
- Download Your Toolkit: Get the GPTAssistant
.aixextension file and a valuable.aiasample project to see it in action and kickstart your development. - Innovate: Import the extension into your App Inventor project and start building the AI-powered apps you've always envisioned!
Don't let this opportunity pass you by. The power of advanced AI is now within your reach in App Inventor.
If you encounter any issues with the payment process or accessing your download, please don't hesitate to contact me via PM on the App Inventor Community forums. I'm here to help you get started on your AI journey!