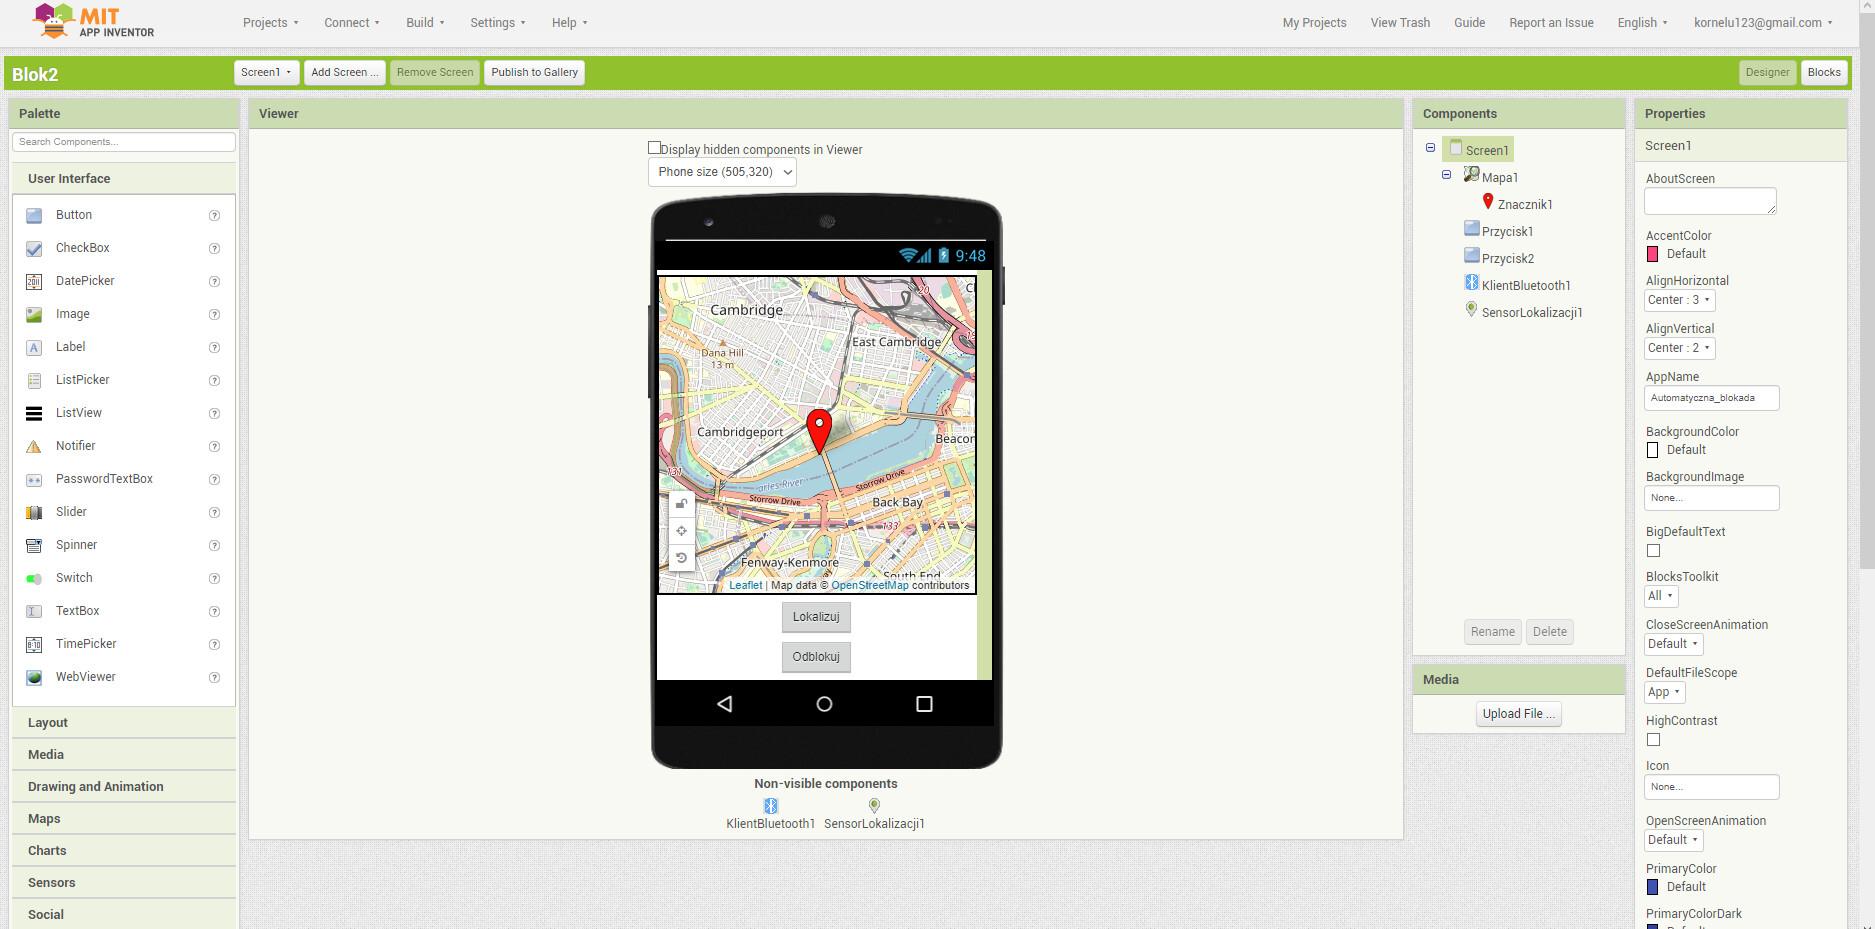
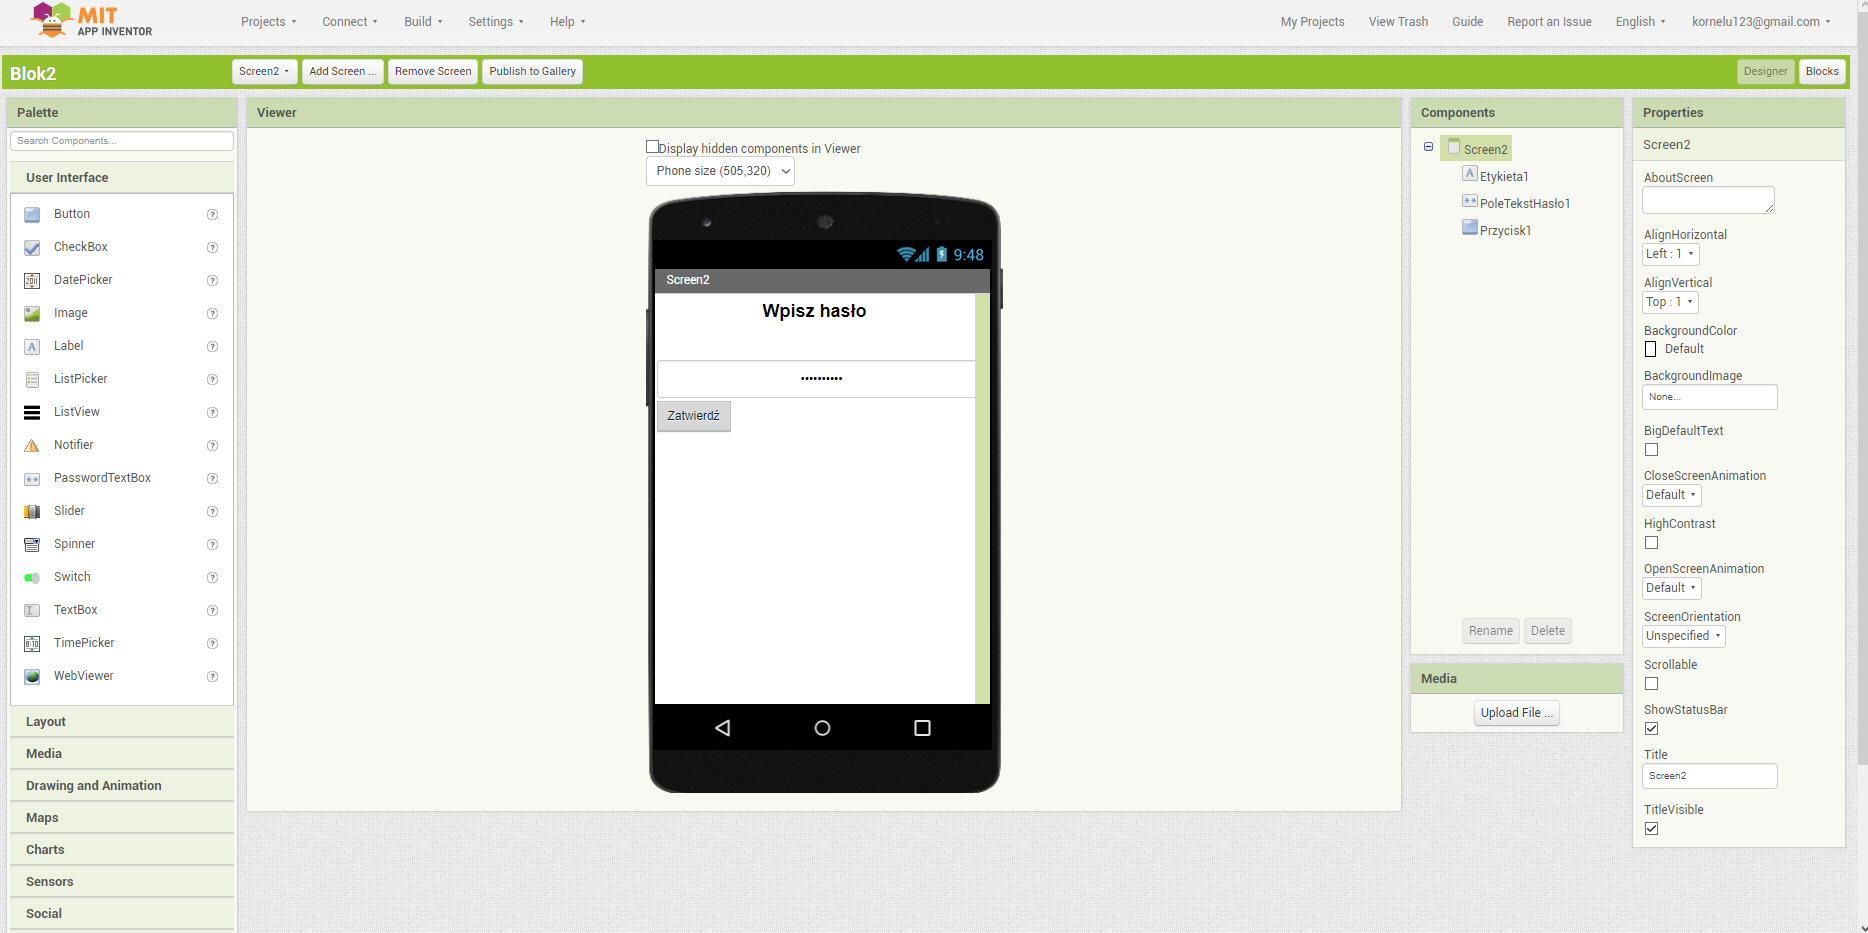
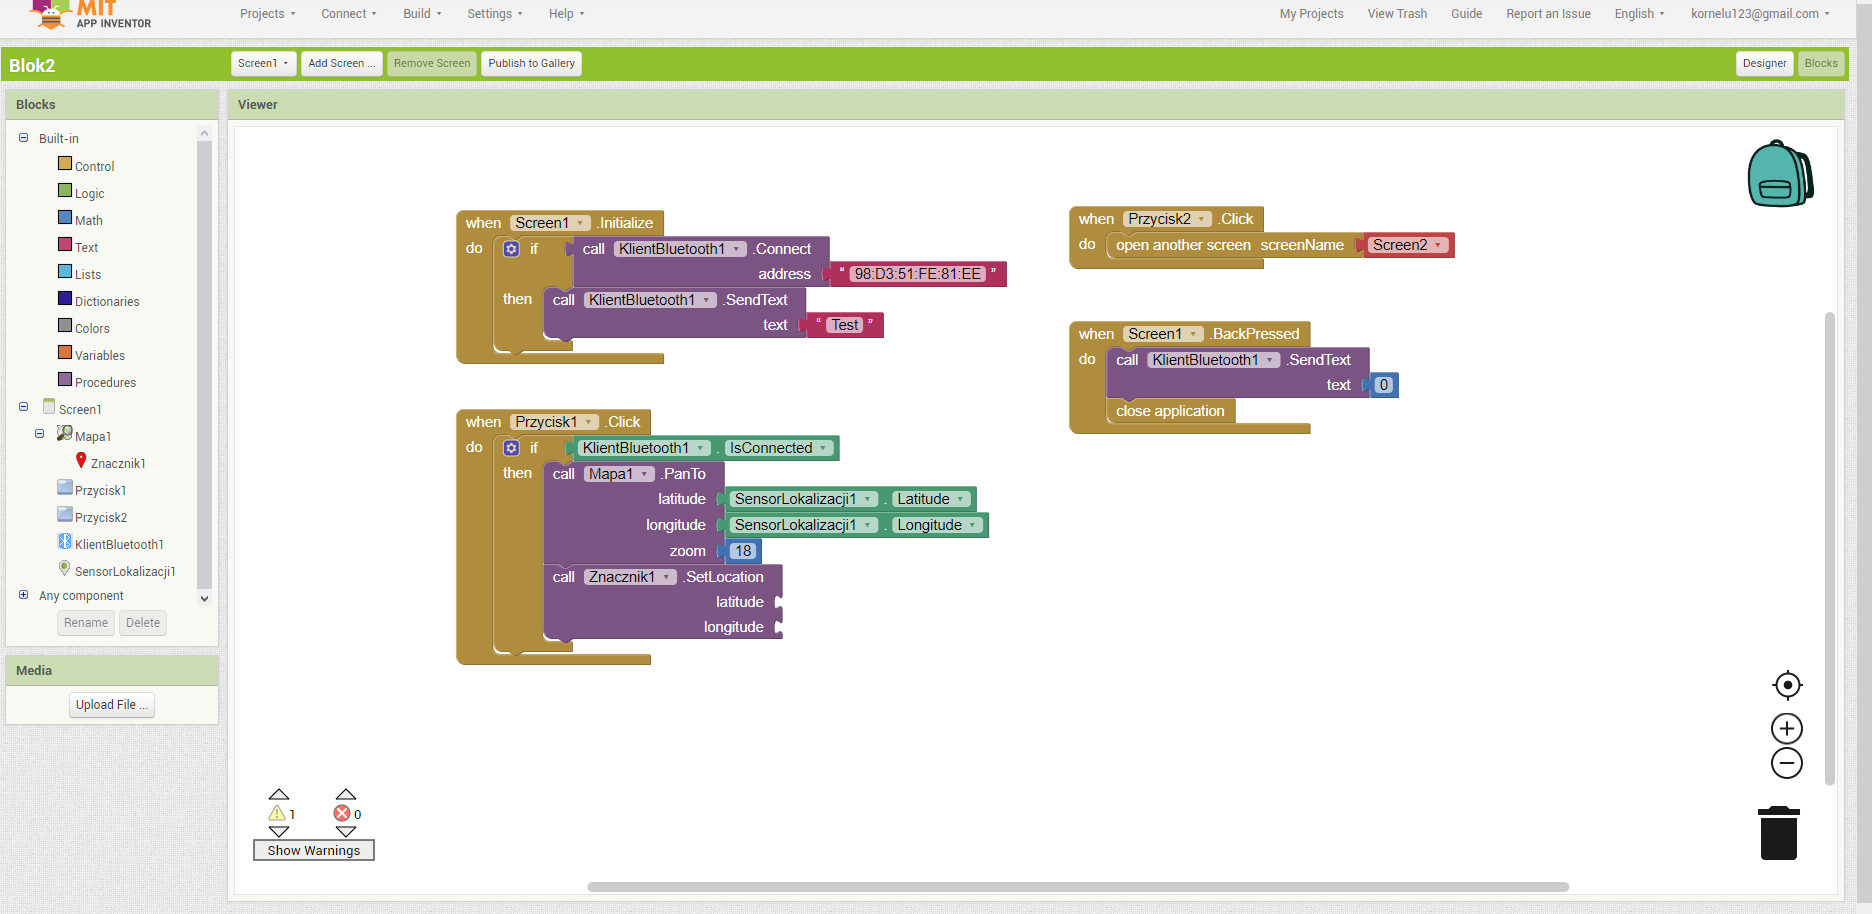
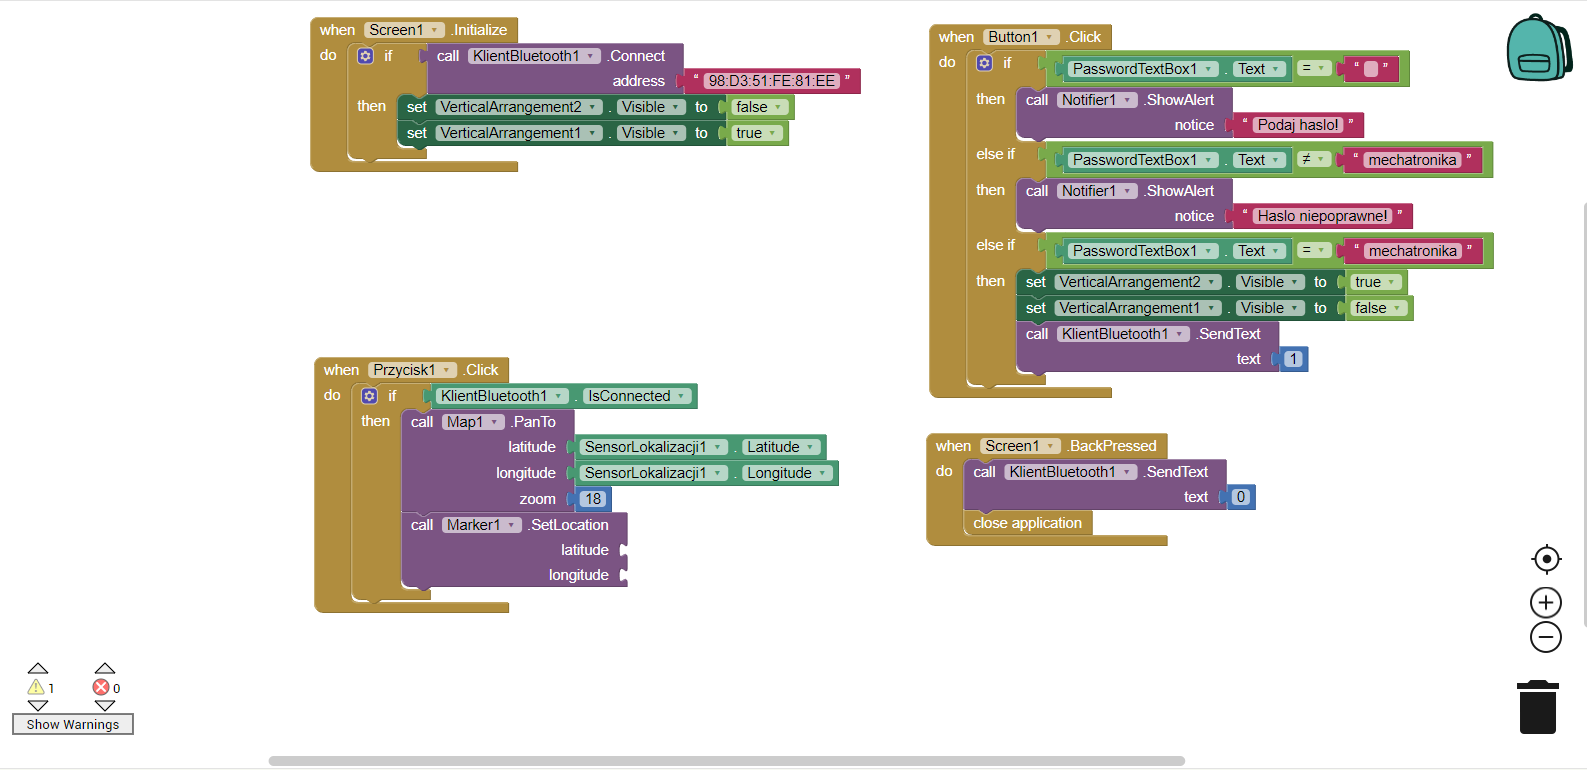
Hello everyone, I am a beginner in the Mit App Inventor environment, so please help. I would like to create an application that when we press the button to unlock, it displays an additional window where we will have to enter the password we set before, if we enter the wrong one, it will say that the wrong password, and if the right one, the application sends the value "1" to the bluetooth module and works normally. After pressing the second button, it receives the location from the GPS module via bluetooth and shows it on the map. I have created the map, the blocks to change to Screen2 also, but I have no idea how to create the blocks in Screen2 with this password and location receive.
#include <LiquidCrystal_I2C.h>
#include <TinyGPS++.h>
#include <SoftwareSerial.h>
#include <PWMServo.h>

PWMServo myservo;
LiquidCrystal_I2C lcd(0x27, 16, 2); // Inicjalizacja obiektu wyświetlacza LCD
SoftwareSerial bluetooth(2, 3); // RX, TX
TinyGPSPlus gps; // Inicjalizacja obiektu TinyGPSPlus


// Zmienne przechowujące dane o prędkości
float speedKMH = 0;
int currentPos = 0; // początkowa pozycja serwomechanizmu


void setup()
{
  Serial.begin(9600); // Inicjalizacja połączenia szeregowego
  bluetooth.begin(9600); // inicjalizacja modułu Bluetooth

  myservo.attach(9); // podłączenie serwomechanizmu do pinu 9
  myservo.write(currentPos); // ustawienie początkowej pozycji serwomechanizmu

  // Inicjalizacja wyświetlacza LCD
  lcd.begin();
  lcd.backlight();

  // Wyświetlenie napisu "Predkosciomierz" na wyświetlaczu LCD
  lcd.setCursor(0, 0);
  lcd.print("Predkosciomierz");
}

void loop()
{

  while (Serial.available() > 0) {
    if (gps.encode(Serial.read())) {
      // Pobranie danych o lokalizacji
      double latitude = gps.location.lat();
      double longitude = gps.location.lng();
      bluetooth.print(latitude, 6);
      bluetooth.print(",");
      bluetooth.println(longitude, 6);
      Serial.print(latitude, 6);
      Serial.print(",");
      Serial.println(longitude, 6);
      // Obliczenie prędkości w km/h
      float speedMS = gps.speed.mps();
      speedKMH = speedMS * 3.6;
    }
  }

  if (bluetooth.available()) { // jeśli dane są dostępne z modułu Bluetooth
    char incomingByte = bluetooth.read(); // odczytaj dane
    if (incomingByte == '1') { // jeśli otrzymano wartość 1
      if (currentPos != 90) { // jeśli serwomechanizm nie jest w pozycji 90 stopni
        myservo.write(90);
        currentPos = 90; // aktualizuj pozycję serwomechanizmu
      }
    }
    if (incomingByte == '0') { // jeśli otrzymano wartość 0
      if (currentPos != 0) { // jeśli serwomechanizm nie jest już w pozycji 0 stopni
        myservo.write(0);
        currentPos = 0; // aktualizuj pozycję serwomechanizmu
      }
    }
  }
  // Wyświetlenie prędkości na wyświetlaczu LCD
  lcd.setCursor(0, 1);
  lcd.print("Speed:");
  lcd.print(speedKMH, 1);
  lcd.print(" km/h ");
}
For your second screen, to keep your Project simple, you might consider using virtual screens instead of Screens. See Building Apps with Many Screens. A virtual screen will help you avoid the possibly complex chore of transferring data between the screens.
For other parts of your Project, here are some resources to help you learn to use the AI2 tools. A very good way to learn App Inventor is to read the free Inventor's Manual here in the AI2 free online eBook App Inventor 2 Book: Create Your Own Android Apps ... the links are at the bottom of the Web page. The book 'teaches' users how to program with AI2 blocks.
So yes, I did almost everything I wanted to do, I used this virtual screen, however:
When you turn on the application displays everything, only after a while the map disappears, is it possible to do something about it or is it normal before the application loads?
I still do not know how to receive location from bluetooth. That topic didn't help me much, because there it is done via WiFi, while in my case it is supposed to be done via bluetooth.
Dzień dobry @xK2x ,
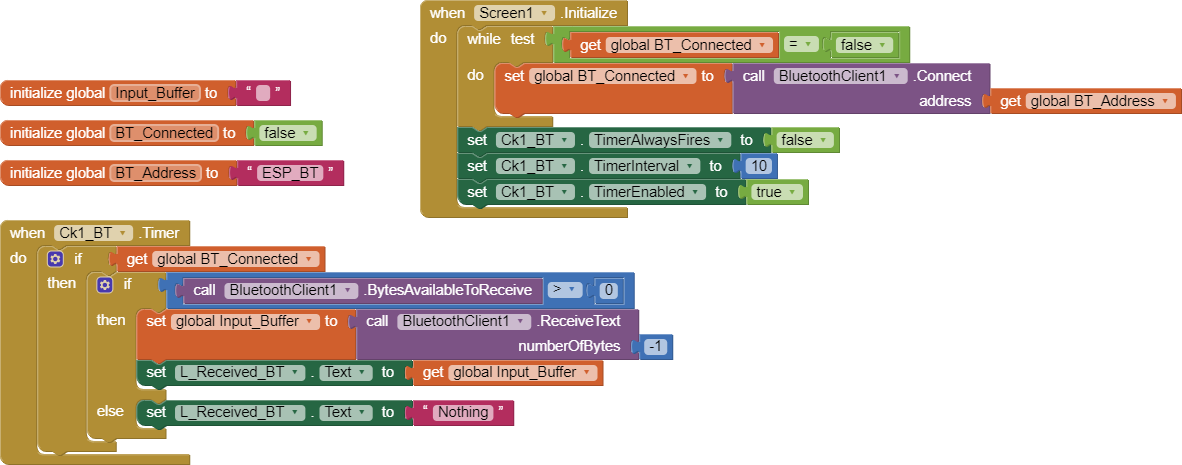
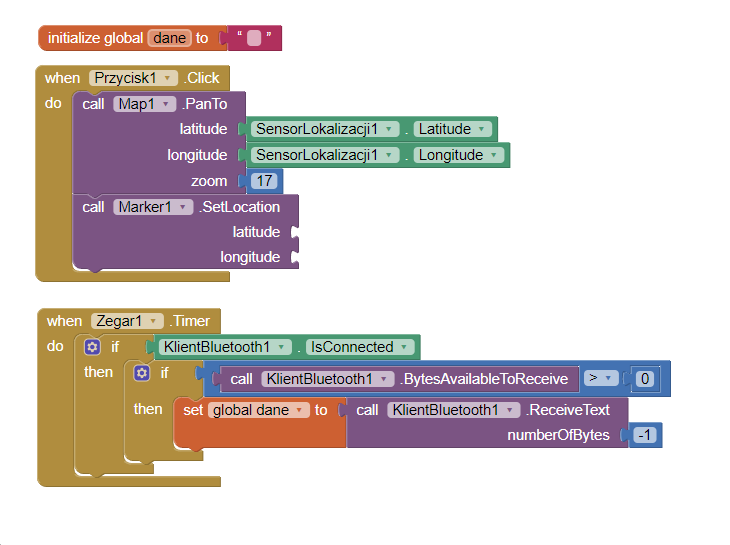
I think that your blocks aren't only those you have posted, because I see nothing which is dedicated to the BT receiving from your device.
Something like:
As @SteveJG has already said, the topic related to BT communication between AI2 and BT devices (typically Arduinos) has been treated a lot in the Community. Perhaps, have you got a look to the web sites of @Juan_Antonio ? (www.Kio4.com). You can find therein tons of code related to BT comms between various types of Arduino boards and AI2.
Asa general hint, I suggest you to divide the problem in two parts: first of all, verify whether your Arduino is sending out data on the BT (if you haven't done it yet) To do so, use an app like Serial Bluetooth Terminal (free from PlayStore) and verify that your phone (or PAD) ir receiving from Arduino, then, when you are done with it, you can focus your efforts on the AI2 app.
Rgds.
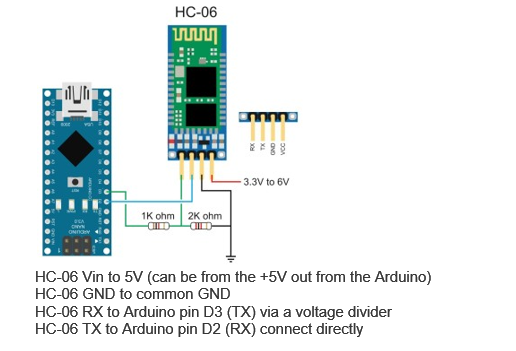
EDIT: I've seen that you use the SoftWareSerial to connect your Arduino to the BT shiled, this means you have a HC05 or HC06 ?
If so please be aware of the following:
Furthermore, be sure that the baudrate bwtween the CPU board and the shield is the same one (i.e. 9600, or whatever, but not greater than 38400, else the SoftwareSerial library has erratic behaviours).
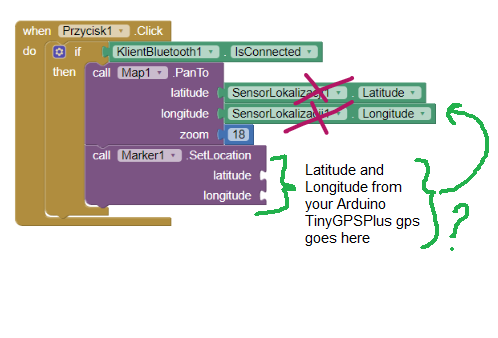
Where is the latitude and longitude coming from? The Arduino TinyGps module or from your Android? To post and see the coordinates from the Arduino, they need to be available at the time you press Button1, otherwise you will see a map of the Atlantic Ocean (coordinates 0,0 ; which are the default coordinates)
This explains how the gps works in your Android, Using the Location Sensor. The GPS module in your Arduino obeys the same principles. If the latitude and longitude showing where your Arduino are not present, the Marker.SetLocation Block will not work.
I would like the location on the map to be shown from the location on the phone, while the marker would have the location received via bluetooth from the GPS module from the Arduino, if it is at all possible. If there isn't, then just to have the map display the location received via bluetooth from the Arduino, not from the phone GPS. I'm trying to figure out how this is supposed to be done, but I'm getting nowhere even with the tutorials, because I don't know just how to receive this data from the bluetooth module, what blocks I should use.
Yes this is possible. It might not be possible with a zoom of 18,. To display both depends on whether both the Arduino and the Android are in the same OpenStreetMap tile.
Dear @xK2x,
Since the Serial Monitor shows lat & lon, this means that your Arduino has this couple of data, therefore it's just a matter to send them to the app ?
"because I don't know just how to receive this data from the bluetooth module, what blocks I should use".
Then, is my previous post not clear ?
I've shown which blocks have to be used for a simple BT comms between AI2 and Arduino.
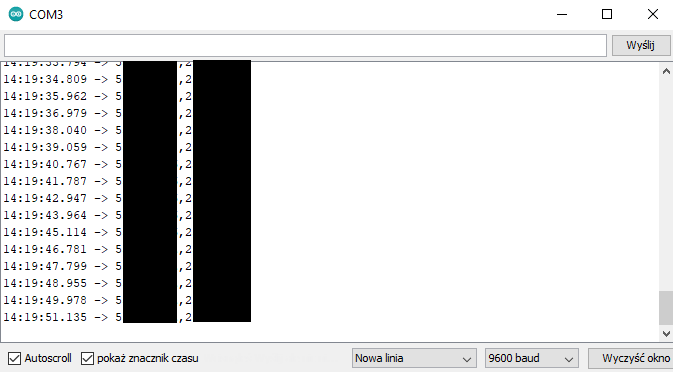
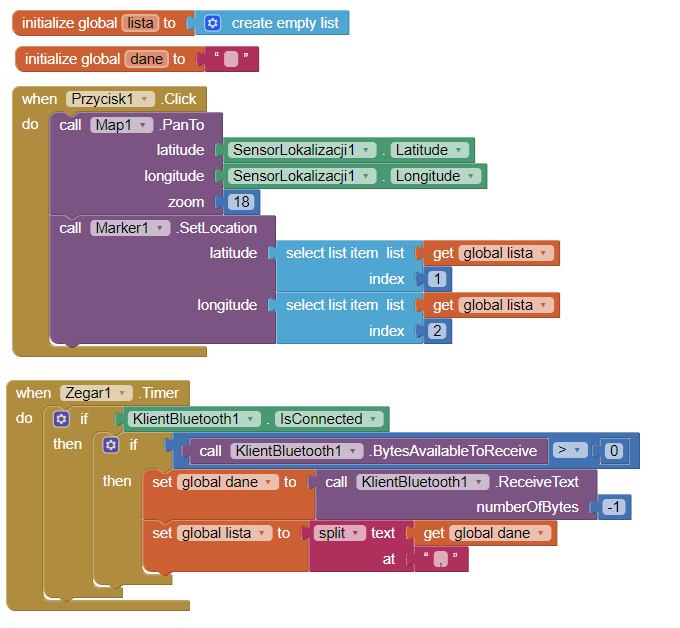
OK, I manage to receive data via bluetooth, but what next? How do I divide this data received via bluetooth into altitude and latitude so that I can use it in the map?
Congratulations. Are you going to show us how you get the data ? and what the data stream looks like?
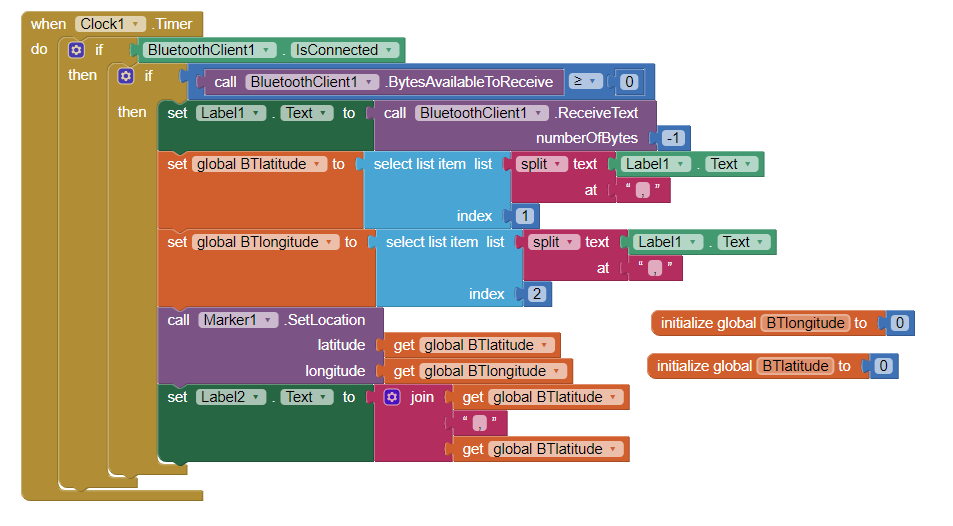
Probably divide the data into latitude and longitude, assign them to latFromArduino and lonFromArduino global variables and use these coordinates in the Marker1.SetLocation Block.
How to divide the data? Show us how the data is being read by the Android. You are possibly capturing the data to a Label now perhaps as a stream of coordinates. Show us what that data stream looks like.
The data probably looks like this in the serial port monitor, string of numbers separated by ",". I created a timer and a global variable for the received data, but I'm not sure what to assign to the global variables lat and lnd to get specific data from it, like you said.
//Edit
So i did something like this and it seems to work