This is a tutorial for HandPose detection with tensorflow.js and customWebview.
1. Prepare the html
This is the html used for the Webview:
<html>

<head>
	<meta charset="UTF-8">
	<title>Handpose with tfjs</title>
	<meta name="viewport" content="width=device-width,initial-scale=1,maximum-scale=1.0, user-scalable=no">

	<script src="https://cdn.jsdelivr.net/npm/@mediapipe/hands"></script>
	<script src="https://cdn.jsdelivr.net/npm/@tensorflow/tfjs-core"></script>
	<script src="https://cdn.jsdelivr.net/npm/@tensorflow-models/hand-pose-detection"></script>

	<style>
		*{margin:0; padding:0}
	</style>

</head>

<body>
	<canvas id="canvas" width=360 height=360 ></canvas>
	<video id="video"  width=360 height=360 autoplay  style="display:none"></video>

	<script>
		let video = document.getElementById("video");
		let canvas = document.getElementById("canvas");
		let ctx = canvas.getContext("2d");
		let hands;
		let detector;

		let showKeyPoints = true;
		let useFront = true;

		function startVideo(){
			if (navigator.mediaDevices && navigator.mediaDevices.getUserMedia) {
				let mode = useFront ? "user" : "environment";
				navigator.mediaDevices.getUserMedia({ audio: false, video: {width:360,height:360,facingMode: mode} }).then(function(stream) {
					video.addEventListener("loadedmetadata",loadModel);
					video.srcObject = stream;
					video.play();

					drawCameraIntoCanvas();
					feedback("onVideoReady");
				});
			}else{
				feedback("onError","Failed to capture video");
			}
		}


		async function loadModel() {
			const model = handPoseDetection.SupportedModels.MediaPipeHands;
			const detectorConfig = {
				runtime: 'mediapipe',
				maxHands:2,
				solutionPath: "https://cdn.jsdelivr.net/npm/@mediapipe/hands"
			};
			detector = await handPoseDetection.createDetector(model, detectorConfig);

			feedback("onModelReady");

			estimateHands();
		}

		async function estimateHands(){
			const estimationConfig = {flipHorizontal: useFront};
			const rawHands = await detector.estimateHands(video, estimationConfig);

			hands = getKeypoints(rawHands);
			feedback("onHands", hands);

			if(showKeyPoints){drawKeypoints();}

			window.requestAnimationFrame(estimateHands);
		}

		function drawCameraIntoCanvas() {
			if(useFront){
				ctx.clearRect(0, 0, 360, 360);
				ctx.save();
				ctx.scale(-1 , 1);
				ctx.translate( -360, 0);
				ctx.drawImage(video, 0, 0, 360, 360);
				ctx.restore();
			}else{
				ctx.drawImage(video, 0, 0, 360, 360);
			}
			window.requestAnimationFrame(drawCameraIntoCanvas);
		}

		function drawKeypoints() {

			for (let i = 0; i < hands.length; i += 1) {

				for (let j = 0; j < hands[i].keypoints.length; j += 1) {
					let keypoint = hands[i].keypoints[j];

					ctx.fillStyle="#ff0000";
					ctx.beginPath();
					ctx.arc(keypoint[0], keypoint[1], 3, 0, 2 * Math.PI);
					ctx.fill();

				}
			}
		}

		function getKeypoints(hands){
			let keypoints = [];
			for (let i = 0; i < hands.length; i += 1) {

				let hand = {};
				let points = [];
				for (let j = 0; j < hands[i].keypoints.length; j += 1) {
					let keypoint = hands[i].keypoints[j];
					points.push([keypoint.x, keypoint.y]);
				}
				hand.handedness = hands[i].handedness;
				hand.keypoints = points;
				keypoints.push(hand);
			}
			return keypoints;
		}

		function feedback(eventName, message){
            let log = {};
            log.event = eventName;
            if(message){log.data = message;}

			if(window.AppInventor){
				window.AppInventor.setWebViewString(JSON.stringify(log));
			}else{
				console.log(JSON.stringify(log));
			}
		}


		function toggleCamera(){
			useFront = !useFront;
			startVideo();
		}

		function toggleKeyPoints(){
			showKeyPoints = !showKeyPoints;
		}

		startVideo();


	</script>
</body>

</html>
Function of this html:
- download the js and model needed.
- show the video on canvas;
- detect the hands;
- draw the hands on the canvas;
- you can toggle camera between front and rear;
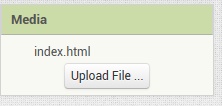
you can download it as 'index.html', and upload the html file to assets:
2. DESIGNER VIEW
- add a vertical arrangemetn on Screen and set its width and height to 360;
- add a Label;
- add a Camera (to add Camera permission declaration)
3. BLOCK VIEW
We use customWebview extension to load the html.
(why not native Webview component? because the Webviewer do not have video permission)
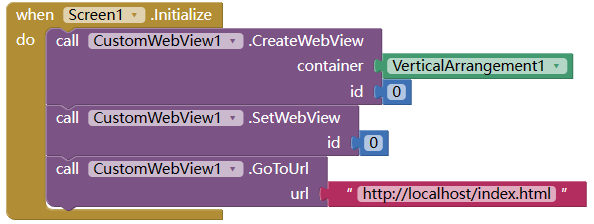
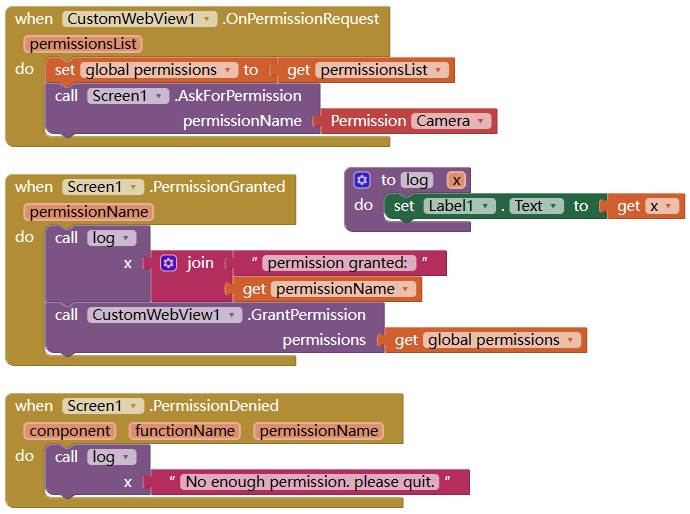
The html will ask permission of video capture, we will pop up a dialog to ask permission:

Now you can see the video on the screen.
4. DETECT HANDS
Now when we put our hand before the camera, maybe there is nothing happened.
This is because the model needed is still being downloaded, it's about 15M.
(you may wait for a long time, or restart the aicompanion)
Luckly we have a feed back from html when the model is ready.
When model is ready, CustomWebView.WebViewStringChanged event will be fired with value
{"event":"onModelReady"}
Now we can detect the hands, and if a hand is detected, it will be draw on the canvas.
and the data of the detection will be send back with WebViewStringChanged .
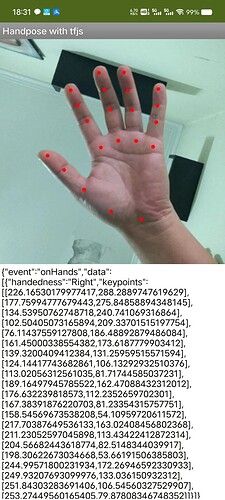
{"event":"onHands", "data":[.....]}
As limitation of the model, max 2 hands can be detected same time.
5. MANIPULATE THE HAND DATA
From above image, we can see the structure of the hand data as following:
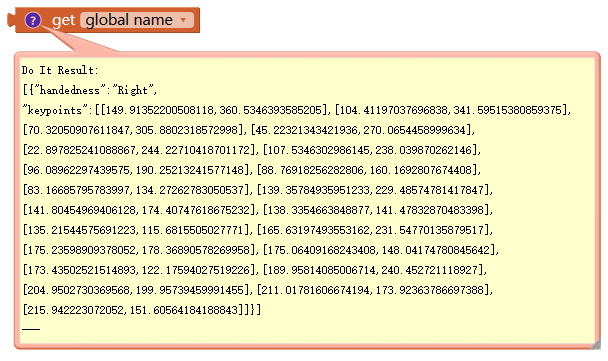
It's a list of dictionary, with lenth of 0, or 1, or 2.
handedness is Right or Left.
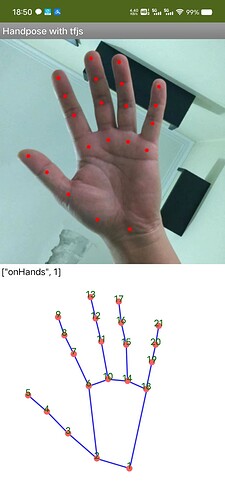
keypoints is a list with length 21 of corrdination on the canvas.
(below image is 0-based)
Now we add a canvas component on Screen1, and set its height/width to 360, and we will draw the 21 dots on the canvas:
(The hand video can be set to invisible, the detection will still be working. )
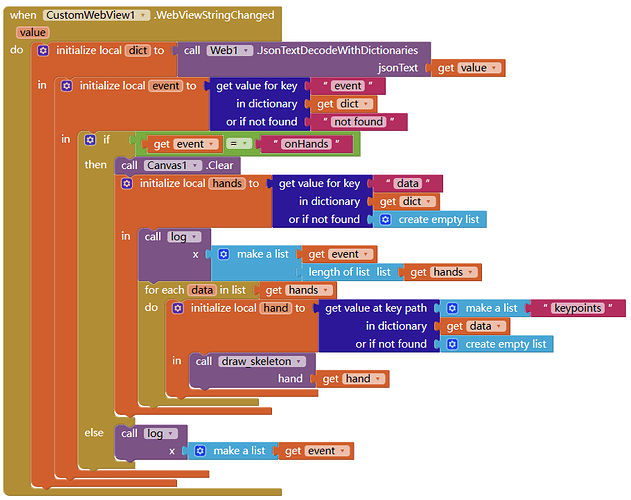
Check if onHands, we get the relavant data, and visualize it on canvas.
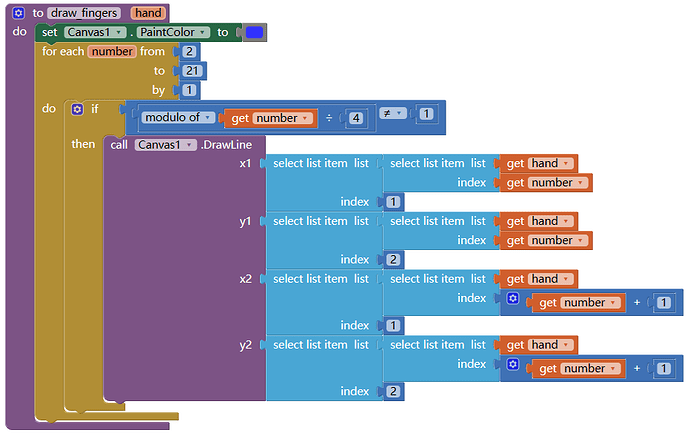
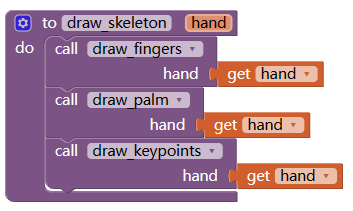
draw 5 fingers:
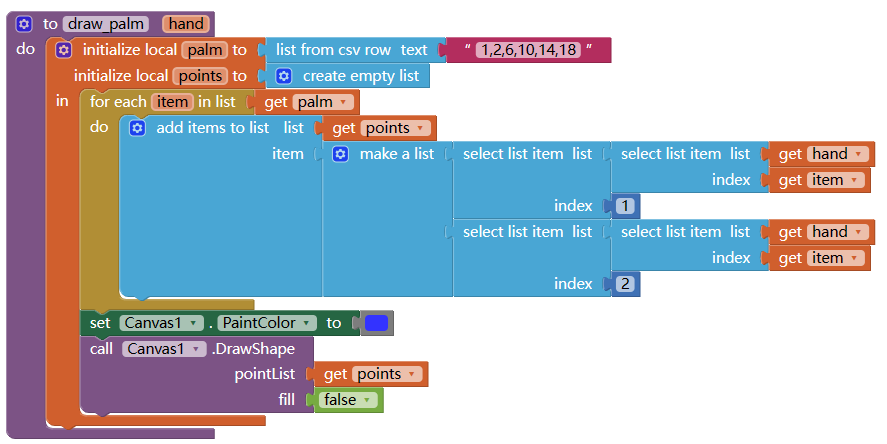
draw the palm with dots number 1,2,6, 10, 14, 18
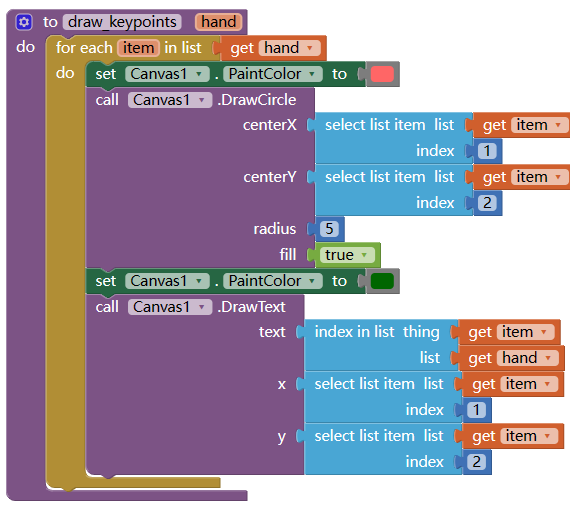
draw a dot and number on each keypoints
6. MAKE IT OFFLINE
The downloading model at first time will be time consuming. or we want to make the app run totally off-line.
Normally we can upload the html file, js file, model file to assets, but the model is too big, we can not do that. how to build a big app.
7. SAMPLE AIA
handpose_tfjs.aia (83.7 KB)
8. CREDIT
Thanks @vknow360 for customWebview extension
and tensorflow hand-pose-detection
