wow i like it 

Hi there could you please put the whole steps for the app and thank you
In WebViewer.
-
Error: header fields are too long for server to interpret.
-
If you use the codes https://randomnerdtutorials.com/esp32-cam-video-streaming-face-recognition-arduino-ide/ to build a Web Server and try to see the stream (http://192.168.1.7/stream) in a WebViewer, you will get the error:
header fields are too long for server to interpret. -
@ewpatton explains this error here:
https://groups.google.com/forum/#!msg/mitappinventortest/jKLQBeKQ9TA/vQSc87hnAwAJ -
In the same topic, Frank Bröker finds the solution:
uses this library and load the example: ./examples/WiFiCam/WiFiCam.ino
with this library you can see the stream in a WebViewer component.
https://github.com/yoursunny/esp32cam -
In this way you can see the stream and put Buttons on the same Screen.
-
Comments on the Rui Santos codes.
-
ESP32-CAM Take Photo and Save to MicroSD Card. It says it clearly, you take a photo and save it in the SdCard. I have used a 32 GB SdCard and it has worked for me. It is like a camera with a flash.
-
ESP32-CAM Take Photo and Display in Web Server.
Take a photo, save it in the internal memory of the ESP32 (NOT in the SdCard) and display it through a web server.
On this page I have modified the code so that in addition to being saved in the internal memory it is saved in the SdCard.
1 Like
Web Server. Web page in SdCard.
-
This code works with ESP32 in board D1 R32 with SdCard reader:
https://github.com/espressif/arduino-esp32/tree/master/libraries/WebServer/examples/SDWebServer -
I have modified that code to work on ESP32-CAM board. It is here.
-
The website is on the SdCard. I have used a 32GB microSdCard.
The SdCard can contain index.htm files or direct images.
It also works with the WebViewer component.

- IP Webcam.
If you don't have this module and you want to stream videos online, you can use your mobile as IP WebCam with this app from the Play Store.
Click in "Start Server"
Then in your PC write IP, example: 192.168.1.5:8080

Hello sir , my quation was in blocks what we add in -
- activity class
2.activity pacakge
?
or not need of that just only we have to add the "action" ? in the activity starter
Action and DataUri
First try in your PC Browser, example:
192.168.1.7:81/stream
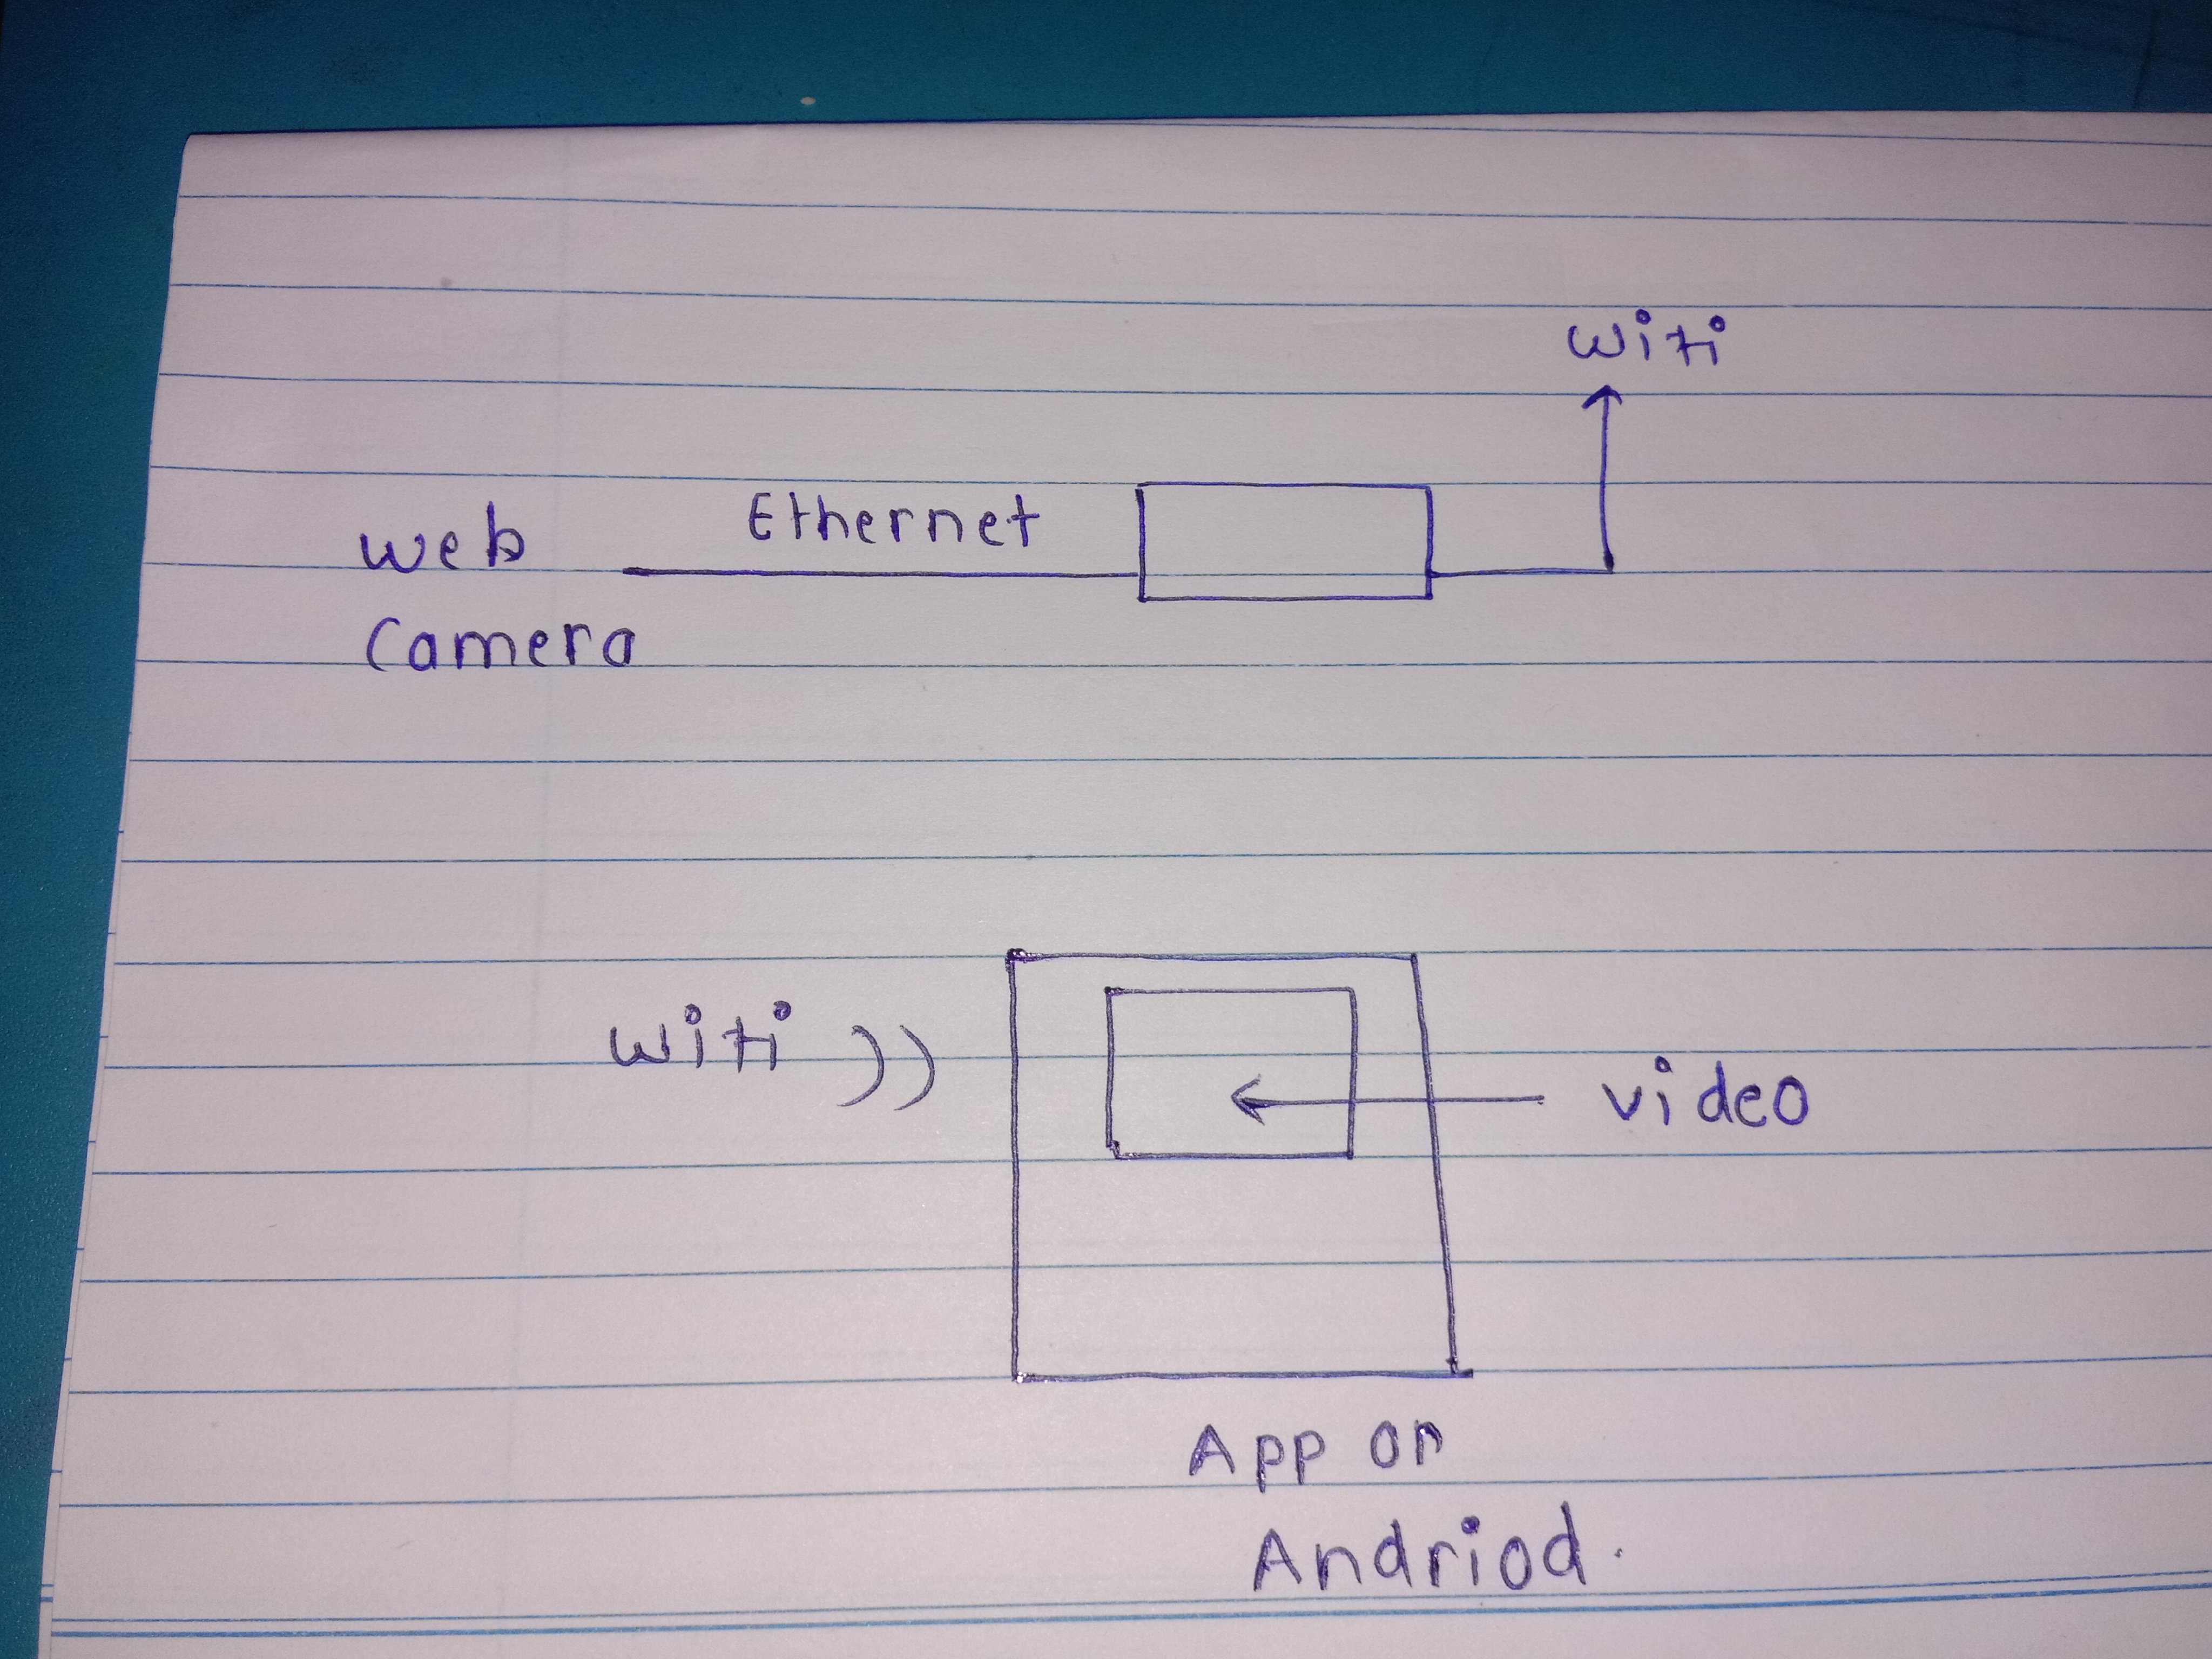
this is block diagram of my projcet
but we not yet decide the wifi module but at last any wifi modul used ,i got the camera stream on serial monitor like-http//192.168.1.92
so how i acces this on my app .
according to ur say that this camera stream not opened in webviewr so i used activity starter .
but my quation was i need to connect my mobile phone wifi with the wifi module or it is without connect wifi is connectivity done through activity starter beacuse i have to make just protocol of this app how streaming i will done and then after some days i do practictly it is..!

this is i do for utube video insted of that i just add for http//192.168.1.92 camera video stream

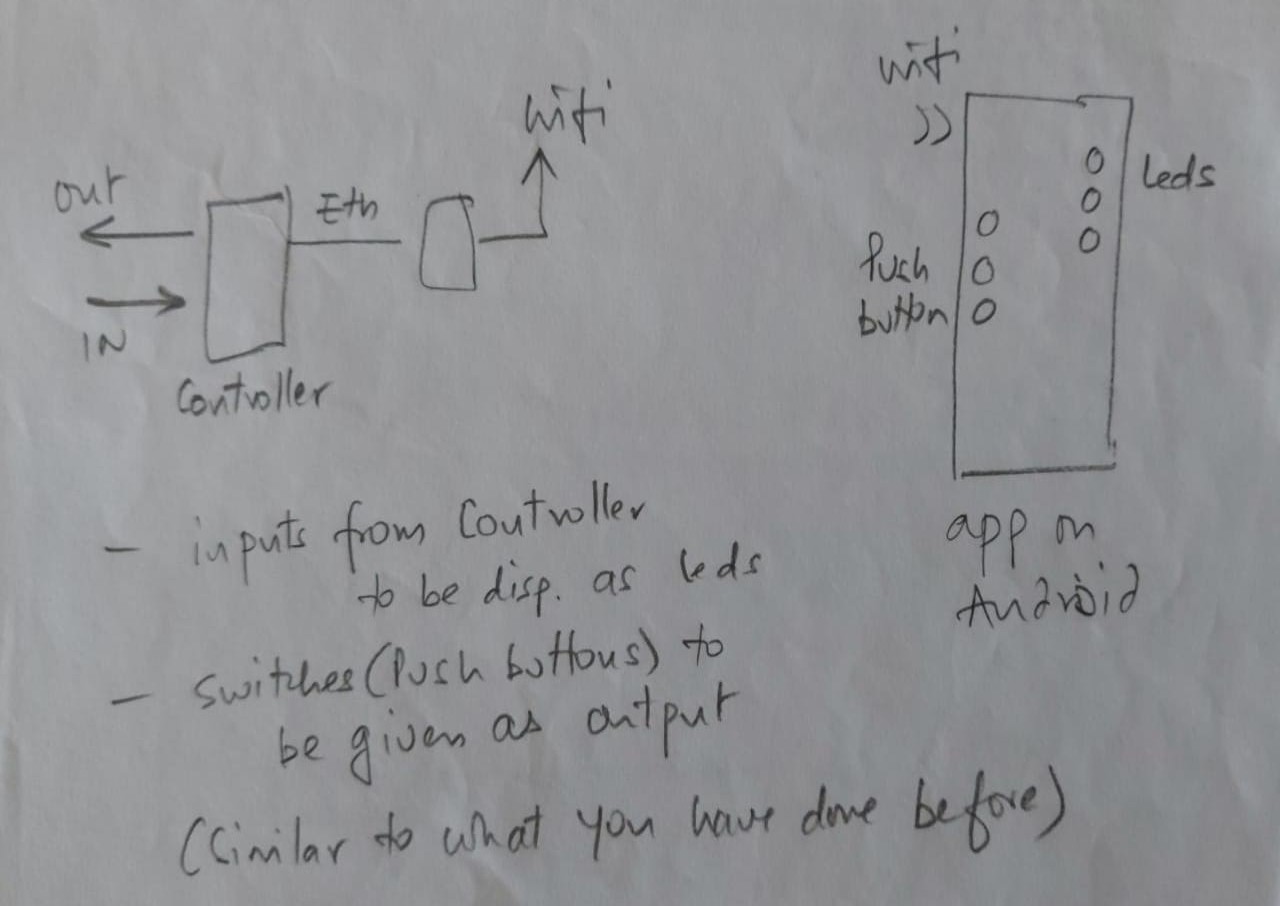
and i have to make another app through wifi i have to controles the led of controoler
so by using web url like http // 192.168.9.21 if i got after run the program on serial monitor then in this in app wifi conncetivity i have to add the ip addres of wifi module ? or not
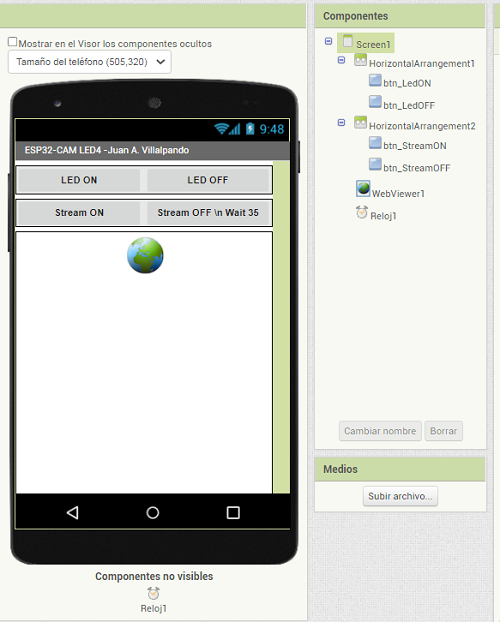
To view the cam in the app, try:
To turn LEDs on/off, see:
1 Like
sir if i used the activity starter i just want like when we acces the link through web in case of wifi or activity starter
there is connection done through entering ip addres in text box is same for activity starter.?

1 Like
in this sam,e as led on off is working witj entering ip addres in text box ..
but for video streaming throught activity starter is coonectivity do like this for wifi is working or not or just we have to acces only not need of wifi connectivity in textbox by entering ip addres!!
or like this only i have to do ( blocks)
1 Like
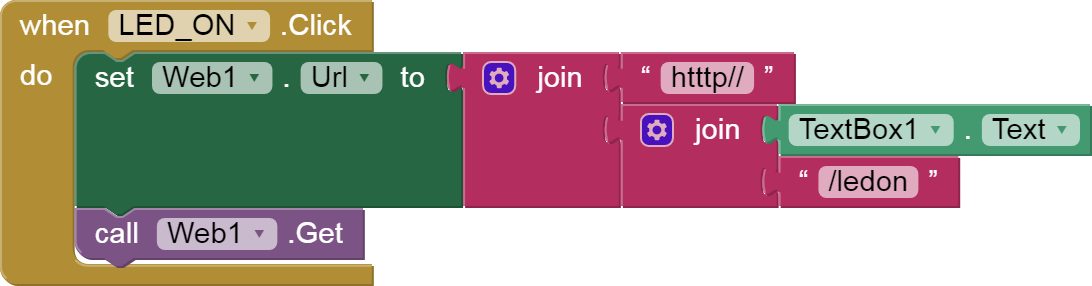
I have not tested it, but you can have the same web server for video transmission and to turn on / off the LED.
Example: TextBox1.Text: http://192.168.9.21
It depends on the code of the ESP32
OK thanks for ur guidence !
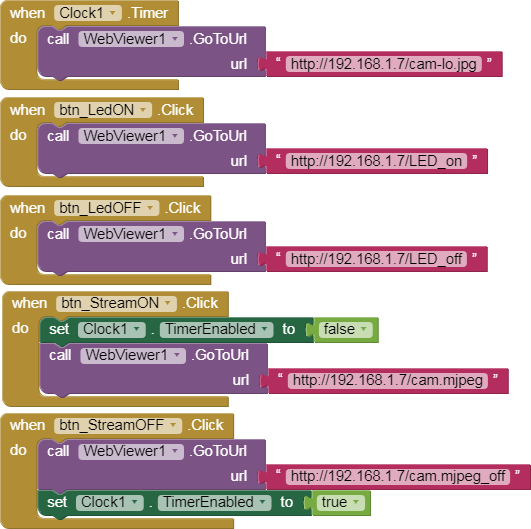
- Turn on/off LED4 of the ESP32-CAM.
p247i_ESP32_Cam.aia (2.3 KB)
-
The ESP32-CAM module has a high luminosity LED, we are going to turn it on/off from an application.
-
We are going to use the library that we saw in one of the previous post:
https://github.com/yoursunny/esp32cam -
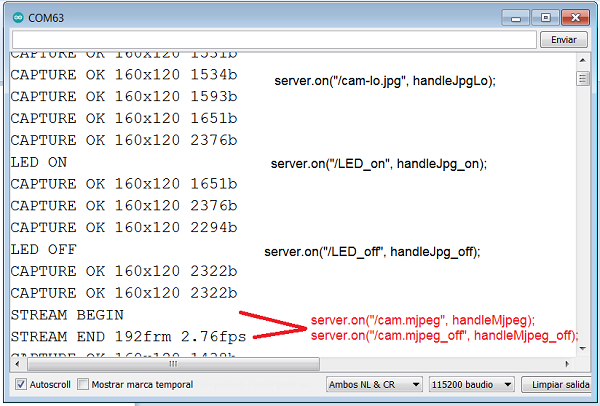
The Clock has an Interval of 800 ms, every that time a CAPTURE will be made.
-
Through the Buttons we send an on/off order to LED4.
-
We can also see the video in Stream, to turn it off we must wait about 35 seconds.
#include <esp32cam.h>
#include <WebServer.h>
#include <WiFi.h>

const char* WIFI_SSID = "my-ssid";
const char* WIFI_PASS = "my-pass";

WebServer server(80);

static auto loRes = esp32cam::Resolution::find(320, 240);
static auto hiRes = esp32cam::Resolution::find(800, 600);

void handleBmp()
{
  if (!esp32cam::Camera.changeResolution(loRes)) {
    Serial.println("SET-LO-RES FAIL");
  }

  auto frame = esp32cam::capture();
  if (frame == nullptr) {
    Serial.println("CAPTURE FAIL");
    server.send(503, "", "");
    return;
  }
  Serial.printf("CAPTURE OK %dx%d %db\n", frame->getWidth(), frame->getHeight(),static_cast<int>(frame->size()));

  if (!frame->toBmp()) {
    Serial.println("CONVERT FAIL");
    server.send(503, "", "");
    return;
  }
  Serial.printf("CONVERT OK %dx%d %db\n", frame->getWidth(), frame->getHeight(), static_cast<int>(frame->size()));

  server.setContentLength(frame->size());
  server.send(200, "image/bmp");
  WiFiClient client = server.client();
  frame->writeTo(client);
}

void serveJpg()
{
  auto frame = esp32cam::capture();
  if (frame == nullptr) {
    Serial.println("CAPTURE FAIL");
    server.send(503, "", "");
    return;
  }
  Serial.printf("CAPTURE OK %dx%d %db\n", frame->getWidth(), frame->getHeight(), static_cast<int>(frame->size()));

  server.setContentLength(frame->size());
  server.send(200, "image/jpeg");
  WiFiClient client = server.client();
  frame->writeTo(client);
}

void handleJpgLo()
{
  if (!esp32cam::Camera.changeResolution(loRes)) {
    Serial.println("SET-LO-RES FAIL");
  }
  serveJpg();
}

void handleJpgHi()
{
  if (!esp32cam::Camera.changeResolution(hiRes)) {
    Serial.println("SET-HI-RES FAIL");
  }
  serveJpg();
}

void handleJpg()
{
  server.sendHeader("Location", "/cam-hi.jpg");
  server.send(302, "", "");
}

void handleMjpeg()
{
  if (!esp32cam::Camera.changeResolution(hiRes)) {
    Serial.println("SET-HI-RES FAIL");
  }

  Serial.println("STREAM BEGIN");
  WiFiClient client = server.client();
  auto startTime = millis();
  int res = esp32cam::Camera.streamMjpeg(client);
  if (res <= 0) {
    Serial.printf("STREAM ERROR %d\n", res);
    return;
  }
  auto duration = millis() - startTime;
  Serial.printf("STREAM END %dfrm %0.2ffps\n", res, 1000.0 * res / duration);
}

void setup()
{
  Serial.begin(115200);
  Serial.println();

  {
    using namespace esp32cam;
    Config cfg;
    cfg.setPins(pins::AiThinker);
    cfg.setResolution(hiRes);
    cfg.setBufferCount(2);
    cfg.setJpeg(80);

    bool ok = Camera.begin(cfg);
    Serial.println(ok ? "CAMERA OK" : "CAMERA FAIL");
  }

  WiFi.persistent(false);
  WiFi.mode(WIFI_STA);
  WiFi.begin(WIFI_SSID, WIFI_PASS);
  while (WiFi.status() != WL_CONNECTED) {
    delay(500);
  }

  Serial.print("http://");
  Serial.println(WiFi.localIP());
  Serial.println("  /cam.bmp");
  Serial.println("  /cam-lo.jpg");
  Serial.println("  /cam-hi.jpg");
  Serial.println("  /cam.mjpeg");

  server.on("/cam.bmp", handleBmp);
  server.on("/cam-lo.jpg", handleJpgLo);
  server.on("/cam-hi.jpg", handleJpgHi);
  server.on("/cam.jpg", handleJpg);
  server.on("/cam.mjpeg", handleMjpeg);

  server.begin();
}

void loop()
{
  server.handleClient();
}
- We can change the resolution of the capture:
static auto loRes = esp32cam::Resolution::find(160, 120);
- This example in Spanish:
http://kio4.com/arduino/247_Wemos_WebCam.htm#led4
- ESP32-CAM captures images and uploads them to Google Drive. (I)

Previously, it is interesting to carry out this example of @TIMAI2 to upload and update files in Google Drive:
-
To carry out this example I will follow this tutorial in Spanish:
ESP32-Cam: Subir fotos a Google Drive – Software | IoT -
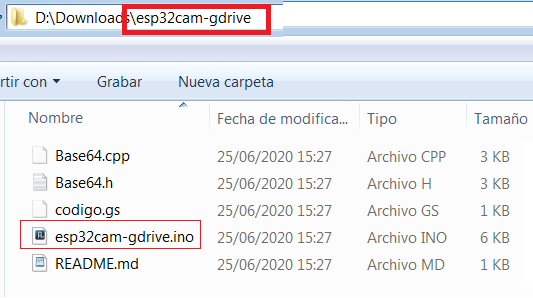
We download the necessary files to a folder:
-
Note that the name of the Sketch is the same as its directory and that the Base64 Library is in the same directory.
-
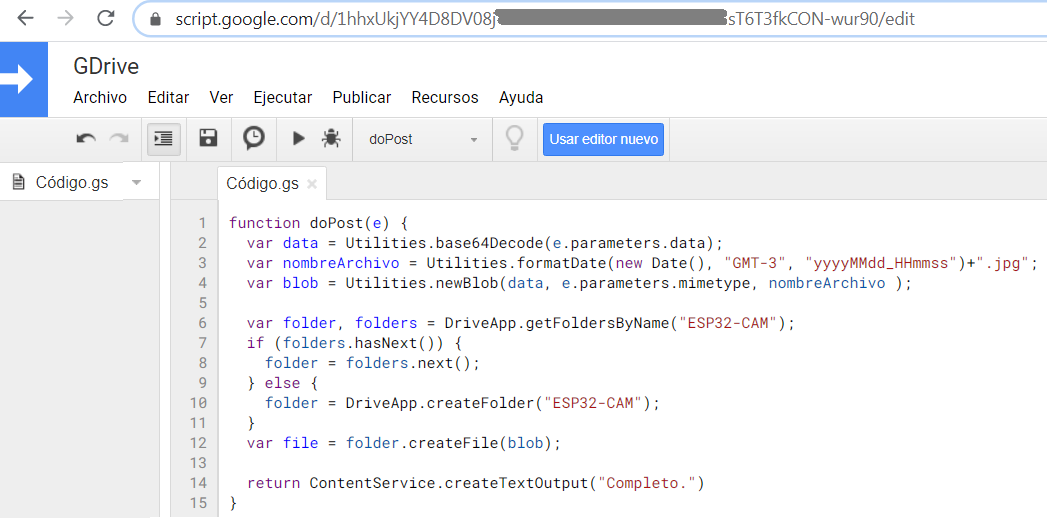
You copy the content of the codigo.gs in Google Script.
-
ESP32-CAM will capture an image every minute, convert it to Base64, and upload it to Google Drive.
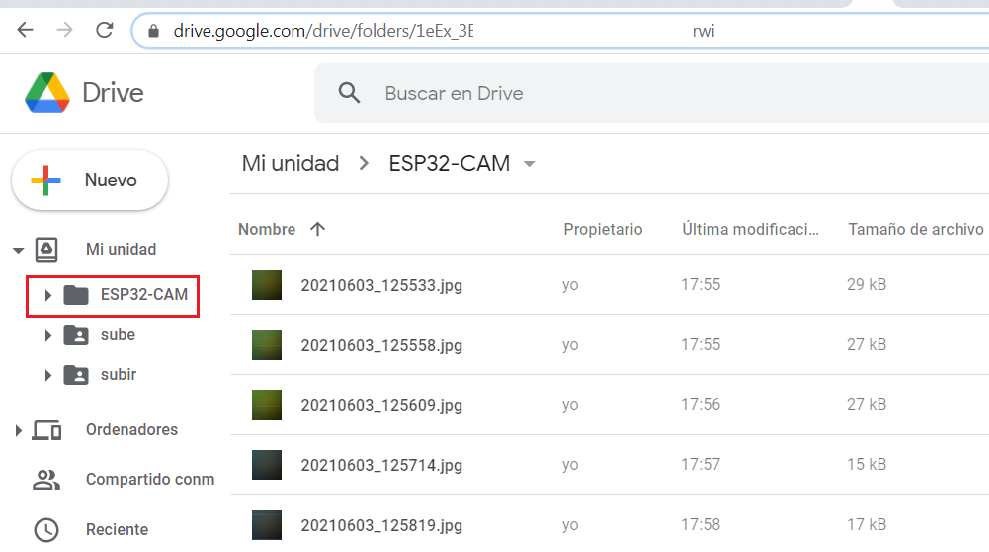
This tutorial in Spanish:
http://kio4.com/arduino/247_Wemos_WebCam.htm#drive
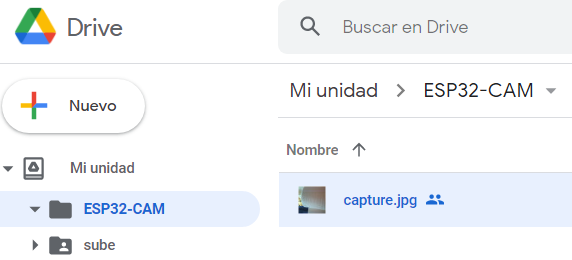
- ESP32-CAM capture image and update that image in Google Drive (II).
We are going to change the Script code, we will use part of the @TIMAI2 code to update the image that we will call capture.jpg
function doPost(e) {
  var data = Utilities.base64Decode(e.parameters.data);
// var nombreArchivo = Utilities.formatDate(new Date(), "GMT-3", "yyyyMMdd_HHmmss")+".jpg";
  var filename = "capture.jpg";
  var blob = Utilities.newBlob(data, e.parameters.mimetype, filename);

  var folder, folders = DriveApp.getFoldersByName("ESP32-CAM");
  if (folders.hasNext()) {
    folder = folders.next();
  } else {
    folder = DriveApp.createFolder("ESP32-CAM");
  }

  var existing = folder.getFilesByName(filename);
    if (existing.hasNext()) {
      var file = existing.next();
      if (file.getName() == filename) {
          fileID = file.getId();
         // Drive.Files.update({title: filename, mimeType: mimetype}, fileID, blob);
          Drive.Files.update({title: filename,  mimeType: file.getMimeType()}, fileID, blob);
      }
    } else {
    blob = Utilities.newBlob(data, e.parameters.mimetype, filename);
    fileID = folder.createFile(blob).getId();
    }

 // var file = folder.createFile(blob);

  return ContentService.createTextOutput("Completo.")
}
- We can locate the key of the file and put it in an Image component within a Clock, every certain interval the image will be updated on the screen.
