Hello friends,
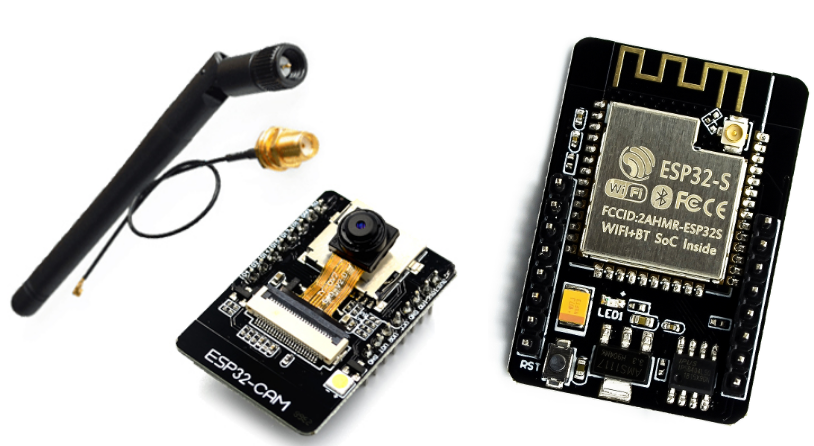
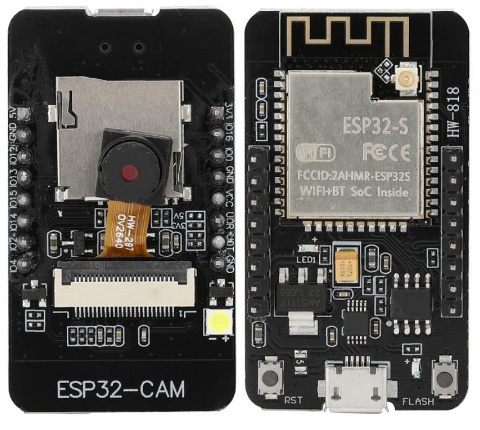
This is a cheap card ($ 6) with ESP32-S and a cam OV2640.
ESP32:
Cam: OV2640
SdCard reader.
Flashlight LED (GPIO 4)
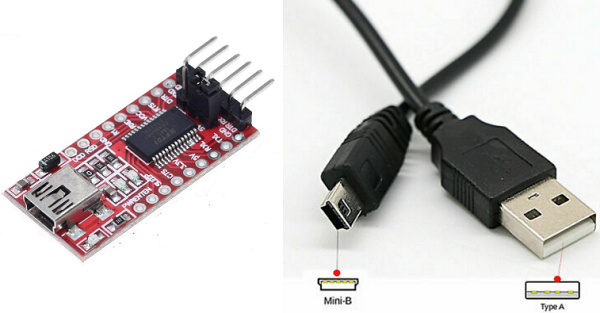
To upload the sketches to this module we will need a USB adapter, for example the FTDI FT232 RL USB.
Search images: ESP32-CAM WiFi OV2640
Search images: FTDI FT232RL USB
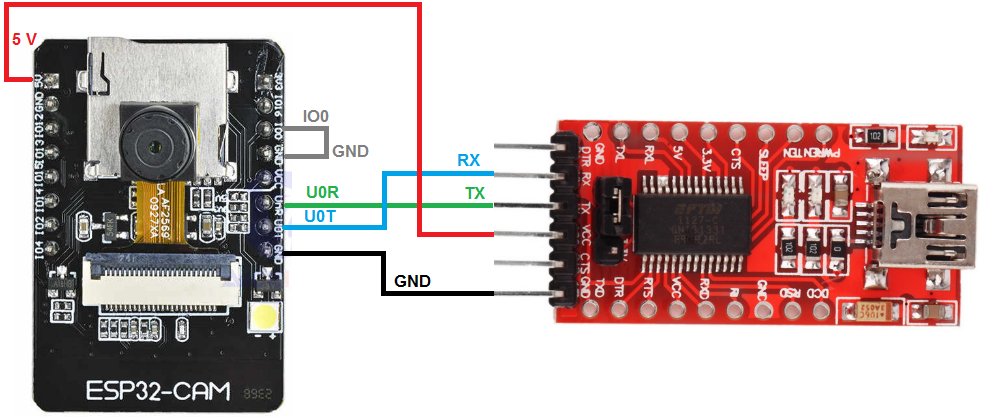
1.- Connections to upload Sketch.
.
2.- Then remove wire GND IO0 and look Serial Monitor to get IP.
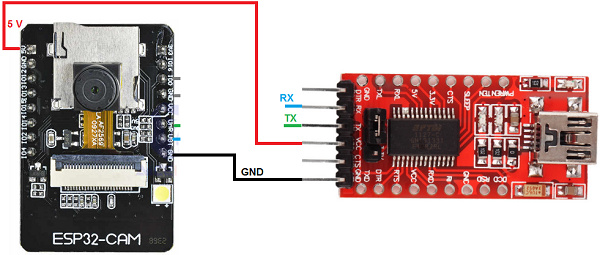
3.- After loading the sketch we will only need the power cables.
4.- In a browser write IP, example:
192.168.1.7
192.168.1.7:81/stream
ooooooooooooooooooo000oooooooooooooooooo
ooooooooooooooooooo000oooooooooooooooooo
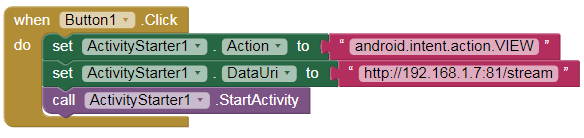
- App Inventor.
We cannot see the videos with the WebViewer component, we can see it through ActivityStarter.
Action: android.intent.action.VIEWhttp://192.168.1.7:81/stream
3 Likes
Hi there could you please put the whole steps for the app and thank you
On this page I have modified the code so that in addition to being saved in the internal memory it is saved in the SdCard.
1 Like
Web Server. Web page in SdCard.
- IP Webcam.
If you don't have this module and you want to stream videos online, you can use your mobile as IP WebCam with this app from the Play Store.
IP Webcam - Aplicaciones en Google Play
IP Webcam convierte su celular en una cámara en red con múltiples opciones de visualización. Funciona en cualquier plataforma con VLC player o navegador web. Emite a través de una red WiFi sin conexión a internet.
Compatible con emisión opcional a través de Ivideon nube, el cual da acceso global e instantáneo.
Compatible con audio bidireccional en tinyCam Monitor en otro dispositivo android.
Use IP Webcam con un software MJPG de terceros, incluyendo software de videovigilancia, monitores de seg...
Free
Click in "Start Server"
Then in your PC write IP, example: 192.168.1.5:8080
Hello sir , my quation was in blocks what we add in -
activity class
priyankakonde:
"action"
Action and DataUri
First try in your PC Browser, example:192.168.1.7:81/stream
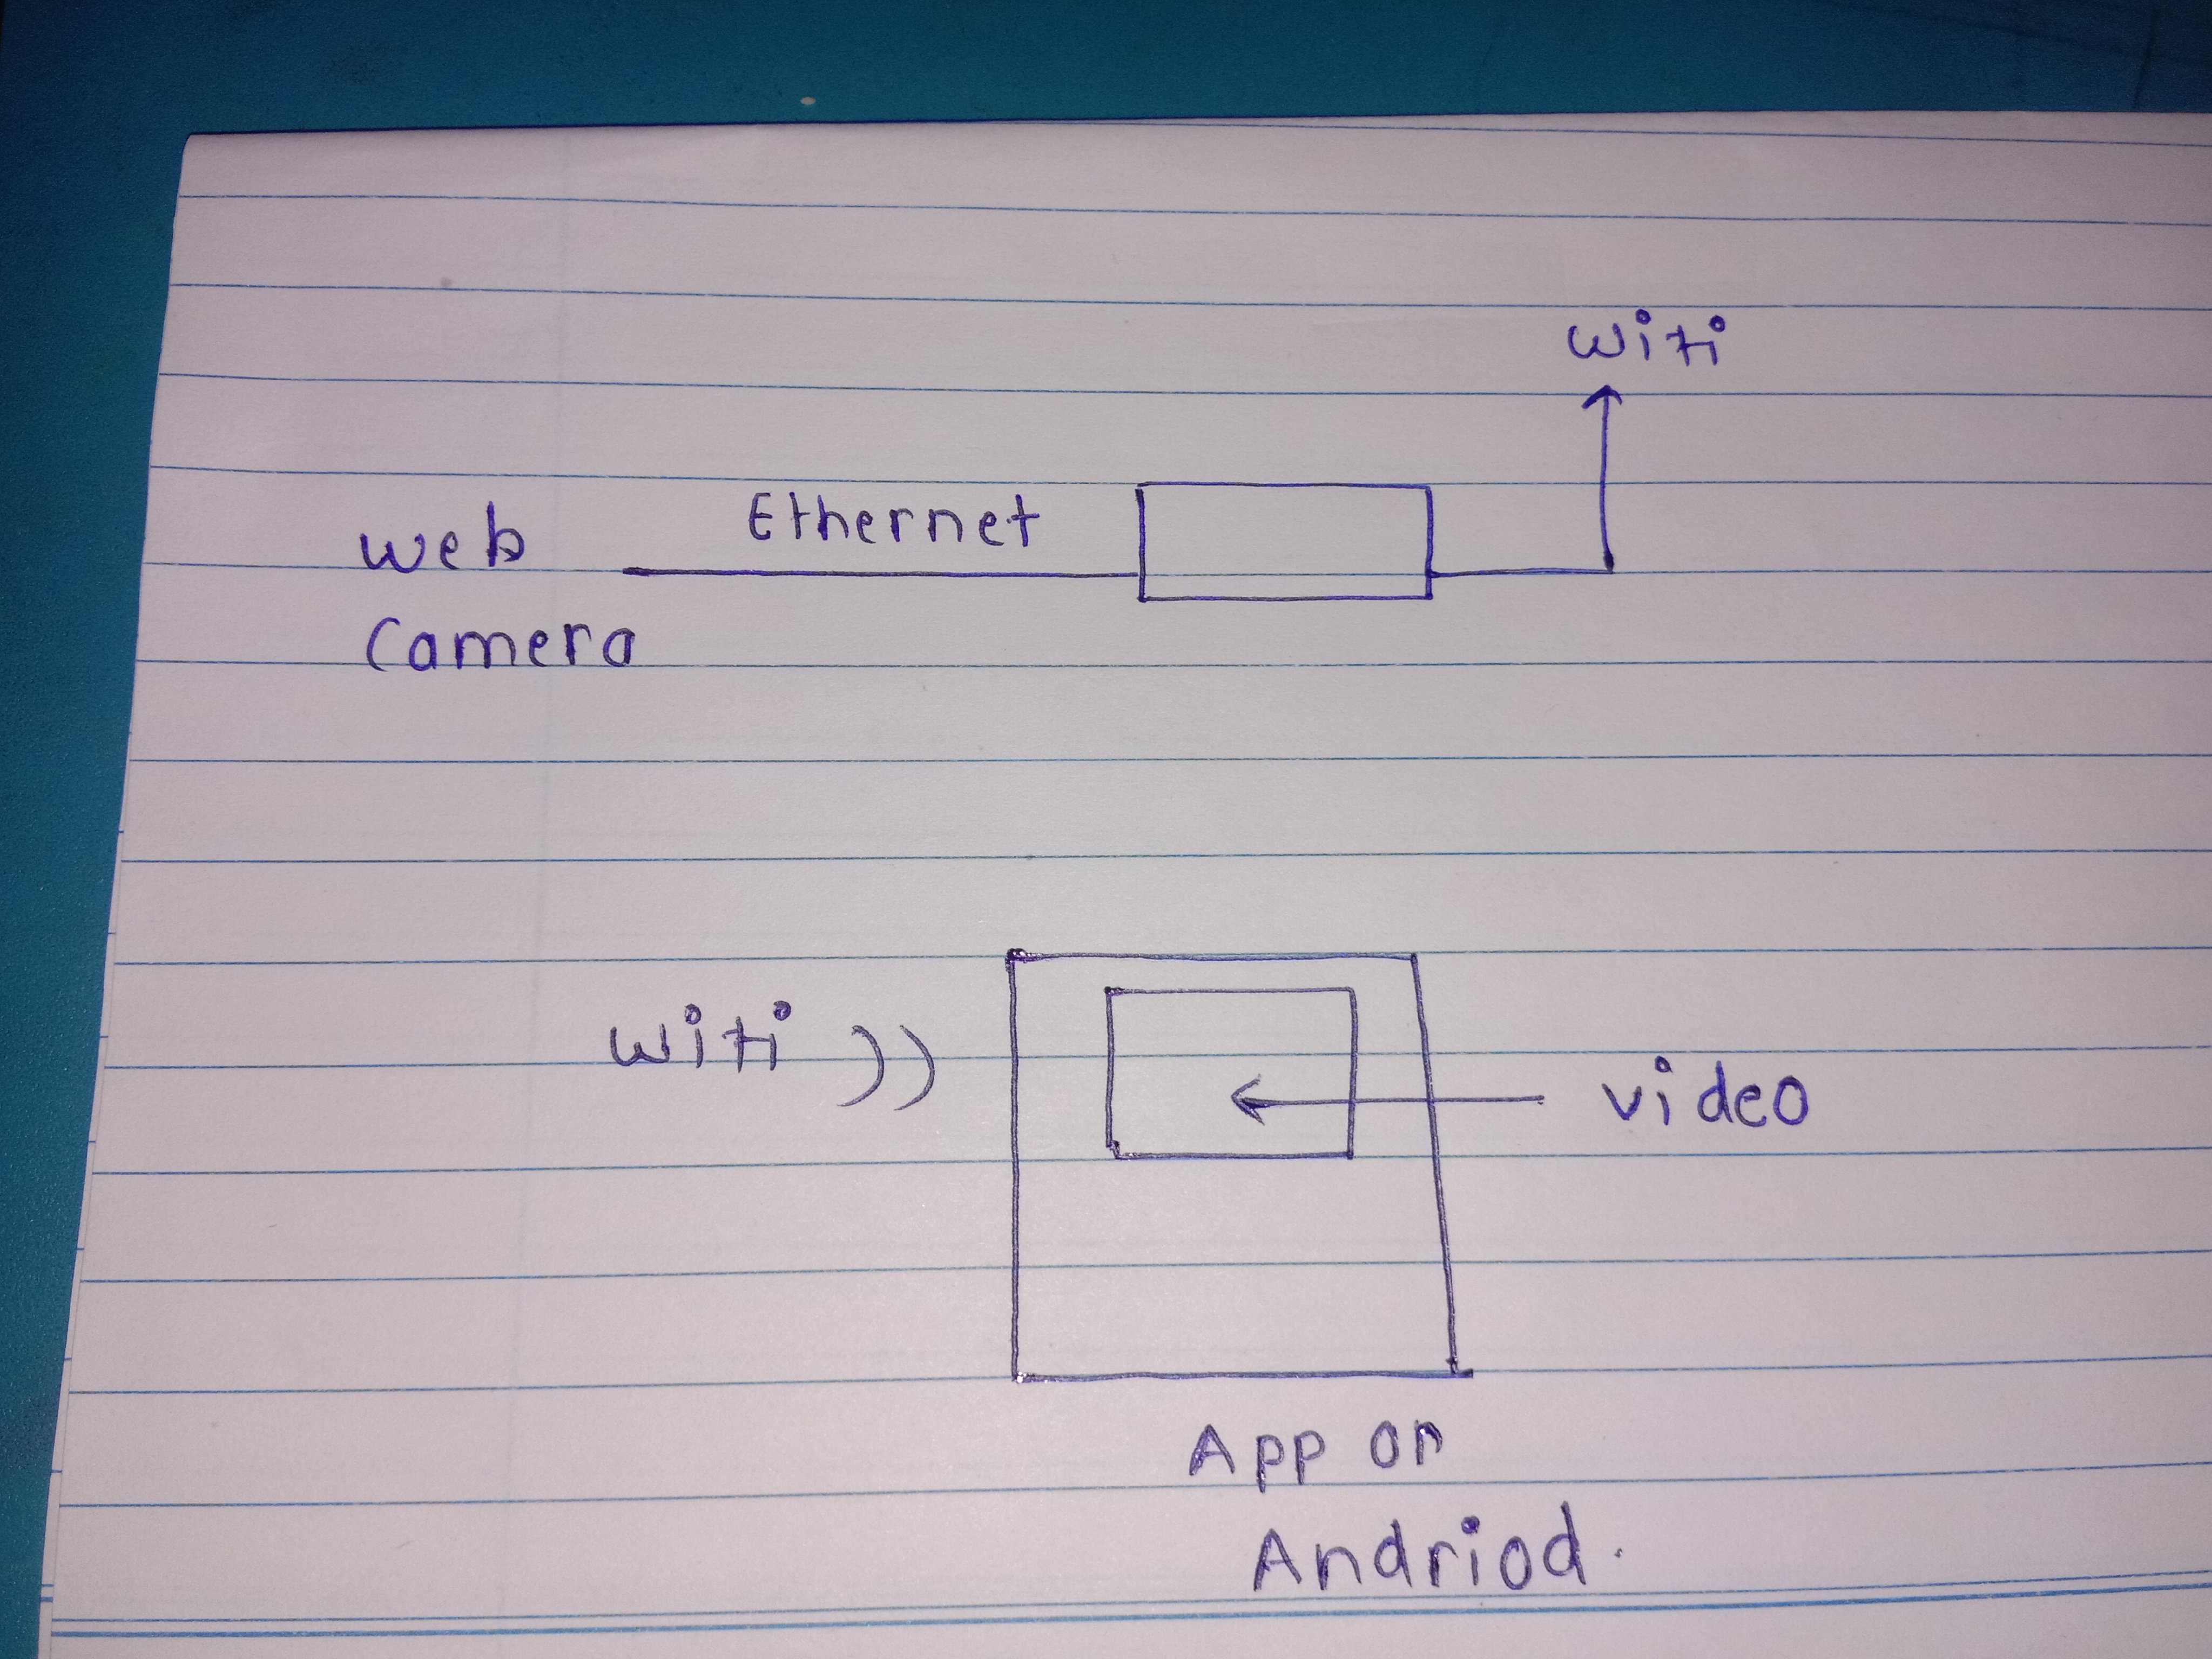
this is block diagram of my projcet
according to ur say that this camera stream not opened in webviewr so i used activity starter .
this is i do for utube video insted of that i just add for http//192.168.1.92 camera video stream
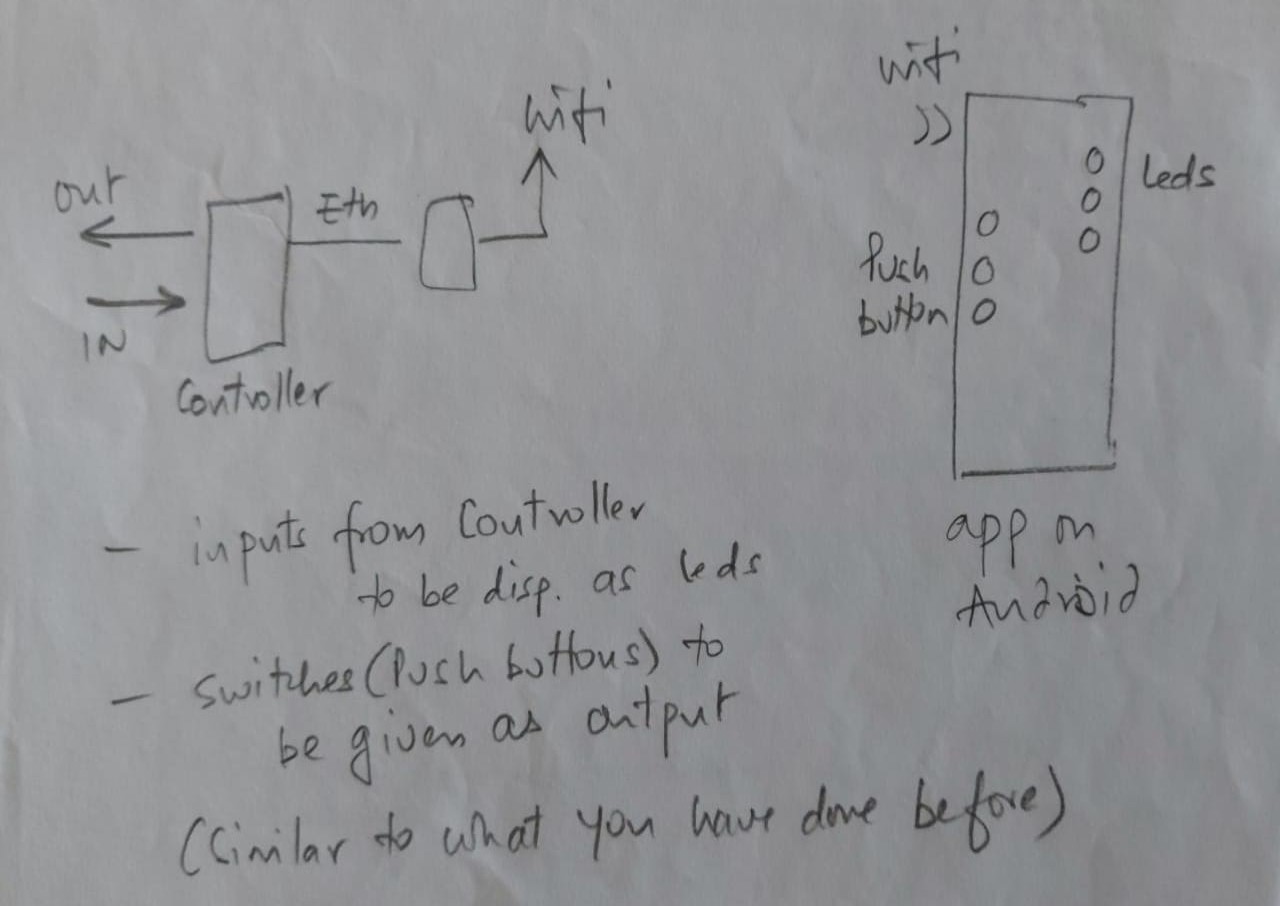
and i have to make another app through wifi i have to controles the led of controoler
To view the cam in the app, try:
here
To turn LEDs on/off, see:
Hello friends,
I’ll write in this topic about WiFi on ESP32, LED on/off, Static IP, SoftAP,…
0.- Board D1 R32 ESP32.
This is a cheap card ($ 5) with the dimensions and shape of the Arduino UNO, but with the ESP32. I used this card in the ESP32 and BLE tutorials .
[esp322pin_h]
Search images: D1 R32 ESP32
This card has classic Bluetooth, BLE, WiFi, ADC, DAC, and more feature.
This card can be programmed with the Arduino IDE.
[base64_11]
1 Like
sir if i used the activity starter i just want like when we acces the link through web in case of wifi or activity starter
1 Like
in this sam,e as led on off is working witj entering ip addres in text box ..
or like this only i have to do ( blocks)
1 Like
I have not tested it, but you can have the same web server for video transmission and to turn on / off the LED.http://192.168.9.21
OK thanks for ur guidence !
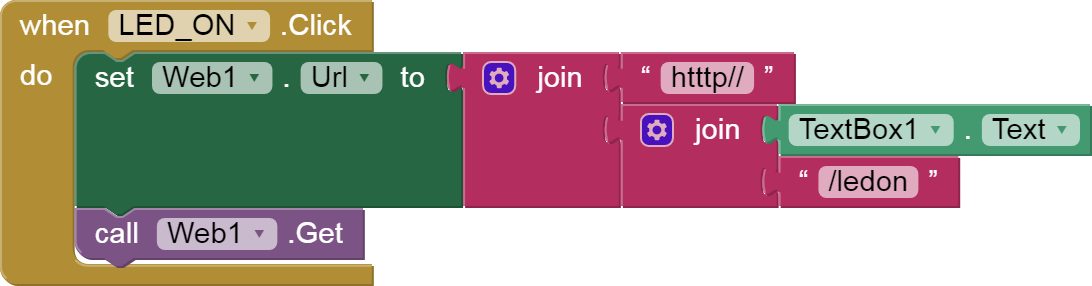
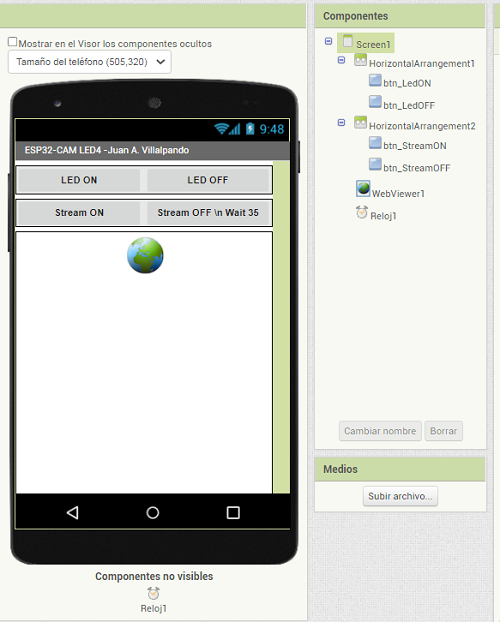
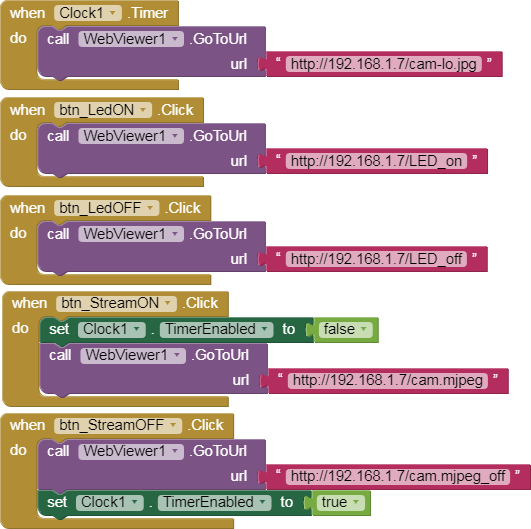
- Turn on/off LED4 of the ESP32-CAM.
p247i_ESP32_Cam.aia (2.3 KB)
The ESP32-CAM module has a high luminosity LED, we are going to turn it on/off from an application.
We are going to use the library that we saw in one of the previous post:https://github.com/yoursunny/esp32cam
The Clock has an Interval of 800 ms, every that time a CAPTURE will be made.
Through the Buttons we send an on/off order to LED4.
We can also see the video in Stream, to turn it off we must wait about 35 seconds.
#include <esp32cam.h>
#include <WebServer.h>
#include <WiFi.h>
const char* WIFI_SSID = "my-ssid";
const char* WIFI_PASS = "my-pass";
WebServer server(80);
static auto loRes = esp32cam::Resolution::find(320, 240);
static auto hiRes = esp32cam::Resolution::find(800, 600);
void handleBmp()
{
if (!esp32cam::Camera.changeResolution(loRes)) {
Serial.println("SET-LO-RES FAIL");
}
auto frame = esp32cam::capture();
if (frame == nullptr) {
Serial.println("CAPTURE FAIL");
server.send(503, "", "");
return;
}
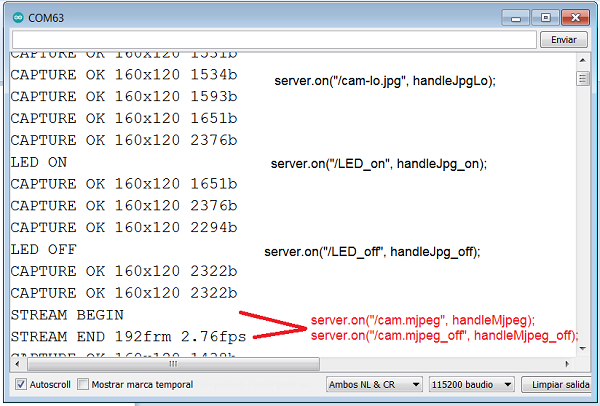
Serial.printf("CAPTURE OK %dx%d %db\n", frame->getWidth(), frame->getHeight(),static_cast<int>(frame->size()));
if (!frame->toBmp()) {
Serial.println("CONVERT FAIL");
server.send(503, "", "");
return;
}
Serial.printf("CONVERT OK %dx%d %db\n", frame->getWidth(), frame->getHeight(), static_cast<int>(frame->size()));
server.setContentLength(frame->size());
server.send(200, "image/bmp");
WiFiClient client = server.client();
frame->writeTo(client);
}
void serveJpg()
{
auto frame = esp32cam::capture();
if (frame == nullptr) {
Serial.println("CAPTURE FAIL");
server.send(503, "", "");
return;
}
Serial.printf("CAPTURE OK %dx%d %db\n", frame->getWidth(), frame->getHeight(), static_cast<int>(frame->size()));
server.setContentLength(frame->size());
server.send(200, "image/jpeg");
WiFiClient client = server.client();
frame->writeTo(client);
}
void handleJpgLo()
{
if (!esp32cam::Camera.changeResolution(loRes)) {
Serial.println("SET-LO-RES FAIL");
}
serveJpg();
}
void handleJpgHi()
{
if (!esp32cam::Camera.changeResolution(hiRes)) {
Serial.println("SET-HI-RES FAIL");
}
serveJpg();
}
void handleJpg()
{
server.sendHeader("Location", "/cam-hi.jpg");
server.send(302, "", "");
}
void handleMjpeg()
{
if (!esp32cam::Camera.changeResolution(hiRes)) {
Serial.println("SET-HI-RES FAIL");
}
Serial.println("STREAM BEGIN");
WiFiClient client = server.client();
auto startTime = millis();
int res = esp32cam::Camera.streamMjpeg(client);
if (res <= 0) {
Serial.printf("STREAM ERROR %d\n", res);
return;
}
auto duration = millis() - startTime;
Serial.printf("STREAM END %dfrm %0.2ffps\n", res, 1000.0 * res / duration);
}
void setup()
{
Serial.begin(115200);
Serial.println();
{
using namespace esp32cam;
Config cfg;
cfg.setPins(pins::AiThinker);
cfg.setResolution(hiRes);
cfg.setBufferCount(2);
cfg.setJpeg(80);
bool ok = Camera.begin(cfg);
Serial.println(ok ? "CAMERA OK" : "CAMERA FAIL");
}
WiFi.persistent(false);
WiFi.mode(WIFI_STA);
WiFi.begin(WIFI_SSID, WIFI_PASS);
while (WiFi.status() != WL_CONNECTED) {
delay(500);
}
Serial.print("http://");
Serial.println(WiFi.localIP());
Serial.println(" /cam.bmp");
Serial.println(" /cam-lo.jpg");
Serial.println(" /cam-hi.jpg");
Serial.println(" /cam.mjpeg");
server.on("/cam.bmp", handleBmp);
server.on("/cam-lo.jpg", handleJpgLo);
server.on("/cam-hi.jpg", handleJpgHi);
server.on("/cam.jpg", handleJpg);
server.on("/cam.mjpeg", handleMjpeg);
server.begin();
}
void loop()
{
server.handleClient();
}
We can change the resolution of the capture :
- ESP32-CAM captures images and uploads them to Google Drive. (I)
Previously, it is interesting to carry out this example of @TIMAI2 to upload and update files in Google Drive:
To carry out this example I will follow this tutorial in Spanish:ESP32-Cam: Subir fotos a Google Drive – Software | IoT
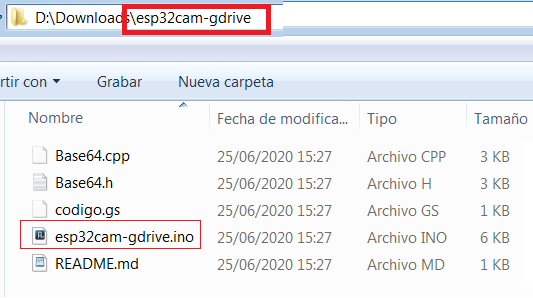
We download the necessary files to a folder:
Note that the name of the Sketch is the same as its directory and that the Base64 Library is in the same directory.
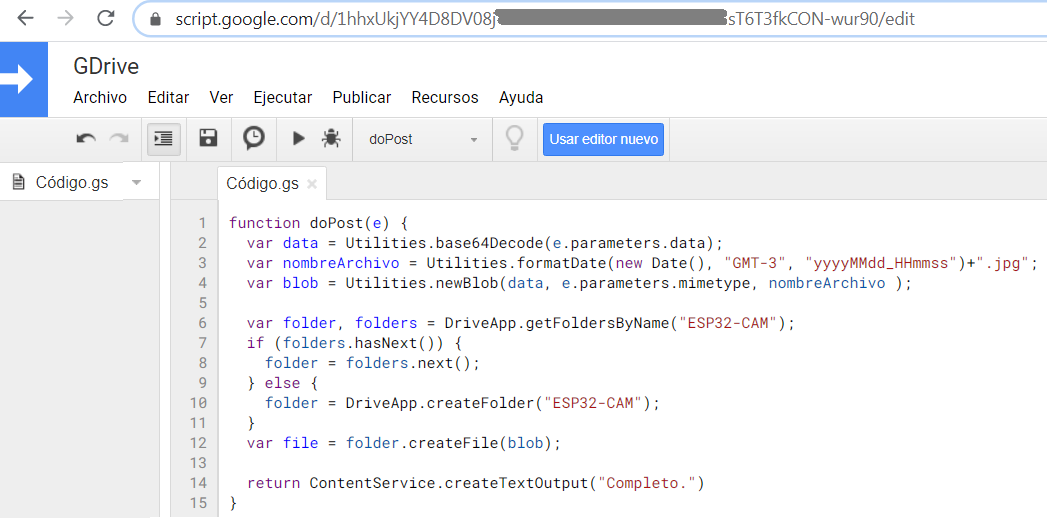
You copy the content of the codigo.gs in Google Script.
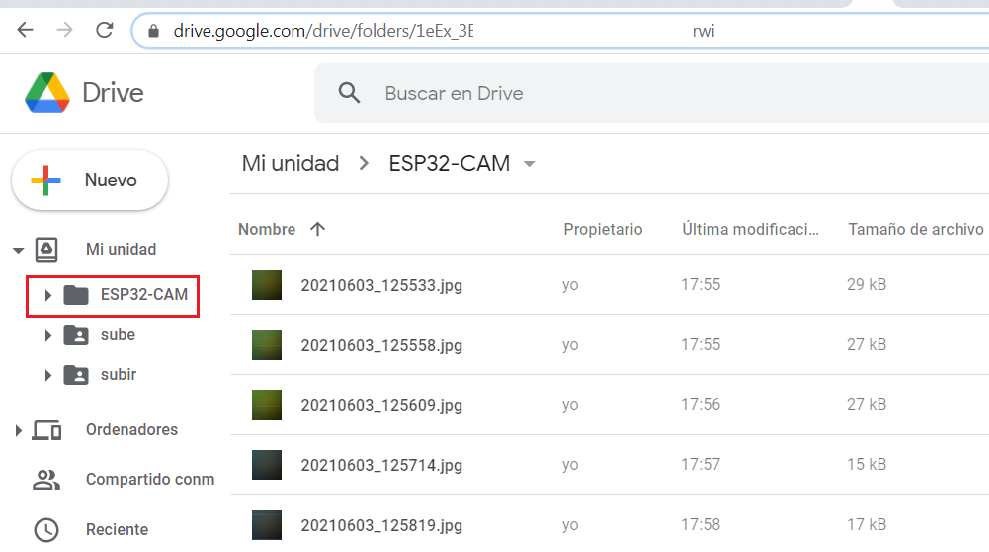
ESP32-CAM will capture an image every minute, convert it to Base64, and upload it to Google Drive.
This tutorial in Spanish:http://kio4.com/arduino/247_Wemos_WebCam.htm#drive