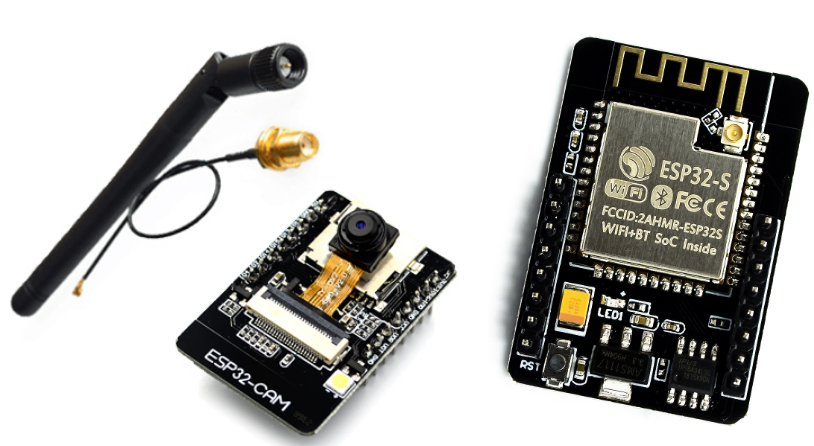
1.- ESP32-CAM as a QR Reader.
-
The project tries to read a QR code with the ESP32-CAM, decode it and send it via classic Bluetooth to an app created with App Inventor.
-
The QR image must be large, for example 5 x 5 cm, if you want a smaller size it will need good lighting.
-
We will follow this great Youtube tutorial: https://www.youtube.com/watch?v=tZV7b8dGgw4
This tutorial contains 4 projects:
- ESP32-CAM reads a QR code and displays its information on the Serial Monitor.
- ESP32-CAM reads a QR and according to the read code it turns on/off two LEDs.
- ESP32-CAM creates a web server, a router client, displays the QR image and its information on a web page.
- ESP32-CAM creates a web server on an access point, displays the QR image and its information on a web page.
You can learn more about ESP32-CAM at...
You can see this tutorial in Spanish at...
http://kio4.com/arduino/247_Wemos_WebCamQR.htm
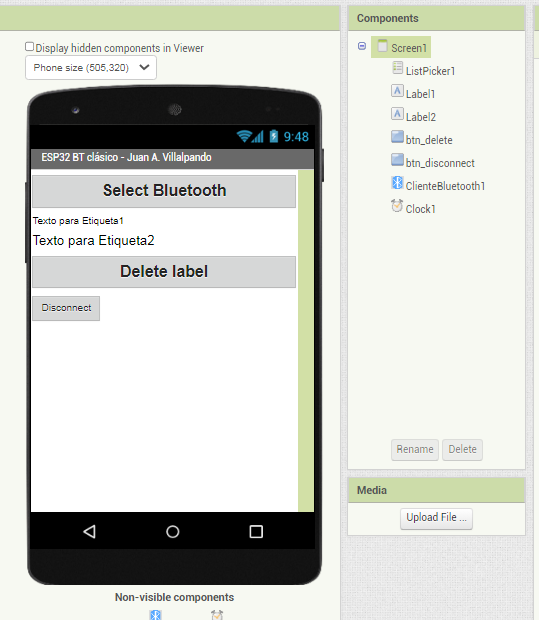
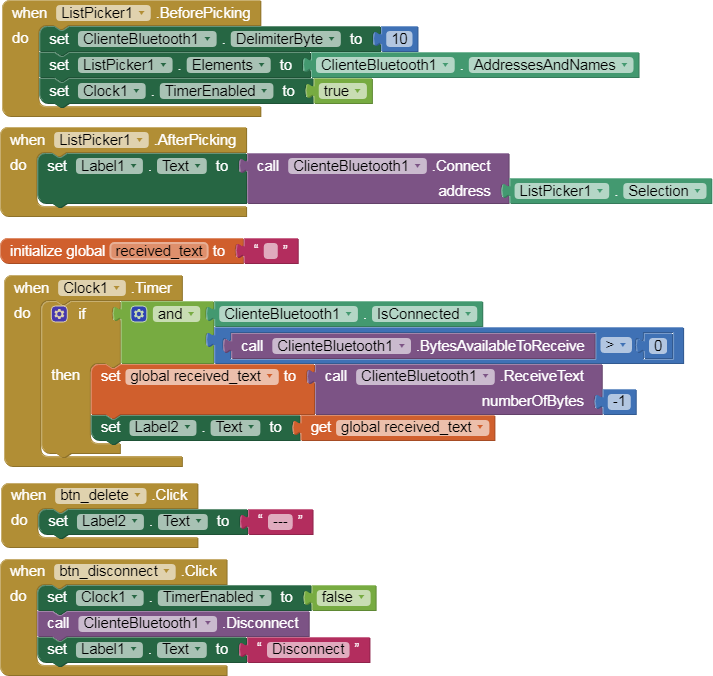
2.- ESP32-CAM reads a QR code, decodes it and sends it via classic Bluetooth to an app.
p62D_esp32_bluetooth_QR_5.aia (15.3 KB)
(*) If Android >11 it is necessary to set permissions.
ESP32-CAM-QR-BT.ino
#include "esp_camera.h"
#include "soc/soc.h"
#include "soc/rtc_cntl_reg.h"
#include "quirc.h"

// creating a task handle
TaskHandle_t QRCodeReader_Task;

/* GPIO of CAMERA_MODEL_AI_THINKER */
  #define PWDN_GPIO_NUM     32
  #define RESET_GPIO_NUM    -1
  #define XCLK_GPIO_NUM      0
  #define SIOD_GPIO_NUM     26
  #define SIOC_GPIO_NUM     27

  #define Y9_GPIO_NUM       35
  #define Y8_GPIO_NUM       34
  #define Y7_GPIO_NUM       39
  #define Y6_GPIO_NUM       36
  #define Y5_GPIO_NUM       21
  #define Y4_GPIO_NUM       19
  #define Y3_GPIO_NUM       18
  #define Y2_GPIO_NUM        5
  #define VSYNC_GPIO_NUM    25
  #define HREF_GPIO_NUM     23
  #define PCLK_GPIO_NUM     22

#include "BluetoothSerial.h"

#if !defined(CONFIG_BT_ENABLED) || !defined(CONFIG_BLUEDROID_ENABLED)
#error Bluetooth no activado! Activa la conexion Bluetooth.
#endif

BluetoothSerial SerialBT;


/*  Variables declaration */
struct QRCodeData
{
  bool valid;
  int dataType;
  uint8_t payload[1024];
  int payloadLen;
};

struct quirc *q = NULL;
uint8_t *image = NULL;
camera_fb_t * fb = NULL;
struct quirc_code code;
struct quirc_data data;
quirc_decode_error_t err;
struct QRCodeData qrCodeData;
String QRCodeResult = "";

/* VOID SETTUP() */
void setup() {
  // Disable brownout detector.
  WRITE_PERI_REG(RTC_CNTL_BROWN_OUT_REG, 0);

  /* Init serial communication speed (baud rate). */
  Serial.begin(115200);
  SerialBT.begin("ESP32test");
  Serial.setDebugOutput(true);
  Serial.println();

  /* Camera configuration. */
  Serial.println("Start configuring and initializing the camera...");
  camera_config_t config;
  config.ledc_channel = LEDC_CHANNEL_0;
  config.ledc_timer = LEDC_TIMER_0;
  config.pin_d0 = Y2_GPIO_NUM;
  config.pin_d1 = Y3_GPIO_NUM;
  config.pin_d2 = Y4_GPIO_NUM;
  config.pin_d3 = Y5_GPIO_NUM;
  config.pin_d4 = Y6_GPIO_NUM;
  config.pin_d5 = Y7_GPIO_NUM;
  config.pin_d6 = Y8_GPIO_NUM;
  config.pin_d7 = Y9_GPIO_NUM;
  config.pin_xclk = XCLK_GPIO_NUM;
  config.pin_pclk = PCLK_GPIO_NUM;
  config.pin_vsync = VSYNC_GPIO_NUM;
  config.pin_href = HREF_GPIO_NUM;
  config.pin_sscb_sda = SIOD_GPIO_NUM;
  config.pin_sscb_scl = SIOC_GPIO_NUM;
  config.pin_pwdn = PWDN_GPIO_NUM;
  config.pin_reset = RESET_GPIO_NUM;
  config.xclk_freq_hz = 10000000;
  config.pixel_format = PIXFORMAT_GRAYSCALE;
  config.frame_size = FRAMESIZE_QVGA;
  config.jpeg_quality = 15;
  config.fb_count = 1;

  esp_err_t err = esp_camera_init(&config);
  if (err != ESP_OK) {
    Serial.printf("Camera init failed with error 0x%x", err);
    ESP.restart();
  }

  sensor_t * s = esp_camera_sensor_get();
  s->set_framesize(s, FRAMESIZE_QVGA);

  Serial.println("Configure and initialize the camera successfully.");
  Serial.println();

  /* Create "QRCodeReader_Task" using the xTaskCreatePinnedToCore() function */
  xTaskCreatePinnedToCore(
             QRCodeReader,          /* Task function. */
             "QRCodeReader_Task",   /* name of task. */
             10000,                 /* Stack size of task */
             NULL,                  /* parameter of the task */
             1,                     /* priority of the task */
             &QRCodeReader_Task,    /* Task handle to keep track of created task */
             0);                    /* pin task to core 0 */
}


void loop() {
  // put your main code here, to run repeatedly:
  delay(1);
}

/* The function to be executed by "QRCodeReader_Task" */
// This function is to instruct the camera to take or capture a QR Code image,
// then it is processed and translated into text.
void QRCodeReader( void * pvParameters ){
  Serial.println("QRCodeReader is ready.");
  Serial.print("QRCodeReader running on core ");
  Serial.println(xPortGetCoreID());
  Serial.println();

  /* Loop to read QR Code in real time. */
  while(1){
      q = quirc_new();
      if (q == NULL){
        Serial.print("can't create quirc object\r\n");
        continue;
      }

      fb = esp_camera_fb_get();
      if (!fb)
      {
        Serial.println("Camera capture failed");
        continue;
      }

      quirc_resize(q, fb->width, fb->height);
      image = quirc_begin(q, NULL, NULL);
      memcpy(image, fb->buf, fb->len);
      quirc_end(q);

      int count = quirc_count(q);
      if (count > 0) {
        quirc_extract(q, 0, &code);
        err = quirc_decode(&code, &data);

        if (err){
          Serial.println("Decoding FAILED");
          QRCodeResult = "Decoding FAILED";
        } else {
          Serial.printf("Decoding successful:\n");
          dumpData(&data);
        }
        Serial.println();
      }

      esp_camera_fb_return(fb);
      fb = NULL;
      image = NULL;
      quirc_destroy(q);
  }

}

/* Function to display the results of reading the QR Code on the serial monitor. */
void dumpData(const struct quirc_data *data)
{
  Serial.printf("Version: %d\n", data->version);
  Serial.printf("ECC level: %c\n", "MLHQ"[data->ecc_level]);
  Serial.printf("Mask: %d\n", data->mask);
  Serial.printf("Length: %d\n", data->payload_len);
  Serial.printf("Payload: %s\n", data->payload);

  QRCodeResult = (const char *)data->payload;
  SerialBT.println(QRCodeResult);
}
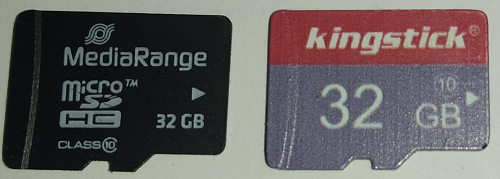
3.- ESP32-CAM reads QR code and save in a SdCard.
- ESP32-CAM has a SdCard reader.
- Not all SdCards work. In my case the card on the left worked, the card on the right didn't.
ESP32-CAM-QR-SdCard.ino
#include "esp_camera.h"
#include "soc/soc.h"
#include "soc/rtc_cntl_reg.h"
#include "quirc.h"

// creating a task handle
TaskHandle_t QRCodeReader_Task;

/* GPIO of CAMERA_MODEL_AI_THINKER */
  #define PWDN_GPIO_NUM     32
  #define RESET_GPIO_NUM    -1
  #define XCLK_GPIO_NUM      0
  #define SIOD_GPIO_NUM     26
  #define SIOC_GPIO_NUM     27

  #define Y9_GPIO_NUM       35
  #define Y8_GPIO_NUM       34
  #define Y7_GPIO_NUM       39
  #define Y6_GPIO_NUM       36
  #define Y5_GPIO_NUM       21
  #define Y4_GPIO_NUM       19
  #define Y3_GPIO_NUM       18
  #define Y2_GPIO_NUM        5
  #define VSYNC_GPIO_NUM    25
  #define HREF_GPIO_NUM     23
  #define PCLK_GPIO_NUM     22

#include "SD_MMC.h"

// Archivo para escribir los datos
File dataFile;


/*  Variables declaration */
struct QRCodeData
{
  bool valid;
  int dataType;
  uint8_t payload[1024];
  int payloadLen;
};

struct quirc *q = NULL;
uint8_t *image = NULL;
camera_fb_t * fb = NULL;
struct quirc_code code;
struct quirc_data data;
quirc_decode_error_t err;
struct QRCodeData qrCodeData;
String QRCodeResult = "";

/* VOID SETTUP() */
void setup() {
  // Disable brownout detector.
  WRITE_PERI_REG(RTC_CNTL_BROWN_OUT_REG, 0);

  /* Init serial communication speed (baud rate). */
  Serial.begin(115200);
  Serial.setDebugOutput(true);
  Serial.println();

  // Inicializar el módulo de tarjeta SD
  if (!SD_MMC.begin()) {
    Serial.println("Error al inicializar el módulo de tarjeta SD");
    return;
  }
  Serial.println("Módulo de tarjeta SD correcto.");

  // Crear o abrir el archivo para escritura
  dataFile = SD_MMC.open("/datos.txt", FILE_WRITE);
  if (!dataFile) {
    Serial.println("Error al abrir el archivo");
    return;
  }
  Serial.println("Archivo abierto correctamente");
///// Fin tarjeta SdCard.

  /* Camera configuration. */
  Serial.println("Start configuring and initializing the camera...");
  camera_config_t config;
  config.ledc_channel = LEDC_CHANNEL_0;
  config.ledc_timer = LEDC_TIMER_0;
  config.pin_d0 = Y2_GPIO_NUM;
  config.pin_d1 = Y3_GPIO_NUM;
  config.pin_d2 = Y4_GPIO_NUM;
  config.pin_d3 = Y5_GPIO_NUM;
  config.pin_d4 = Y6_GPIO_NUM;
  config.pin_d5 = Y7_GPIO_NUM;
  config.pin_d6 = Y8_GPIO_NUM;
  config.pin_d7 = Y9_GPIO_NUM;
  config.pin_xclk = XCLK_GPIO_NUM;
  config.pin_pclk = PCLK_GPIO_NUM;
  config.pin_vsync = VSYNC_GPIO_NUM;
  config.pin_href = HREF_GPIO_NUM;
  config.pin_sscb_sda = SIOD_GPIO_NUM;
  config.pin_sscb_scl = SIOC_GPIO_NUM;
  config.pin_pwdn = PWDN_GPIO_NUM;
  config.pin_reset = RESET_GPIO_NUM;
  config.xclk_freq_hz = 10000000;
  config.pixel_format = PIXFORMAT_GRAYSCALE;
  config.frame_size = FRAMESIZE_QVGA;
  config.jpeg_quality = 15;
  config.fb_count = 1;

  esp_err_t err = esp_camera_init(&config);
  if (err != ESP_OK) {
    Serial.printf("Camera init failed with error 0x%x", err);
    ESP.restart();
  }

  sensor_t * s = esp_camera_sensor_get();
  s->set_framesize(s, FRAMESIZE_QVGA);

  Serial.println("Configure and initialize the camera successfully.");
  Serial.println();

  /* Create "QRCodeReader_Task" using the xTaskCreatePinnedToCore() function */
  xTaskCreatePinnedToCore(
             QRCodeReader,          /* Task function. */
             "QRCodeReader_Task",   /* name of task. */
             10000,                 /* Stack size of task */
             NULL,                  /* parameter of the task */
             1,                     /* priority of the task */
             &QRCodeReader_Task,    /* Task handle to keep track of created task */
             0);                    /* pin task to core 0 */
}


void loop() {
  // put your main code here, to run repeatedly:
  delay(1);
}

/* The function to be executed by "QRCodeReader_Task" */
// This function is to instruct the camera to take or capture a QR Code image,
// then it is processed and translated into text.
void QRCodeReader( void * pvParameters ){
  Serial.println("QRCodeReader is ready.");
  Serial.print("QRCodeReader running on core ");
  Serial.println(xPortGetCoreID());
  Serial.println();

  /* Loop to read QR Code in real time. */
  while(1){
      q = quirc_new();
      if (q == NULL){
        Serial.print("can't create quirc object\r\n");
        continue;
      }

      fb = esp_camera_fb_get();
      if (!fb)
      {
        Serial.println("Camera capture failed");
        continue;
      }

      quirc_resize(q, fb->width, fb->height);
      image = quirc_begin(q, NULL, NULL);
      memcpy(image, fb->buf, fb->len);
      quirc_end(q);

      int count = quirc_count(q);
      if (count > 0) {
        quirc_extract(q, 0, &code);
        err = quirc_decode(&code, &data);

        if (err){
          Serial.println("Decoding FAILED");
          QRCodeResult = "Decoding FAILED";
        } else {
          Serial.printf("Decoding successful:\n");
          dumpData(&data);
        }
        Serial.println();
      }

      esp_camera_fb_return(fb);
      fb = NULL;
      image = NULL;
      quirc_destroy(q);
  }

}

/* Function to display the results of reading the QR Code on the serial monitor. */
void dumpData(const struct quirc_data *data)
{
  Serial.printf("Version: %d\n", data->version);
  Serial.printf("ECC level: %c\n", "MLHQ"[data->ecc_level]);
  Serial.printf("Mask: %d\n", data->mask);
  Serial.printf("Length: %d\n", data->payload_len);
  Serial.printf("Payload: %s\n", data->payload);

  QRCodeResult = (const char *)data->payload;
  dataFile.println(QRCodeResult);
  dataFile.flush();

}
4.- Another project with QR reader.
In this project we can see a more professional scanner, in this case it is connected with a USB cable.
It uses Arduino UNO and a USB Shield.
https://www.youtube.com/watch?v=a84M-VmvpCg
- The proposal is to connect an HC-06 Bluetooth module to the Arduino UNO and send the information to the app via Bluetooth.
[There are also scanners that send the information directly via WiFi and via Bluetooth.]