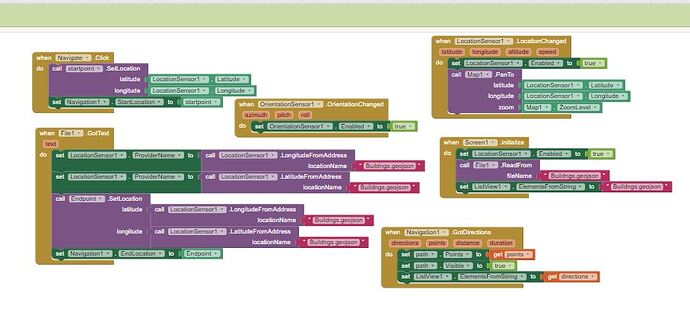
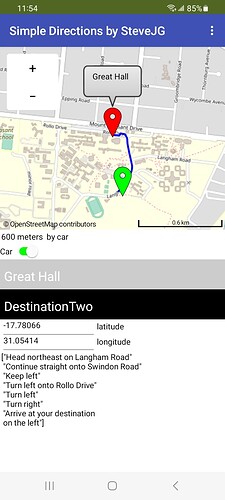
Hello friends if l want to set my markers not to be draggable but for the start marker to read the user's current location and the end marker to read a destination location from a geojson file
I want it to provide a path and directions that one can user to move from their current location to the destination they want which is within the geojson file
What you do might work. Where are you getting your geojson file? From Navigate? If from Navigate, just use the Navigate control that is part of the Map control to provide direction AND set the TransportationMethod to Walking. Depending on whether map tiles for your campus have sufficient detail of your campus buildings, that might work.
The Navigate control can display the path from one place to another and provide 'directions' which sometimes are right. ![]() Convert the geojson from Navigate to a List then use the first or last item to set your 'start' and 'finish' Markers. Navigate also can provide 'distance'.
Convert the geojson from Navigate to a List then use the first or last item to set your 'start' and 'finish' Markers. Navigate also can provide 'distance'.
An app that uses a different technique to find buildings and rooms on a campus is described here:
How to make a Custom Map Overlay Part II .. Show the user on the Map and a Custom Map Overlay The tutorial might help you add features to your app.
I was getting the geojson file from File( which l got from Storage)
I will try the tutorial you sent and the steps mentioned and get back to you with feedback
Is the geojson file where you get the coordinates for your campus destinations? If so you might find these examples that make use of Lists and csv files useful:
- National Park Tutorial (Markers) updated
- HOW TO: Set Runtime Map Marker Characteristics using a CSV file
Good luck and have fun designing your Project.
Good day
l just tried out the tutorial you sent 'How to use the navigation application' and it worked but l have a few questions
- Am l supposed to add the maker in design or through the blocks only if its in blocks how?
- How does the Text for checkBox work
3.I want the start location to reader the current user's location, hence is the need to have a hint text in text box1 and 2
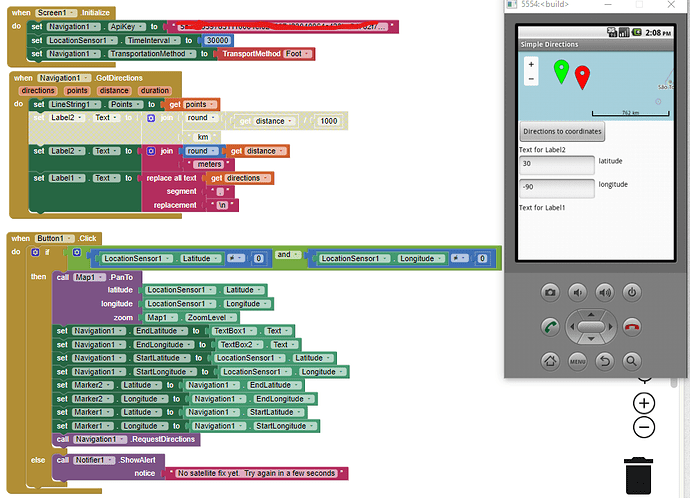
Drag a Marker on to the Map. You could have two, a green one for your location and a red one for your destination. The Blocks below show one way to use the two Markers.
I don't understand. For your campus app you need either a List of destination coordinates to select from or two TextBoxes (one to provide the destination latitude and one to provide destination longitude)
No. The start location is provided by the user's gps. TextBox1 and 2 are used in the example to provide a destination lat and lon manually. If you have a List of destination locations (coordinates) you should use a ListView or ListPicker for the user to select where they want to go. You then will not need to use the TextBoxes at all. ![]()
Here is an example possibly suitable for your campus app that might help you construct your app:
Good day Thank you so much for the provided blocks to help with the creating of the navigation application. I just have one question left which is how do l input the list view into the blocks so as to link the coordinates of the destinations
Provide a List of coordinate pairs, place them in a ListView or ListPicker and use the AfterPicking event to send the coordinates to the Navigate control's EndLatitude and EndLongitude Properties. Send the call Navigate.RequestDirections to a Label.
Without knowing your Project code so far and a small portion of the List you intend to hold the coordinates neither I (nor anyone else) can provide specific advice.
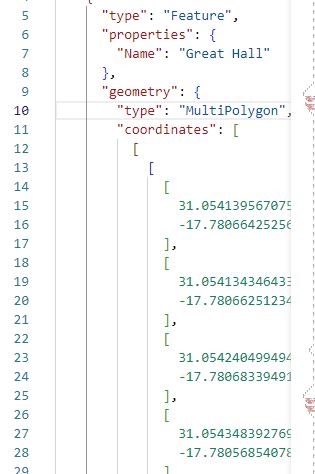
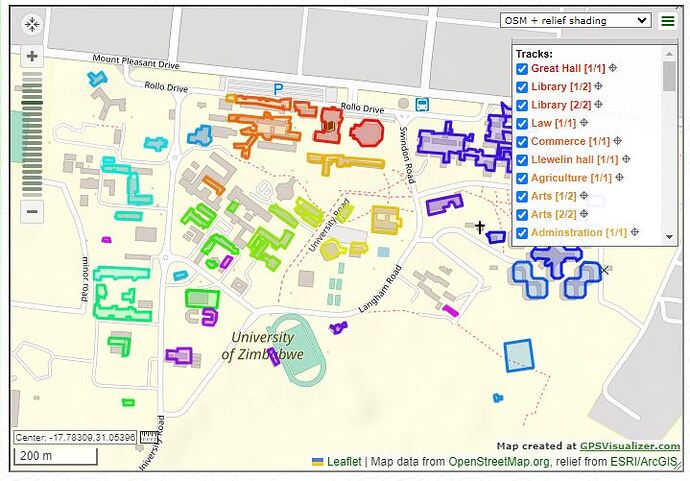
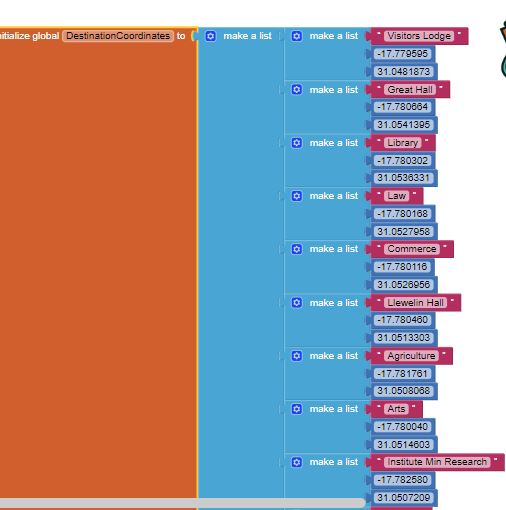
The above images show the samples of the data that am using that is the buildings name and the coordinates and l have converted the utm coordinate system to decimal degrees hence am sharing these as per your suggestion
What you have in your FeatureCollectiion are the coordinates of a Polygon with multiple coordinates. A single set of coordinates is necessary to navigate for each building. Make a List of buildings and their coordinate or write very complex code to use the json for the destination coordinates to build your destination selection ListView
An example List for two buildings:
What is possible using a List of Buildings in the form Building, latitude, longitude is shown here:
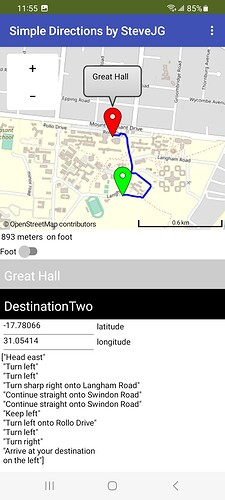
using the Navigate by foot option (left) and car option (right).
The user's location is the green marker; the destination is the red marker. I used the coordinates of the first coordinate shown for the Great Hall polygon.
The directions are pretty vague ( in my opinion). They certainly do not provide the best route using the Navigation tool and probably do not need to be displayed. Showing just the user location, destination location and track on the map might be sufficient.
I will try to make use of the first suggestion of creating a list of buildings and their coordinates. This means that l will have to do so for all the other datasets that l have for example parking spaces and sports grounds. I also agree with advice that you stated above of using a track on the map l will definitely take into considerations. Kindly provide the full blocks that you used for creating the samples of the navigation app that you sent ( the one showing great hall)
Also l wanted to ask how many elements can l add to the buildings list (the buildings dataset contains 60 buildings) Is it possible for me to add all of them in the list l will be creating with their single set of coordinates
The full blocks for a basic app might look like this:
To construct the Great Hall images of the app, I had to disable the Blocks that link the LocationSensor to the Navigate.StartLatitude and StartLongitude. I then use a static value for the StartLatitude and StartLongitude. Why? To present an example. The Navigate will give an error if the LocationSensor coordinates and Destination coordinates are not in the same continent or isolated by bodies of water (OSR believes no on can walk on water) and announces a fault.
The StartLatitude/StartLongitude blocks which provide a dummy StartLocation (shown with a red arrow on the Blocks image) need to be greyed out when you use your LocationSensor coordinates. The dummy blocks are there so I can use them since I cannot create a track using my location for the Great Hall (but you can). Removing or greying out will allow you to run using your LocationSensor. Anyone wanting to see the demonstration should leave those blocks in (unless they live in Africa). Remove the two blocks when building a app using a LocationSensor.
I don't know if you want to place the polygons you showed of buildings using the FeatureCollection on the App Inventor map display. The polygons should be possible to show depending of the FeatureCollection file structure. You might be able to do that but I am dubious for multiple reasons.
Yes, you can add all of them in a single List You can use either a ListView or ListPicker with the building (parking lot) List. Both ListView and ListPicker have a feature called Filter which if enabled a user can 'search' for an item. For a large number of items a ListPicker might be a 'better' choice for selecting a Destination. Alternatively you could have two ListPickers; one for buildings another sourced from a different list of coordinates for parking lots etc. ![]()
Good luck with your Project.
Remember, you need to delete the Blocks shown with the red arrow so the start location will be from your device.
Thank you so much you have been of great help. l have created the following list l hope l did it correctly.
I will also take note to delete the blocks shown with the red arrow. Am working on the project currently hopefully tomorrow l will send a positive result
Yes, your Blocks look fine. It is simple for small Lists.
Here is a quick way for generating large lists:
This tutorial shows how to use a spreadsheet to generate a csv file . The csv file can be converted into your list.
Actually the whole block contains 62 blocks of the different buildings and their coordinates so l just sent you a sample so converting into a spread sheet to generate csv will be of great help
Confirm you disabled the textbox blocks?
I disabled them using TextBox Properties using the Designer.
The destination textBlocks only now function like a label to display Destination selected coordinates.
so they should be disabled in your app.
Actually, they are no longer needed. I think they can be deleted from the project although I haven't tested what happens when that is done, 
