Hello to all friends
Q1: I have a problem working with Image, Clock & Save
I want the camera to automatically take a picture and save it by pressing the button
I used to do this manually before and the image was stored in canvas
But I want to do this with just the push of a button and save the image automatically to Canvas 1 or Image 1
Q2: Perform the above steps so that the camera automatically captures and stores for example 10 photos
Problem: Focus time does not allow high-speed shooting, shooting can be reduced to 10 intarval or even less if focus is disabled
what is your suggestion?
I am thankful with your guidance
I think @Taifun’s Camera extension might be helpful to your project.
You can use many camera functions including focus modes and file saving through the extension.
In that way you can automate the whole process.
Link for the extension: https://puravidaapps.com/camera.php
1 Like
Is taifun service free?
@Program_maker You need to check on the extension’s page. Some extensions are free, others are paid. You may pm @Taifun regarding the same.
1 Like
The Camera Extension from PuraVidaApps is a paid extension
1 Like
Hi again
I still couldn't complete my project ![]()
Although I used the taifun image plugin, my problem is with the camera
I need the camera to automatically save the image
My problem is not using all taifun extensions
please guide me
Thank you
as far as I know, the only option for you currently is to use the already mentioned paid camera extension to take a picture programmatically
Taifun
Trying to push the limits! Snippets, Tutorials and Extensions from Pura Vida Apps by
Taifun.Hi
I pushed the project somewhat, but I still need your help
I have manually launched this software so far and the images will fit in a directory
The problem is: the software only saves 6 images and deletes the previous image in the directory and instead takes the new image.
I tried a few ways to use the lists but the problem didn't work out
Including: Image stored in 2 directories; 2: Default phone directory with picture name 2: Application defined directory
Image sent to attachment


Thanks for your guidance
you have to use a new filename for each new image
Taifun
Please give an example of this section:
I take a 1: 1 photo with the camera
2: Save the photo to a directory
3: Take a photo again and add the previous photo to the directory “without deleting the previous photo”
Please also upload the image of the selected blocks so that I can understand them more
Thanks
yes, do it exactly as you explained here
and if you get stuck, then post a screenshot of your relevant blocks
A very good way to learn App Inventor is to read the free Inventor's Manual here in the AI2 free online eBook App Inventor 2 Book: Create Your Own Android Apps ... the links are at the bottom of the Web page. The book 'teaches' users how to program with AI2 blocks.
There is a free programming course here Course In A Box and the aia files for the projects in the book are here: App Inventor 2 Book: Create Your Own Android Apps
How to do a lot of basic things with App Inventor are described here: How do you...? .
Also do the tutorials Our Tutorials! to learn the basics of App Inventor, then try something and follow the Top 5 Tips: How to learn App Inventor
Taifun
Trying to push the limits! Snippets, Tutorials and Extensions from Pura Vida Apps by
Taifun.
1 Like

Thank you
But I tried several methods
I want the default file extension (app_inventor) not to be displayed with image details
I did it once and the changes were made right.
But with changes made to the default extension again (app_inventor_11111111.jpg)
Example: Save Image as Default Phone Image (11111111.jpg)
Add to saved image
Do you have a solution for this?
Thanks
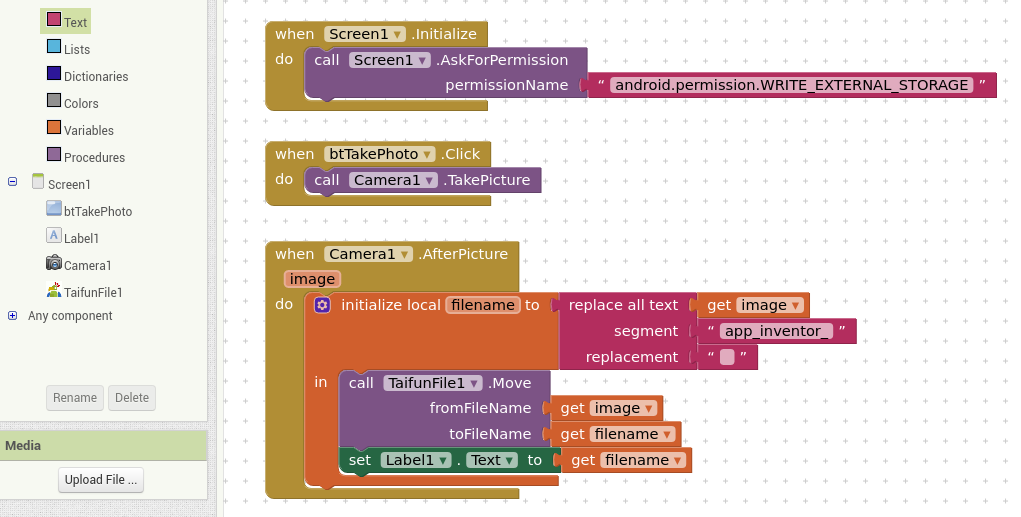
I would use Taifun’s File Extension to do this:
https://puravidaapps.com/file.php
Use the Move or MoveAsync blocks, which will allow you to rename and move to another location if you want. Do this in the AfterPictureTaken event block.
3 Likes
Hi
While this topic is being suggested as the best solution for me, it is closing, but I have encountered the problem again to use the solution.
Can you send me a picture of the suggested solution?
1: take a photo
2: save in canvas1
3: save this pic in new directory
4: with tifunFile file save picture without deleting the previous image in this directory.
Thank you very much for the guidance and patience you took to read my issues and problems.
I wish you success
Thanks
I’ll try this method in the shortest time
:گل سرخ:
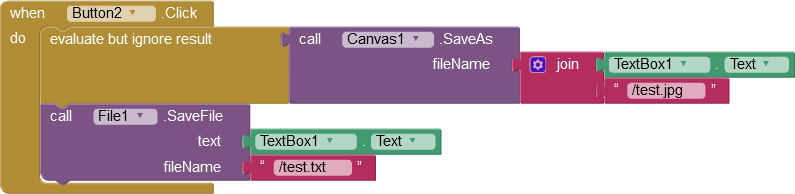
Please see this picture
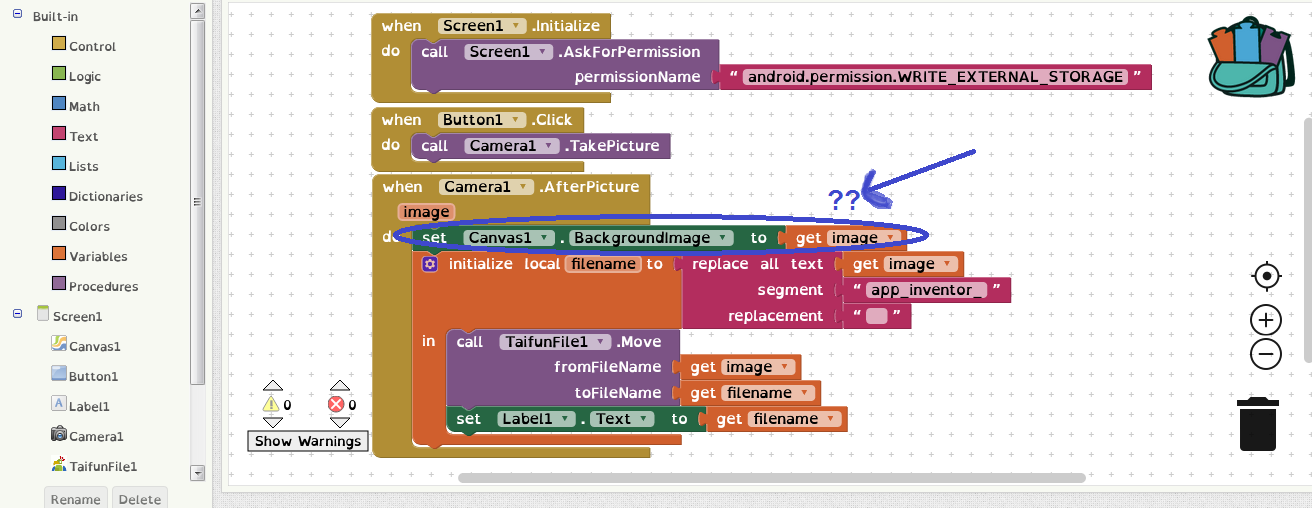
Everything worked fine until I imported "set canvas - to backgrandimage" but didn't save the image.
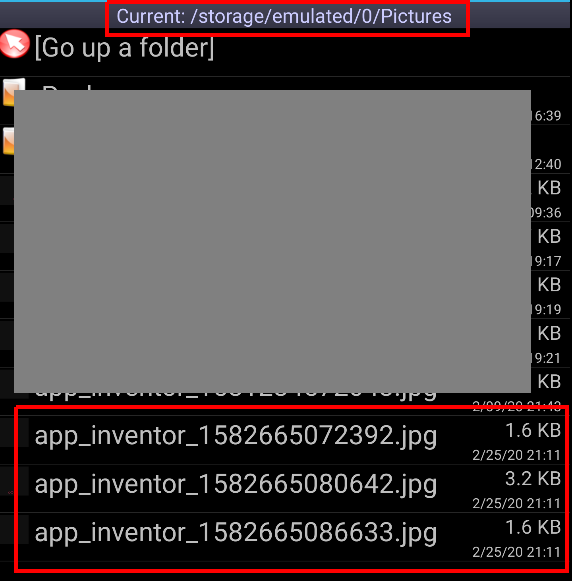
And when the image is saved with "save as" the image output is saved to the phone as follows ...
.
.

I tried my best and moved the blocks and read the articles but didn't notice.
Where do you think the problem is?
Thanks
for example :
if canvas1 <>"" then
canvas1 . backgrandimage = photo after picker
else
camera = true
end if
buttun1.click = take picker
for each item in canvas1
item . save to phonegallery
if item in gallery = **app_inventor_**544544780.jpg then
if show.contain ((item)) app_inventor) then
app_inventor_ = removeed
end if
end if
next
"picture in galery = ( / jpg ) "
{ canvas1.backgrandcolor= flie *pictore }
for example : with taifunFile , picture = /my directory / 544544780.jpg
Thank you
If you must make a copy of the file, having just renamed it (why do you need a copy?)
then use the copy method in the File extension…