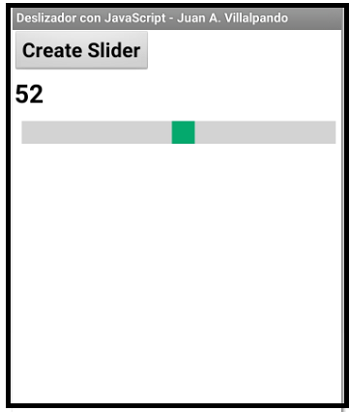
Using JavaScript and the WebViewer component we can create custom Sliders.
slider.htm
<head>
<meta name="viewport" content="width=device-width, initial-scale=1">
<style>
.slidecontainer {
  width: 100%;
}

.slider {
  -webkit-appearance: none;
  width: 100%;
  height: 25px;
  background: #d3d3d3;
  outline: none;
  opacity: 0.7;
  -webkit-transition: .2s;
  transition: opacity .2s;
}

.slider:hover {
  opacity: 1;
}

.slider::-webkit-slider-thumb {
  -webkit-appearance: none;
  appearance: none;
  width: 25px;
  height: 25px;
  background: #04AA6D;
  cursor: pointer;
}

.slider::-moz-range-thumb {
  width: 25px;
  height: 25px;
  background: #04AA6D;
  cursor: pointer;
}
</style>
<meta name="viewport" content="width=device-width, initial-scale=1, maximum-scale=1, user-scalable=0">
</head>
<body>
<div class="slidecontainer">
  <input type="range" min="1" max="100" value="50" class="slider" id="myRange">
</div>

<script>
var slider = document.getElementById("myRange");

/// 	THIS LINE FOR CONTINUOUS CHANGE    ////
slider.oninput = function() {window.AppInventor.setWebViewString("" + slider.value);}
///////////////////////////////////////////////////////////////////////////

/// 	THIS LINE FOR TOUCH UP    ////
// slider.addEventListener('change', () => {window.AppInventor.setWebViewString("" + slider.value);});
///////////////////////////////////////////////////////////////////////////
</script>
</body>
</html>
p169C4i_javascript_deslizador.aia (2.6 KB)
7 Likes
Wow that's the greatest idea, good job @Juan_Antonio 

2.- Circular Slider with JavaScript.
Code adapted to App Inventor from...
https://www.cssscript.com/demo/circular-range-slider-svg/
p169C4_javascript_deslizadorcirculo.aia (6.8 KB)
 updateLegendUI(currentAngle) {
        const targetSlider = this.activeSlider.getAttribute('data-slider');
        const targetLegend = document.querySelector(`li[data-slider="${targetSlider}"] .sliderValue`);
        const currentSlider = this.sliders[targetSlider];
        const currentSliderRange = currentSlider.max - currentSlider.min;
        let currentValue = currentAngle / this.tau * currentSliderRange;
        const numOfSteps =  Math.round(currentValue / currentSlider.step);
        currentValue = currentSlider.min + numOfSteps * currentSlider.step;
     //   targetLegend.innerText = currentValue;
		 window.AppInventor.setWebViewString("" +  currentValue + currentSlider.color) ;
    }
2 Likes
Can't get it to work on Android 10 in companion. Even tried putting all the js and css inside the html file. Just a blank web page. Works OK in my PC browser.
Ah, working on real device Android 11 using companion, and works with localhost link.
1 Like
Hi
Is it possible to send a value to the slider?
eg: I have a button which when I click will send a value eg: 78 to the slider
which will move it to show 78.
May I know how do I go about this, maybe some sample for changes to the javascript or blocks?
Thank you.
3.- Input value.
p169C4_javascript_deslizador_Entra.aia (4.0 KB)
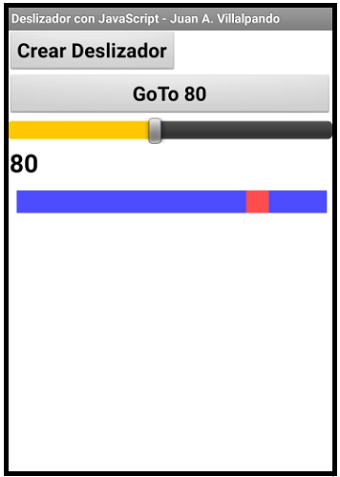
- When we press the Button, the slider is at position 80.
- When we move the Slider component, the JavaScript Slider moves.
<!DOCTYPE html>
<html>
<head>
<meta name="viewport" content="width=device-width, initial-scale=1, maximum-scale=1, user-scalable=0">
<style>
.slidecontainer {
  width: 100%;
}

.slider {
  -webkit-appearance: none;
  width: 100%;
  height: 25px;
  background: #0000FF;
  outline: none;
  opacity: 0.7;
  -webkit-transition: .2s;
  transition: opacity .2s;
}

.slider:hover {
  opacity: 1;
}

.slider::-webkit-slider-thumb {
  -webkit-appearance: none;
  appearance: none;
  width: 25px;
  height: 25px;
  background: #FF0000;
  cursor: pointer;
}

.slider::-moz-range-thumb {
  width: 25px;
  height: 25px;
  background: #FFFF00;
  cursor: pointer;
}
</style>
</head>
<body>
<div class="slidecontainer">
  <input type="range" min="1" max="100" value="50" class="slider" id="myRange">
</div>

<script>
var datos =  window.AppInventor.getWebViewString(); // Entrada de datos.
var slider = document.getElementById("myRange");
slider.value = datos;

/// 	THIS LINE FOR CONTINUOUS CHANGE    ////
slider.oninput = function() {window.AppInventor.setWebViewString("" + slider.value);}
///////////////////////////////////////////////////////////////////////////

/// 	THIS LINE FOR TOUCH UP    ////
// slider.addEventListener('change', () => {window.AppInventor.setWebViewString("" + slider.value);});
///////////////////////////////////////////////////////////////////////////
</script>
</body>
</html>
http://kio4.com/appinventor/169C4_javascript_deslizador.htm
More JavaScript:
http://kio4.com/appinventor/index.htm#javascript
2 Likes
Hi Juan,
Thank you very much for the samples.

1 Like
Merhaba ben app invertor kullanarak ardiuno dan analog bir çıkış almak istiom ornegin 0- 5 volt yada 0 - 10 volt bu islemi kullanirkenden de arduino nun ethernet shield modülünü kullanmak istiom sizce mumkun mü
If you are wondering about Arduino's Ethernet shield, it would be a good idea to open a new topic with the more detailed question.