I'm trying to control something (LEDs in this case, but eventually will be more) with the APP and then have the MCU (a D1 Mini Pro (ESP8266) report data and other info back. I used the code a project in electronicshub.org as the basis. I'm doing this to experiment with wifi, I already can do this in BLE. I'm doing the project in Arduino IDE.
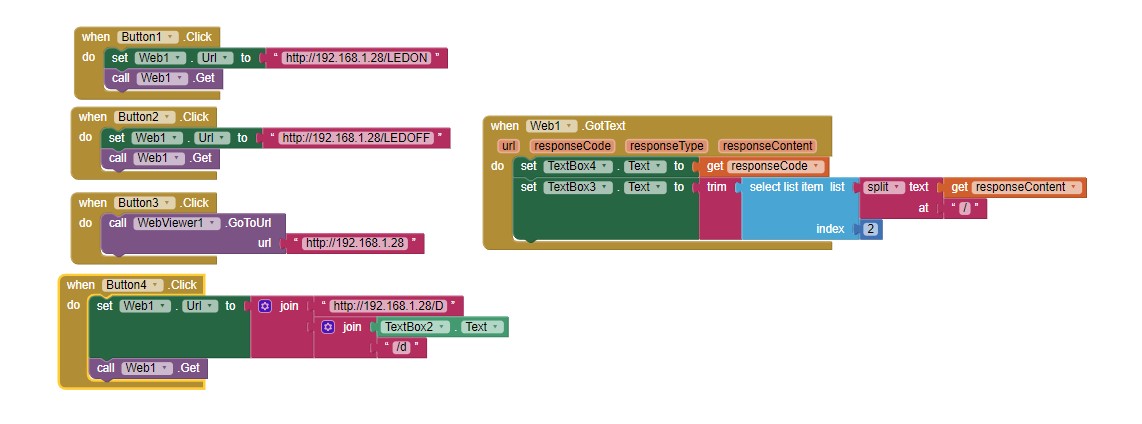
So my APP works like this:
button 1 turns LED on
status of LED is sent from MCU and displayed in textbox3
button 2 turns LED off
status of LED is sent from MCU and displayed in textbox3
button 3 shows the contents of my local ESP8266 page
button 4 sends the contents of textbox2 to the MCU
value will be sent from MCU and displayed in textbox3 (not enabled now)
All the buttons seem to do what they are supposed to. That is, LEDs turn off and on and the commands look good in the serial monitor. I can turn the LED off and on as many times as I want.
The problem is with the status. It seems to only report the status the first time. After that, the URL always shows the same data regardless of what button I press. It seems like maybe I should clear the URL after I got the data, so that different data can be posted.
Yes, I think the program is with that. But I thought I’d be criticized because it’s an Arduino IDE issue, not MIT app inventor. I don’t ask that many questions, especially in the Arduino forums because they are very surly. This is my first question here. I do have 2 engineering master degrees but just not in this field. So I’m a noob. I uploaded a ESP8266 GPIO controlling server example only using Arduino, and that worked fine (random tutorials site). There is a lot of html code in it, which I don’t understand. But I think I’d like to use the MIT APP maker. One thing I don’t understand is the ip addresses. http://192.168.1.28/LEDON
Does the “/” mean the LEDON is a subfolder?
Funny thing, I was able to run that Arduino IDE example on the app inventor by using the webviewer call.
#include <ESP8266WiFi.h>
// Network SSID and Password
const char* ssid = "NETGEAR";
const char* password = "s3";
int ledPin = D0;
int potPin = A0;
// Start WiFi Server on port 80
WiFiServer ESPserver(80);
// data Value to be received from app
int dValue = 1000;  // experimented with this to pass textbox data in app to MCU
int aValue = 1023;  //experimented with this to pass data from MCU to app
String request; //this is what the app is sending over wifi
// for example, it looks like the following when LED ON button is pressed:  GET /LEDON HTTP/1.1
// it looks like this when a data value of 1000 is sent with SEND button :  GET /D1000/d HTTP/1.1


void setup() {
  Serial.begin(115200);
  pinMode(ledPin, OUTPUT);
  digitalWrite(ledPin,LOW);

// Connect WiFi
  Serial.println();
  Serial.println();
  Serial.print("Connecting to ");
  Serial.println(ssid);
  WiFi.hostname("Name");
  WiFi.begin(ssid, password);

  while (WiFi.status() != WL_CONNECTED) {
    delay(500);
    Serial.print("."); // a "dot" is added until connection is established
  }
  Serial.println("");
  Serial.println("WiFi connected");

  // Print the IP address
  Serial.print("IP address: ");
  Serial.println(WiFi.localIP()); // local IP address
  ESPserver.begin();
  Serial.println("Server started");
}

void loop() {
WiFiClient client = ESPserver.available();
// Check if a client has connected
if (!client)
{
return;
}
// Wait until the client sends some data
Serial.println("New Client");
while(!client.available())
{
delay(1);
}

// Read the first line of the request
request = client.readStringUntil('\r');
Serial.println(request);
client.flush();

// Match the request
int value = LOW;
if (request.indexOf("GET /D") != -1)
{
  getDelayTime();
}

if (request.indexOf("/LEDON") != -1)
{
  Serial.println("LED is ON");
  digitalWrite(ledPin, HIGH);
  value = HIGH;
}
if (request.indexOf("/LEDOFF") != -1)
{
  Serial.println("LED is OFF");
  digitalWrite(ledPin, LOW);
  value = LOW;
}

  if (value = HIGH) {
  client.println("HTTP/1.1 200 OK");
  client.println("Content-Type: text/html");
  client.println(""); //  IMPORTANT
  client.println("<!DOCTYPE HTML>");
  client.println("<html>");
  client.print('/');
    client.println("Status of LED: ON");
    delay(10);

  }
  if (value = LOW) {
  client.println("HTTP/1.1 200 OK");
  client.println("Content-Type: text/html");
  client.println(""); //  IMPORTANT
  client.println("<!DOCTYPE HTML>");
  client.println("<html>");
    client.print('/');
    client.println("Status of LED: OFF");
    delay(10);

  }
delay(1);
//client.stop();
Serial.println("Client disconnected");
Serial.println("");
}

void getDelayTime() {
  int dStart = request.indexOf("/D");
  int dEnd = request.indexOf("/d");
  String dData = request.substring(dStart+2,dEnd);
  dValue = dData.toInt();
  Serial.println(dData);
  Serial.println(dStart);
  Serial.println(dEnd);
  Serial.println(dValue);
  }
You are sending too many responses, as each loop sends one.
You need to communicate a response only when there is a state change for LEDs.
Hence, remove the responses from loop - (remove the following part)
if (value = HIGH) {
  client.println("HTTP/1.1 200 OK");
  client.println("Content-Type: text/html");
  client.println(""); //  IMPORTANT
  client.println("<!DOCTYPE HTML>");
  client.println("<html>");
  client.print('/');
    client.println("Status of LED: ON");
    delay(10);

  }
  if (value = LOW) {
  client.println("HTTP/1.1 200 OK");
  client.println("Content-Type: text/html");
  client.println(""); //  IMPORTANT
  client.println("<!DOCTYPE HTML>");
  client.println("<html>");
    client.print('/');
    client.println("Status of LED: OFF");
    delay(10);
Then create a method sendResponse() and add the above code to the method.
void sendResponse(){

	if (value = HIGH) {
  client.println("HTTP/1.1 200 OK");
  client.println("Content-Type: text/html");
  client.println(""); //  IMPORTANT
  client.println("<!DOCTYPE HTML>");
  client.println("<html>");
  client.print('/');
    client.println("Status of LED: ON");
    delay(10);

  }
  if (value = LOW) {
  client.println("HTTP/1.1 200 OK");
  client.println("Content-Type: text/html");
  client.println(""); //  IMPORTANT
  client.println("<!DOCTYPE HTML>");
  client.println("<html>");
    client.print('/');
    client.println("Status of LED: OFF");
    delay(10);

 }

}
Finally call the sendResponse() method whenever there is a LED state change -
if (request.indexOf("/LEDON") != -1)
{
  Serial.println("LED is ON");
  digitalWrite(ledPin, HIGH);
  value = HIGH;

  sendResponse();
}
if (request.indexOf("/LEDOFF") != -1)
{
  Serial.println("LED is OFF");
  digitalWrite(ledPin, LOW);
  value = LOW;

  sendResponse();
}
thanks for the suggestion - it is much appreciated! I modified the code but it looks like nothing is being written to the url. It seems if I don’t have those http/html things in the loop, the page won’t open. It does still turn the led off and on but I’m not getting the feedback. Eventually, I’d like to return sensor values as well. Since “client” is now in a procedure, I had to declare it at the beginning, otherwise it won’t be in scope in the procedure. I’m also attaching the code for a ESP8286 server that works without MIT app inventor. I’ve been studying it to see what the differences are but I’m not experienced enough to see why my app inventor implementation won’t work. Is it possible to point me to an example where someone used MIT app inventor and local wifi and sent info to and from an MCU and MIT app? I’ve spent quite a few hours combing the web on it. It looks like it is ridiculously easy to control something over local wifi with MIT app inventor but frustratingly difficult to get feedback (data) back to the APP from the MCU.
// Load Wi-Fi library
#include <ESP8266WiFi.h>

// Replace with your network credentials
const char* ssid     = "N";
const char* password = "s";

// Set web server port number to 80
WiFiServer server(80);

// Variable to store the HTTP request
String header;

// Auxiliary variables to store the current output state
String output5State = "off";
String output4State = "off";

// Assign output variables to GPIO pins
const int output5 = 5;
const int output4 = 4;

// Current time
unsigned long currentTime = millis();
// Previous time
unsigned long previousTime = 0;
// Define timeout time in milliseconds (example: 2000ms = 2s)
const long timeoutTime = 2000;

void setup() {
  Serial.begin(115200);
  // Initialize the output variables as outputs
  pinMode(output5, OUTPUT);
  pinMode(output4, OUTPUT);
  // Set outputs to LOW
  digitalWrite(output5, LOW);
  digitalWrite(output4, LOW);

  // Connect to Wi-Fi network with SSID and password
  Serial.print("Connecting to ");
  Serial.println(ssid);
  WiFi.begin(ssid, password);
  while (WiFi.status() != WL_CONNECTED) {
    delay(500);
    Serial.print(".");
  }
  // Print local IP address and start web server
  Serial.println("");
  Serial.println("WiFi connected.");
  Serial.println("IP address: ");
  Serial.println(WiFi.localIP());
  server.begin();
}

void loop(){
  WiFiClient client = server.available();   // Listen for incoming clients

  if (client) {                             // If a new client connects,
    Serial.println("New Client.");          // print a message out in the serial port
    String currentLine = "";                // make a String to hold incoming data from the client
    currentTime = millis();
    previousTime = currentTime;
    while (client.connected() && currentTime - previousTime <= timeoutTime) { // loop while the client's connected
      currentTime = millis();
      if (client.available()) {             // if there's bytes to read from the client,
//        header = client.readStringUntil('\r');
        char c = client.read();             // read a byte, then
        Serial.write(c);                    // print it out the serial monitor
       header += c;
        if (c == '\n') {                    // if the byte is a newline character
          // if the current line is blank, you got two newline characters in a row.
          // that's the end of the client HTTP request, so send a response:
          if (currentLine.length() == 0) {
            // HTTP headers always start with a response code (e.g. HTTP/1.1 200 OK)
            // and a content-type so the client knows what's coming, then a blank line:
            client.println("HTTP/1.1 200 OK");
            client.println("Content-type:text/html");
            client.println("Connection: close");
            client.println();
            Serial.println(header);

            // turns the GPIOs on and off
            if (header.indexOf("GET /5/on") >= 0) {
              Serial.println("GPIO 5 on");
              output5State = "on";
              digitalWrite(output5, HIGH);
            } else if (header.indexOf("GET /5/off") >= 0) {
              Serial.println("GPIO 5 off");
              output5State = "off";
              digitalWrite(output5, LOW);
            } else if (header.indexOf("GET /4/on") >= 0) {
              Serial.println("GPIO 4 on");
              output4State = "on";
              digitalWrite(output4, HIGH);
            } else if (header.indexOf("GET /4/off") >= 0) {
              Serial.println("GPIO 4 off");
              output4State = "off";
              digitalWrite(output4, LOW);
            }

            // Display the HTML web page
            client.println("<!DOCTYPE html><html>");
            client.println("<head><meta name=\"viewport\" content=\"width=device-width, initial-scale=1\">");
            client.println("<link rel=\"icon\" href=\"data:,\">");
            // CSS to style the on/off buttons
            // Feel free to change the background-color and font-size attributes to fit your preferences
            client.println("<style>html { font-family: Helvetica; display: inline-block; margin: 0px auto; text-align: center;}");
            client.println(".button { background-color: #195B6A; border: none; color: white; padding: 16px 40px;");
            client.println("text-decoration: none; font-size: 30px; margin: 2px; cursor: pointer;}");
            client.println(".button2 {background-color: #77878A;}</style></head>");

            // Web Page Heading
            client.println("<body><h1>ESP8266 Web Server</h1>");

            // Display current state, and ON/OFF buttons for GPIO 5
            client.println("<p>GPIO 5 - State " + output5State + "</p>");
            // If the output5State is off, it displays the ON button
            if (output5State=="off") {
              client.println("<p><a href=\"/5/on\"><button class=\"button\">ON</button></a></p>");
            } else {
              client.println("<p><a href=\"/5/off\"><button class=\"button button2\">OFF</button></a></p>");
            }

            // Display current state, and ON/OFF buttons for GPIO 4
            client.println("<p>GPIO 4 - State " + output4State + "</p>");
            // If the output4State is off, it displays the ON button
            if (output4State=="off") {
              client.println("<p><a href=\"/4/on\"><button class=\"button\">ON</button></a></p>");
            } else {
              client.println("<p><a href=\"/4/off\"><button class=\"button button2\">OFF</button></a></p>");
            }
            client.println("</body></html>");

            // The HTTP response ends with another blank line
            client.println();
            // Break out of the while loop
            break;
          } else { // if you got a newline, then clear currentLine
            currentLine = "";
          }
        } else if (c != '\r') {  // if you got anything else but a carriage return character,
          currentLine += c;      // add it to the end of the currentLine
        }
      }
    }
    // Clear the header variable
    header = "";
    // Close the connection
    client.stop();
    Serial.println("Client disconnected.");
    Serial.println("");
  }
}
#include <ESP8266WiFi.h>
// Network SSID and Password
const char* ssid = “N”;
const char* password = “s”;
int ledPin = D0;
int potPin = A0;
// Start WiFi Server on port 80
WiFiServer ESPserver(80);
WiFiClient client;
// data Value to be received from app
int dValue = 1000;
int aValue = 1023;
int value = LOW;
String request; //this is what the app is sending over wifi
//String request2;
// for example, it looks like the following when LED ON button is pressed: GET /LEDON HTTP/1.1
// it looks like this when a data value of 1000 is sent with SEND button : GET /D1000/d HTTP/1.1
while (WiFi.status() != WL_CONNECTED) {
delay(500);
Serial.print("."); // a “dot” is added until connection is established
}
Serial.println("");
Serial.println(“WiFi connected”);
// Print the IP address
Serial.print("IP address: ");
Serial.println(WiFi.localIP()); // local IP address
ESPserver.begin();
Serial.println(“Server started”);
}
I guess I’ll just use the non-MIT app inventor method and brush up on html. If you can point me to an example with the app inventor, please do.
thanks for your help.
In your code I changed: // Assign output variables to GPIO pins const int output5 = D5; const int output4 = D4;
// Load Wi-Fi library
#include <ESP8266WiFi.h>

// Replace with your network credentials
const char* ssid     = "Nombre_red";
const char* password = "contraseña";

// Set web server port number to 80
WiFiServer server(80);

// Variable to store the HTTP request
String header;

// Auxiliary variables to store the current output state
String output5State = "off";
String output4State = "off";

// Assign output variables to GPIO pins
const int output5 = D5;
const int output4 = D4;

// Current time
unsigned long currentTime = millis();
// Previous time
unsigned long previousTime = 0;
// Define timeout time in milliseconds (example: 2000ms = 2s)
const long timeoutTime = 2000;

void setup() {
  Serial.begin(115200);
  // Initialize the output variables as outputs
  pinMode(output5, OUTPUT);
  pinMode(output4, OUTPUT);
  // Set outputs to LOW
  digitalWrite(output5, LOW);
  digitalWrite(output4, LOW);

  // Connect to Wi-Fi network with SSID and password
  Serial.print("Connecting to ");
  Serial.println(ssid);
  WiFi.begin(ssid, password);
  while (WiFi.status() != WL_CONNECTED) {
    delay(500);
    Serial.print(".");
  }
  // Print local IP address and start web server
  Serial.println("");
  Serial.println("WiFi connected.");
  Serial.println("IP address: ");
  Serial.println(WiFi.localIP());
  server.begin();
}

void loop(){
  WiFiClient client = server.available();   // Listen for incoming clients

  if (client) {                             // If a new client connects,
    Serial.println("New Client.");          // print a message out in the serial port
    String currentLine = "";                // make a String to hold incoming data from the client
    currentTime = millis();
    previousTime = currentTime;
    while (client.connected() && currentTime - previousTime <= timeoutTime) { // loop while the client's connected
      currentTime = millis();
      if (client.available()) {             // if there's bytes to read from the client,
//        header = client.readStringUntil('\r');
        char c = client.read();             // read a byte, then
        Serial.write(c);                    // print it out the serial monitor
       header += c;
        if (c == '\n') {                    // if the byte is a newline character
          // if the current line is blank, you got two newline characters in a row.
          // that's the end of the client HTTP request, so send a response:
          if (currentLine.length() == 0) {
            // HTTP headers always start with a response code (e.g. HTTP/1.1 200 OK)
            // and a content-type so the client knows what's coming, then a blank line:
            client.println("HTTP/1.1 200 OK");
            client.println("Content-type:text/html");
            client.println("Connection: close");
            client.println();
            Serial.println(header);

            // turns the GPIOs on and off
            if (header.indexOf("GET /5/on") >= 0) {
              Serial.println("GPIO 5 on");
              output5State = "on";
              digitalWrite(output5, HIGH);
            } else if (header.indexOf("GET /5/off") >= 0) {
              Serial.println("GPIO 5 off");
              output5State = "off";
              digitalWrite(output5, LOW);
            } else if (header.indexOf("GET /4/on") >= 0) {
              Serial.println("GPIO 4 on");
              output4State = "on";
              digitalWrite(output4, HIGH);
            } else if (header.indexOf("GET /4/off") >= 0) {
              Serial.println("GPIO 4 off");
              output4State = "off";
              digitalWrite(output4, LOW);
            }

            // Display the HTML web page
            client.println("<!DOCTYPE html><html>");
            client.println("<head><meta name=\"viewport\" content=\"width=device-width, initial-scale=1\">");
            client.println("<link rel=\"icon\" href=\"data:,\">");
            // CSS to style the on/off buttons
            // Feel free to change the background-color and font-size attributes to fit your preferences
            client.println("<style>html { font-family: Helvetica; display: inline-block; margin: 0px auto; text-align: center;}");
            client.println(".button { background-color: #195B6A; border: none; color: white; padding: 16px 40px;");
            client.println("text-decoration: none; font-size: 30px; margin: 2px; cursor: pointer;}");
            client.println(".button2 {background-color: #77878A;}</style></head>");

            // Web Page Heading
            client.println("<body><h1>ESP8266 Web Server</h1>");

            // Display current state, and ON/OFF buttons for GPIO 5
            client.println("<p>GPIO 5 - State " + output5State + "</p>");
            // If the output5State is off, it displays the ON button
            if (output5State=="off") {
              client.println("<p><a href=\"/5/on\"><button class=\"button\">ON</button></a></p>");
            } else {
              client.println("<p><a href=\"/5/off\"><button class=\"button button2\">OFF</button></a></p>");
            }

            // Display current state, and ON/OFF buttons for GPIO 4
            client.println("<p>GPIO 4 - State " + output4State + "</p>");
            // If the output4State is off, it displays the ON button
            if (output4State=="off") {
              client.println("<p><a href=\"/4/on\"><button class=\"button\">ON</button></a></p>");
            } else {
              client.println("<p><a href=\"/4/off\"><button class=\"button button2\">OFF</button></a></p>");
            }
            client.println("</body></html>");

            // The HTTP response ends with another blank line
            client.println();
            // Break out of the while loop
            break;
          } else { // if you got a newline, then clear currentLine
            currentLine = "";
          }
        } else if (c != '\r') {  // if you got anything else but a carriage return character,
          currentLine += c;      // add it to the end of the currentLine
        }
      }
    }
    // Clear the header variable
    header = "";
    // Close the connection
    client.stop();
    Serial.println("Client disconnected.");
    Serial.println("");
  }
}