Hello friends,
this topic is about
- installing Raspberry Pi on an SdCard.
- Remote desktop with VNC.
- Installing Apache with PHP.
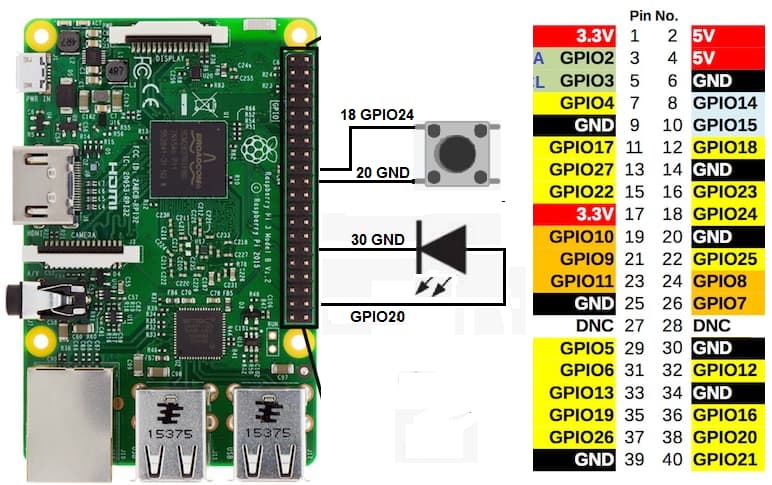
- Wiring Pi to control the pins of the Raspberry.
- Turn on/off an LED from a web page and from App Inventor.
- Check the state of a button from App Inventor.
I used Raspberry Pi 3 Model B and SdCard 32 GB
1.- Installation on SdCard.
Raspberry Pi OS (previously called Raspbian). Install Raspberry Pi OS using Raspberry Pi Imager.
Installation is easy, you can follow the video. On this page I have put pictures of my installation. http://kio4.com/raspberry/1_instalacion.htm
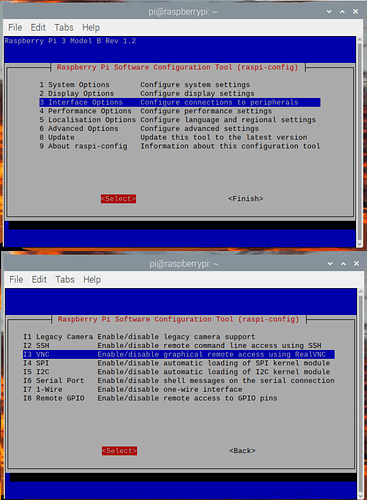
2.- Enable VNC remote desktop.
In a terminal:
sudo raspi-config
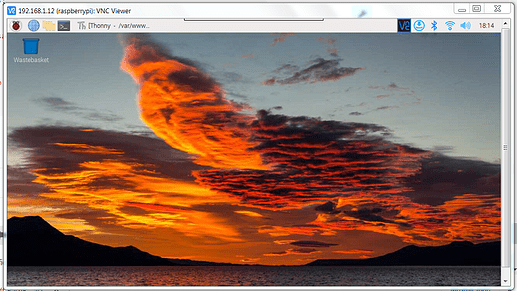
- Client. Viewer. In your Windows install VNC Viewer. (There is a version for LINUX)
https://www.realvnc.com/es/connect/download/viewer/
In a terminal:
hostname -I
3 Likes
3.- Install Web server. Apache. PHP.
In a Terminal.
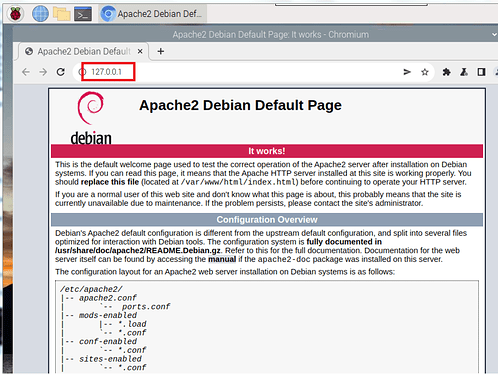
sudo apt-get install apache2
then in a browser:
sudo apt install php libapache2-mod-php
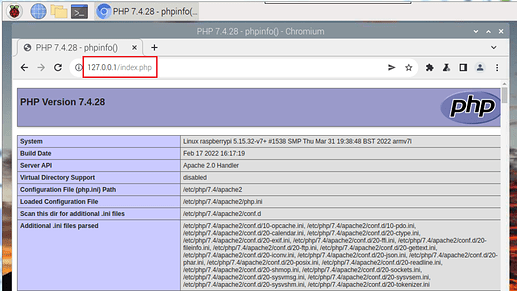
Let's create a page with the following content:
sudo nano /var/www/html/
<?php phpinfo ( ) ; ?>
then in a browser:
4.- Install Wiring Pi
Wiring Pi is a library to be able to control the pins of the Raspberry from the Terminal and from PHP, as well as other possibilities.
http://wiringpi.com/wiringpi-updated-to-2-36/
I used WiringPi-2.61-1.tar.gz of:
https://github.com/WiringPi/WiringPi/releases/tag/2.61-1
Library installation:
pi@raspberrypi:~ $ sudo su
root@raspberrypi:/home/pi# mkdir /home/pi/wiringPi
root@raspberrypi:/home/pi# cd /home/pi/wiringPi
root@raspberrypi:/home/pi/wiringPi# cp /home/pi/Downloads/WiringPi-2.61-1.tar.gz /home/pi/wiringPi/
root@raspberrypi:/home/pi/wiringPi# tar xfz WiringPi-2.61-1.tar.gz
root@raspberrypi:/home/pi/wiringPi# cd /home/pi/wiringPi/WiringPi-2.61-1
root@raspberrypi:/home/pi/wiringPi/WiringPi-2.61-1# ./build
ooooooooooooooooooooooooooooooooooooooooooo
- Example, we can turn on/off an LED from the Terminal.
pi@raspberrypi:~ $ /usr/local/bin gpio -g mode 26 out
pi@raspberrypi:~ $ /usr/local/bin gpio -g write 26 0
pi@raspberrypi:~ $ /usr/local/bin/gpio -g write 26 1
5.- Turn on/off a LED GPIO20 from a Web page. PHP.
/var/www/html/led.php
<html>
<head>
<meta name="viewport" content="width=device-width" />
<title>Encendido y apagado de un LED.</title>
</head>
       <body>
       <center><h1>Control de un LED mediante página web</h1>
         <form method="get" action="led.php">
            <input type="submit" style = "font-size: 16 pt" value="OFF - Apagar" name="off">
            <input type="submit" style = "font-size: 16 pt" value="ON - Encender" name="on">
         </form></center>
<?php
    shell_exec("/usr/local/bin/gpio -g mode 20 out");
    if(isset($_GET['off']))
        {
                        echo "LED OFF - Apagado";
                        shell_exec("/usr/local/bin/gpio -g write 20 0");
        }
            else if(isset($_GET['on']))
            {
                        echo "LED ON - Encendido";
                        shell_exec("/usr/local/bin/gpio -g write 20 1");
            }
?>
   </body>
</html>
then
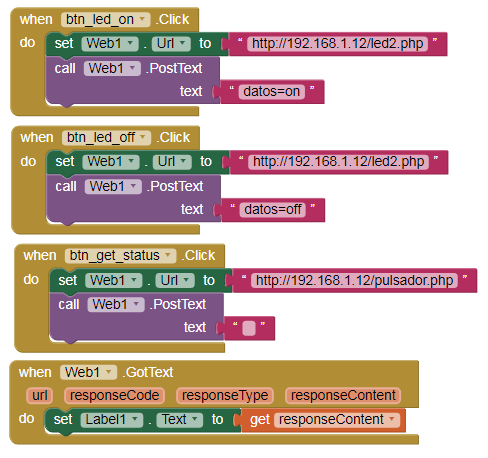
6.- Turn on/off LED GPIO20 from App Inventor.
p9B3_on_off_RaspBerry.aia (2.2 KB)
Blocks:
btn_led_on
btn_led_off
/var/www/html/led2.php
<?php
$led= $_POST['datos'];
    shell_exec("/usr/local/bin/gpio -g mode 20 out");
    if($led == "on")
        {
          shell_exec("/usr/local/bin/gpio -g write 20 1");
          echo "LED ON - Encendido";
        }
    if($led == "off")
        {
          shell_exec("/usr/local/bin/gpio -g write 20 0");
          echo "LED OFF - Apagado";
        }

?>
7.- Get status of Pushbutton GPIO24 from App Inventor.
It is the btn_get_status block from the previous application.
/var/www/html/pulsador.php
<?php
    shell_exec("/usr/local/bin/gpio -g mode 24 in");
    shell_exec("/usr/local/bin/gpio -g mode 24 up");
    $boton = shell_exec("/usr/local/bin/gpio -g read 24");
    $boton = trim($boton);
    if($boton == "1")
         {
            echo "No Pulsado - Pushbutton UP";
         }
    else
         {
            echo "Pulsado - Pushbutton DOWN";
         }
?>
