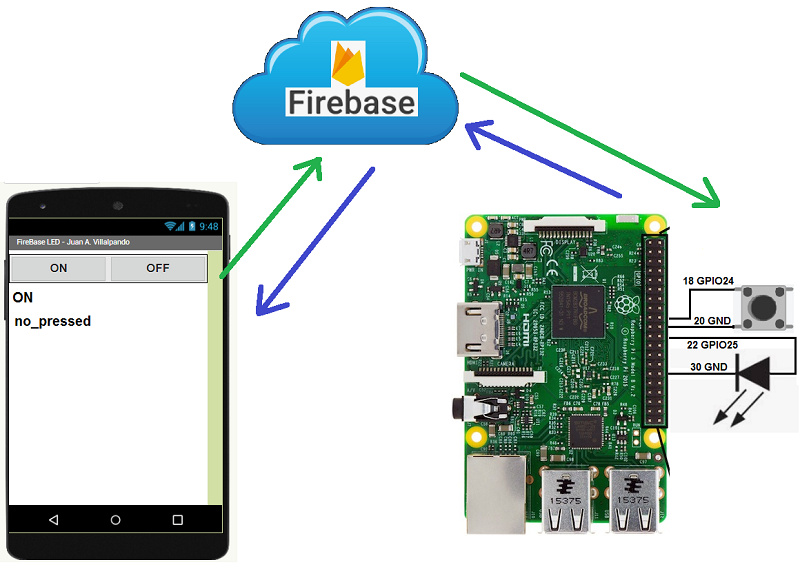
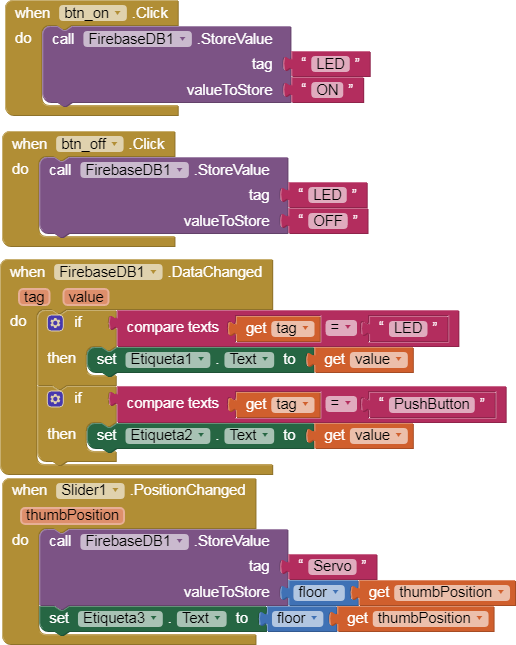
- Raspberry generates two random numbers, sends them to Firebase, the application receives them.
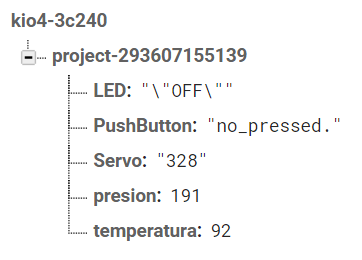
- Raspberry generates temperature (0 ... 100) and pressure (0 ... 700).
# Juan A. Villalpando
# http://kio4.com/raspberry/9_firebasedb.htm
import RPi.GPIO as GPIO
import pyrebase
from time import sleep
# generate random integer values
from random import seed
from random import randint
config = {
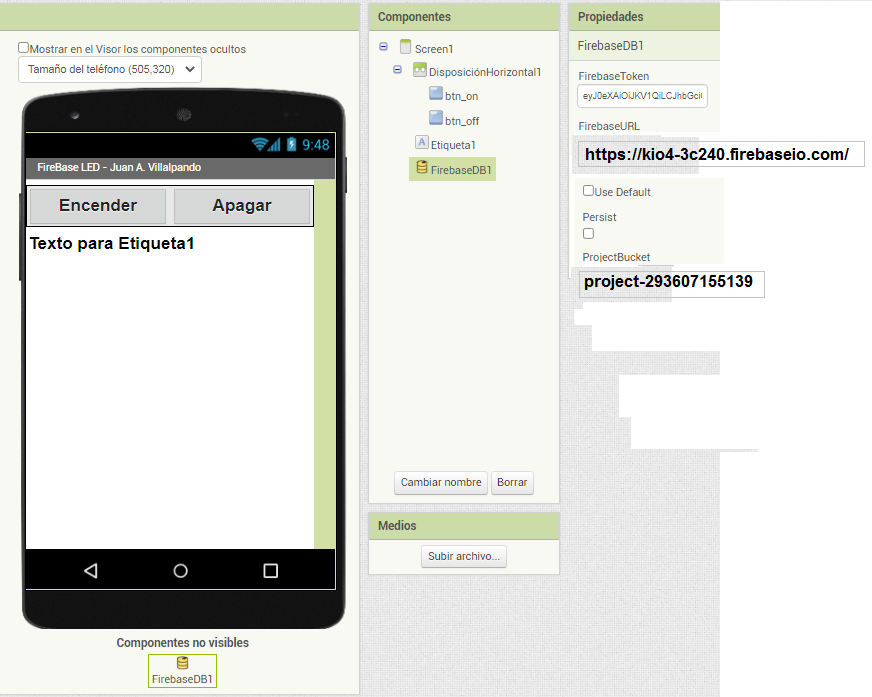
"apiKey": "AIzaSyAo9cEmTy2pOEygEEIXdCUHc7uOlSFdcW4",
"authDomain": "kio4-3c240",
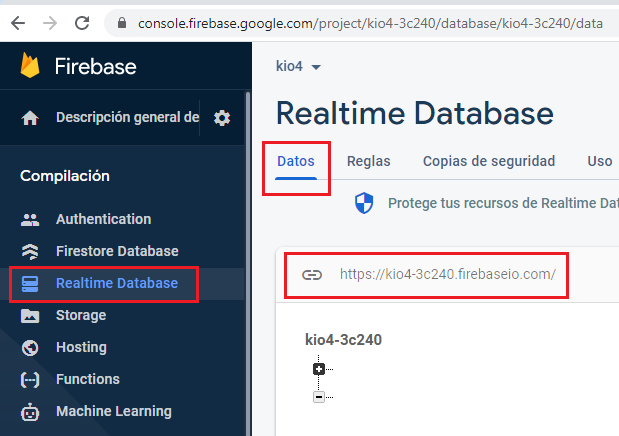
"databaseURL": "https://kio4-3c240.firebaseio.com/",
"storageBucket": "project-293607155139"
}
firebase = pyrebase.initialize_app(config)
database = firebase.database()
ProjectBucket = database.child("project-293607155139")
temperatura = 50
presion = 350
print("Inicio. (CTRL + C para salir.)")
try:
while True: # Bucle principal
temperatura = randint(0, 100)
presion = randint(0, 700)
ProjectBucket.child("project-293607155139").child("temperatura").set(temperatura)
ProjectBucket.child("project-293607155139").child("presion").set(presion)
sleep(4)
except KeyboardInterrupt: # Salir con CTRL+C
print("Salida.")
GPIO.cleanup() # Limpiar GPIO
-
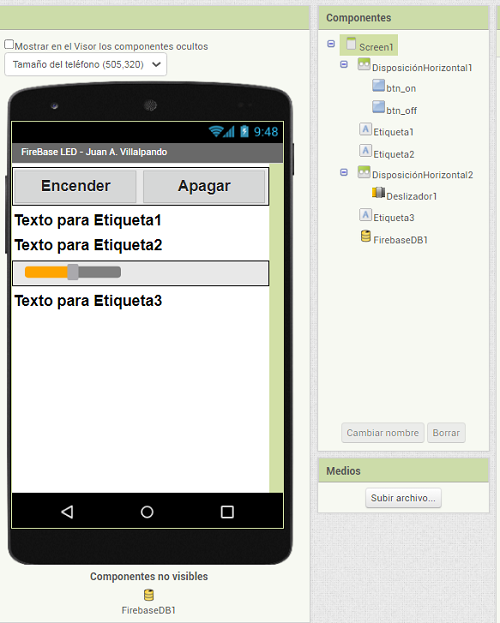
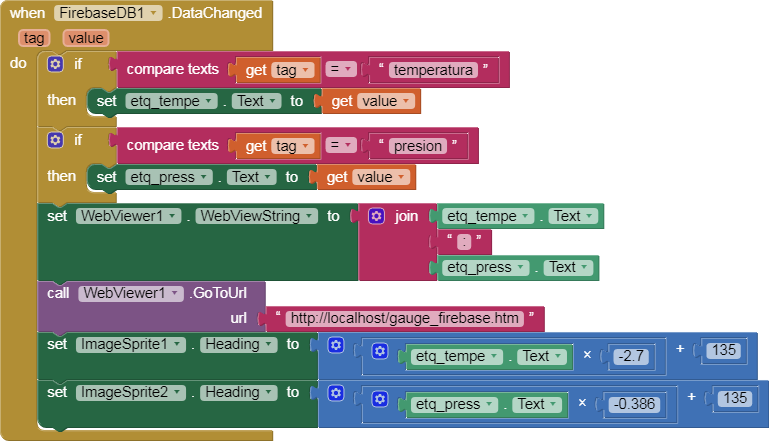
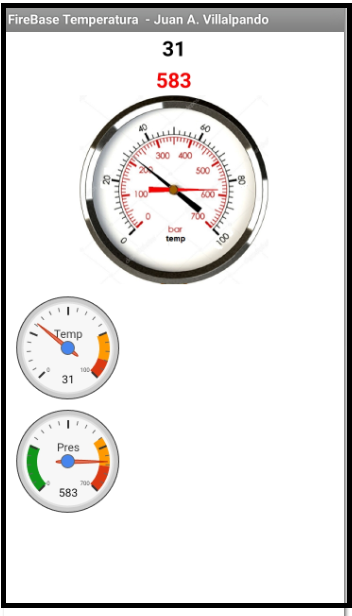
I use two types of Gauges, through a Canvas with two ImageSprites and through Google Chart.
-
The Canvas has as background image: gauge_firebase1.png.
For the needles we used two ImageSprites with a transparent background.
p9i_raspberry_firebase_temperatura.aia (176.9 KB)
Summary
<html><head>
<meta name="viewport" content="width=device-width, initial-scale=1.0, maximum-scale=1.0, user-scalable=no">
   <script type="text/javascript" src="https://www.gstatic.com/charts/loader.js"></script>
   <script type="text/javascript">
      // Juan A. Villalpando
	  // http://kio4.com/raspberry/9_firebasedb.htm
      google.charts.load('current', {'packages':['gauge']});
      google.charts.setOnLoadCallback(drawChart);

	  temp_hume = window.AppInventor.getWebViewString().split(":");// Entrada de datos.
      temperatura =  temp_hume[0];
      humedad =  temp_hume[1];

       function drawChart() {

        var data = google.visualization.arrayToDataTable([
          ['Label', 'Value'],
          ['Temp', 50],
        ]);

        var options = {
          width: 400, height: 120,
          redFrom: 90, redTo: 100,
          yellowFrom:75, yellowTo: 90,
          minorTicks: 5
        };

        var chart = new google.visualization.Gauge(document.getElementById('chart_div_1'));

		///////////////////////////////////////////////
		 var data2 = google.visualization.arrayToDataTable([
          ['Label', 'Value'],
          ['Pres', 350],
        ]);

        var options2 = {
          width: 400, height: 120,
		  greenFrom: 0, greenTo: 180,
          redFrom: 600, redTo: 700,
          yellowFrom:490, yellowTo: 600,
          minorTicks: 5,
		  max: 700
        };

        var chart2 = new google.visualization.Gauge(document.getElementById('chart_div_2'));

       ///////////////////////////////////////////////
        chart.draw(data, options);
        data.setValue(0, 1, temperatura);
        chart.draw(data, options);

		chart2.draw(data2, options2);
        data2.setValue(0, 1, humedad);
        chart2.draw(data2, options2);
      };
      </script>
  </head>
 <body>
    <div id="chart_div_1" style="width: 400px; height: 120px;"></div>
	<div id="chart_div_2" style="width: 400px; height: 120px;"></div>
 </body></html>