In this tutorial, we'll create a complete chatbot using OpenRouteAI. We'll need an API key, which is completely free and can be found at https://openrouter.ai/. With it, and depending on your subscription type, you can use all of AI's models, both free and paid.
In the design section, we need to include a WebViewer, a TextBox, a ListPicker, a button, a Label, a Web component, and a clock.
The resources section includes an HTML file with JavaScript for the chatbot, which is already included in the AI.
In the Blocks section, we'll create four global variables:
model: This is the default model; in my case, it's gemini-2.5-flash-lite.
models: This is a list of the 20 most commonly used models; you can expand the list if you wish.
sent: This is a control variable to determine if a request has been sent to the web component.
apikey: This is the OpenRoute API key you registered. It's recommended that you set it to obfuscated text.
Now I'll explain the two main blocks: the button to submit the question and the answer received by the web component.
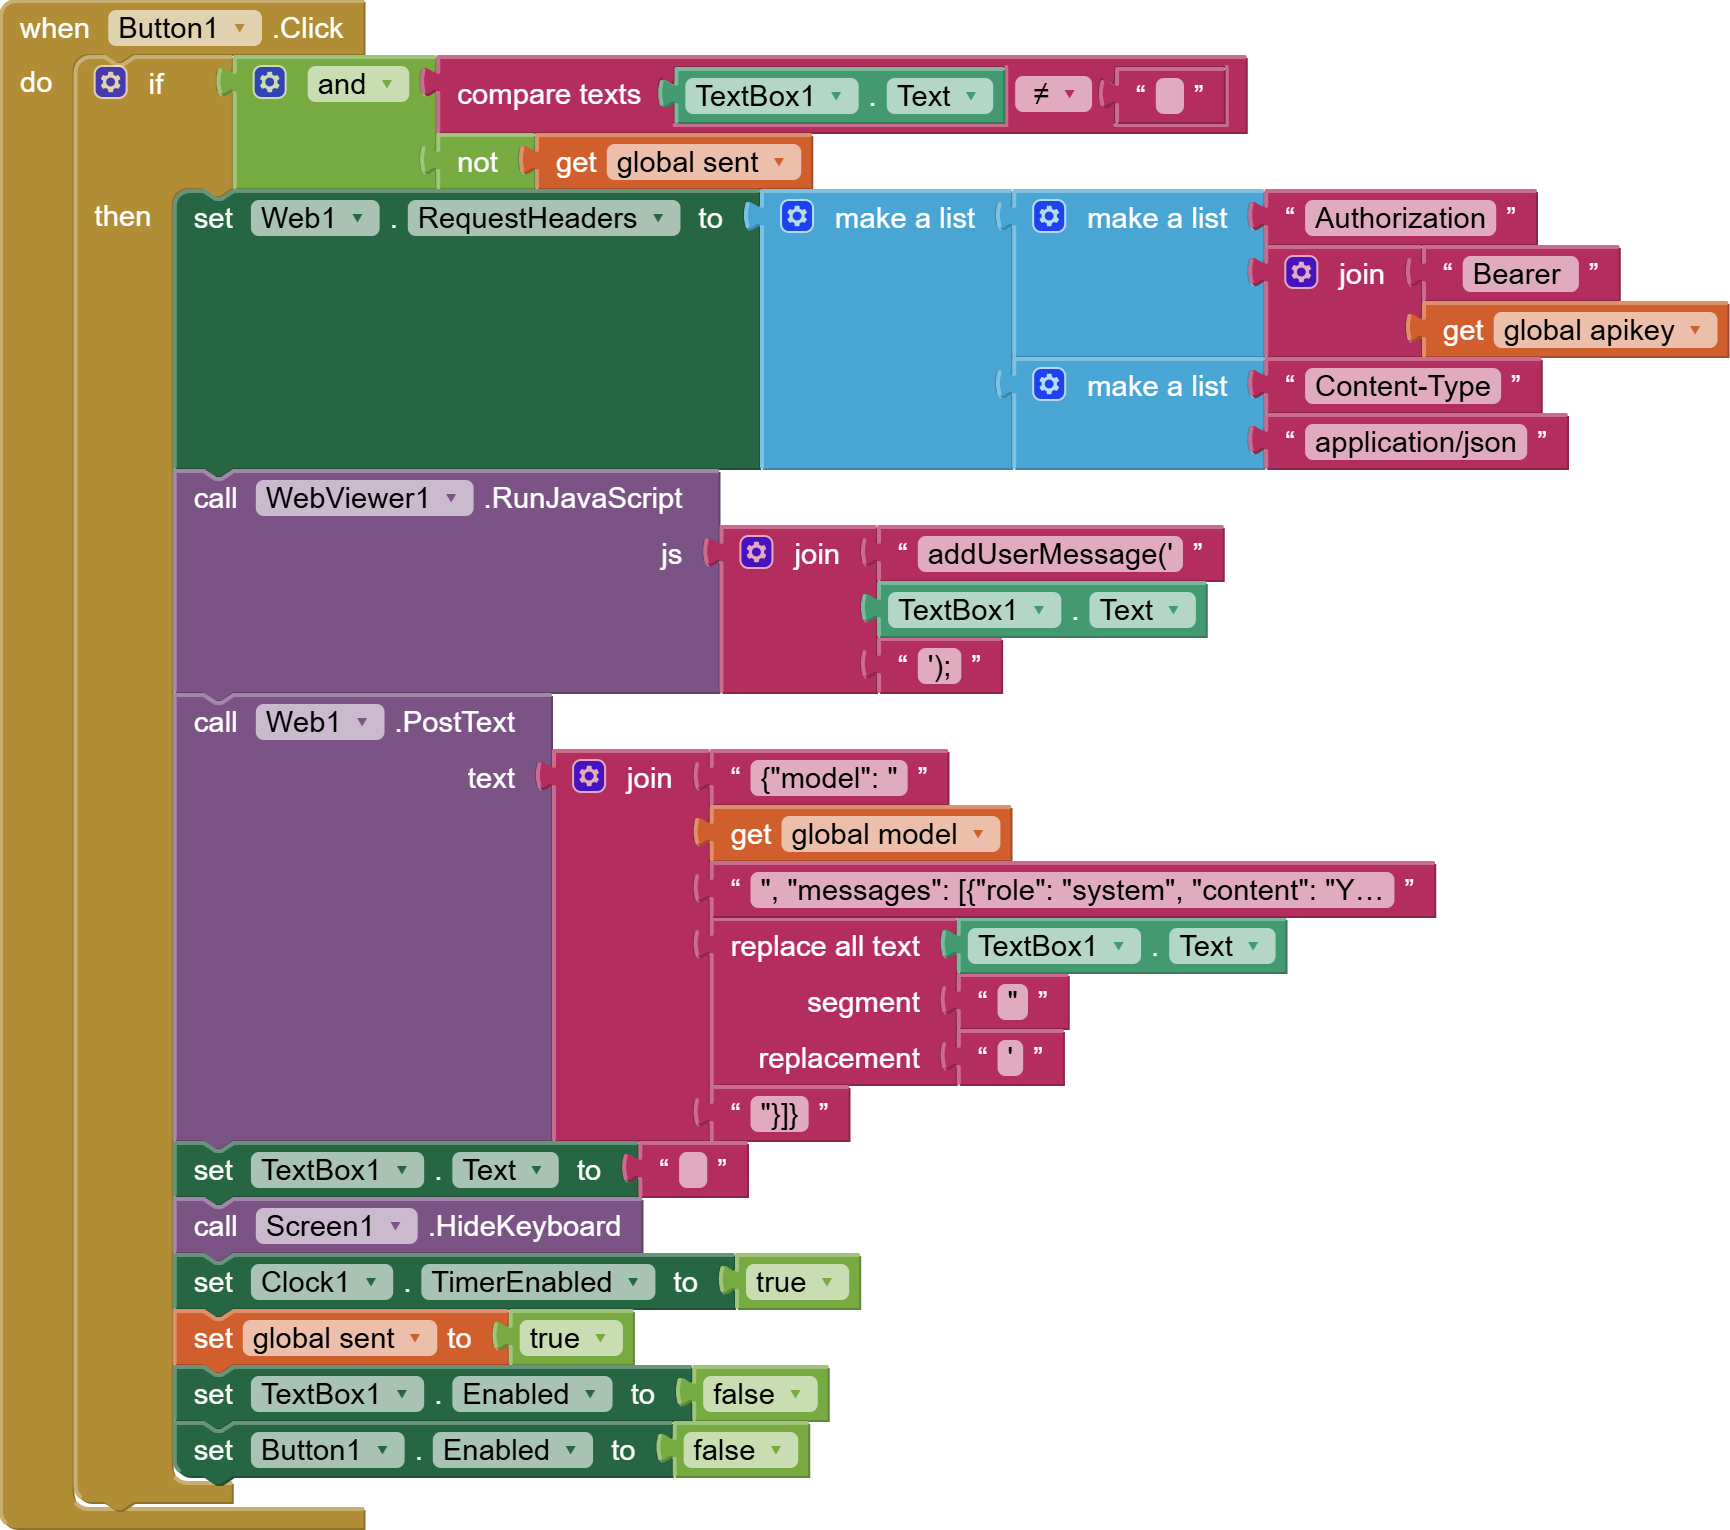
Here is a clear, professional, and step-by-step description of your blocks in English, specifically tailored for a programming tutorial. It explains the core logic, including your custom safety mechanism (global sent) and how the text is processed.
Tutorial Section: Sending Messages and Managing App States
This block handles the user interaction when sending a message to the AI assistant. It safely manages network states, prepares the JSON payload, clears the UI, and starts a security timeout counter.
Step-by-Step Breakdown
1. Input Validation and "Mutex" Lock
- Condition Check: Before performing any action, the block evaluates an
ifcondition using anandlogical operator. - It ensures that the input field (
TextBox1.Text) is not empty (≠ "") and that no other request is currently active (not get global sent). This acts as a software lock (Mutex) to prevent the user from accidental double-submitting or flooding the connection.
2. Configuring HTTP Headers
- If the condition is met, it configures the
Web1component'sRequestHeaders. - It builds a structured list containing two key pairs:
Authorization: Set to"Bearer "combined with yourglobal apikey.Content-Type: Set to"application/json".
3. Updating the Chat Interface (JavaScript Bridge)
- It triggers the
addMessagefunction inside theWebViewerviacall WebViewer1.RunJavaScript. - It uses a
joinblock to format a clean JavaScript call:addUserMessage('User Text Here');.
4. Asynchronous Network Request (Web1.PostText)
- It prepares and sends the raw JSON body to the OpenRouter API.
- Inside the
joinblock, it structures the payload required by standard chat completion endpoints: - Model: Injects the selected model from
get global model. - Messages Array: It embeds the instructions. Notice the sanitization step: it uses a
replace all textblock to switch standard double quotes (") inside the user's message into single quotes (') to guarantee that the final JSON payload structure does not break or escape unexpectedly.
5. Interface Housekeeping and Keyboard Behavior
- UI Clean-up: The
TextBox1.Textis immediately set to an empty string (""), clearing the field so the user knows the message went through. - UX Comfort: It calls
Screen1.HideKeyboardto dismiss the Android virtual keyboard, leaving more screen real estate open for the ongoing conversation.
6. System State Locking and Timers
- Timeout Protection: It triggers
set Clock1.TimerEnabled to true. This activates your background countdown loop to guard against frozen server sockets. - Variable State Flip: It sets
global senttotrue. This locks down the script block. - Physical Component Locks: Lastly, it locks down both interactive UI components by setting
TextBox1.EnabledandButton1.Enabledtofalse. This visually signals to the user that the system is hard at work waiting for a backend response.
Technical Summary for Users
Pro-Tip for Your Tutorial: This layout represents an excellent architectural design patterns for mobile development. By disabling the buttons and changing a tracking variable (
global sent), we completely isolate the network layer. The app remains visually frozen in an un-clickable state until either the network event finishes successfully or the security clock triggers an error handler.
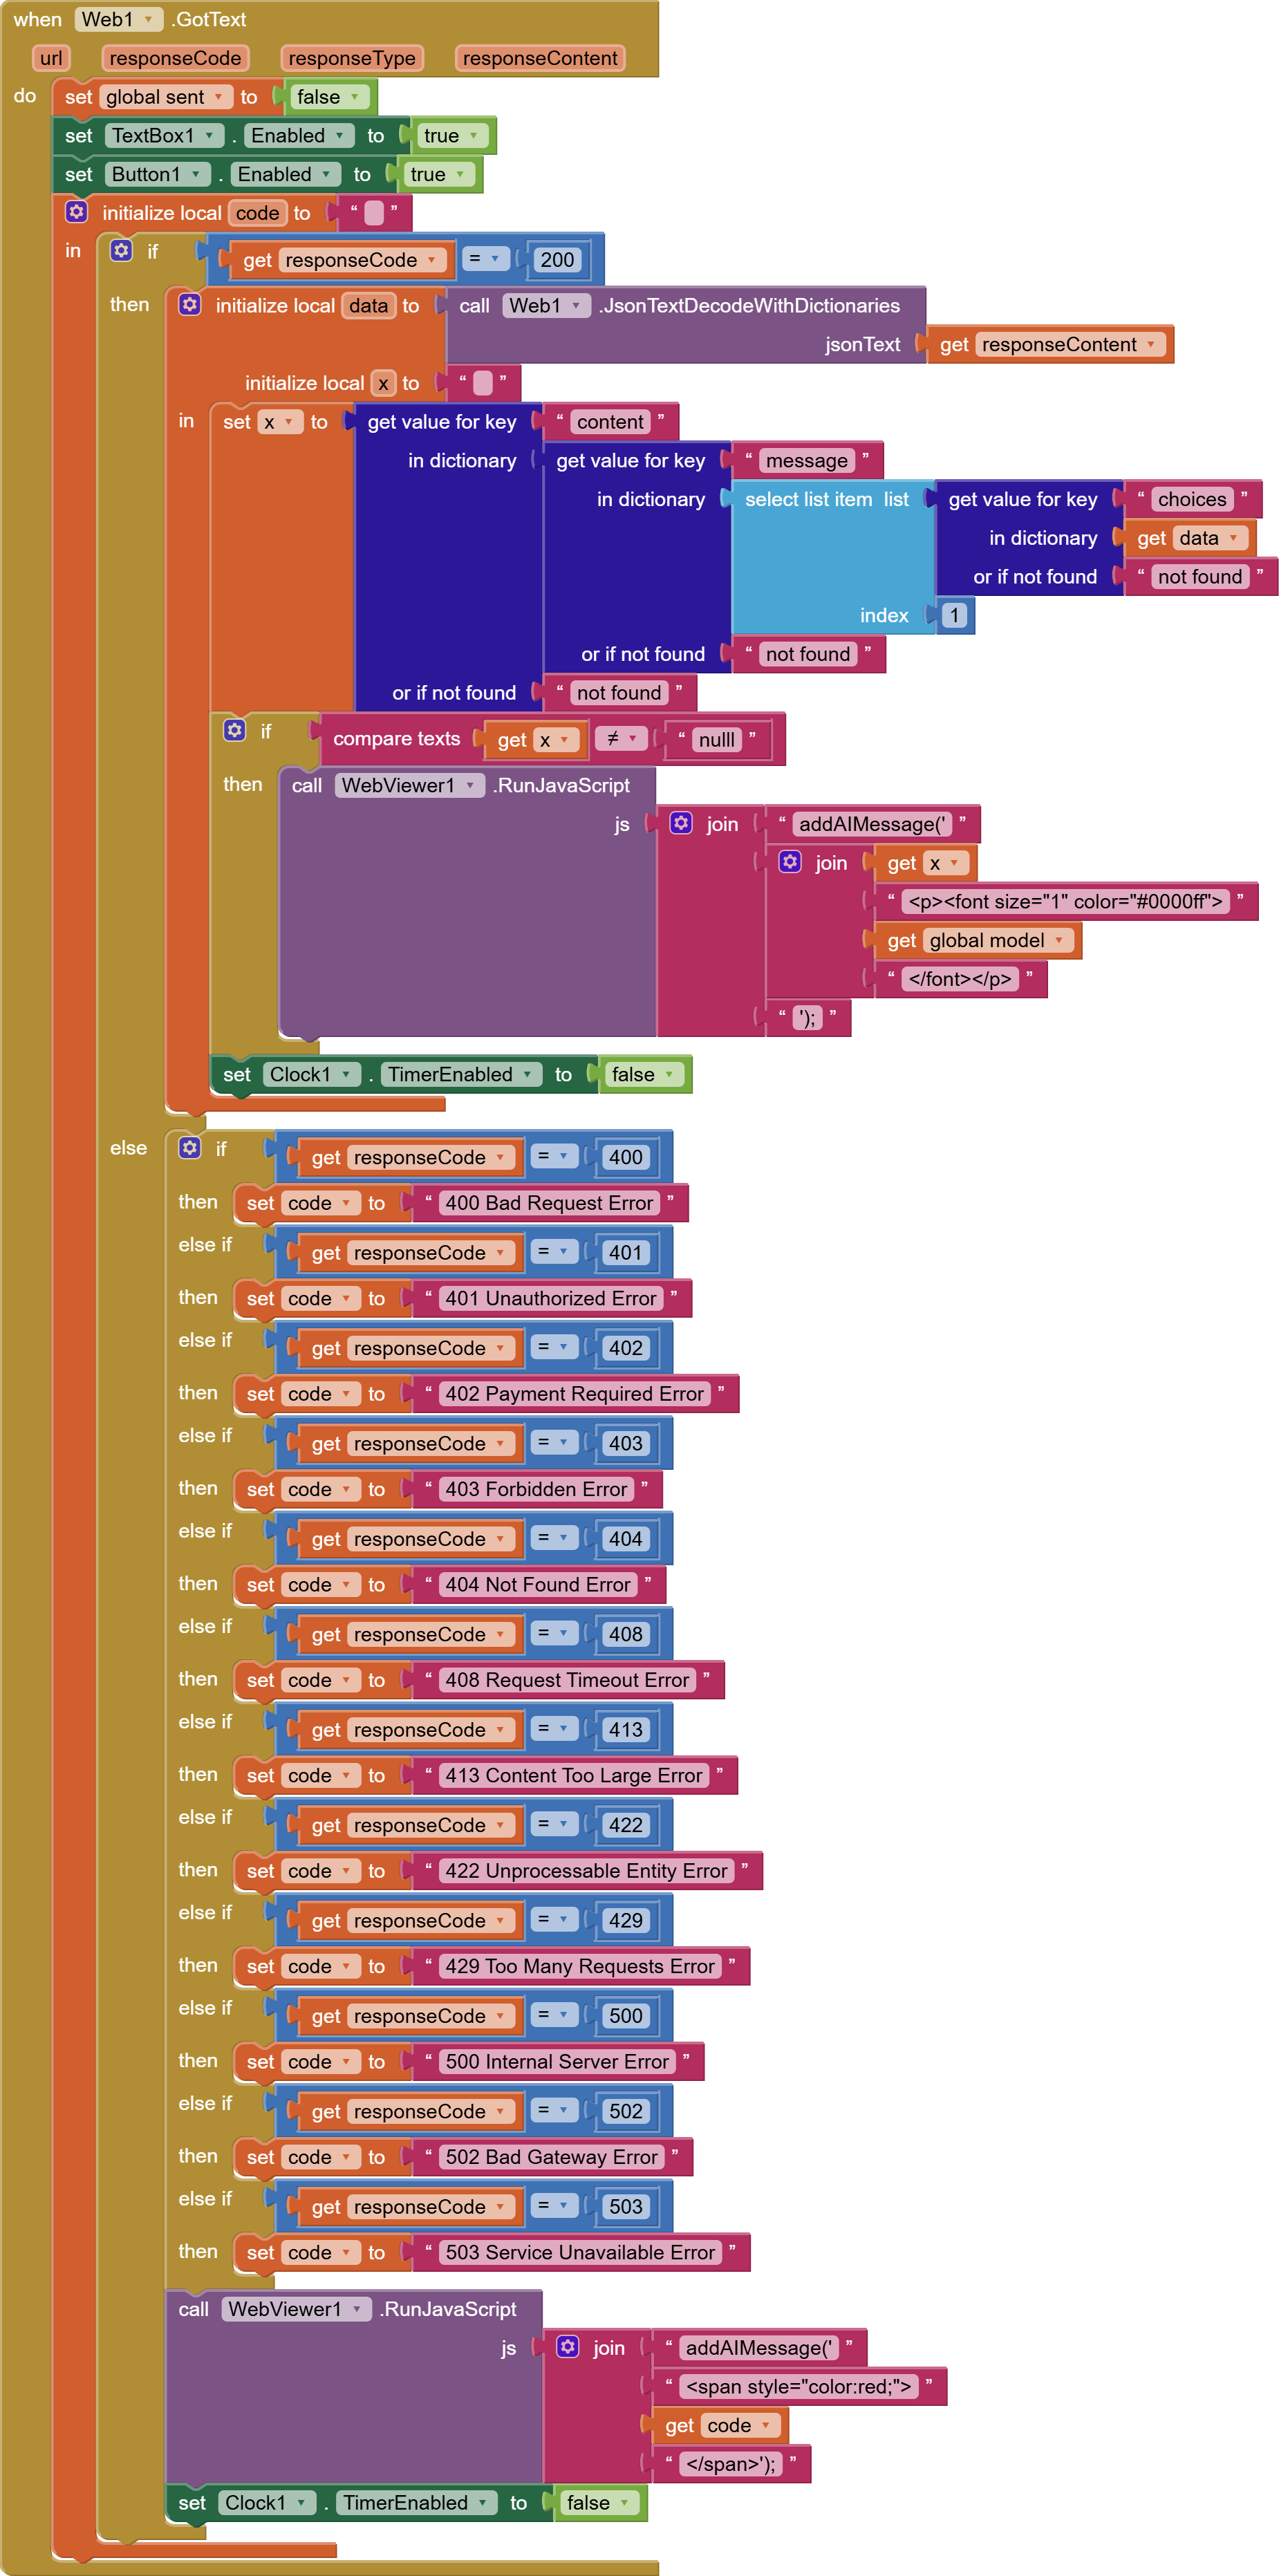
Here is the tutorial description for your backend response event block (Web1.GotText), based on the updated logic shown in your new images.
Tutorial Section: Handling the API Response and Error Catching
This event block handles the backend data when OpenRouter responds. It acts as the "Receiver". It unlocks the application interface, securely parses the JSON text payload, updates the chat UI, and maps standard HTTP web errors into readable messages.
Step-by-Step Breakdown
1. Resetting the Application Lock (The Reset)
- As soon as
Web1.GotTexttriggers, the very first blocks reset your interface variables: set global sent to false: Opens up the lock variable so a new question can be evaluated later.set TextBox1.Enabled to trueandset Button1.Enabled to true: Reactivates your input box and Send button visually.
2. Evaluating Success (HTTP 200 OK)
- The main structure uses an
ifblock to verify ifresponseCode = 200. - JSON Decoding: If successful, it passes
responseContentthrough the nativeJsonTextDecodeWithDictionariesblock to turn raw server text into accessible App Inventor structures (data). - Path Navigation: It initializes a local variable
xand drills down through the nested response mapping keys: **choices➔ Select Item Index1➔message➔content**.
3. Protection Against Empty or Null Values
- The
nullFilter: Before updating the UI, it passesxthrough an internal text comparison check:if get x ≠ "null". This keeps empty server timeouts from throwing errors or printing ugly text on screen. - JavaScript Injected Update: If valid, it passes the text package over the bridge into your Canvas UI layout using
call WebViewer1.RunJavaScriptlinked up to anaddAIMessageexecution script. (In your second variant, it safely hooks the specificglobal modelindicator right below the chat line). - Timer Safety Switch: It forces
set Clock1.TimerEnabled to falseso that the background security clock doesn't fire off an accidental timeout alert.
4. The Advanced Error Trap List (else if Cascade)
If the response code is anything other than 200, the block drops down into a comprehensive error mapping array. It checks the specific HTTP status code and assigns a readable label to a local variable code:
| Status Code | Assigned Tutorial Label | Meaning |
|---|---|---|
| 400 | 400 Bad Request Error |
Broken JSON syntax or prompt structural error. |
| 401 | 401 Unauthorized Error |
Wrong, expired, or missing API key. |
| 403 | 403 Forbidden Error |
Access denied by the endpoint provider. |
| 404 | 404 Not Found Error |
Wrong API URL path or missing endpoint model. |
| 408 | 408 Request Timeout Error |
The backend provider upstream took too long to build a response. |
| 429 | 429 Too Many Requests Error |
Rate limits hit or insufficient credits remaining. |
| 500 / 502 / 503 | Server / Gateway Errors |
Internal issues on OpenRouter's host nodes. |
5. Sending the Error Layout to the Chat Screen
- Once the error code is evaluated, the block issues a distinct JavaScript bridge command.
- It formats the specific error text wrapped neatly inside an inline HTML styling parameter:
<span style="color:red;"> get code </span>. This prints out a crisp, styled alert directly within the user's bubble feed without crashing the App Inventor workflow. - Finally, it shuts down the security clock timer to close out the request cycle safely.
Here is the tutorial explanation in English, explaining the technical reason behind using the Clock1 component instead of the native Web1.Timeout property, along with exactly what the Clock does behind the scenes.
Tutorial Section: Advanced Network Management – Clock vs. Web Timeout
When building real-time chat applications in MIT App Inventor, managing connection drops or frozen API servers is critical. In this project, we explicitly use a Clock (Timer) component to handle timeouts instead of relying on the native Web.Timeout property.
Here is the technical reasoning and an explanation of how it works.
Why the Native Web1.Timeout Fails
MIT App Inventor's Web component features a built-in Timeout property (measured in milliseconds). However, it has a severe platform limitation:
The technical limitation: The native
Web.Timeoutproperty only works for HTTP GET requests. When you are communicating with LLM APIs like OpenRouter, you are forced to use HTTP POST requests via thecall Web1.PostTextblock.
Under the hood in Android, App Inventor ignores the native timeout setting entirely during a POST operation. If the OpenRouter server hangs, drops a socket, or gets overloaded, your application's network thread will stay open indefinitely in a frozen state.
Because we cannot natively Destroy an active POST request thread, we must handle the application's behavior using an external supervisor: Clock1.
Exactly What the Clock Component Does
The Clock1 component acts as a Security Watchdog Timer. Instead of closing the internet connection (which App Inventor doesn't allow dynamically), it safely manages the state of the application so the user is never left stranded.
Here is its precise lifecycle execution:
Phase 1: Arming the Timer (On Send)
When the user clicks the send button (Button1.Click), the app fires the web request and immediately executes:
set Clock1.TimerEnabled to true(with a preset interval, e.g.,15000milliseconds / 15 seconds).- The clock begins its background countdown.
Phase 2: Scenario A – The Server Responds Quickly (Happy Path)
If OpenRouter responds within the 15-second window, the Web1.GotText event triggers instantly. The very first thing your code does is:
set Clock1.TimerEnabled to false- This disarms the watchdog. The countdown is aborted because the data was successfully received, and the chat continues normally.
Phase 3: Scenario B – The Server Freezes (Timeout Triggered)
If 15 seconds pass and the server remains completely silent, the when Clock1.Timer event fires automatically. Since we cannot stop the low-level Web1 background thread, the Clock executes a graceful software override:
- Disarms Itself: It sets
Clock1.TimerEnabled to falseso it stops counting. - Alerts the User: It bypasses the missing server data and runs a JavaScript command (
addAIMessage) to print a clean error directly into the chat bubble feed (e.g., "Connection Timeout. Server is taking too long."). - Locks the App Defensively: It intentionally leaves your
global sentvariable astrueand keeps the UI buttons disabled.
Technical Summary for the Tutorial
By leaving global sent as true inside the Clock timeout event, your app follows a Fail-Safe Design Pattern.
Since App Inventor leaves the broken HTTP thread running invisibly in Android's memory, forcing a manual app restart is the only way to guarantee that a late, corrupted, or null response from the frozen server won't suddenly pop up later and break your chat structure. The Clock ensures the user is informed immediately of the freeze rather than staring at a broken, unresponsive screen.
OpenRoute.aia (10,7 KB)