Hi all.
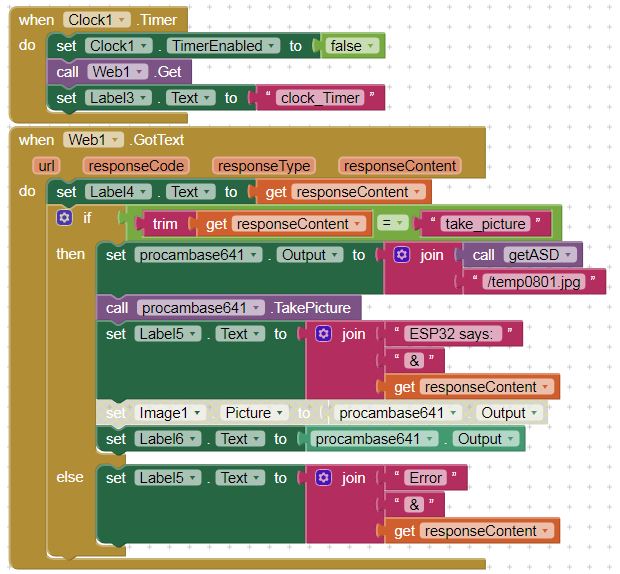
the attached two blocks one with web1.Get and Web1.GotText works fine, but can't upload image;
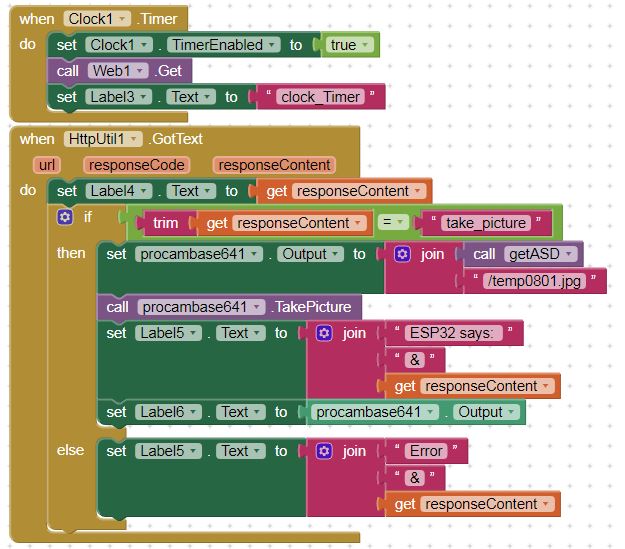
check here mentined to use HttpUtil, replaced Web1.GotText by HttpUtil1.GotText, can't receive any thing? how to fix?
thanks.
upload to where?
here is an example to upload something to your own php server
Taifun
1 Like
Sorry.
Upload image to ESP32 AP web by WiFi;
Thanks.
is there any documentation about how to do it in other languages?
Taifun
1 Like
Thanks.
I didn't find any info. of it.
I just see one post here : Web1.PostFile not working for multipart/form-data - #5 by Hazrat_Alli
you mentioned try to use HttpUtil, I test of it firstly by simple replace HttpUtil1.GotText only but receive failed.
well, that will make it difficult somehow...
why do you think you need a multipart/form-data request?
Taifun
1 Like
Thanks.
I am trying to upload images into a ESP32 AP web, and display on it's TFT.
I now asked Gemini for you, Below is the answer
If you want to use the HttpUtil extension then you should also use the HttpUtil.Request or HttpUtil.PostForm method instead of Web.Get... see here [FREE]HttpClient- Post a html form with enctype set to multipart/form-data...
Taifun
Uploading an image from an App Inventor app to an ESP32 AP web server is definitely achievable, but it requires a careful setup on both sides, especially concerning how App Inventor handles file paths and HTTP POST requests with multipart/form-data.
Here's a detailed guide:
ESP32 (AP Web Server) Setup
The ESP32 side will be very similar to the Arduino IDE example provided previously. You still need to configure it as an Access Point and run an asynchronous web server to handle file uploads.
1. Hardware & Software Requirements:
- ESP32 Development Board: Any ESP32 board will work.
- Arduino IDE: With ESP32 Board Support Package installed.
- Libraries:
WiFi.h(for AP mode)ESPAsyncWebServer.hAsyncTCP.hSPIFFS.horLittleFS.h(for storing the image on ESP32 flash)
2. ESP32 Code (Arduino IDE):
#include <WiFi.h>
#include <ESPAsyncWebServer.h>
#include <SPIFFS.h> // Or <LittleFS.h>
#include <AsyncTCP.h> // For ESP32

const char* ssid = "ESP32-AP-Image"; // Your desired AP SSID
const char* password = "your_strong_password"; // At least 8 characters

AsyncWebServer server(80);

void setup() {
  Serial.begin(115200);
  Serial.println();

  // Initialize SPIFFS (or LittleFS)
  if (!SPIFFS.begin(true)) {
    Serial.println("An Error has occurred while mounting SPIFFS");
    return;
  }
  Serial.println("SPIFFS mounted successfully");

  // Set up ESP32 as Access Point
  WiFi.softAP(ssid, password);
  IPAddress IP = WiFi.softAPIP();
  Serial.print("AP IP address: ");
  Serial.println(IP);

  // Handle POST requests for file uploads
  server.on("/upload", HTTP_POST, [](AsyncWebServerRequest *request){
    // This handler is called when the request body is fully received.
    // We already saved the file in the onFileUpload handler.
    if (request->hasParam("status")) {
        Serial.println("Upload complete from App Inventor.");
        request->send(200, "text/plain", "Upload successful!");
    } else {
        request->send(200, "text/plain", "Upload started.");
    }

  }, [](AsyncWebServerRequest *request, String filename, size_t index, uint8_t *data, size_t len, bool final){
    // This is the onFileUpload handler, called as data chunks arrive.
    // It's crucial for saving the incoming file data.

    if(!index){ // First chunk of the file
      Serial.printf("Upload Start: %s\n", filename.c_str());
      // Open the file on SPIFFS for writing
      request->_tempFile = SPIFFS.open("/" + filename, "w");
      if(!request->_tempFile){
        Serial.println("Failed to open file for writing");
        // You might want to send an error response here, but App Inventor's
        // Web component might not handle partial responses well.
        return;
      }
    }
    if(len){ // Write data chunks
      if(request->_tempFile){
        request->_tempFile.write(data, len);
      }
    }
    if(final){ // Last chunk of the file
      Serial.printf("Upload End: %s, Size: %u\n", filename.c_str(), index + len);
      if(request->_tempFile){
        request->_tempFile.close();
      }
      // You can do something with the uploaded file here, e.g., display it or process it.
    }
  });

  // Serve a simple HTML page with an upload form (optional, for browser testing)
  server.on("/", HTTP_GET, [](AsyncWebServerRequest *request){
    request->send(200, "text/html",
      "<!DOCTYPE HTML>"
      "<html>"
      "<head><title>ESP32 Image Upload</title></head>"
      "<body>"
      "<h1>Upload Image</h1>"
      "<form method='POST' action='/upload' enctype='multipart/form-data'>"
      "<input type='file' name='image'>"
      "<input type='submit' value='Upload'>"
      "</form>"
      "</body>"
      "</html>"
    );
  });

  server.begin();
  Serial.println("HTTP server started");
}

void loop() {
  // AsyncWebServer handles everything in the background
}
Upload the ESP32 Sketch:
- Connect your ESP32 to your computer.
- Select the correct board and COM port in the Arduino IDE.
- Upload the sketch.
- Open the Serial Monitor (115200 baud) and note the ESP32's IP address (usually
192.168.4.1). This is the IP you'll use in App Inventor.
App Inventor App Setup
1. Designer View:
Drag and drop the following components onto your screen:
- User Interface:
Button(Rename:PickImageButton, Text: "Pick Image")Image(Rename:PreviewImage, to display the selected image)Button(Rename:UploadButton, Text: "Upload Image")Label(Rename:StatusLabel, Text: "Status: Ready")
- Media:
ImagePicker(This is the key component for selecting images.)
- Connectivity:
Web(Rename:Web1, this component handles HTTP requests)
2. Blocks Editor:
This is where you'll define the logic for picking and uploading the image.
Variables:
global imagePath(Text): To store the selected image's path. Initialize to an empty string.global esp32IP(Text): To store the ESP32's IP address. Initialize to192.168.4.1(or whatever your ESP32 reports).
Blocks:
a) Pick Image:
When PickImageButton.Click
call ImagePicker1.PickImage
When ImagePicker1.AfterPicking
set global imagePath to ImagePicker1.Selection
set PreviewImage.Picture to global imagePath
set StatusLabel.Text to "Image selected: " & global imagePath
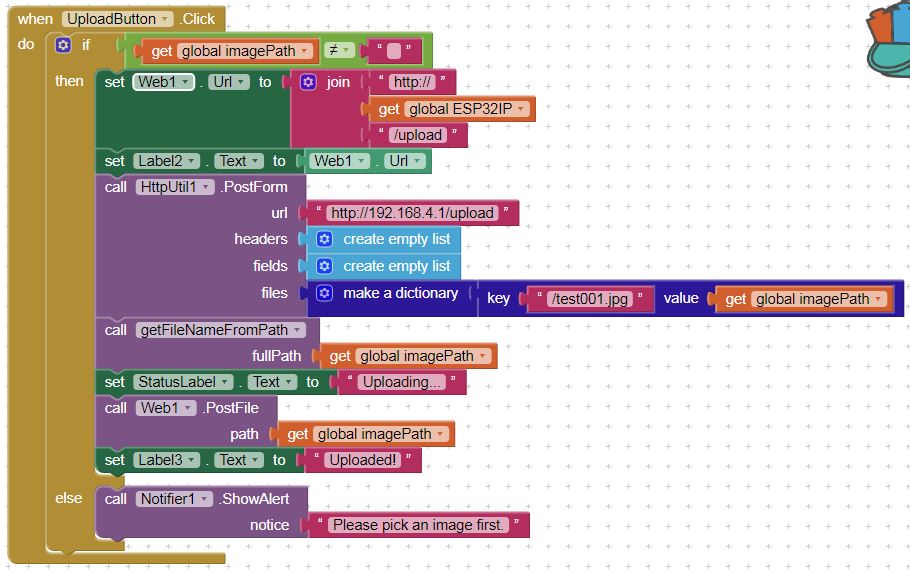
b) Upload Image:
When UploadButton.Click
if (global imagePath is not empty)
set Web1.Url to join("http://", global esp32IP, "/upload")
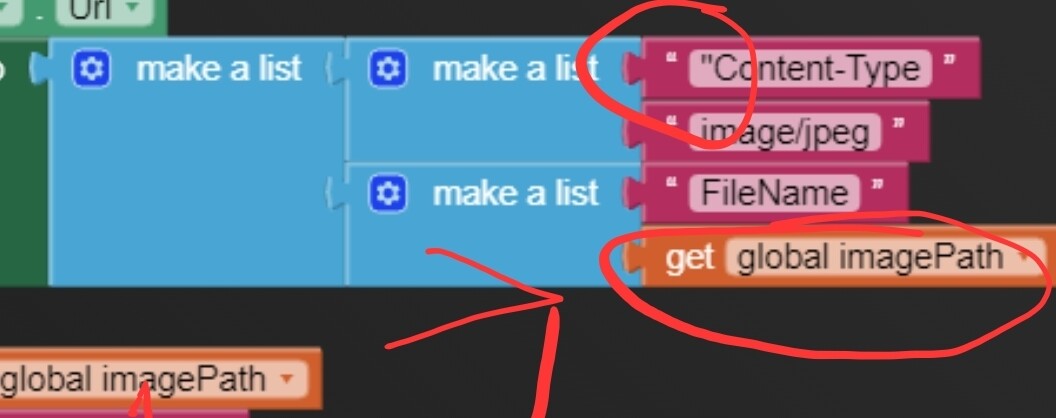
set Web1.RequestHeaders to make a list
add item (make a list "Content-Type" "image/jpeg") (Note: App Inventor's PostFile currently sends application/octet-stream. The ESP32's AsyncWebServer is generally robust enough to handle the actual file content, but setting a specific MIME type might be helpful for future processing. However, the PostFile block often overrides this. A more reliable way is to ensure your ESP32 accepts generic binary streams, or if you were sending a true multipart/form-data manually, you'd specify the type there.)
add item (make a list "FileName" get filename from global imagePath) * (Optional, but useful for ESP32 to get original name. App Inventor might send it automatically.)*
set StatusLabel.Text to "Uploading..."
call Web1.PostFile (global imagePath)
else
call Notifier1.ShowAlert("Please pick an image first.")
c) Handle Web Response:
When Web1.GotText
if (responseCode = 200)
set StatusLabel.Text to "Upload successful! Response: " & responseContent
call Notifier1.ShowAlert("Image uploaded successfully!")
else
set StatusLabel.Text to "Upload failed! Code: " & responseCode & ", Response: " & responseContent
call Notifier1.ShowAlert("Upload failed!")
When Web1.ErrorOccurred
set StatusLabel.Text to "Web Error: " & errorNumber & " - " & message
call Notifier1.ShowAlert("Network Error: " & message)
Helper Function (for filename - optional but good practice):
To extract a filename from the imagePath (which is a full file path like /storage/emulated/0/DCIM/Camera/IMG_20250803_123456.jpg):
- Create a
ProcedurenamedgetFileNameFromPaththat takes atextargument (e.g.,fullPath). - Inside this procedure:
- Use
split text at /onfullPath. - Use
select list item list (result of split) index (length of list (result of split)). This gets the last item, which should be the filename. returnthis filename.
- Use
- Then, in your
UploadButton.Clickblock, when setting theFileNameheader, you'd callcall getFileNameFromPath (global imagePath).
Example App Inventor Blocks Layout:
Designer:
| Component | Name | Properties |
|---|---|---|
| Button | PickImageButton |
Text: "Pick Image" |
| Image | PreviewImage |
Height: Fill Parent, Width: Fill Parent (or auto) |
| Button | UploadButton |
Text: "Upload Image" |
| Label | StatusLabel |
Text: "Status: Ready" |
| ImagePicker | ImagePicker1 |
(Non-visible component) |
| Web | Web1 |
(Non-visible component) |
Blocks:
// Variables
// Initialize global imagePath to an empty string
// Initialize global esp32IP to "192.168.4.1" (or your ESP32's actual AP IP)

// Pick Image Button Click
when PickImageButton.Click
  call ImagePicker1.PickImage

// After ImagePicker picks an image
when ImagePicker1.AfterPicking (image)
  set global imagePath to get image
  set PreviewImage.Picture to get global imagePath
  set StatusLabel.Text to join("Image selected: ", get global imagePath)

// Upload Button Click
when UploadButton.Click
  if (is not empty global imagePath)
    set Web1.Url to join("http://", get global esp32IP, "/upload")
    // App Inventor's PostFile sends the file directly, so Content-Type might be overridden.
    // The ESP32 AsyncWebServer's onFileUpload handler directly processes the stream.
    // However, if you wanted to pass additional info as headers:
    // set Web1.RequestHeaders to (make a list (make a list "Custom-Header" "Value"))
    set StatusLabel.Text to "Uploading..."
    call Web1.PostFile (get global imagePath)
  else
    call Notifier1.ShowAlert("Please pick an image first.")

// Web GotText Event (response from ESP32)
when Web1.GotText (url, responseCode, responseType, responseContent)
  if (responseCode = 200)
    set StatusLabel.Text to join("Upload successful! Response: ", get responseContent)
    call Notifier1.ShowAlert("Image uploaded successfully!")
  else
    set StatusLabel.Text to join("Upload failed! Code: ", get responseCode, ", Response: ", get responseContent)
    call Notifier1.ShowAlert("Upload failed!")

// Web ErrorOccurred Event
when Web1.ErrorOccurred (url, errorNumber, message)
  set StatusLabel.Text to join("Web Error: ", get errorNumber, " - ", get message)
  call Notifier1.ShowAlert(join("Network Error: ", get message))
Important Notes for App Inventor:
- File Path: The
ImagePicker.Selectionblock returns a file path (e.g.,/storage/emulated/0/DCIM/Camera/IMG_20250803_123456.jpg). TheWeb.PostFileblock expects this full file path. PostFileLimitations: TheWeb.PostFileblock in App Inventor is designed to send a single file directly as the request body. It might not create a fullmultipart/form-datarequest with a field name like "image" that the ESP32onFileUploadtypically looks for. However,ESPAsyncWebServer'sonFileUploadis robust enough that it will detect the incoming file stream even if it's not explicitly named in a multipart body from App Inventor. Thefilenameargument in theonFileUploadhandler often comes from the filename in the path you send.- Permissions: App Inventor typically handles necessary permissions like
READ_EXTERNAL_STORAGEfor theImagePickerautomatically when the app is built. - IP Address: Make sure the
global esp32IPvariable in your App Inventor app precisely matches the IP address printed by your ESP32 in the Serial Monitor. - Connectivity: For this to work, your Android device must be connected to the Wi-Fi network created by the ESP32 (e.g., "ESP32-AP-Image" with your chosen password). While connected to the ESP32's AP, your phone will not have internet access.
This setup should allow you to select an image from your App Inventor app and send it to your ESP32 web server for storage. Remember to test thoroughly and add more robust error handling and user feedback as needed for a production application.
1 Like
Great!
Thanks a lot for detail help.
Here is the testing results. every thing run well, the picture uploaded.
SPIFFS mounted successfully
AP IP address: 192.168.4.1
HTTP server started
Upload Start: test0802.jpg
Upload End: test0802.jpg, Size: 4202
well. come back after days and start to list and display the images uploaded.
can't figular out whats wrong but doesn't list.
- esp32s3 used the code above;
added list and put into loop as:
void loop(){
 delay(3000);
 listSPIFFS();
}


void listSPIFFS() {
  Serial.println("checking");
  File root = SPIFFS.open("/");
  File file = root.openNextFile();
  while (file) {
    Serial.print("FILE: ");
    Serial.print(file.name());
    Serial.print("  SIZE: ");
    Serial.println(file.size());
    file = root.openNextFile();
  }
  Serial.println("checked");
}
- block attached.

thanks again for reopen.
This topic was automatically closed 7 days after the last reply. New replies are no longer allowed.
Hi Taifun, thank you for your help on the web1.postFile topic.
I have tested that and did get one picture uploaded in that testing. got stuck now try to upload more pictures, I guess may need clear some thing before uploade another one?
can you kindly help.
best regards!
Taking a look at your latest screenshot
Learn the difference between a procedure and a procedure with result.
http://ai2.appinventor.mit.edu/reference/blocks/procedures.html#return
Then convert your procedure getFilenameFromPath into a procedure with result and use it here
You can then also delete your global variable Filename... you forgot to use it anyway...
Also remove that double quote
After fixing this and you still have issues in uploading several pictures please let us know and elaborate what happens and what you want to happen instead
Taifun
1 Like
Thanks.
I modified: 1) the procedure; 2) the requestHeader;
and tested with and without requestHeader, all got upload failed.

very creative!
a procedure with result usually looks like this, no need to set a local variable to something... you do not use it anyway...
do not set a variable inside a procedure!
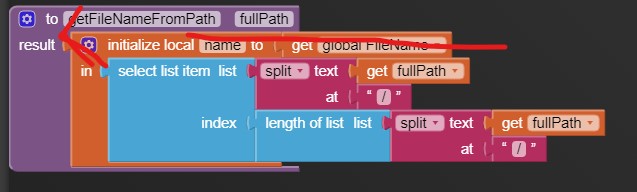
Also 1) would be the text "FileName" as you had it previously and 2) would be the global variable FileName
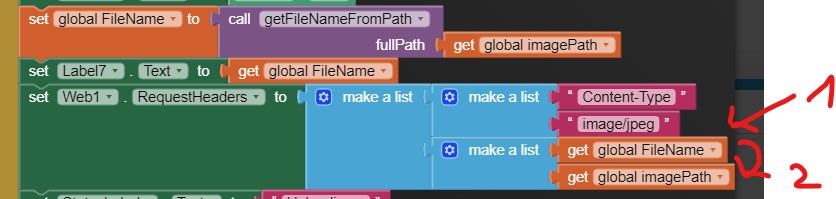
Taifun
1 Like
Thanks.
modified request:

log: (tested with or without : check if image uploaded sub)
SPIFFS mounted successfully
AP IP address: 192.168.4.1
HTTP server started
check if image uploaded?
check if image uploaded?
check if image uploaded?
no:
 Serial.printf("Upload Start: %s\n", filename.c_str());
        Serial.printf("Free heap: %d\n", ESP.getFreeHeap());
phone shown: upload success.
BTW. I'm using Samsung A16 that is Android 14, need any permissions?
tried lot of no lucky.
well. try maybe last. sorry bother.
the GPT tell why uploded success some time and a conclusion as:
Explanation of Sporadic Upload Success in MIT App Inventor → ESP32 AP Uploads
Although MIT App Inventor stock blocks cannot reliably upload raw binary image files to an ESP32 AP, we observed a few successful uploads. This happened because:
PostFile sends raw bytes of the image along with a basic content-type header (application/octet-stream).
ESP32 code that writes raw request bodies to SPIFFS can occasionally receive all bytes correctly and save them as a valid file.
These successes are coincidental, depending on factors such as timing, file size, and memory buffers.
Key point:
MIT App Inventor does not construct proper multipart/form-data requests for images.
Therefore, any observed working uploads are not reproducible or reliable for production use.
For consistent uploads, one must either:
Convert images to Base64 (text) and send via PostText, or
Use a proper file upload extension (e.g., TaifunFile HTTP Upload), or
Use a browser-based HTML upload page served by the ESP32 AP.
Conclusion:
The two observed successful uploads demonstrate that data can occasionally reach the ESP32, but they do not constitute a reliable method for image transfer.
If you want, I can also draft a one-paragraph version suitable to include in your project notes or forum post, summarizing it even more concisely.
for these requests you have to use an extension, for example
- HttpUtil Extension by kevinkun, Post a html form with enctype set to multipart/form-data
Taifun
1 Like
Thanks.
I understand now.
I'll test extension like HttpUtil by kevinkun.
tested HttpUtil:
log:
FILE: img_55793278.jpg  SIZE: 2624
FILE: img_28360268.jpg  SIZE: 2624
checked
Upload Start: picked_image4929405483549874429.jpg
Failed to open file for writing
Upload End: picked_image4929405483549874429.jpg, Size: 2638
checking
FILE: img_55793278.jpg  SIZE: 2624
FILE: img_28360268.jpg  SIZE: 2624
checked
.........
Upload Start: picked_image5865258734287258334.jpg
Failed to open file for writing
Upload End: picked_image5865258734287258334.jpg, Size: 535768
checking
FILE: img_55793278.jpg  SIZE: 2624
FILE: img_28360268.jpg  SIZE: 2624
the upload seems success, but failed to save?