How do I set temperature in Arduino using app?

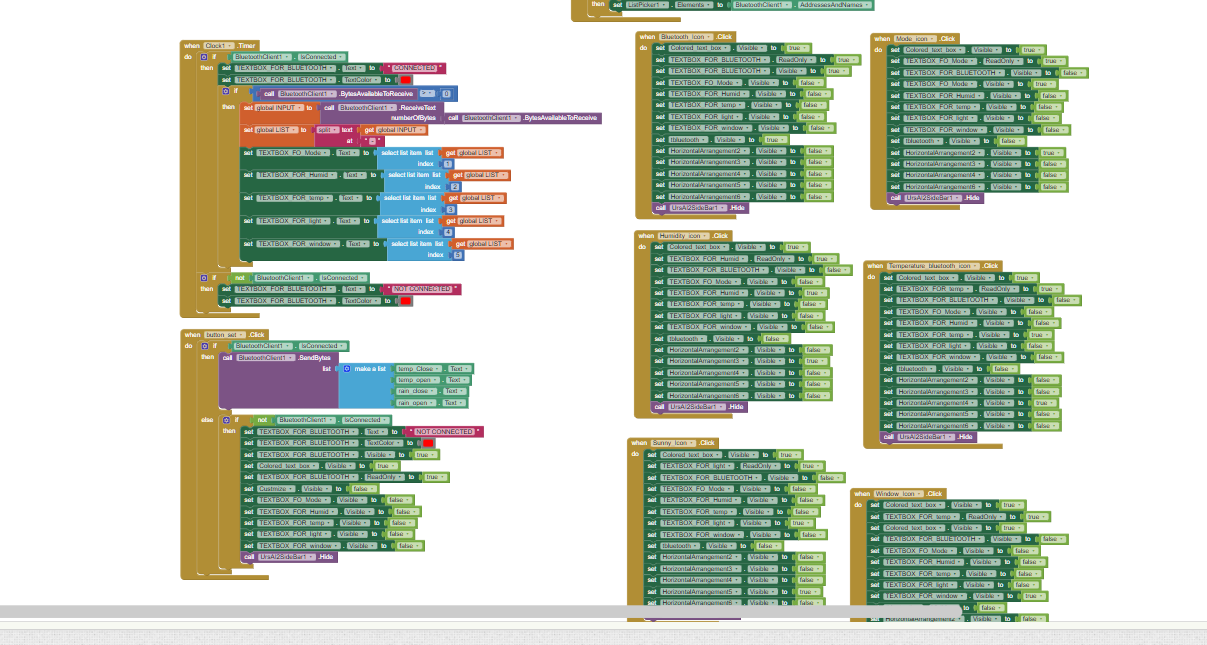
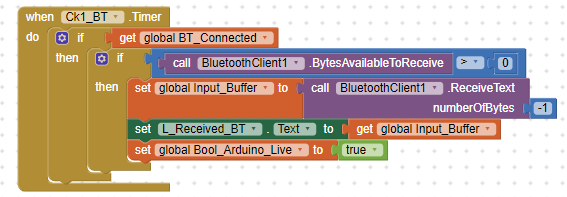
Hi I'm still a beginner, I need help for my final project, I'm trying created an application that can set temperature in arduino to open and close the window, but unfortunately the number sent to arduino is not accurate, and when the Bluetooth disconnect the set temperature gets reset.

any sugestion?

Here's the code

#include <Adafruit_Sensor.h>
#include <DHT.h>
#include <SoftwareSerial.h>
  
    SoftwareSerial BTserial(12, 13); // RX , TX
#define DHTPIN 2

#define DHTTYPE DHT11   // DHT 11 
DHT dht = DHT(DHTPIN, DHTTYPE);
const int ENA_PIN = 7; // the Arduino pin connected to the EN1 pin L298N
const int IN1_PIN = 6; // the Arduino pin connected to the IN1 pin L298N
const int IN2_PIN = 5; // the Arduino pin connected to the IN2 pin L298N

const int BUTTON_PIN8 = 8;  // the number of the pushbutton pin
const int BUTTON_PIN9 = 9; 
const int BUTTON_PIN10 = 10;  // the number of the pushbutton pin
const int BUTTON_PIN11 = 11; 


int buttonState1 = 0;   // variable for reading the pushbutton status
int buttonState2 = 0;
int buttonState3 = 0;   // variable for reading the pushbutton status
int buttonState4 = 0;
int data = 0;
void setup() {
 dht.begin();
  Serial.begin(9600);
  pinMode(4, OUTPUT);
  pinMode(2, OUTPUT);
  digitalWrite(ENA_PIN, HIGH);
BTserial.begin(9600);
  // initialize the pushbutton pin as an pull-up input:
  // the pull-up input pin will be HIGH when the switch is open and LOW when the switch is closed.
  pinMode(BUTTON_PIN8, INPUT_PULLUP);  //to manual
   pinMode(BUTTON_PIN9, INPUT_PULLUP);  //to automation
    pinMode(BUTTON_PIN10, INPUT_PULLUP);  
   pinMode(BUTTON_PIN11, INPUT_PULLUP);
   
}

void loop() {
    if (BTserial.available() > 0) 
  {
    int data = (int) BTserial.read();
    BTserial.print(data);

  }
  // read the state of the pushbutton value:
  buttonState1 = digitalRead(BUTTON_PIN8);
  buttonState2 = digitalRead(BUTTON_PIN9);
  // control LED according to the state of button
  if(buttonState1 == LOW) {      // If button is pressing
      Manual();
    
 
}
  if (buttonState2 == LOW) {      // If button is pressing
      Automation();
   
 
}
}
void Manual(){


  buttonState3 = digitalRead(BUTTON_PIN10);
  buttonState4 = digitalRead(BUTTON_PIN11);

   if(buttonState3 == LOW) {      // If button is pressing
  digitalWrite(IN1_PIN, LOW);
  digitalWrite(IN2_PIN, HIGH);
  int l = analogRead(A1);
  int rain = analogRead(A0);
  float t = dht.readTemperature();
  float h = dht.readHumidity();
  BTserial.print("MANUAL");
BTserial.print("-");  
  BTserial.print(h);        //ito yung index(1) na ilalagay sa mit
  BTserial.print("-");
  BTserial.print(t);
  BTserial.print("-");     //ito naman ay yung pang split
     //index(2)
   

if (l < 10) {
    BTserial.print("VERY LIGHT");
 

  } else if (l < 200) {
    BTserial.print("LIGHT");
  

  } else if (l < 500) {
    BTserial.print("BRIGHT");
    
  } else if (l < 800) {
    BTserial.print("DARK");
     
  } else {
    BTserial.print("DIM");
  
  }
  BTserial.print("-"); 
BTserial.print("OPEN");
  
}
   if(buttonState4 == LOW) {
  digitalWrite(IN1_PIN, HIGH);
  digitalWrite(IN2_PIN, LOW);
  int l = analogRead(A1);
  int rain = analogRead(A0);
  float t = dht.readTemperature();
  float h = dht.readHumidity();
  BTserial.print("MANUAL");
BTserial.print("-");  
   Serial.print(h);        //ito yung index(1) na ilalagay sa mit
  Serial.print("-");
  Serial.print(t);
  Serial.print("-");     //ito naman ay yung pang split
     //index(2)
   

if (l < 10) {
    BTserial.print("VERY LIGHT");
 

  } else if (l < 200) {
    BTserial.print("LIGHT");
  

  } else if (l < 500) {
    BTserial.print("BRIGHT");
    
  } else if (l < 800) {
    BTserial.print("DARK");
     
  } else {
    BTserial.print("DIM");
  
  }
  BTserial.print("-"); 
BTserial.print("CLOSE");
}
delay(1000);
}

void Automation(){
 
    int data = (int) BTserial.read();
int l = analogRead(A1);
  int rain = analogRead(A0);
  float t = dht.readTemperature();
  float h = dht.readHumidity();
  BTserial.print("AUTOMATIC");
BTserial.print("-");
   BTserial.print(h);        //ito yung index(1) na ilalagay sa mit
 BTserial.print("-");
  BTserial.print(t);
 BTserial.print("-");     //ito naman ay yung pang split
     //index(2)
   

if (l < 10) {
    BTserial.print("VERY LIGHT");
 

  } else if (l < 200) {
    BTserial.print("LIGHT");
  

  } else if (l < 500) {
    BTserial.print("BRIGHT");
    
  } else if (l < 800) {
    BTserial.print("DARK");
     
  } else {
    BTserial.print("DIM");
  
  }
  
  if (t < data) {
       BTserial.print("-");
 BTserial.print("CLOSE");

  digitalWrite(IN1_PIN, HIGH);
  digitalWrite(IN2_PIN, LOW);
  delay(1000);
  }
 else if (rain < 500) { 
  //rain but high temp
  //output in linear
  BTserial.print("-");
 BTserial.print("CLOSE");

  digitalWrite(IN1_PIN, HIGH);
  digitalWrite(IN2_PIN, LOW);
  delay(1000);
  } 
 
  else if (rain > 500) { 
 //sunny high temp
 //output in linear
BTserial.print("-");
 BTserial.print("OPEN");
 
  digitalWrite(IN1_PIN, LOW);
  digitalWrite(IN2_PIN, HIGH);
delay(1000);
  } else {
    digitalWrite(IN1_PIN, LOW);
  digitalWrite(IN2_PIN, HIGH);
    
  
 delay(1000);
  }
  }

Dear @zfier_xionen_agape, welcome to the community.
I have given a quick look to both your Arduino code and AI2 blocks and the first suggestion that I can give you is to change the way you are sending data from Arduino and receiving by the app.
As you can find in many other posts, the most easy and robust way to manage the transmission via BT is to use as a delimiter the character Linefeed (i.e. ASCII "LF" or hex 0x0A or decimal 10) and to change the receiving block into:
image

To comply with this method your Arduino code shall transmit the last sending by using a BTSerial.println(); that is closing the last transmission with a LF character (this is done by using the println).
When you are done with that, you'll be sure that the app will wait until the last character is received and will not interrupt the receiving "on the fly".
If the problem still persists we'll search deeper.
Best wishes.

PS there are many Power Users which have deepen the BT comm's on their web sites: you can find huge information and plenty of examples on: "KIO4.com" and "professorcad.co.uk". Give them a look :slight_smile:

2 Likes

Hi thank you so much for the reply and for the suggestion
Receiving data by the app is already okay, any suggestion how can I set temperature using the application, and when the Bluetooth gets diconnected to arduino the set temperature will stay as it is.

Dear @zfier_xionen_agape,
ok, your app is already fine for receiving (but I strongly suggest to change the way you receive with the standard one). To send commends from the app to Arduino, the best way is to implement one of the examples of @Juan_Antonio's web site (KIO4). You'll find therein everything you need to send commands to the Arduino board.

I don't see anything in your arduino code that would set the temperature. Your app is a thermostat?

1 Like

Dear @zfier_xionen_agape,
according to what @Patryk_F has said, it seems that your app should behave like a thermostat.
If this is the case, what you app has to do is to send to the Arduino board the required temperature and an ON/OFF command via BT but the "real" thermostat algorithm shall be coded on the Arduino board.
This is to comply with the requirement that when the app and Arduino are disconnected the temperature shall remain there (in effect I did an application that was doing exactly this job, but instead of using a BT I have used a SMS transmission to remotely control the heating system of my house).
Resuming: the app shall send the wanted temperature and an ON/OFF command, and that's all for the app.
The Arduino code, when receiving an ON command, shall verify if the received temperature is different from the one stored into the EEPROM of the board (if any) so to maintain it also after a accidental power-off; for the same reason it shall also store into the EEPROM the required status (ON/OFF). If the status is ON, it shall actuate a relay that will power-on the heating system (this has to happen also if resuming from a power-off, because it reads from the EEPROM that the status was previously ON).
Please be aware that you have to implement also an hysteresis algorithm, so to avoid a continuous "jump" ON/OFF of the relay, when the temperature reaches the wanted value, Typically you should swith off the relay when you have reached the wanted temperature +0.5 degrees (or +1 degrees) and switch it on when the temperature has fallen down to wanted temperature -1 degree. This solution makes completely independent your heating system from a shut down of the BT coomunication, and from a power-off of your Arduino controller when it was commanding ON.
When your app sends OFF, your Arduino just has to switch off the relay and write into the EEPROM the OFF status.
Another feature that you can implement in your Arduino, is the anti-icing system: independently from the ON/OFF status, when the temperature measured by the DHT is lower than a specified value (typically 0 or 1 degrees celsius) it shall energise the relay and try to reach a minimum safe temperature (typically 4 degrees) always applying the hysteresis.
Lastly: I have experienced that the DHT suffers of a self-heating, therefore the "real" temperature could be 1 or 2 degrees lower than that measured by the DHT.
Not the most simple application, but not the hardest one, as well. :muscle:
Best wishes.

PS all the above if you want to control the temperature with a heating system, if you only want to open/close a window, you can discard all what I've said ... :upside_down_face: and keep it for a next version of your home automation system ... :rofl: :rofl: :rofl: