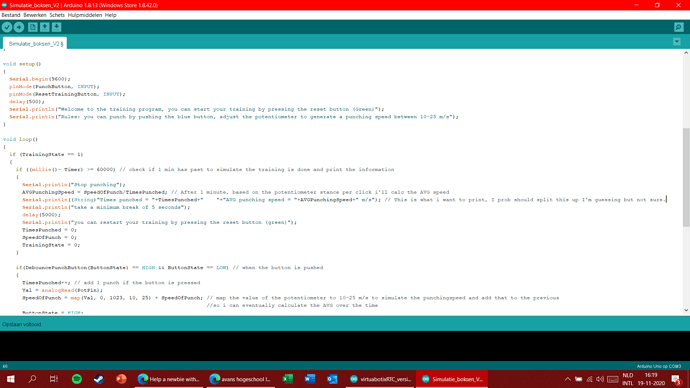
Show the script for Arduino. Or describe exactly how you send the data, what it looks like.
Well i'm currently at school, but basicly for my test im making the variables TimesPunched and AVGspeed.
I havent got the module yet i'm still waiting on it first time of that either.
But after some research i think i need to print those variables (which i do after 1 min has past) and it should send them but what i need to do for receiving it on the app i don't know.
You explain vaguely that you must send the data. So I will answer vaguely. You must use the clock and wait for the data in the clock block. If data available, read them in blocks from the Bluetooth component. Then save it to a variable and convert it into values to be displayed in application fields.
First you need to build a program for arduino and think what the data to send to the application will look like. Will it be text or binary data? whether they will be open or coded in some way. Then you prepare the appropriate blocks for the application. That's why I asked what exactly will you be shipping with arduino.
Hello Brum
By that, do you mean you do not have a Bluetooth module for you Arduino yet? I see you are experimenting with App Inventor's 'Classic' Bluetooth functions. 'Classic' Bluetooth is Bluetooth version 2.0 to 2.1. The HC-05/HC-06 and HM-05/HM-06 Bluetooth Modules are widely used and relatively cheap.
The question is, what model Arduino do you have? That greatly affects the approach to handling the data collected by the sensors.
Other design considerations:
- How is your Arduino attached to the Punch Bag. It will need to be protected from shock/vibration and heat.
- How is it powered - with a battery pack? Ease of access is important and an indication of battery power available might be a valuable addition to your App, given that someone wearing boxing gloves can't change the batteries.......
- The boxer might punch the bag faster than Arduino + App can process the data.
You can see more about Arduino and Bluetooth on my website:
https://www.professorcad.co.uk/appinventortips#TipsArduino
https://www.professorcad.co.uk/appinventortips#TipsBluetooth
Here is a basic 'Template' for receiving data from Ardunio in an App. It's not as advanced as you will need, but it is a good start and can be modified to suit relatively easily.
BT_Basic_Setup_Receive.aia (8.4 KB)
.... and similarly, a very basic Arduino Sketch to send data to the App, which also can be modified to suit easily (note, a .txt file has to be posted to the forum, rename it to .ino on receipt.):
ClassicBt_Arduino_ToApp.txt (770 Bytes)
That's a lot of text xD
I've bought an HC-05 but it's currently shipping
I'm using an arduino uno for my test.
Due to coronavirus we can't be together with the whole group so i haven't got all the components. So i made a test with a button which indicates there has been a punch and a potentiometer which will give a value of 10-25 m/s everytime i press the button. I'm adding up the speed everytime i punch and after 1 minute i'll divide it with my times punched to get the AVG speed.
after that minute and calculation i'm going to print the data and that's what i wanna display on my label inside the app. I made some progress watching some videos but dont know if it'll work.
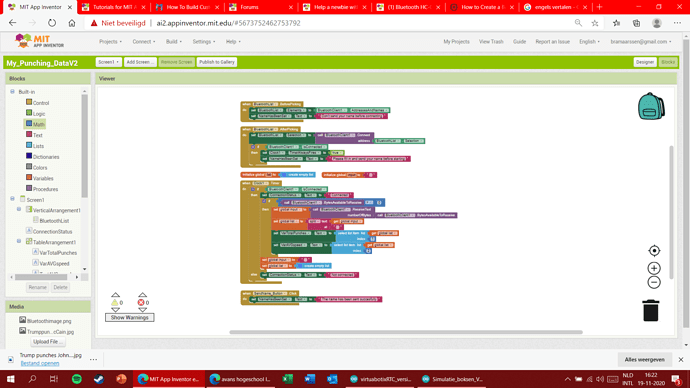
i'll screenshot my new block diagram and arduino code (important stuff for the code, it contains more like debouncing but i don't think that's important to know), i think i'll prob need to remove some printed text to make it work like the things in my setup. maybe print that to the app not sure yet, but if this will work i'm leaving it like this
hope you guys can give me some feedback on it.
greeting,
Bram
Fun questions 
the project is to take mechanical energy and convert it to electrical energy.
we will have a generator on top of the bag which goes to a powerbank which will power the arduino. (we got some tips from our teacher how to charge and discharge at the same time because that is prob the hardest part)
further we are going to get the arduino and all other components to the bottom of the bag and glue them or screw we are not sure yet and give them some cover of protection, and the powerbank prob will go there to. after all that we will make like a tiny door (can't figure the correct english word) so the powerbank will be easily accesseble to put in a charger if our generator will not give enough power, because we haven't learned yet how to calc how much the generator can deliver.
overall quite a fun project just pretty difficult if you're doing everything for the 1st or 2nd time.
Certainly going to be fun and challenging. 
I wanted to let you guys know I think I'm making some pretty good progress, but I would like some feedback on it.
I think it's going pretty well although im not sure my get GetData procedure would work.
With my ConnectionStatusProcedure i want the user to fill in the textbox and with the send button to send it to the arduino, but i'm not really sure how to do it. I was thinking about the block i used in the
video and then my textbox attached to it to send it but it won't let me.
The same thing is in my StartTraining procedure but it's prob better to send a 1 or something and program it in arduino if i receive a one start training, but again don't know how to set that box up.
Also i'm 99% sure that logic block in my StartTraining procedure won't work because i'm using = "text", would like the +1% confirmation on that one as well.
Video: https://drive.google.com/file/d/1dE1ibqAWfcCFyGcsACIzPNPWzO2gDn8E/view?usp=sharing
Thanks in advance for all the help.
Greetings,
Bram
Your Google Drive Link is not shared.
Adjust your Google settings for that Drive file.
I'm trying to fix it on my mobile but when i click on share it says it's good, but when i click for the info again it doesn't look like it went well.
I think it works now
That's exactly what the .aia file I posted does.
Hc05 has a 3.3V logic. Arduino Uno 5V. Additional logic converter required. I use the XM-15b module, it is also a BT classic module operating at 5V. An additional advantage is the ability to enter AT mode without pressing external buttons.
To finalize my project i want a couple of things.
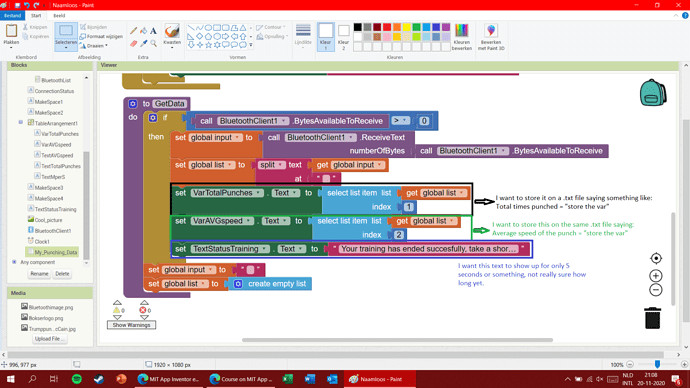
I want to make a .txt file like My_Punching_Data for everyone who installed the app, then store the time the app get's those variables along with the variables itself. like "Time" "text next to my var block".
I want to make the file only once and keep adding the information on it for example i can close the app, not train for days then start again and still don't lose the data from the previous training. I'm afraid i'll program it to overwrite the file but i want to be able to read my first training even after 300 trainings.
Furthermore i want that bottom text to appear for 5 seconds or something. The way i programmed it it will probably print it for just a second then turn blank again (because i'm saying that in an if bytesrecieve = 0)
I've watched several tutorials on these subjects but they are or to basic (storing to .txt) or in Spanish (good clock tutorial), so i can't figure out how to program all this.
Not 100% sure about the text file database yet, but I think that's the best one.
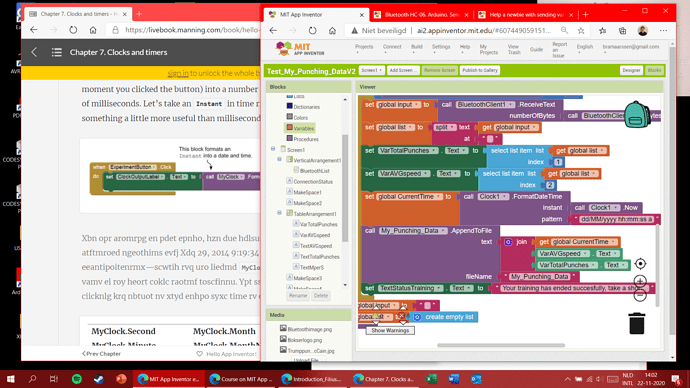
You can use the "join" text block to join the two data. Use the "append to file" block instead of the "save file" block.
Do you happen to have an english version of that xD
I corrected. You can also save the data in CSV format. Then you will open the file in excel.
So basicly this is how i can set my current time to the time on my phone, and store all that information like this over and over again right? (I changed MM/dd to dd/MM hope that works correctly because in Holland we swap those)
Hi Brum. Take 5 minutes to study the template (.aia) I supplied you. Should save you time and grey hair getting things working because the devil is in the detail with Bluetooth.
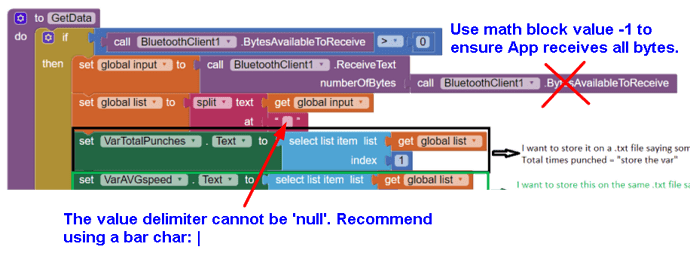
what do you mean with using a bar char?
also what does the /n in your .aia template mean? because it isn't included in the arduino code, does it mean that to indicate i have send all data to print a final /n?
with the can't be 'null' do you mean that i should type for example the /n, then in my code print my var then the /n and after that my other var with another /n?
Hi Brum
This is a bar char: |
It's a good choice when seperating values being sent from Ardunio to an App:
val1 | val2 | val3
The \n in this case means "End of Data", so:
val1 | val2 | val3 \n
(It is explained in my sample App Inventor file, so you lose a brownie point  )
)
In the Sketch, \n is represented in Serial Comms by Serial.println(); (also explained in my sample Sketch, so that's another brownie point lost 
 )
)
