🧩 GoogleSheetAPI
An extension for MIT App Inventor 2.Extension to interact with Google Sheets & Drive via Apps Script Web App
 Specifications
![]() Package: io.jsr.googlesheetapi
Package: io.jsr.googlesheetapi
![]() Size: 31.39 KB
Size: 31.39 KB
![]() Minimum API Level: 7
Minimum API Level: 7
![]() Updated On: 2025-06-05T18:30:00Z
Updated On: 2025-06-05T18:30:00Z
![]() Built & documented using: FAST v3.5.1
Built & documented using: FAST v3.5.1
 Free Google Sheets & Drive Extension for MIT App Inventor by Still_Learning
Hello MIT App Inventor community!
I’m excited to share with you my free extension: GoogleSheetAPI — a powerful, easy-to-use extension to interact seamlessly with Google Sheets and Google Drive via Google Apps Script Web Apps. This apps script code did not taken from anywhere from the users of any builder community also this code works based on doPost. doPost writes deletes faster with bigger amount of datas so it was chosen.
* It requires, Script url, Sheet name, Sheet ID and folder ID (to upload files)
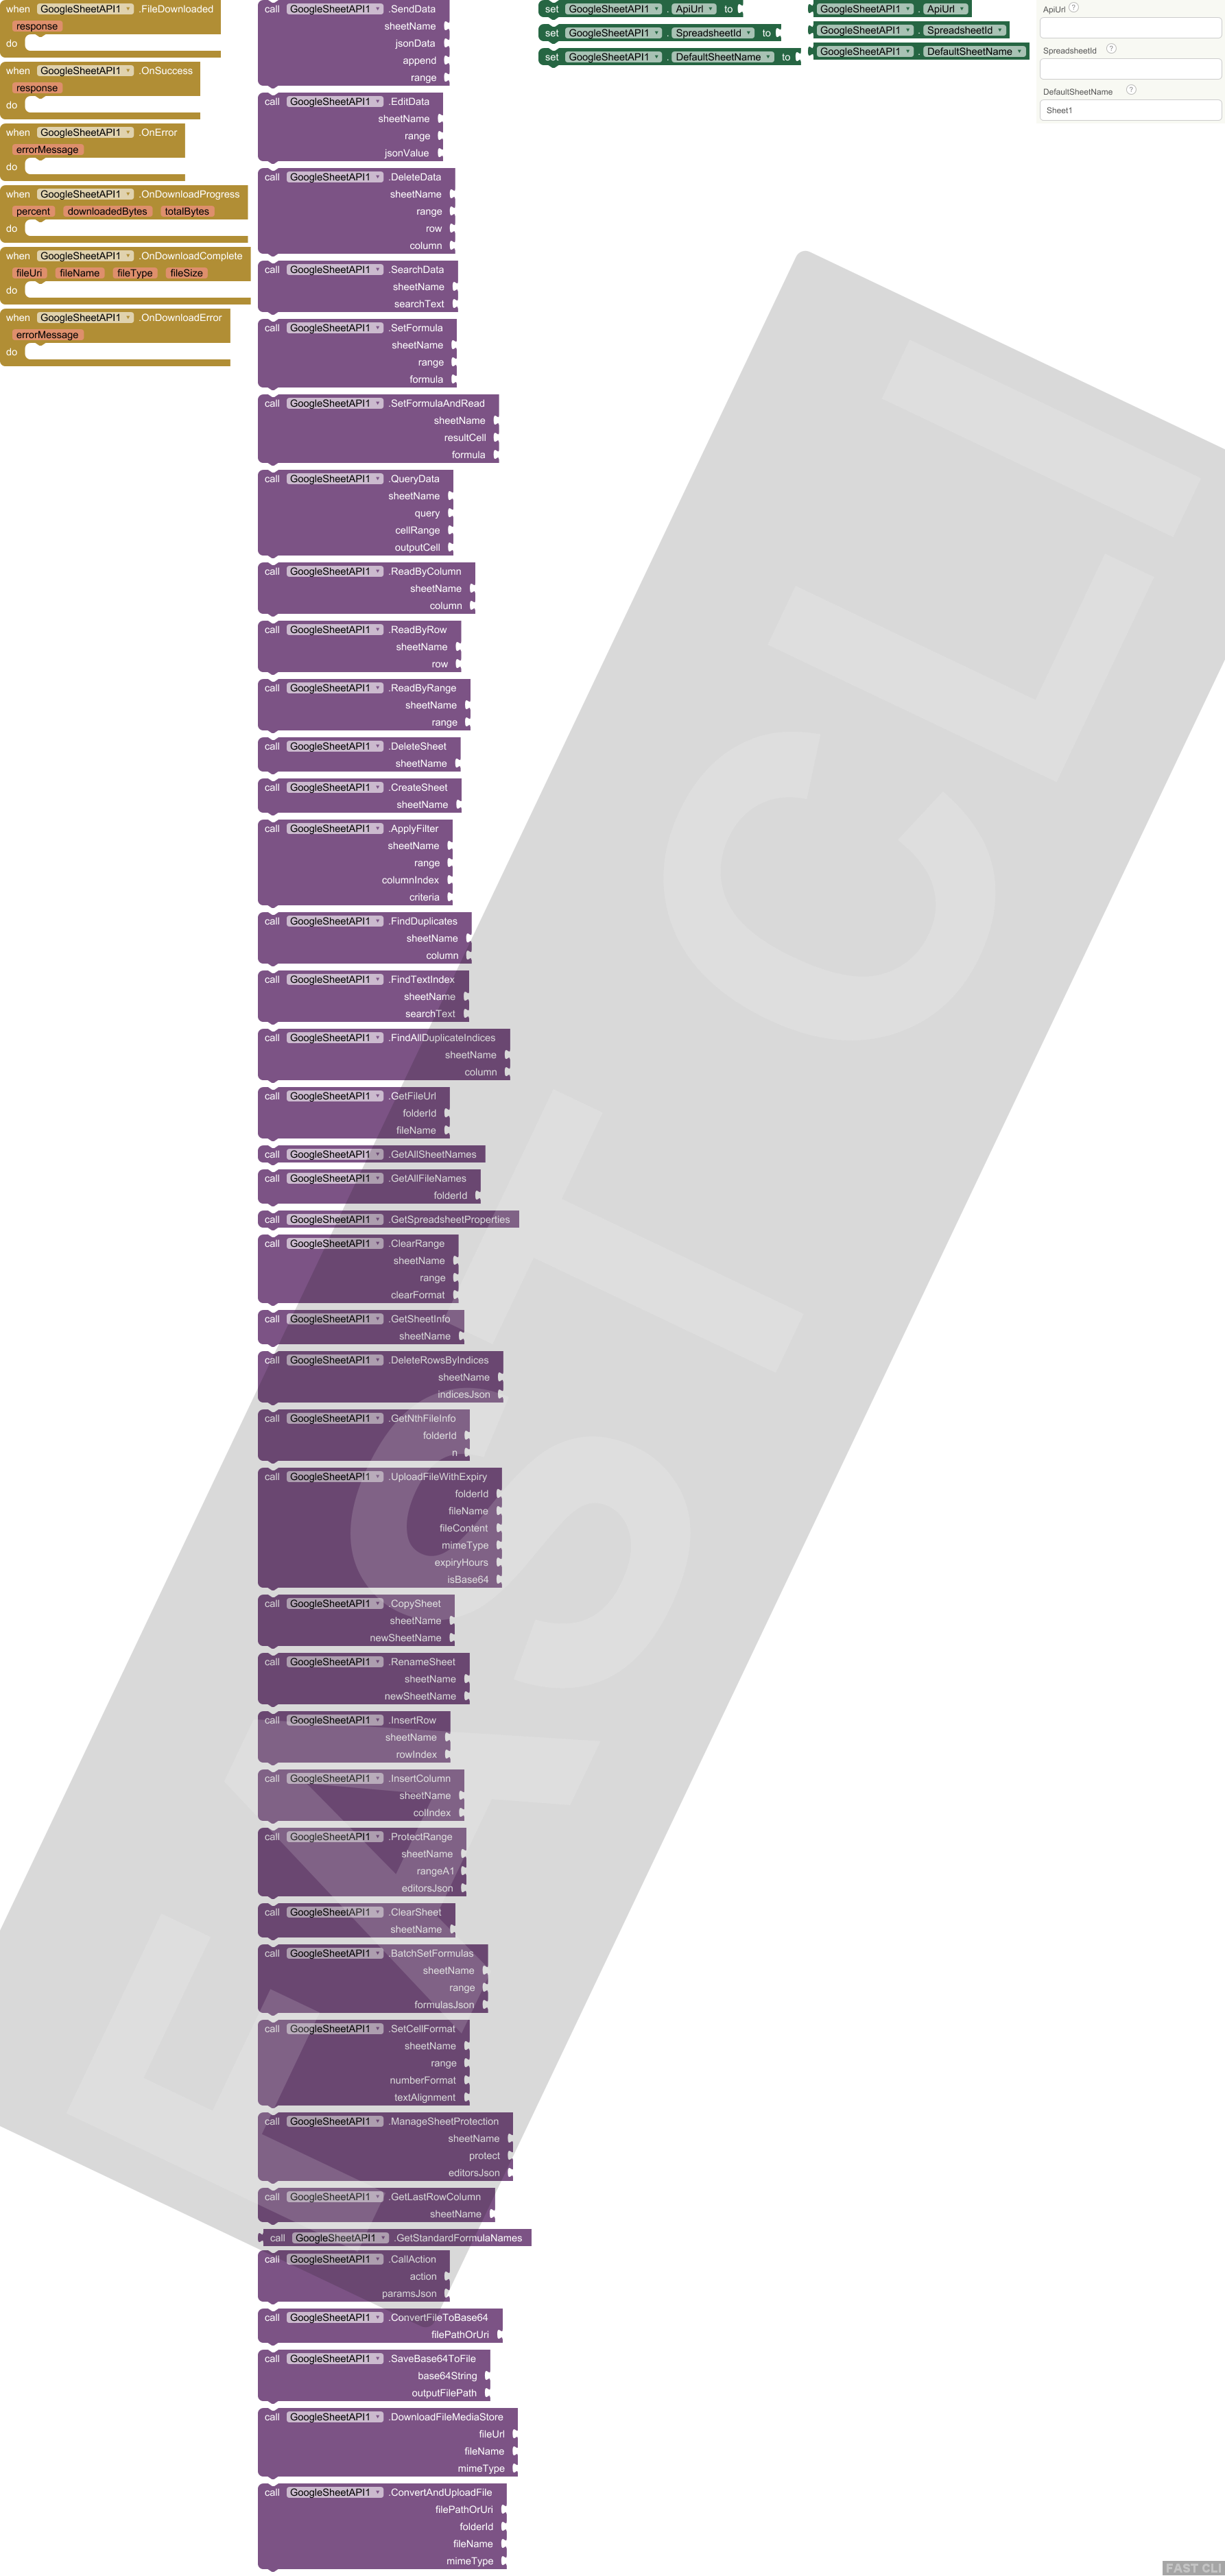
 Features
- Read & Write Data: Send, edit, delete, and search data in Google Sheets.
- Formulas Support: Set single or batch formulas, read formula results.
- Sheet Management: Create, delete, rename, copy sheets.
- Filtering & Searching: Apply filters, find duplicates, search text indices.
- File Upload & Management: Upload files (including Base64), get file URLs, list files in Drive folders.
- File Upload with Expiry: Upload files with automatic expiry (auto-delete after specified hours).
- Sheet Protection: Protect entire sheets or specific ranges with editor permissions.
- Download Files: Download files with progress updates, compatible with Android 10+.
- Advanced Utilities: Get spreadsheet properties, last row/column, batch set formulas, set cell formats, and more.
- Custom Actions: Call any backend action with JSON parameters.
- Standard Formula Examples: Built-in list of common Google Sheets formulas for easy reference.
 How to Use
-
Deploy the Google Apps Script Web App
- Use the provided Apps Script code (free and open source).
- Deploy as a Web App with access: Anyone, even anonymous (or as per your security needs).
-
Set API URL & Spreadsheet ID in the Extension
- Set the Apps Script Web App URL in the extension property
ApiUrl. - Set your Google Spreadsheet ID in the
SpreadsheetIdproperty.
- Set the Apps Script Web App URL in the extension property
-
Call Extension Functions
- Use simple functions like
SendData,ReadByRange,UploadFileToDrive,UploadFileWithExpiry, etc. - Handle events
OnSuccess,OnError,OnDownloadProgress, andOnDownloadCompletefor feedback.
- Use simple functions like
-
Automate File Expiry
- The extension supports uploading files with expiry hours.
- The backend script automatically deletes expired files via a time-driven trigger (set it once in Apps Script).
- No manual intervention needed — fully automated cleanup!
 Pros
Pros
- Free and Open Source: No cost, fully transparent code.
- Comprehensive: Covers almost all common Google Sheets and Drive operations.
- Easy Integration: Simple properties and functions, designed for MIT App Inventor and Kodular.
- Automated File Expiry: Unique feature to manage file lifecycle without manual cleanup.
- Supports Base64 File Uploads: Upload any file type encoded in Base64.
- Download Support with Progress: Download files with progress events, compatible with modern Android versions.
- Flexible: Supports custom backend actions via JSON parameters.
 Cons / Limitations
- Google Apps Script Quotas: Subject to Google Apps Script daily quotas and limitations.
- File Size Limit: Uploads limited to ~6MB due to Apps Script restrictions.
- User Identity: Does not track uploader identity unless users authenticate (requires additional setup).
- Requires Apps Script Deployment: You need to deploy and maintain the backend script.
- Permissions: For file downloads on Android 10 and below, WRITE_EXTERNAL_STORAGE permission is required.
 How to Get Started
-
Download the extension
.aixfile here:
io.jsr.googlesheetapi.aix (31.4 KB) -
Get the full Apps Script code here:
Still_Learning_GoogleSheetAPI.txt (31.9 KB) -
Follow the detailed setup guide in the README.
 About Me
I’m Still_Learning, passionate about making powerful tools accessible to the MIT App Inventor community.
Feel free to ask questions, request features, or contribute!
 Join the Discussion
I’d love to hear your feedback and see what amazing projects you build with this extension!
Post your questions, share your experiences, or suggest improvements here.
Thank you for your support and happy building! ![]()
Credits
- @JEWEL for his wounderful platform FAST-CLi, his last update is awesomne. Generates blocks part as a png files including designer part. Freemium version does a lot.
- Thanks to @TIMAI2 for his wounderful guide regarding how to deploy the apps script at HERE for version 1 and HERE to retain the same script url after another deploy
How to setup trigger to delete the uploaded file automatically
Summary
Step-by-Step Guide to Automate File Deletion After Expiry Using Your Existing Apps Script
Step 1: Confirm Your Apps Script Contains the deleteExpiredFiles Function
- Your script already includes the function
deleteExpiredFiles()that:- Reads expiry info from the
"expire"sheet (or file properties). - Deletes files whose expiry date has passed.
- Reads expiry info from the
- No need to add or modify this function if it’s already present and correct.
Step 2: Deploy Your Apps Script as a Web App
- You have already deployed your script as a Web App with a URL.
- Make sure the deployment settings allow access as needed (e.g., "Anyone, even anonymous" or "Anyone with the link").
Step 3: Set Up a Time-Driven Trigger to Run deleteExpiredFiles Automatically
This is the key step to automate deletion without manual intervention.
How to set up the trigger:
-
Open your Apps Script project in the editor: https://script.google.com/
-
Click on the Triggers icon (clock symbol) on the left sidebar, or go to:
Edit > Current project's triggers -
Click the "+ Add Trigger" button (bottom right).
-
In the dialog:
- Choose which function to run: Select
deleteExpiredFiles. - Select event source: Choose Time-driven.
- Select type of time based trigger: Choose how often you want the cleanup to run, e.g.:
- Hour timer (runs every hour)
- Day timer (runs once a day)
- Select time of day or interval: Choose your preferred interval.
- Choose which function to run: Select
-
Click Save.
-
If prompted, authorize the script to access your Google Drive and Sheets.
Step 4: Verify Your Upload Function Records Expiry Info
-
When users upload files via your extension’s
UploadFileWithExpiryfunction, the script should:- Upload the file to the specified Drive folder.
- Record the expiry date in the
"expire"sheet or as a file property.
-
This ensures
deleteExpiredFilesknows which files to delete.
Step 5: Test the Automation
-
Upload a file with a short expiry time (e.g., 1 hour).
-
Wait for the trigger to run (based on your chosen interval).
-
Check:
- The file is moved to Trash in Google Drive after expiry.
- The corresponding row is removed from the
"expire"sheet (if using sheet tracking).
Step 6: Inform Your Users
- Let your users know that files will be automatically deleted after the expiry time.
- Explain that this is handled by the backend script running on a schedule.
Additional Tips
- Logging: Use
Logger.log()insidedeleteExpiredFilesto monitor deletions. - Quota Limits: Google Apps Script has quotas; avoid very frequent triggers.
- Permissions: The script runs under your Google account, so it can delete files you have access to.
- Security: Ensure your Apps Script deployment settings match your security needs.
Summary Table
| Step | Action | Notes |
|---|---|---|
| 1 | Confirm deleteExpiredFiles exists |
No duplicate needed |
| 2 | Deploy script as Web App | Already done |
| 3 | Set up time-driven trigger for deleteExpiredFiles |
Runs automatically on schedule |
| 4 | Ensure upload records expiry info | In "expire" sheet or file properties |
| 5 | Test by uploading files with expiry | Verify deletion after expiry |
| 6 | Inform users about automatic deletion | Transparency and expectations |
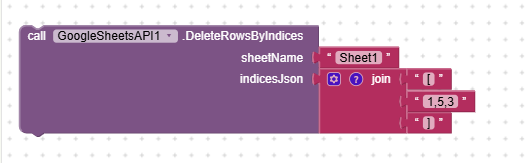
Using the above block you can delete any row in any order
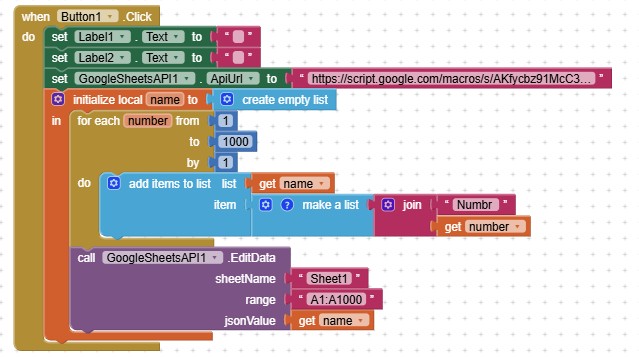
Above blocks use to send data in a single col but multiple rows
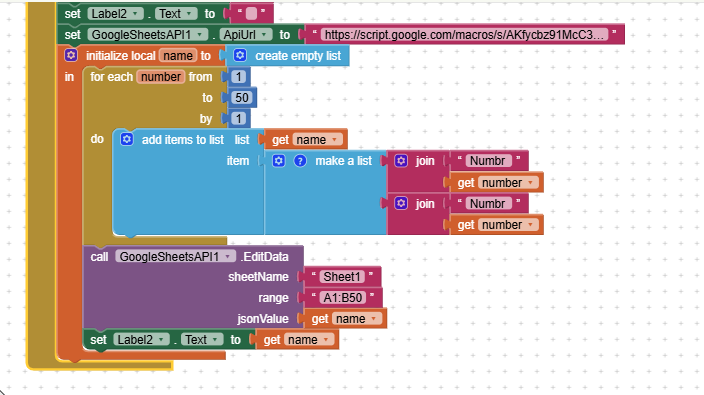
Above code is code to send data into Multiple rows and col at a time
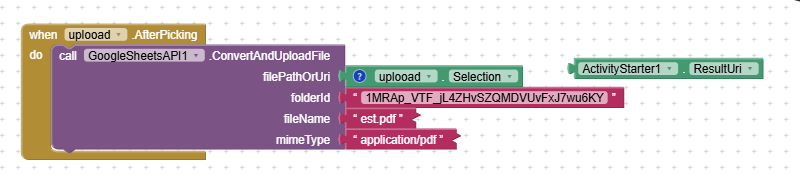
Above code is used to upload the file using file picker or activity starter.
Depending upon the nature of file change the file name, mime type
I have simplefied the event listners. Did not add multiple events. For all operations you can get it under Onsuccess event.
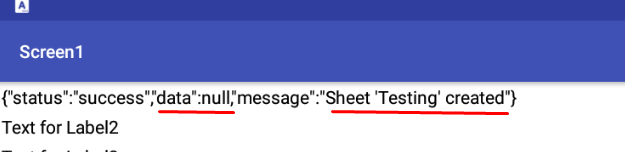
If your action brings data you can get it from here using the dictionary block, get key value of data. So this will help you a lot.