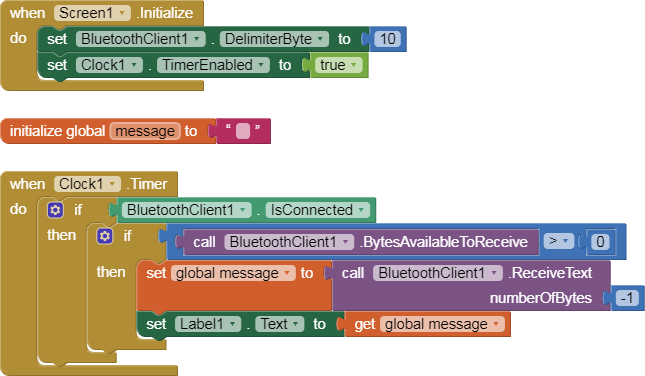
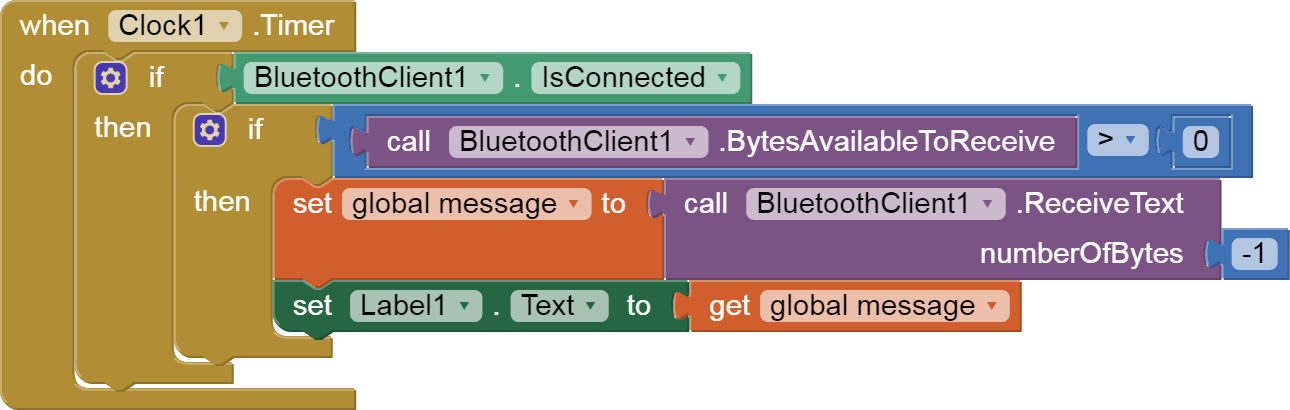
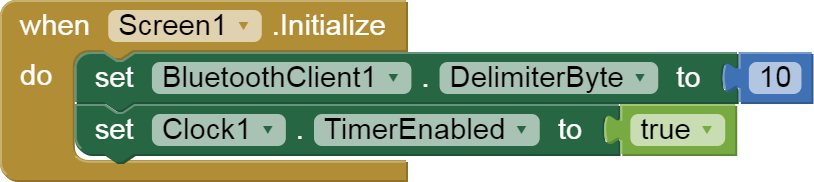
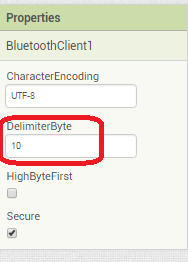
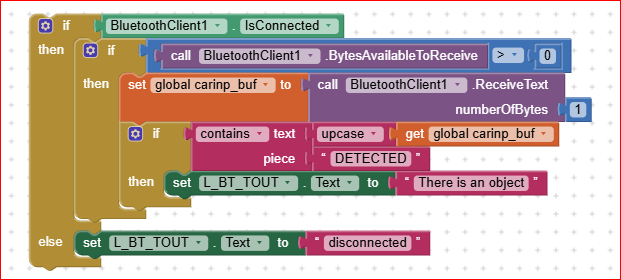
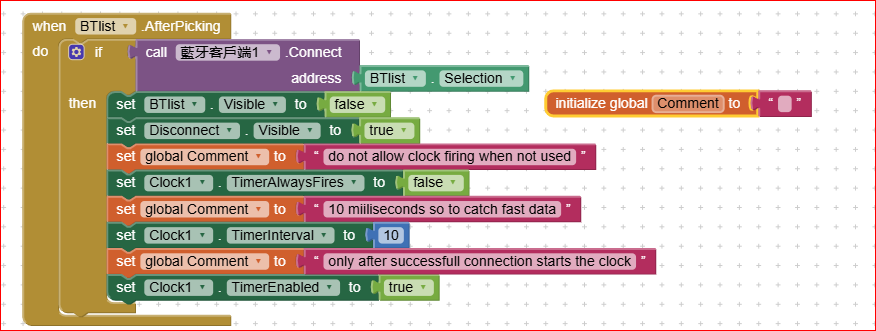
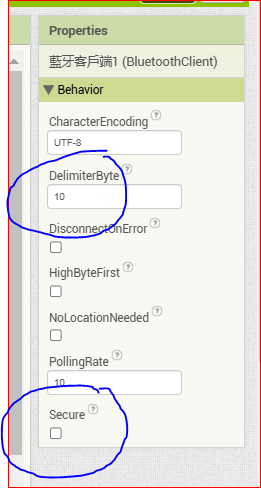
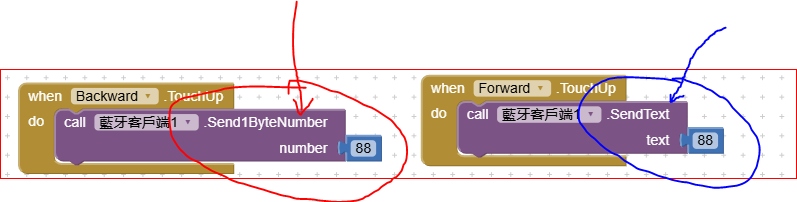
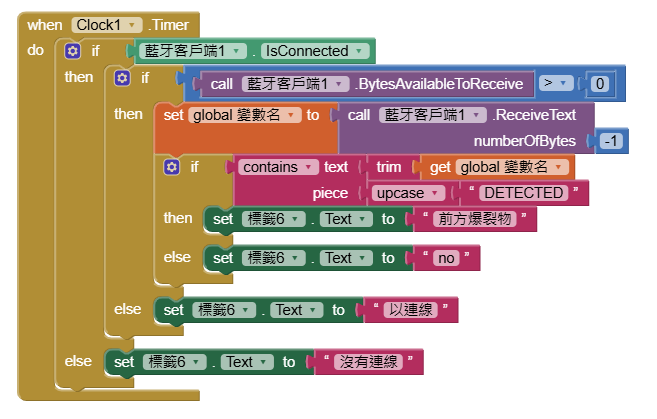
I am developing an app to control my Arduino car. I have successfully managed to control the motor, but I also want the app to display a message when the ultrasonic sensor on the car detects an object. However, I have been trying for a long time without success. Could you help me check what the problem is?

#include <Servo.h> // Include Servo library to control the servo motor
#include <SoftwareSerial.h> // Include SoftwareSerial library
// Ultrasonic sensor pins
int trigPin = 5;
int echoPin = 6;
long duration, dist;
Servo servo;
// L298N motor control pin definitions
const int IN1 = 7;
const int IN2 = 8;
const int IN3 = 13;
const int IN4 = 12;
const int ENA = 3; // Use a different PWM pin to control the left motor
const int ENB = 11; // Control the speed of the right motor
// Define motor speeds
int motorSpeed = 150;
int fastSpeed = 180; // Higher speed for turning
int slowSpeed = 120; // Lower speed for turning
// Define Bluetooth module RX and TX pins
const int rxPin = 2;
const int txPin = 4;
const int statePin = 1; // Bluetooth state pin
// Create a SoftwareSerial object
SoftwareSerial bluetooth(rxPin, txPin);
// Define variables to control message display intervals
unsigned long previousMillis = 0;
const long interval = 500;
// Define movement status variable
bool isMoving = false;
void setup() {
servo.attach(9); // Change servo control pin to avoid conflict with motor PWM
pinMode(trigPin, OUTPUT);
pinMode(echoPin, INPUT);
servo.write(0);
delay(100);
pinMode(IN1, OUTPUT);
pinMode(IN2, OUTPUT);
pinMode(IN3, OUTPUT);
pinMode(IN4, OUTPUT);
pinMode(ENA, OUTPUT);
pinMode(ENB, OUTPUT);
Serial.begin(9600);
bluetooth.begin(9600);
pinMode(statePin, INPUT);
Serial.println("Bluetooth module ready, waiting for messages...");
}
void loop() {
unsigned long currentMillis = millis();
if (currentMillis - previousMillis >= interval) {
previousMillis = currentMillis;
if (digitalRead(statePin) == HIGH) {
Serial.println("Connected, waiting for data");
if (bluetooth.available()) {
Serial.println("Message received:");
while (bluetooth.available()) {
char receivedChar = bluetooth.read();
Serial.print("Character (Hex representation): ");
Serial.print(receivedChar, HEX);
Serial.print(" (ASCII: ");
Serial.print(receivedChar);
Serial.println(")");
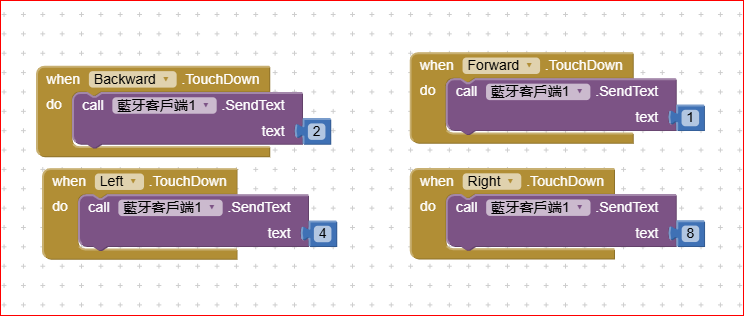
switch (receivedChar) {
case 1:
moveBackward();
break;
case 2:
moveForward();
break;
case 4:
turnLeft();
break;
case 8:
turnRight();
break;
default:
stopMovement();
break;
}
}
}
} else {
Serial.println("Bluetooth not connected");
}
detectObstacle();
}
}
// Detect ultrasonic distance
void detectObstacle() {
if (!isMoving) { // Only detect and open the trash can lid when the car is stopped
digitalWrite(trigPin, LOW);
delayMicroseconds(2);
digitalWrite(trigPin, HIGH);
delayMicroseconds(10);
digitalWrite(trigPin, LOW);
duration = pulseIn(echoPin, HIGH);
dist = (duration / 2) / 29.1;
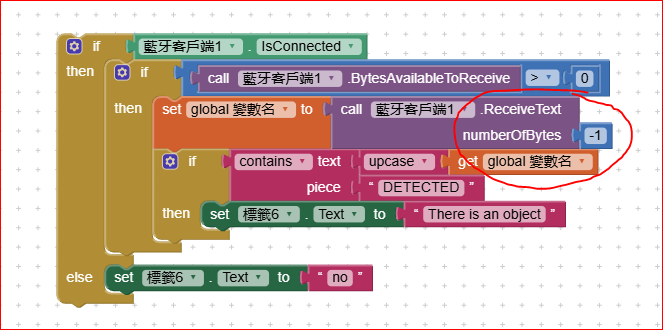
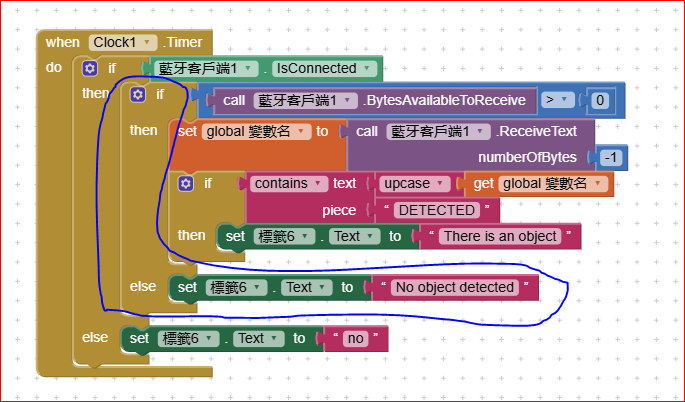
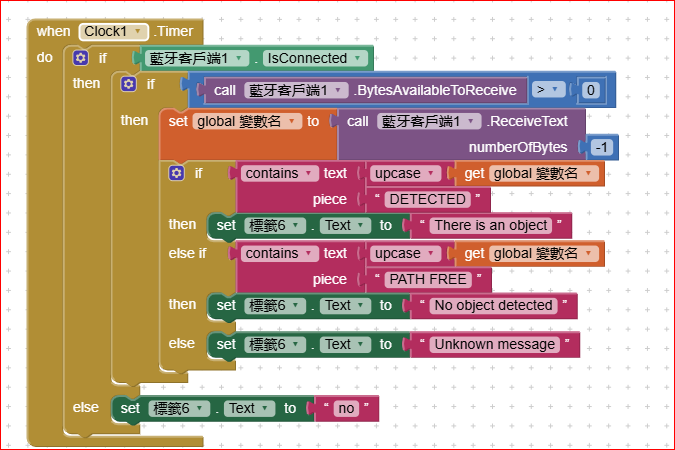
if (dist < 8) {
bluetooth.println("DETECTED");
servo.write(90);
delay(3000);
servo.write(0);
delay(300);
}
}
}
// Move forward with both wheels
void moveForward() {
analogWrite(ENA, motorSpeed);
analogWrite(ENB, motorSpeed);
digitalWrite(IN1, HIGH);
digitalWrite(IN2, LOW);
digitalWrite(IN3, HIGH);
digitalWrite(IN4, LOW);
isMoving = true; // Set car to moving state
Serial.println("Moving forward: motorSpeed = " + String(motorSpeed));
}
// Move backward with both wheels
void moveBackward() {
analogWrite(ENA, motorSpeed);
analogWrite(ENB, motorSpeed);
digitalWrite(IN1, LOW);
digitalWrite(IN2, HIGH);
digitalWrite(IN3, LOW);
digitalWrite(IN4, HIGH);
isMoving = true; // Set car to moving state
Serial.println("Moving backward: motorSpeed = " + String(motorSpeed));
}
// Turn left (right side moves forward faster, left side moves backward slower)
void turnLeft() {
analogWrite(ENA, slowSpeed); // Left side moves backward
analogWrite(ENB, fastSpeed); // Right side moves forward
digitalWrite(IN1, LOW);
digitalWrite(IN2, HIGH);
digitalWrite(IN3, HIGH);
digitalWrite(IN4, LOW);
isMoving = true; // Set car to moving state
Serial.println("Turning left: Right side moves forward (fast), left side moves backward (slow)");
}
// Turn right (left side moves forward faster, right side moves backward slower)
void turnRight() {
analogWrite(ENA, fastSpeed); // Left side moves forward
analogWrite(ENB, slowSpeed); // Right side moves backward
digitalWrite(IN1, HIGH);
digitalWrite(IN2, LOW);
digitalWrite(IN3, LOW);
digitalWrite(IN4, HIGH);
isMoving = true; // Set car to moving state
Serial.println("Turning right: Left side moves forward (fast), right side moves backward (slow)");
}
// Stop all movement
void stopMovement() {
analogWrite(ENA, 0);
analogWrite(ENB, 0);
digitalWrite(IN1, LOW);
digitalWrite(IN2, LOW);
digitalWrite(IN3, LOW);
digitalWrite(IN4, LOW);
isMoving = false; // Set car to stopped state
Serial.println("Stopping all movement");
}