So I've made a working prototype of an app that sends Strings via Bluetooth to my Arduino. My Arduino then interprets the data and runs two motors. It works fine but after a while of using the app it just hangs and then crashes and I'm not sure why but I have a hunch that it has something to do with the app more than the Arduino.
This is most likely a timing problem. The dragging event occurs too fast and your Arduino is not able to handle all those messages and then chokes after a while. There are several things you can do.
Instead of using the Dragged event, use a timer event. In this timer event you use the same logic as in your Dragged events. You can play around with your timer interval to see at what interval your Arduino is able to process the messages.
Another approach would be, to send a reply from you Arduino and only send new messages when a reply has been received to the previous message.
You can also combine the two approaches.
The timer approach is certainly the easiest. I have done a similar thing, not with balls on a canvas but using the tilting of the phone to steer a little robot and I had a similar problem of events happening too fast. Good luck!
...also, \n on the end of the string is not required. Plus, the Sketch is calculating directions that the App already 'knows'. So you could send single-character or integer codes and reduce the complexity all-round. Ditch the "else ifs" and use switch.
Hi,
could you take a sight on what happens to x=-20 and x=20 ?
It seems out of your "if" tests.
More: please be aware that is "dangerous" (like Chris says) to use the same serial line for both the BT connection and the PC monitor. You'd better use the Softwareserial library to connect the BT (i.e. on pins 2 & 3 if you use a UNO board) and leave the Serial for the PC monitor. In this case you can also differentiate the two baudrates : the monitor line @115200, which it is (obviously) faster than 9600 and frees the CPU earlier (according to Ghica suggestion about Arduino's timing issues). And put the printlns under an #ifdef debug directive, so all of them can be disabled at once, when you are done with debugging
Like here below: #define DEBUG 1 // at the top of the source (sketch) file.
Then, when you want to print a debug message, surround it with another preprocessor directive:
This will free the final code from debug stuff when you will comment out the first directive:
// #define DEBUG 1
Also follow the other Chris hint: since you don't close the movement loop in the Arduino code (you don't stop the movement when the x or y values are reached, but only when a new value is set by the balls on the app) consider to make all the computations in the app and send only a character like "L" for left, "R" for right and so on...
Cheers !
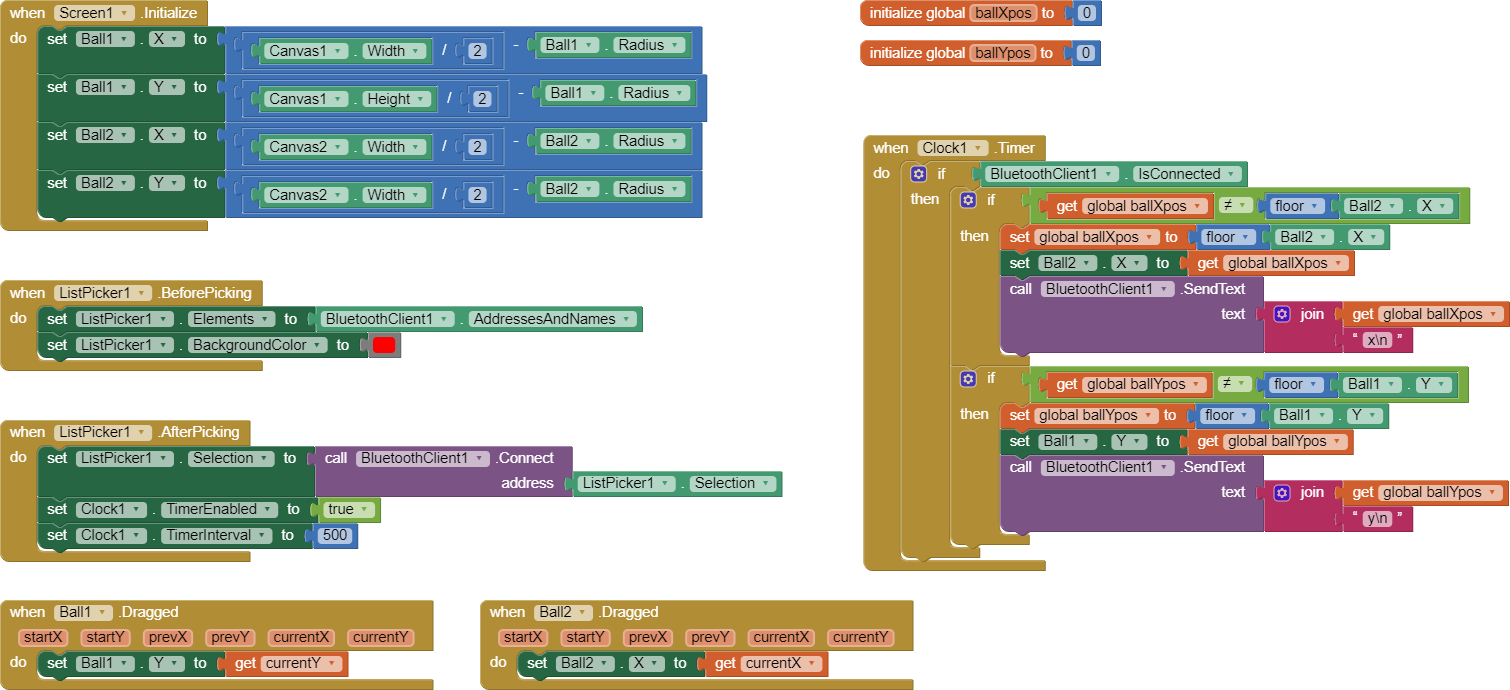
Since the others looked at your .ino, I looked at your blocks. And looking at it, the logic of it escapes me.!
I changed it to use a timer, you still seems to need the dragged events, otherwise the ball does not move.
(I did not try it, because I did not want to change the .ino code in my Sparky, without knowing what it really should do).
But: why do you have 2 canvases and 2 balls, where 1 of each could do?
And what does the value represent? As far as I see from the discussion, just a direction. How about speed?
I am not using the PC to send any data (unless that involces the println statements) so why would it be dangerous to have both BT and PC connections on the same Serial line?
I'm pretty new to arduino and app inventor so I'm not sure how to do the (#ifdef debug directive) thing.
If you have arduino connected to your computer while you are running and you turn on the terminal, eg for debugging purposes, it won't work. If you don't, it's okay.
If you want to debug the code in arduino, then the BT module must be connected to another UART port created programmatically using the library.
Hello,
I believe that I've been not clear:
you cannot use the same serial line for both the PC monitor and the BT connection otherwise you could have a loopback between the PC and the BT.
In other words: whenever you send data to the PC, you also send data to the BT, since you use the same line. And this can cause a local loop back to the PC itself.
Normally you need to separate the two lines: one used for the PC monitor, and the other for the BT.
Second the #define is an Arduino directive, not an AI2 one.
Cheers.
I mean like this(it's already written in my first post):
at the beginning of your Arduino sketch you shall write: #define DEBUG 1
then, when you want to send a message to the PC you shall code something like this: #ifdef DEBUG
Serial.println(x);
Serial.println("Right"); #endif
When you are done with debugging just comment out the #define DEBUG line by putting a double slash in front of:
// #define DEBUG 1
Of course this is not the most important thing, but it can improve readability and maintainability of the code.
Please also take a look to the -20 and +20 comparisons. It seems to me that the =-20 and =+20 are not included in your code.
If you use a UNO and you want to use two serial lines you better use the Softwareserial library. Supposing you connect the BT shield to pins 10 and 11 you shall put this code at the beginning of the sketch (i.e. after the #defines...):
SoftwareSerial BTSerial = SoftwareSerial(10, 11); // Rx on pin 10 and Tx on pin 11 toward the (supposed) BT shield.
Consequently the initialization should be something like here below:
void setup()
{
     BTSerial.begin(9600);  // Data exchange to/from App via BT
     Serial.begin(9600);      // Echo to Serial Monitor
}
and don't forget to put a partition between the pin 11 (Tx) of the UNO and the Rx pin of the BT shield, so to reduce the voltage to approx. 3.3 Volts, otherwise you could damage the BT shield. (Don't care if the picture below is referred to a NANO, it is the same for any Arduino board, since the digital outputs are sourcing 5 volts): Hoping it can help.
Cheers
You need a time interval in the App and in the Arduino Sketch, the purpose of which is to allow each to complete their processes. The receiving device's interval wants to be approx 20% faster than the sender to avoid buffer overflow. A general rule of thumb is to send data at the largest practical time interval that works with the requirements in hand - i.e. there is no point in sending data every second if every ten minutes is sufficient.
I can do that for my horizontal joystick, however I'm using the values from the vertical joystick to PWM motors so how would sending a single character help in this scenario?