Can someone help me further please
I think we've all lost the thread. What do you really need?
A program in mit app inventor to measure the wind speed and maybe the anemometer (option)
maybe i will start with chatGPT and when i get a start i will come back for help if needed
Thank you all for the information provided
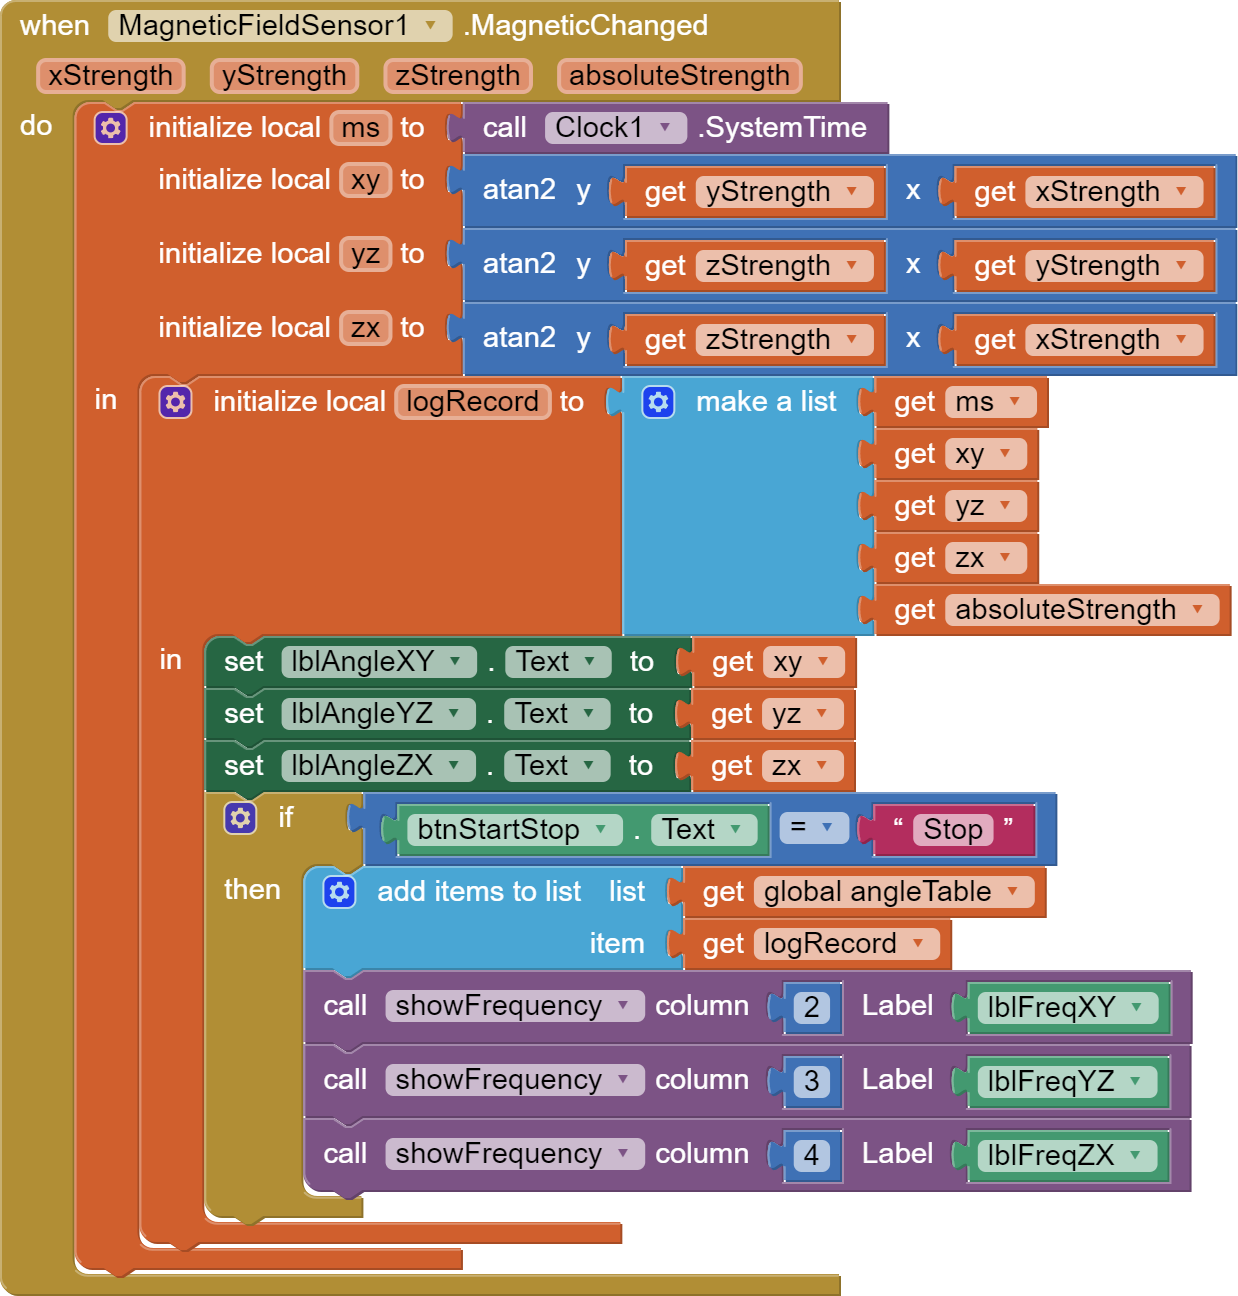
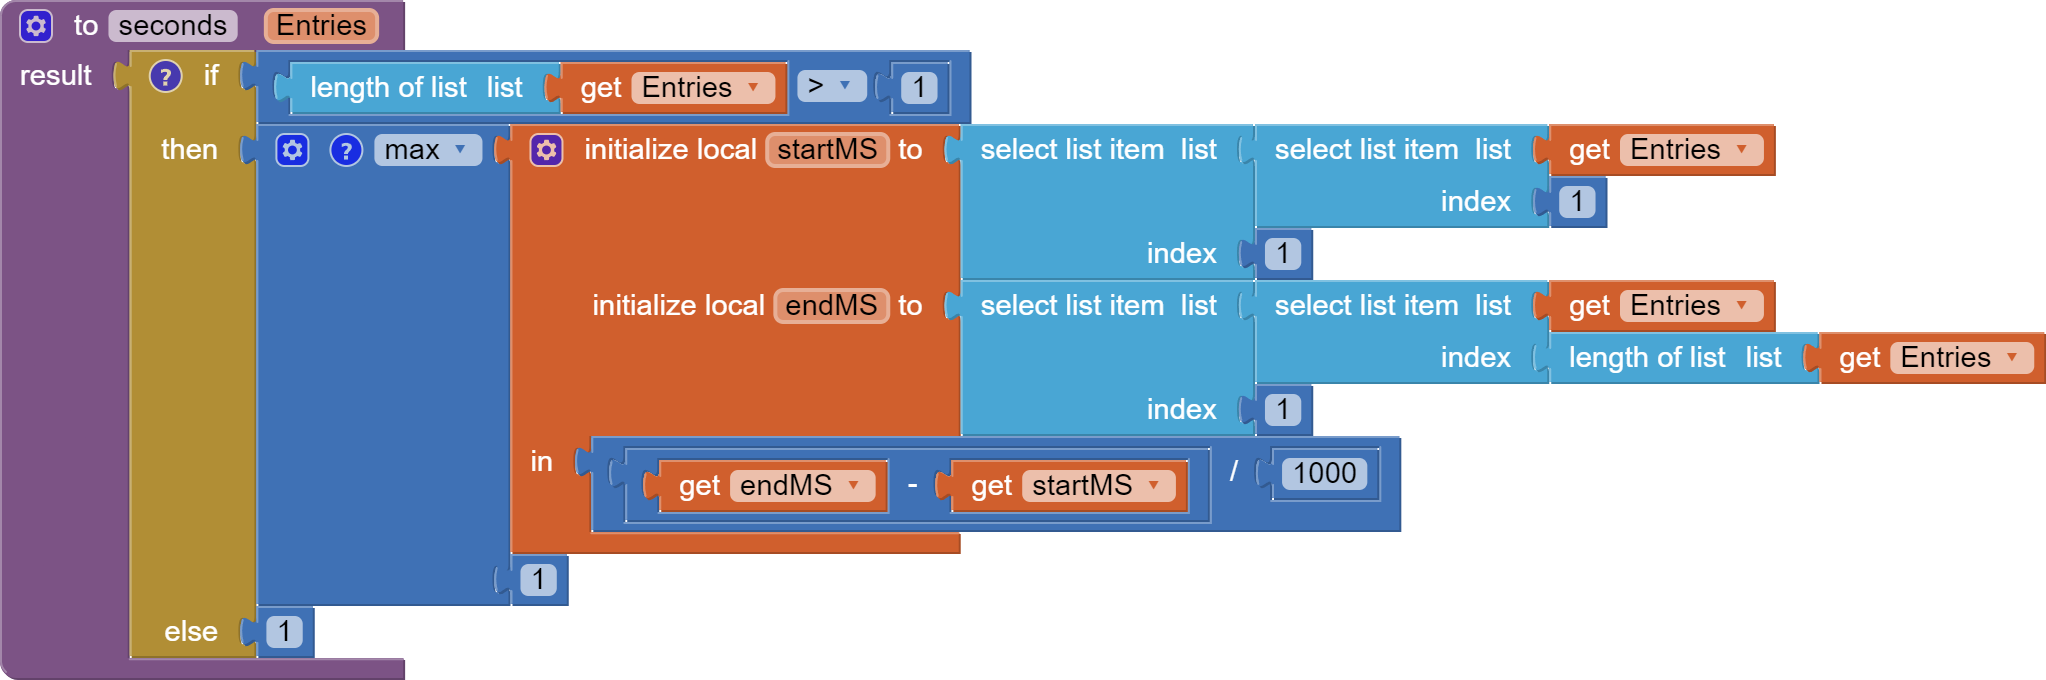
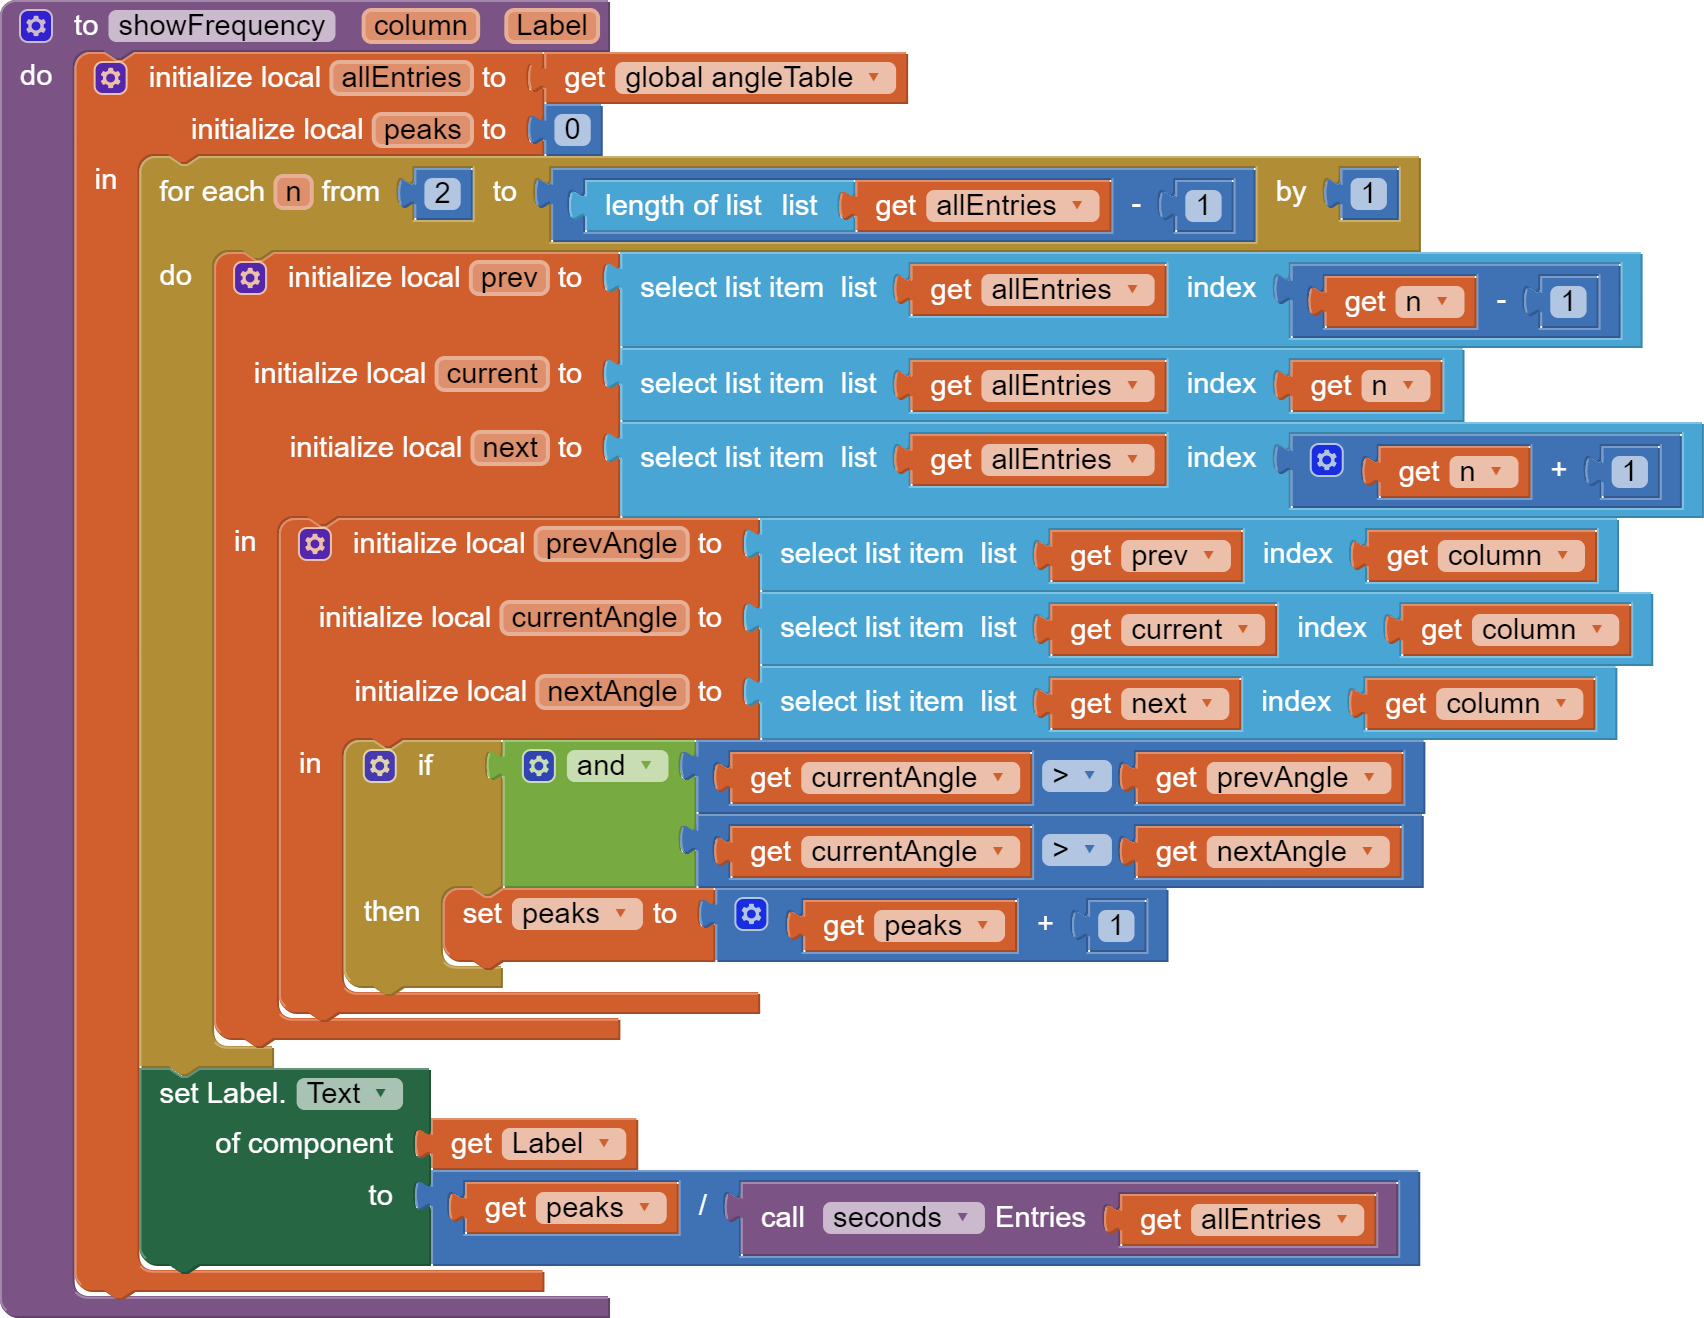
I already posted code to show the rotation rate by counting peaks.
That is a fudge factor away from wind speed.
Thank you very much for this info
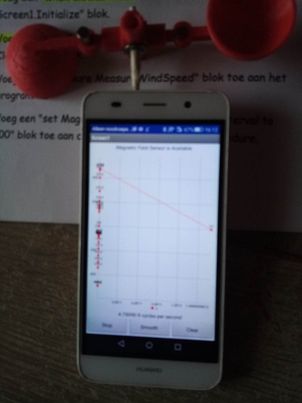
I have this but the smooth and clear button don't work according to me
Can you perhaps only indicate the speed in km/h for example
I thought further on the wind direction problem.
The hardware you mentioned did indeed have two moving parts,
- a spinning part to measure wind speed by spinning fast in string wind, and
- a slow moving off center paddle to align with the wind direction.
I assume both parts have magnets in them, and the magnetic field detected by the phone is the sum of the magnetic fields induced by the two moving parts.
The spinning part will add a repeating wave pattern to the 4 directional magnetic field strengths (x,y,z,total) if you map them over time.
The paddle induces a slow moving change to the ratios of the magnetic forces in the three directions x,y,z, depending on how you hold the phone (Statue of Liberty torch vs motor boat engine.)
There is precedent for detection of external magnetic field direction in the AI2 Gallery. They are called Compass apps. I have not searched for them recently, I leave that to you.
Be aware of the existence of a very handy trig function atan2(x,y) in the math blocks section. It is superior to the other functions arcsin, arctan, arccos, in that it avoids the divide by zero problem when getting angles from the x axis to points at (x,y).
Also, be aware that by holding the phone up like a torch, the new directions will change from (x,y,z) to (x,z,y) (depending on how you hold your phone), so the angle would be atan2(xStrength,zStrength) in the Magnetic Field Sensor.
(edit - Maybe the app is using the wrong axis for that orientation. Instead of xStrength, use yStrength or zStrength and check the graph for wiggles when you spin the magnet.)
Please download and post each of those event block(s)/procedures here ...
P.S. These blocks can be dragged directly into your Blocks Editor workspace.
See Download Block Images for a demo.
Translating rotational speed to km/h requires calibration, perhaps by having some one drive you around on a calm day at set speeds (km/h) and recording the rotational speeds at different auto speeds (hold the phone out an open car window and don't drop it.)
Do I need to explain the arithmetic to derive the fudge factor from the calibration run?
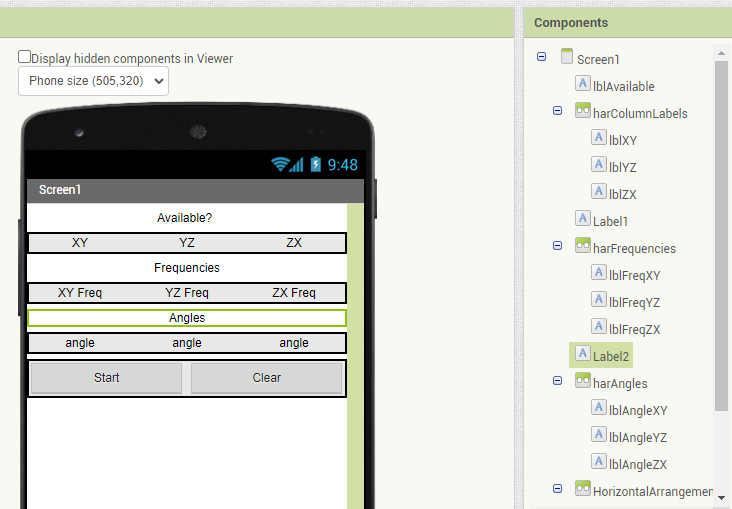
Here is a separate app to play with the angles and guess the spin rate without a graph.
Data is collected into a global table, for you to export to a File if you want.
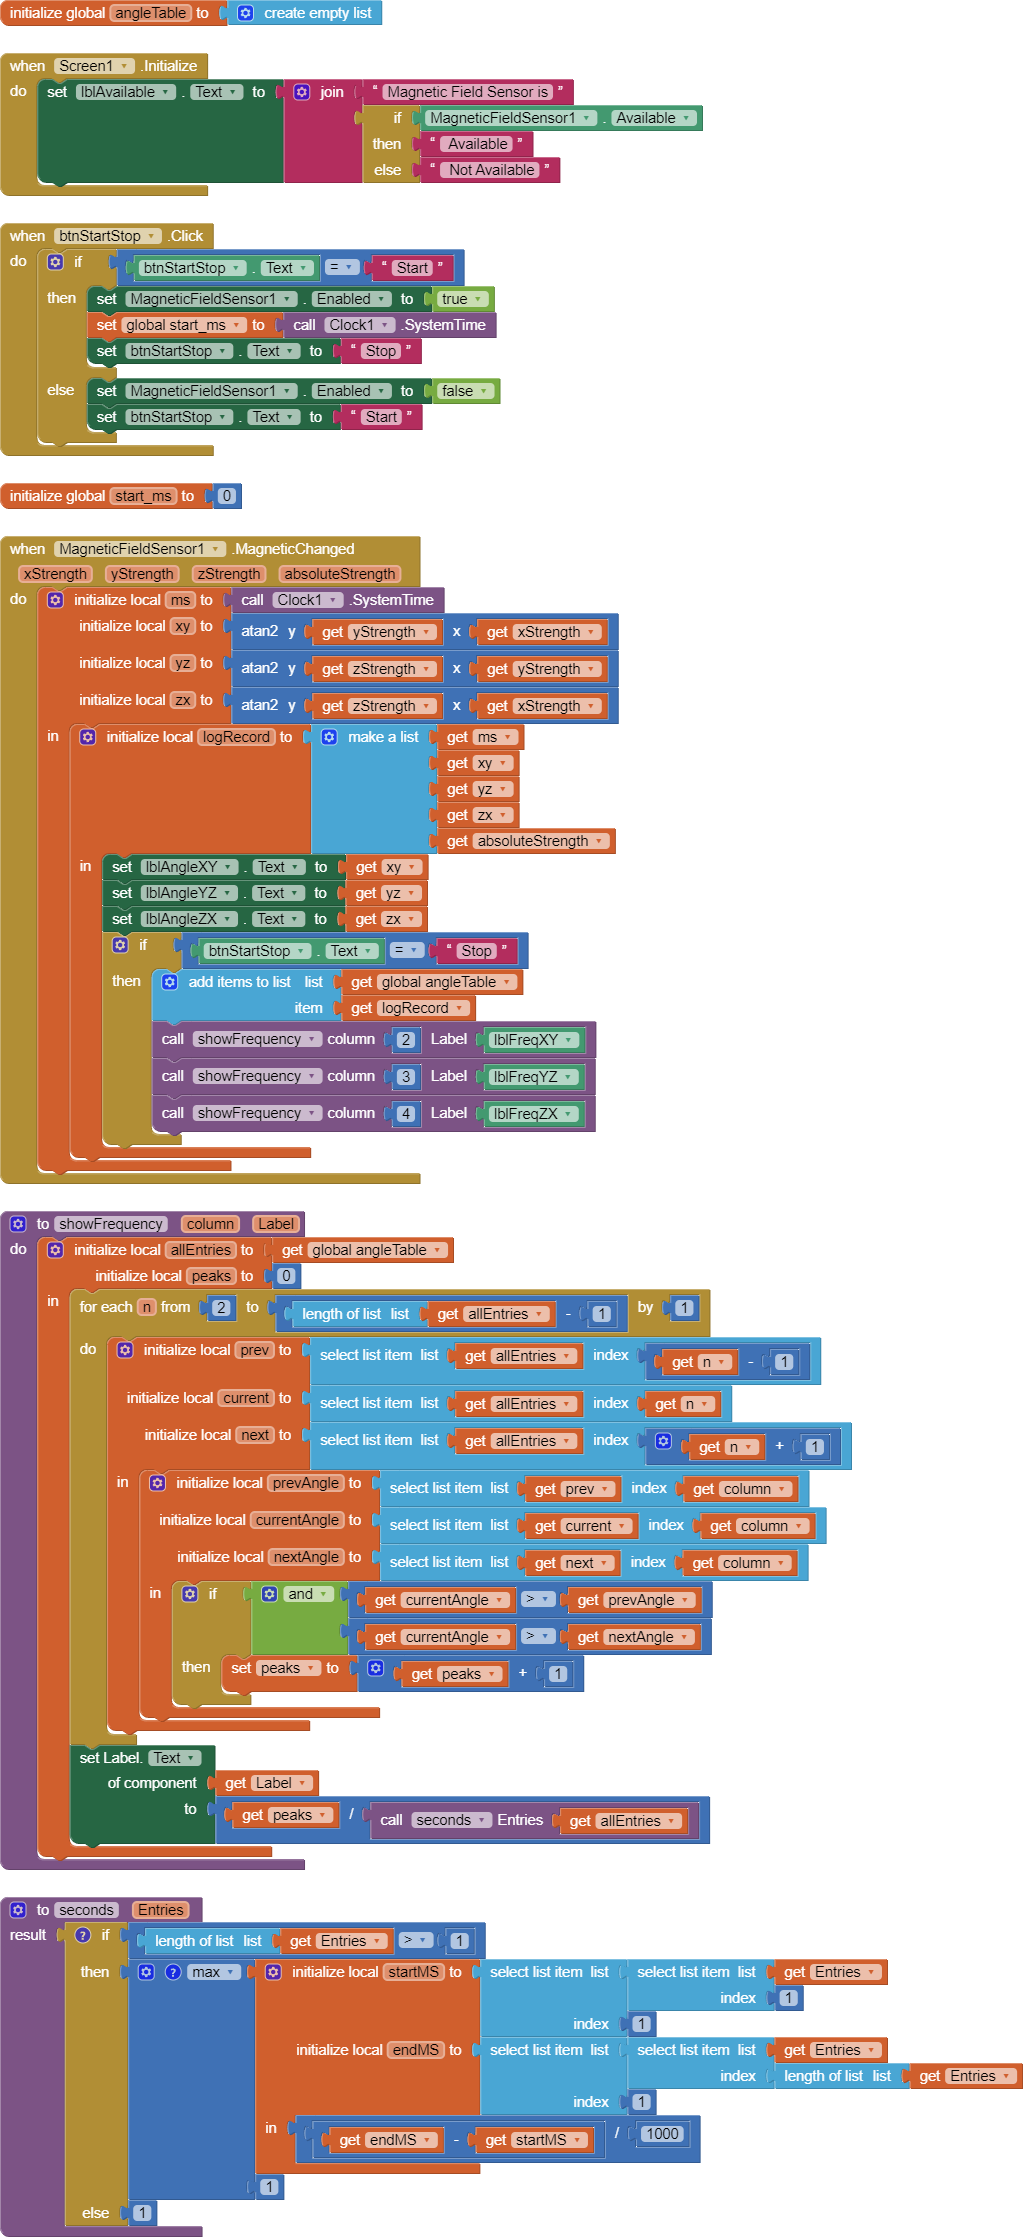
magnetic_spin.aia (6.3 KB)

Feel free to customize it once you have completed your manual calibration of frequency ve land speed.
P.S. I hope the magnetic strength of your rotor exceeds the local magnetic field of your car.
thanks for all the info, to be continued
I am still looking for a program, I asked ChatGPT and he forwarded it to me
- First you need to go to the MIT App Inventor website and create a new project. You can give your project a name, for example "Anemometer".
- Then you need to go to the "Designer" tab and add a new screen. You can give your screen a name, for example "Screen1".
- On the "Designer" tab, you need to go to the "Palette" and drag and drop the following components onto your screen:
- A "MagneticFieldSensor" component from the "Sensors" category. This is the component that can measure the strength of the magnetic field in three directions (x, y, z). You do not need to change anything in the properties of this component.
- A "Label" component from the "User Interface" category. This is the component that will show the speed on the screen. You can change the text of this component to something like "Speed: 0 m/s". You can also adjust the size, font and color of this component to your preference.
- Next you need to go to the "Blocks" tab and write the logic of your program using the blocks. You can find the blocks in the "Blocks" toolbar on the left side of the screen.
- The explanation of each block is as follows:
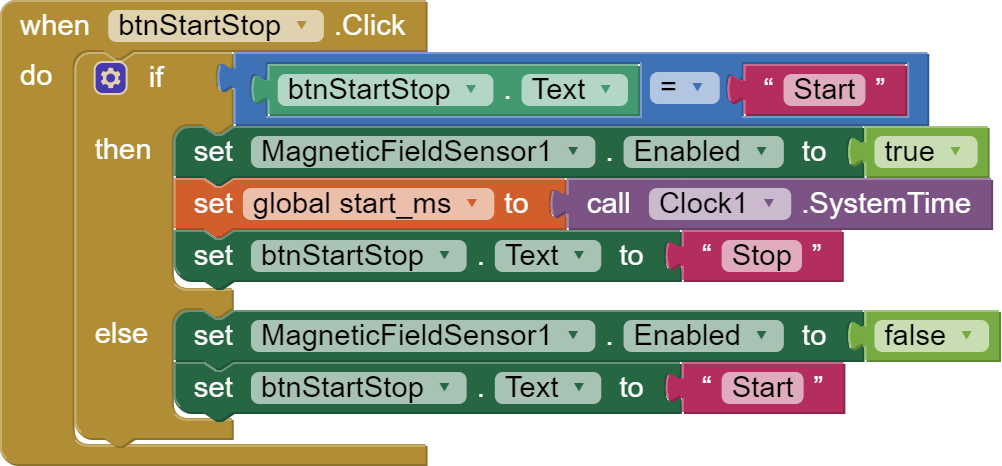
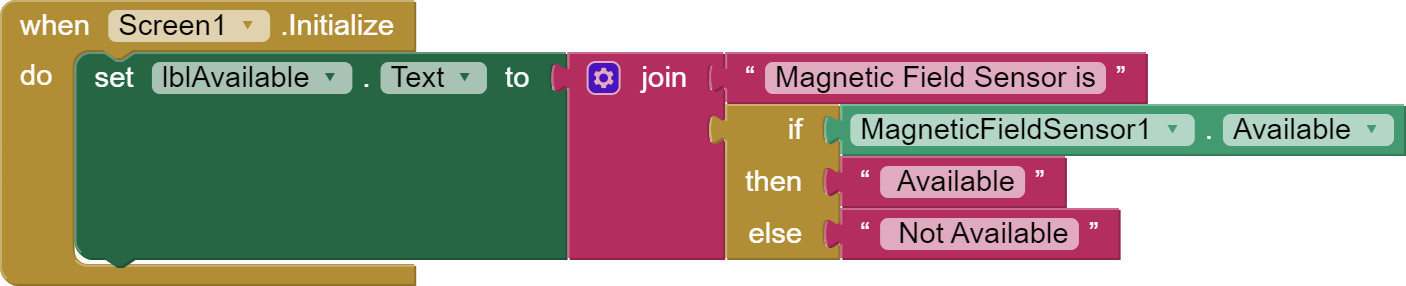
- The first block is a "when Screen1.Initialize" block. This block is executed when the screen is opened. In this block you set the "Enabled" property of the "MagneticFieldSensor1" component to true using a "set MagneticFieldSensor1.Enabled to" block and a "true" block.
- The second block is a "when MagneticFieldSensor1.MagneticChanged" block. This block is executed when the "MagneticFieldSensor1" component detects a change in the magnetic field. In this block you call a procedure that calculates the speed based on the x-strength of the magnetic field. The procedure is called "calculateSpeed" and has one parameter called "x". You use a "call calculateSpeed" block and a "get MagneticFieldSensor1.XStrength" block to call this procedure.
- The third block is a "to calculateSpeed x" block. This is the definition of the procedure that calculates the speed. This procedure has one parameter called "x", which is the x-strength of the magnetic field. In this procedure you do the following:
- You create two variables, called "lastTime" and "penultimateTime". These variables store the time of the last and penultimate passage of a magnet past the sensor, respectively. You use two "initialize global name to" blocks to create these variables and initialize them to 0.
- You check whether the x-strength is greater than a certain threshold value, for example 20. This means that a magnet has passed the sensor. You use an "if" block and a ">" block to do this check.
- If so, do the following:
- You set the value of the variable "penultimateTime" equal to the value of the variable "lastTime". You use a "set global name to" block and a "get global name" block to do this.
- You set the value of the variable "lastTime" equal to the current time in milliseconds. You use another "set global name to" block and a "Clock1.Now" block to do this.
- You calculate the time difference between the last and penultimate passage of a magnet. You use a "-" block and two "get global name" blocks to do this.
- You check whether the time difference is greater than 0. This means that there has been a valid rotation. You use another "if" block and a ">" block to do this check.
- If so, do the following:
- You calculate the rotation speed in rotations per minute (RPM) using the formula: rotation speed = 1000 / (time difference between last and penultimate pass). You use a "/" block, a "1000" block and a "-" block to do this.
- You calculate the speed in m/s using the formula: speed = rotational speed * circumference / 60. Here the circumference is equal to 2 * pi * radius, where the radius is the distance between the center of the anemometer and the center of a cup. You can adjust the radius to the actual value of your anemometer, for example 0.05 m. You use a "*" block, a "/" block, a "2" block, a "pi" block, a "0.05" block and a "60" block to do this.
- You set the text of the "Label1" component equal to the speed, possibly with an additional unit. You use a "set Label1.Text to" block and a "join" block to do this. You can also use a "round" block to round the speed to, for example, two decimal places.
Is there any truth in that??????? Before I investigate further to program it in the app inventor, someone can sometimes check whether this is correct
Best regards
ChatGPT is a politician that tells you what you want to hear.
You still have to think and test.
1 Like
It's huge that he responds like this to a question, I know he sometimes makes mistakes, which is why I ask whether there is anything useful in his explanation.
It is beneficial to your understanding of the problem for you to follow the detailed instructions and to see where they go wrong.
Correcting other people's code on this board can be enlightening to both sides of the conversation.
ChatGPT lacks gratitude, though.
For chatgpt to answer correctly, you need to ask your question very carefully and wisely. Too general questions will bring bad answers. You also need to have some knowledge of the subject to spot obvious mistakes.