Hi @rkl099
I have seen the documentation for the conectivity components before i think i do the necessary blocks in my program. I will upload it in a minute. The arduino and any other device using serial will still be using the same serial connection and it doesn't matter if you are sending bytes to an arduino or any other device PIC, window serial connection, arduino or an experimantal serial lan. all the same except that usb serial is 0v and 5v and normal rs232 is +/- 12 v (usually).
In order to obtain logical states of + -12V, you must additionally use the MAX232 integrated circuit. There is no difference from the drivers and application side.
Agree Patryk. The USB-Serial chip can be on the target board like Arduino Uno. For some other boards like Arduino Pro mini or Raspberry Pi you use an USB-Serial converter with TTL levels, 3,3V or 5V. Then there are USB-Serial Rs232 converters with a level converter like Max232 that outputs +-3V - +-15V. They also inverts the signal. (Logic 0 is +5 - +15V).
Arduino’s also use DTR for reset. Some devices also use/needs RTS, but many application just ignores all control signals like CTS, DSR DTR or make connections RTS---CTS, DTR---DSR,DTR.
This driver only handles outgoing signals RTS, DTR.
Your post demonstrates an exceptionally clear understanding of the underlying mechanisms. Don't reveal too many details ! If stuff like this leaks out, kids might be able to connect MicroBits to AI2 apps.
Oh....wait, hang on, ....that IS what we want, isn't it ?!! (i've got a computing degree but two weeks later, i still can't get it to bloody work) Seriously though, sincere thanks for these hints. I may need more of them...
Thanks for this. The default serial function didn't work for a radio that I'm trying to control via an OTG cable to serial adapter. But your function works very well with the Silicon Labs CP2105 Dual UART Bridge that's build in to the radio.
Do you have any more documentation on the different blocks in your package? The different behaviours of Read, ReadLn, etc?
The only documentation for the moment is SerialOTG.pdf (see https://github.com/rkl099/Appinventor-SerialOTG).
Read returns all characters received up to the moment you call the function. ReadLn collects characters received for each call until a LF character is found. Then it returns the complete line. Both returns data as a string. An empty string means nothing received (or for ReadLn not a complete line received yet). WriteLn is the same as Write with a LF added to the string. Please note that Appinventor uses UTF-8 character set (1 or 2 byte for each character), but many other systems uses 8 bit ASCII. That is why I implemented ReadByte and WriteByte so you can send and receive any byte 0..255 .
Ps. Nice to hear from users of the extension
Thanks for the reply, that PDF is very useful.
I've written some tasks to poll various settings from the radio, and though each works fine independently they get garbage when run in series. Clearly something I'm misunderstanding about polling a serial device, but what?
In the example below get_test should return something like "SM0123;?;" and get_test2 should return something like "FA007123400;?;". But when run in series they get partial responses, or part of each others responses too.

Hmm, looks like I had misunderstood how appinventor schedules events, and the procedures get called asynchronously? The flow shown below seems to have tamed it. At least it only triggers one procedure per clock tick, then moves on to the next.
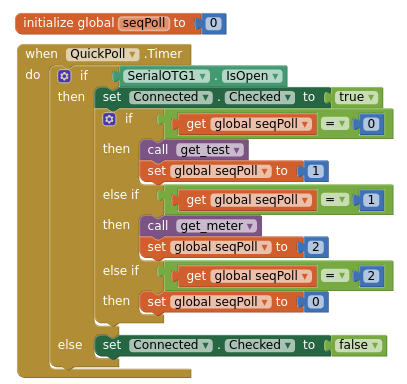
I think that this can be the correct solution. There are no user events or user call-backs for received characters. You have to poll for the response. Serial communication is always depending on timing. Ex: at 9.6 kbaud each char needs about 1ms to be transmitted or received.
Serial line is mostly used for request-response communication. I implemented ReadLn to simplify ASCII message communication. Each message is terminated with a LF character, and you can poll the response by simply repeatedly call ReadLn until you get a non empty string in return. (You may also need a timeout function if you don’t get a response). This is a common method for communication.
Other protocol is simply depending on timing. Send a request, wait x ms, read response. So the question is: what is the message delimiter in your protocol?
Protocol that uses non-ascii character (each byte has a value 0-255) like ModbusRTU are more complicated. The protocol must be implemented by collecting characters and decode the message using ReadByte and WriteByte.
(I have implemented a ModbusRTU single register read/write extension if anyone is interested)
I have now rewritten and added code my SerialOTG extension built on the Physicaloid library. It now supports BT client/server and WIFI TCP client/server. All data transfer methods are supported. You can upload code to Atmega 168, 328 and 2560 Arduino cards over Serial and BT (also WIFI if you implement reset att the right time).
The extension SerialOTG ver 1.2 and documentation can be found at:
ps
Glad to hear from so many that uses the extension. I’m always interested to hear about your applications.
3 Likes
Something seems to be broken for me or I dont know how to install this extension
If I upload it using "Palette>>Extension>>Upload extension" it shows me error "Import extension failed! Uploaded file does not contain any component definition files"
How should I add it to my project?
I missed to upload ver 1.2 of the extension, but you should have got ver 1.1 (tested).
Try to download file com.SerialOTG.aix from git (now updated to 1.2).
Import extension as you described: Palette→Extension→import extension select com.SerialOTG.aix and import. I have tested it on a new application and it should work.
Thanks it worked with updated version. Now I can finally try to read from my arduino 
I received the following email by @rkl099
Hello, I want to update information about my contributions to Appinventor
SerialOTG by rkl099. New version of the built-in component Serial. It accepts more USB serial adapters and add functions. Also add BT/WIFI Client/Server and Arduino program upload.
Thank you for listing extensions to Appinventor
Thank you @rkl099, now updated in the extensions directory App Inventor Extensions | Pura Vida Apps
Taifun
Dear @rkl099 , could you please update the SerialOTG with the vid_16D0&pid_087E ? It is for the Digispark ATTINY85.
Also the way of selecting the device, and not connecting to the first available would be very welcome.
Thanks.
The ATTINY85 has no hw usb-serial interface. However there is a software library VUSB-AVR that seems to implement a CDC usb-serial interface with limited capabilities. It should be detected by Linux and can probably use the CDC-driver in SerialOTG. So it depends on what you want to do.
As I have mentioned before, the implementation for detection of VID, PID is simplified in the modified Physicaloid library. It will only test for VID, but this is probably good enough.
To be able to select one of connected devices or a port on multi-port devices needs to much rewriting of code.
Thanks,
This is what I think I am doing. This is the Arduino code:
#include <DigiCDC.h>
void setup() {
  // initialize the digital pin as an output.
  SerialUSB.begin();
  pinMode(1,OUTPUT);
}

// the loop routine runs over and over again forever:
void loop() {

  if (SerialUSB.available()) {
    char input = SerialUSB.read();
    if(input == '0')
      digitalWrite(1,LOW);
    else if(input == '1')
      digitalWrite(1,HIGH);

  }

   SerialUSB.delay(100);               // keep usb alive // can alos use SerialUSB.refresh();
}
And the ATTINY85 can be detected in Windows, also in Android, but using the serial USB terminal app from Google Play.
Using the SerialOTG in my app I can detect other device connected to the same Android ( com.physicaloid_ai.lib.usb.driver.uart.UartWinCH34x), but not my ATTINY85, even if it is the only connected device.
Thanks
Interesting application with USB support on this small board. I have added support for ATTINY85 VID 0x16D0 9 in com.SerialOTG. I also updated my test program SerialOTG.apk. You can download them at https://github.com/rkl099/Appinventor_Debug. I have tested the led application on a ATTINY85 that I had and it seems to work. it has a different PID, but it's not used in the library. Please test and tell me if it works OK.
Yes, now it works as expected, thanks a lot.
Trying now to workaround the issue of having more than one USB device attached to Android.
Thanks again.