Serial OTG. Arduino CH340. FTDI. rkl099's Extension

OK, this is a property of the built in component for bluetooth communication.

SerialOTG already is a complex software that can handle many USB/serial adapters, communication as byte streams for bluetooth client/server, tcp/ip client/server, serial, as well as arduino programming. It’s to much work to expand it with ANSI characters with code page selection, signed/unsigned 1/2/4 byte numbers, byte order and more features that has been asked for.
So for now, you have to translate to/from bytes if you want to use SerialOTG.

Thanks for your work.
I already made an ANSI worksheet, for Java

  static final String[]  digitsHex1 = new String[]{"\u0000","\u0001","\u0002","\u0003","\u0004","\u0005","\u0006","\u0007","\b","\t","\n","\u000B","\f","\r","\u000E","\u000F","\u0010","\u0011"
          ,"\u0012","\u0013","\u0014","\u0015","\u0016","\u0017","\u0018","\u0019","\u001A","\u001B","\u001C","\u001D","\u001E","\u001F"," ","!","\"","#","$","%","&","'","(",")","*","+"
          ,",","-",".","/","0","1","2","3","4","5","6","7","8","9",":",";","<","=",">","?","@","A","B","C","D","E","F","G","H","I","J","K","L","M","N","O","P","Q","R","S","T","U","V","W"
          ,"X","Y","Z","[","\\","]","^","_","`","a","b","c","d","e","f", "g","h","i","j","k","l","m","n","o","p","q","r","s","t","u","v","w","x","y","z","{","|","}","~","\u007F"
          ,"Ђ","Ѓ","‚","ѓ","„","…","†","‡","€","‰","Љ","‹","Њ","Ќ","Ћ","Џ","ђ","‘","’","“","”","•","–","—","\u0098","™","љ","›","њ","ќ","ћ","џ"," ","Ў","ў","Ј","¤","Ґ","¦","§","Ё","©"
          ,"Є","«","¬","­","®","Ї","°","±","І","і","ґ","µ","¶","·","ё","№","є","»","ј","Ѕ","ѕ","ї","А","Б","В","Г","Д","Е","Ж","З","И","Й","К","Л","М","Н","О","П","Р","С","Т","У"
          ,"Ф","Х","Ц","Ч","Ш","Щ","Ъ","Ы","Ь","Э","Ю","Я","а","б","в","г","д","е","ж","з","и","й","к","л","м","н","о","п","р","с","т","у","ф","х","ц","ч","ш","щ","ъ","ы","ь","э","ю","я"};
 

perhaps this will help somehow.
(I'm sorry in advance if i read your post wrong, because i am writing and reading a message through Google Translate)
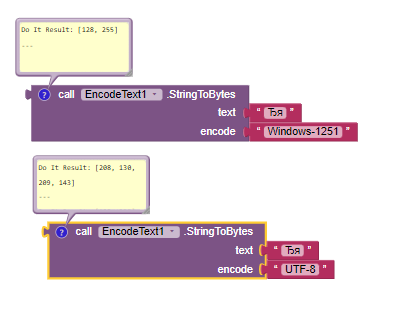
Hope that will solve your problem. Good luck.

Have you tested the bluetooth component by setting the Windows-1251 encoding? Does it work for sure?

Yes, when I set the Windows-1251 encoding in the BluetoothClient.
The mobile app transmitted directly all the characters from "Ђ" to "я". (0x80 - 0xff).
Checked in the "iron" (Checked in hardware).
The receiving side was the arduino HC06 module.

So this extension could help?
orientation
Is hexadecimal data required or is decimal also accepted?

No, I have no problem converting ANSI characters to other number systems.

The problem is that it is not possible to broadcast these ANSI
symbols.
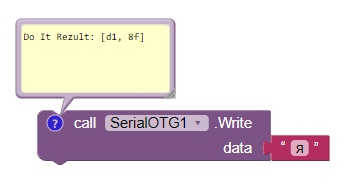
For example, when I, from a mobile application, transmit the character "я",
The receiving side receives , some two values "d18f".
And there's no way I can change it
2023599

SerialOtg has a WriteBytes block? Then convert the text to bytes and send the bytes.

WriteBytes? In this extension from the blocks that suits me,
I only see the WriteSerial block.
But it doesn't pass ANSI characters

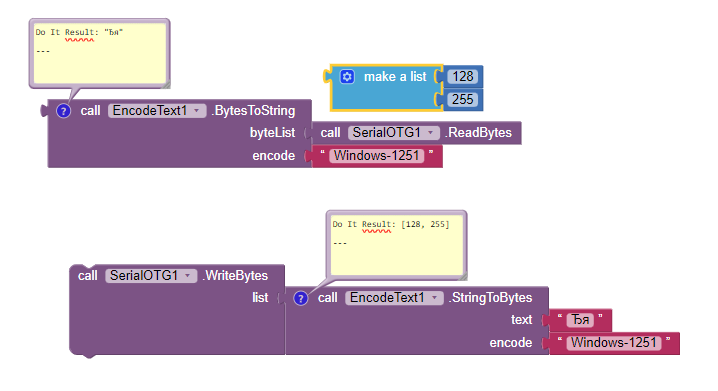
First, use an extension to convert your text or character to ansi byte as shown above with my extension. And then send the obtained byte as a block WriteSerialByte or WriteSerialHexList. Don't send text over otgserial, only created bytes.

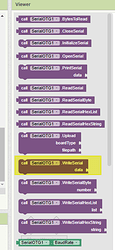
This is an old version of SerialOTG with suffix serial in the method names.

From the documentation:
Using single byte
ReadByte()
Read a byte as a number 0..255 from serial line, if empty return -1
WriteByte(num)
Write a number 0..255 as a byte to serial line
Using multiple bytes in lists
ReadBytes()
Read unsigned bytes 0..255 from serial line to a list.
WriteBytes(List)
Write unsigned bytes 0..255 in a list, to serial line.

see: GitHub - rkl099/Appinventor-SerialOTG: Appinventor extension SerialOTG with BT/WIFI client/server support, examples of apps and Arduino code, ver 1.5

1 Like

Thank you, I need a little more time to figure it out.
From Monday I will continue to understand.

Exactly, you are using an old version of the extension. Download new. Then it might look like this:

1 Like

In the process of learning how the extension works,
there is something I don't understand
Single symbol "Ё" is not sent (blocks as in the picture)
20235902
Only the next time a character is sent (double-clicking on the button),
photo_2024321
two characters "ЁЁ" are sent at once.
Maybe I don't understand How should I use the block set?

We do not know how you send and how you receive data. Show the blocks with which you have a problem and show the arduino code with which you receive data.

Now I use the program SerialOTG.aia
I downloaded it on the page GitHub - rkl099/Appinventor-SerialOTG: Appinventor extension SerialOTG with BT/WIFI client/server support, examples of apps and Arduino code, ver 1.5

If in this program we write a symbol,
as i showed in this picture
photo_2024321
The symbol will not be sent with one click of the button.
If there are two clicks on the button,
the character will be sent to the terminal,
but only in the amount of 2 pieces.

I can't see any problem with the program. Tested with loop-back connection on the USB-Serial adapter and Byte, Hex sting and Byte List protocol. What I send will come back each time I press the Send button. Maybe it's on the receiving end?

1 Like

"SerialOTG.aia" is a good tutorial for me,
With the transmission of a single character, I did not experiment anymore.
Because, I began to use the WriteBytes block for this purpose. WriteBytes transmits the data I need, all at once in a packet.
Using the "SerialOTG.aix" extension,I am using an OTG cable.
now I can change JDY-41 settings, everything is working.
Many thanks to everyone for the tips, everything worked out.
Good luck everyone! :))

I have used this extension together with an esp32 for a long time, now I intend to replace it with an Arduino Giga but I am unable to send/receive data.
Is there a solution to be able to use my new Arduino? ?

Please check the VID PID for the Giga. Also check the driver needed. You will probably have to force the driver to CdcAcm. Use USBDriver(1) to force CdcAcm (see the documentation)