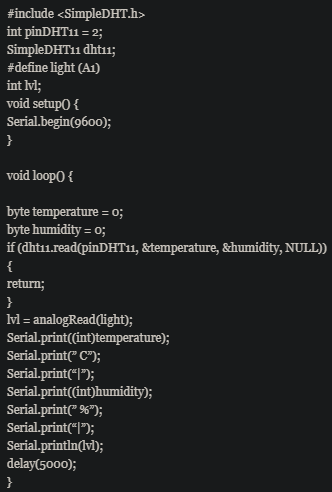
Hi! I'm new at App building. I found an interesting experiment to read via Bluetooth device some data. The sensor I'm reading the data from is a DHT11 (humidity and temperature sensor) and a light dependent resistor. I have the Arduino code and I also have the "final" App. The app itself doesn't work, so I've decided to do it myself. The "blocks" part and the Arduino code are attached.
Can someone explain me how to recreate the "design" part of the app just by reading the app code in order to create the app?
1 Like
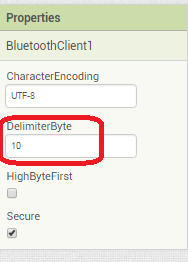
Please see the Delimiter article in FAQ
Be sure to use println() at the end of each message to send from the sending device, to signal end of message. Do not rely on timing for this, which is unreliable.
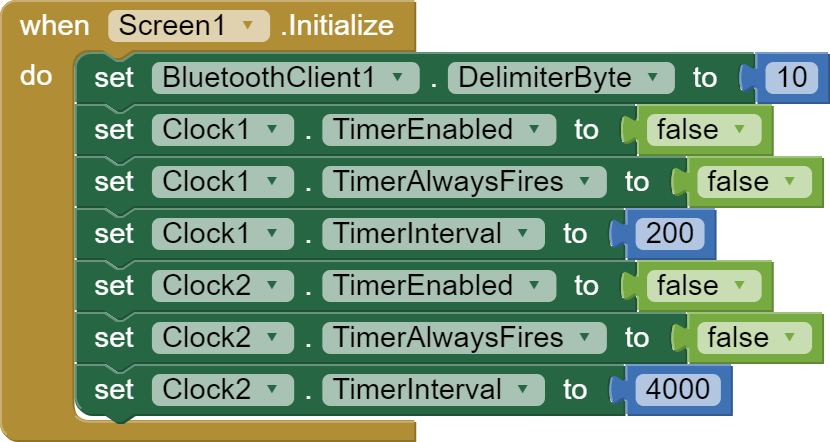
In the AI2 Designer, set the Delimiter attribute of the BlueTooth Client component to 10 to recognize the End of Line character.
Also, return data is not immediately available after sending a request,
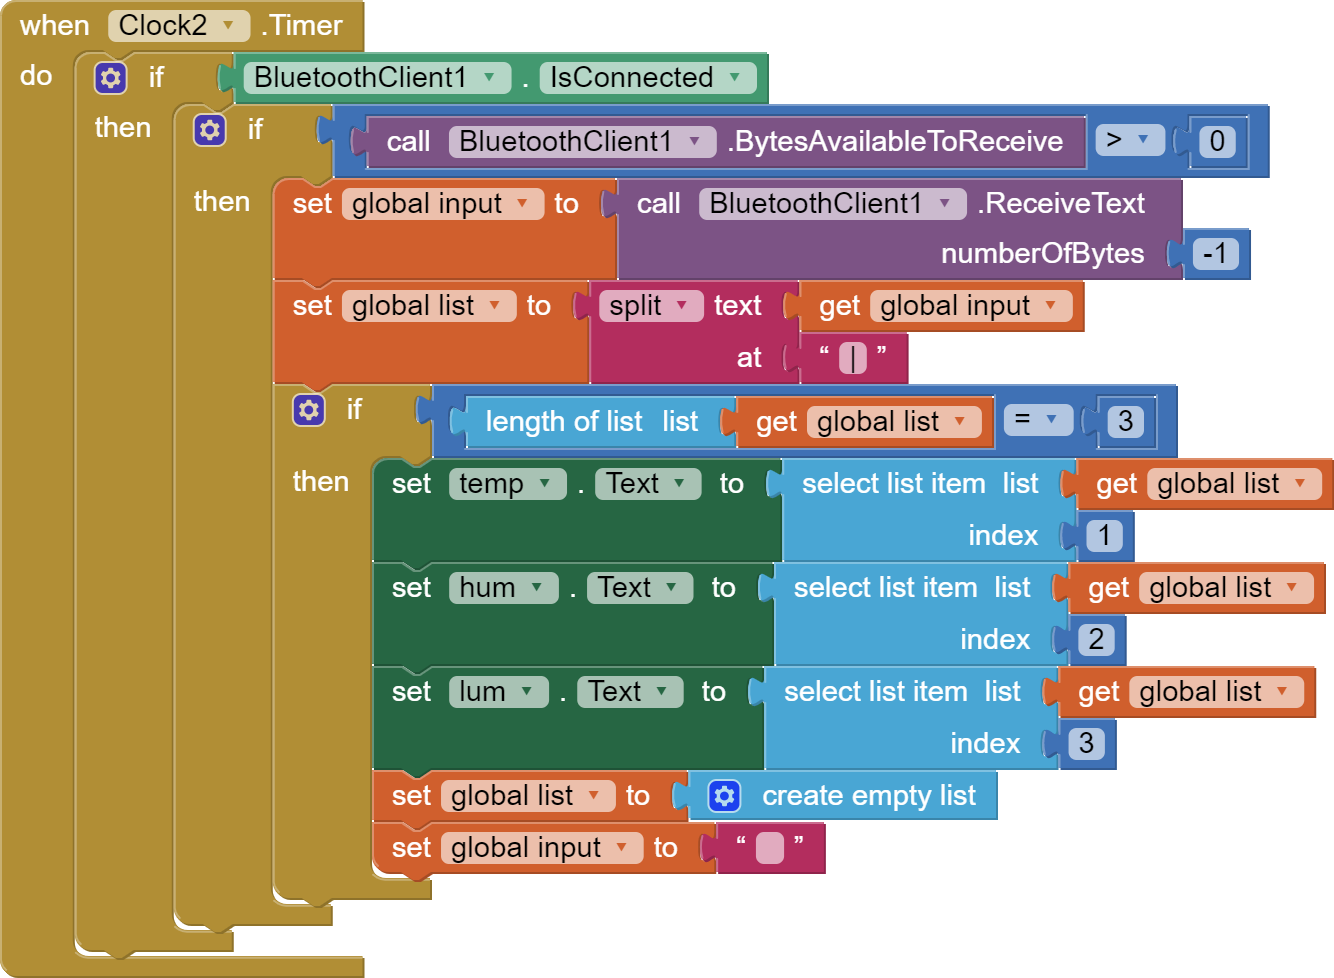
you have to start a Clock Timer repeating and watch for its arrival in the Clock Timer event. The repeat rate of the Clock Timer should be faster than the transmission rate in the sending device, to not flood the AI2 buffers.
In your Clock Timer, you should check
  Is the BlueTooth Client still Connected?
  Is Bytes Available > 0?
     IF Bytes Available > 0 THEN
       set message var  to BT.ReceiveText(-1)
This takes advantage of a special case in the ReceiveText block:
ReceiveText(numberOfBytes)
Receive text from the connected Bluetooth device. If numberOfBytes is less than 0, read until a delimiter byte value is received.
If you are sending multiple data values per message separated by | or comma, have your message split into a local or global variable for inspection before trying to select list items from it. Test if (length of list(split list result) >= expected list length) before doing any select list item operations, to avoid taking a long walk on a short pier. This bulletproofing is necessary in case your sending device sneaks in some commentary messages with the data values.
Hi! Thanks for replying. I'm not sure about what you wrote. This is my first time using this App Inventor and I'm not sure about the last message you wrote.
This:
If you are sending multiple data values per message separated by | or comma, have your message split into a local or global variable for inspection before trying to select list items from it. Test if (length of list(split list result) >= expected list length) before doing any select list item operations, to avoid taking a long walk on a short pier. This bulletproofing is necessary in case your sending device sneaks in some commentary messages with the data values.
What should I actually do? This blocks are hard to understand 
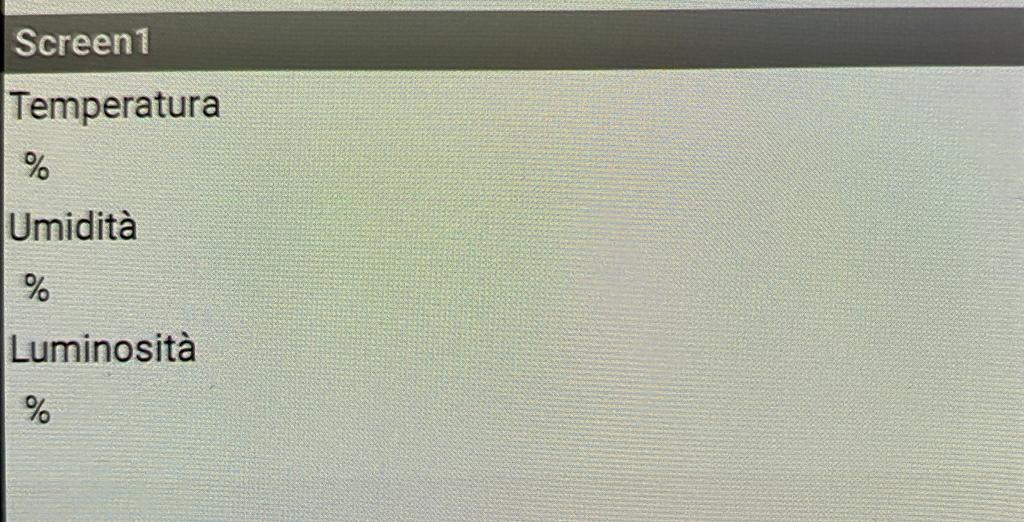
But, I'm now able to "see" my app without error messages, but it shows just the "%" symbol and nothing more, like C for Centigrade or numbers.
Last thing, I tried to split the Arduino code using println, but the code won't work at all
I'll attach the AI2 code i rewrote and the app itself. Any suggestion? Thanks a lot!!
Hello Noobie
Your code is nearly correct, but it has to sing the same song as the Arduino.
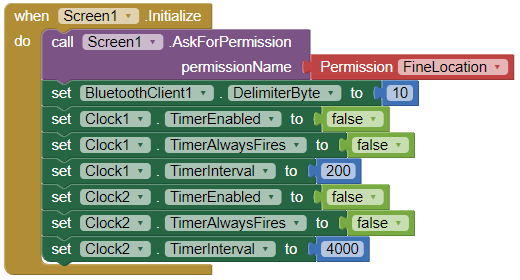
- Initialise Clock Timers in the Screen Initialize Block. Also initialise the Bluetooth delimiter byte. It's a good idea to also use a Timer for device connection to ensure the List of available devices is complete (and therefore includes your Arduino). Finally, this is the time to check that the Smartphone Bluetooth is switched on and the App User gives permission to use it via Location (A Google Android security requirement).
-
The App needs to process data received before the next packet of data arrives. That is why the Clock Timer is used - so it must have a time interval about 20% shorter than the Arduino.
-
the 'Bytes available to receive' Block should be regarded as a flag that simply reports availability. To receive all the data bytes, set 'number of bytes' to -1 (maths block) which ensures that all bytes sent are received.
-
'Timer Always Fires' is intended for a different type of App (such as a game) - it should not be true in a data collection App.
-
Do not hide GUI components! Imagine if your car dashboard suddenly revealed new instruments - that would be confusing huh?
-
When data is received, your App needs to check that, having split the data into a List, the List length is correct, and only attempt to fill the Labels if it is correct.
- The Ardunio Sketch loop should be controlled with a time elapsed method, not a delay, as that can have a negative effect on the sensors. I see you are sending every five seconds. Best practice is to set the time interval to the longest practical - As values are displayed in your App GUI, this is important because our eyes cannot tolerate fast changing displays.
//ArduinoToApp.ino  Chris Ward 15/10/2021 10:23:03

//Fake data stream to test App. Classic Bluetooth
//Modified from 1 to 2 vars

//vars
unsigned long lgUpdateTime;
int iVal = 50;
float fVal = 3.14159265358979

void setup()
{
       Serial.begin(9600);
       lgUpdateTime = millis();
}

void loop()
{
	  if(millis() - lgUpdateTime > 6000) //Loop approx every 6 seconds
      {
           lgUpdateTime = millis();

           if (Serial.connected())
           {
                     //To App via Bluetooth
                                  iVal = iVal + 2;
                     Serial.print(iVal);
                     Serial.print('|');               //Value Separator
                                  fVal = fVal + 0.2;
                     Serial.print(fVal,4);
                     Serial.println();                //This tells App "End of Data"
                                                      //= Ascii LineFeed Char Num 10
           }
      }
}
- Bluetooth Data packets are small (approx 28 bytes) so you should not send any decoration like value titles, just the values themselves. If the values are floats, set the decimal places as per the example above (fVal,4) - set to four decimal places.
Example Project (which you may copy from via the Backpack or modify to suit your requirements):
BT_Basic_Setup_Receive_two_vals.aia (7.7 KB)
4 Likes
Hi! Thank for replying to my message. I'm still not able to display my data on the app properly.
Here is my problems:
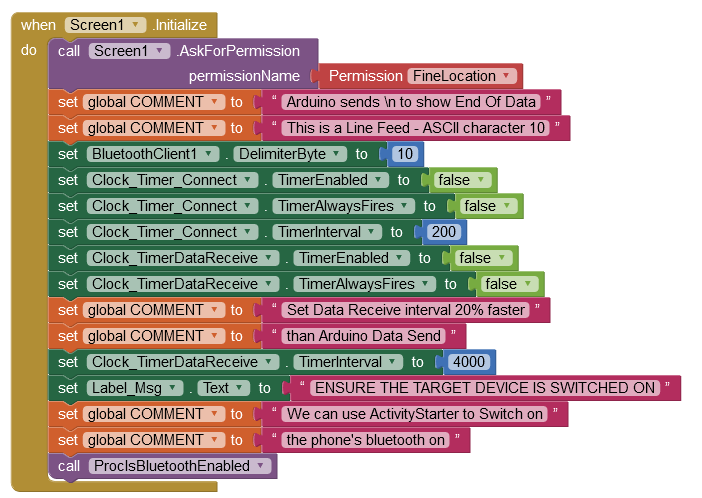
Your 1 point: When I initialize my Screen1 for FineLocation permission an error on the app accours and I can't give any fine location permission in phone settings. (I deleted some comments blocks because I don't think I need them now) I think I need 2 clocks instead of 1? Your example says "Clock_Timer_Connect" and "clock_TimerDataReceive" so 2 different clocks.
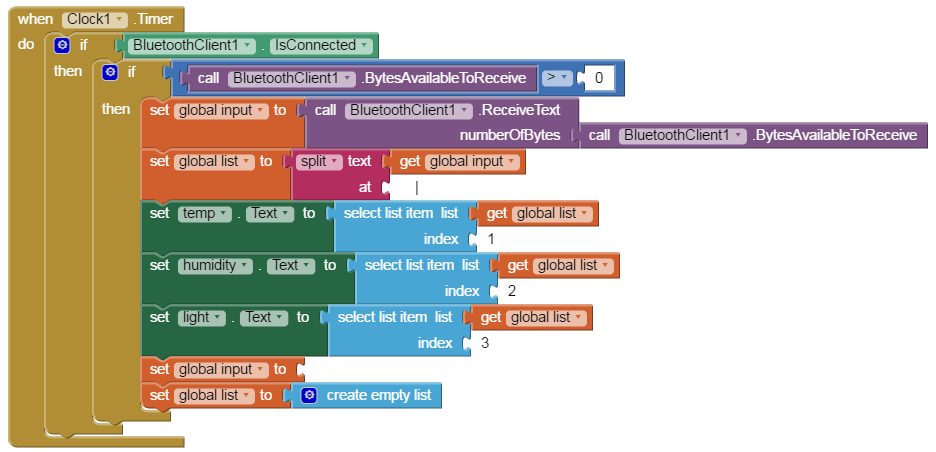
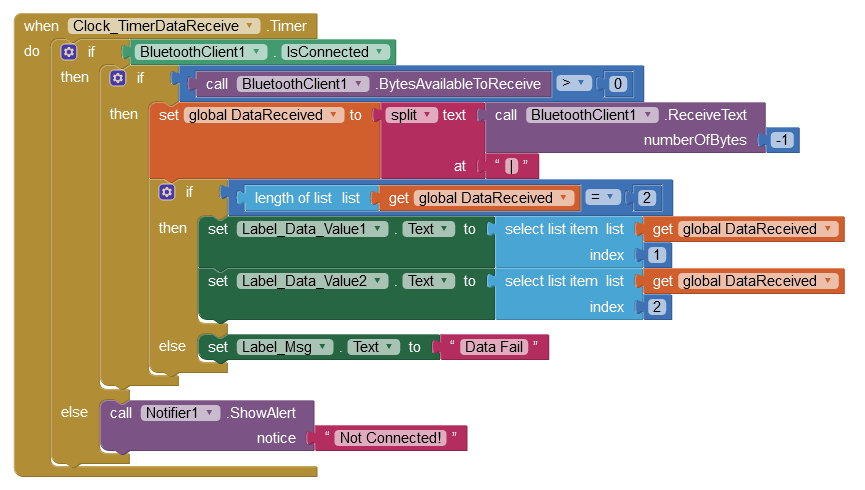
Your 6 point: my list length should be 3 because I have 3 different data readings to display, so I set 3 instead of 2 in your example. Then I should take the 1, 2 or 3 index in my new list and put them in the label I have created before in the Design menu for the actual data reading coming from the sensors. I've created also the "Error" label just to see if the list is being created or else and get an actual message that says "fail".
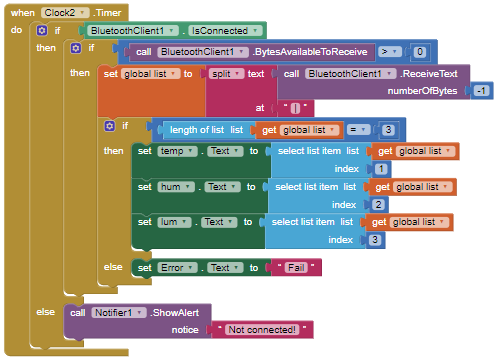
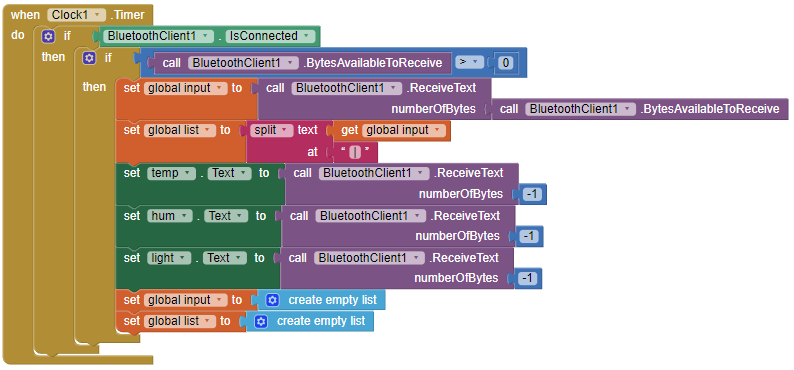
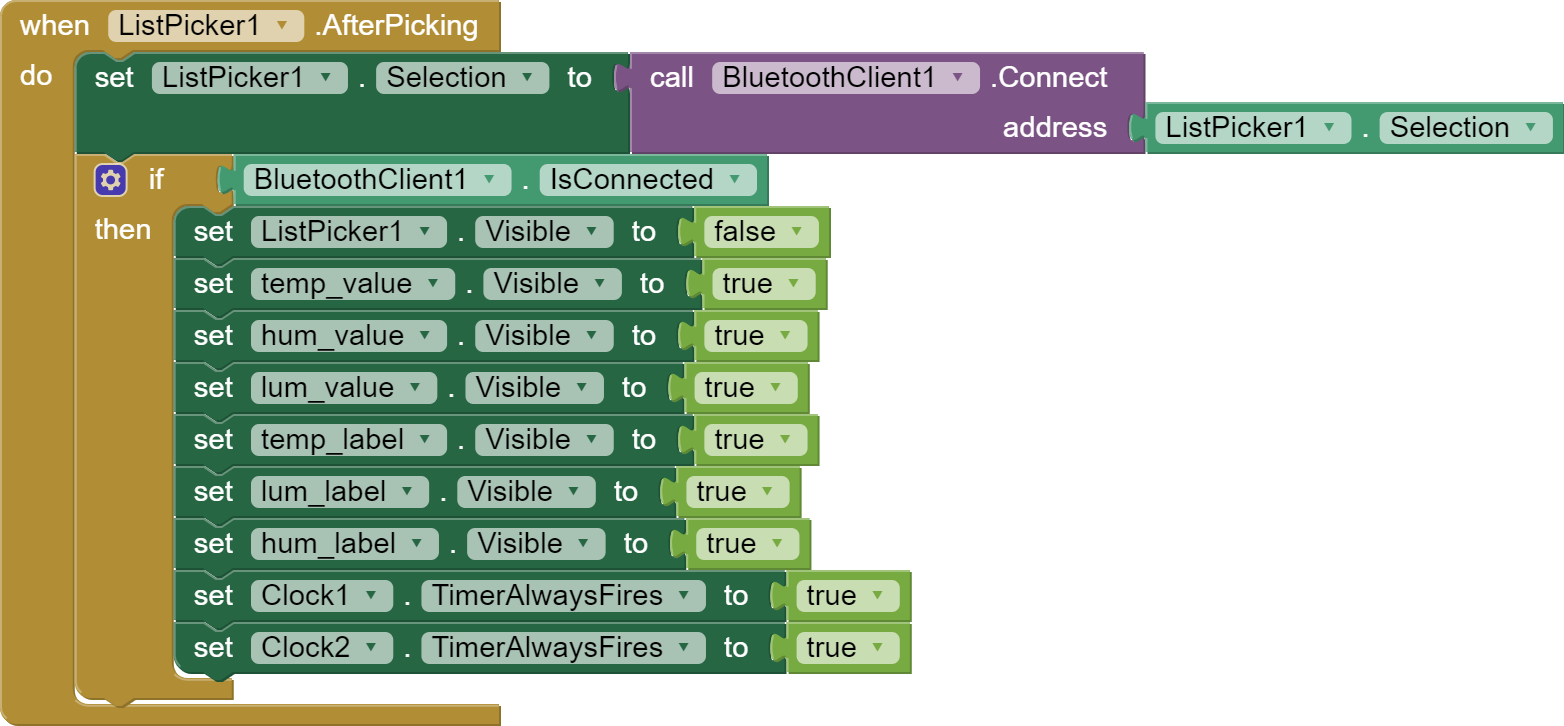
Your 7 point: I tried to write the code like the image down below, but I'm not sure what I did.
If the mills is > 6000 than it should go on with the reading right? (but I guess I'm very wrong here)
Your 8 point: I kept just the data and the "|" to split the data in the app and removed everything like I did in the image above...
It doesn't work... Am I dumb like a rock? Am I not seeing the solution to this basic problem? These are my first attempts to write an app but I'm considering to change project just not to use this AI2....
Thanks a lot for taking time reading this ChrisWard. I really appreciate it
OK - try 'Coarse Location'
1 Like
Yes, in fact it sometimes takes a little while for all available devices to be found, so a Clock Timer for that (a 3rd timer) can sometimes be necessary too. It all depends on your environment, the strength of the Bluetooth signal and how faraway the device you want to connect to is. So to recap, a Timer for Listing available devices if that proves to be an issue, a timer for connection if that proves to be an issue and with 'Classic' Bluetooth (which your App is using), always a timer for data received.
1 Like
That's exactly right ![]()
1 Like
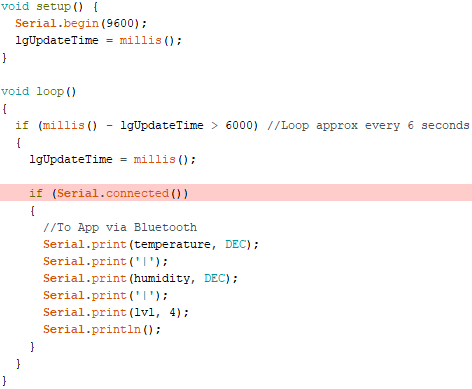
Copy my example Sketch for the time elapsed method. Do not assign value types in the loop, define them as global variables at the top of the Sketch, like my example. What is the type used for the light reading?
1 Like
That's exactly right too ![]()
However, if you want to cast a value to an integer via the Serial function, it works like this:
Serial.print(temperature, DEC);
Serial.print("|");
Serial.print(humidity, DEC);
Serial.print("|");
Serial.print(lvl, 4); //4 decimal places
Serial.println();
Also, if you are using a DHT11 sensor, you need to include the DHT library and define the Sensor Pin too.
1 Like
I see Clocks being disabled in Screen1.Initialize, but I don't see them being enabled.
Where does that happen?
1 Like
Same error as Fine Location, tried Mock Location too but the same error keep showing up
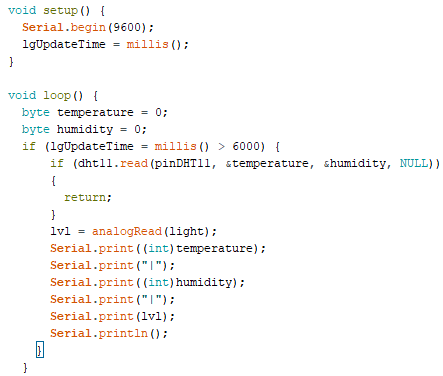
The sketch looks like this, but once again I am not sure about what I did. The "Serial.connected()" doesn't work, it says "class HardwareSerial has no member named connected". I tried Serial.available() but it does absolutely nothing. I defined temperature and humidity at the top as "byte temperature" and "byte humidity" is that correct? I've incluede the DHT library in the first place, that was not the problem ![]() . I've noticed that in the "Serial.print(lvl, 4)" line, the 4 is not "blue" like DEC or other stuff...
. I've noticed that in the "Serial.print(lvl, 4)" line, the 4 is not "blue" like DEC or other stuff...
Last thing. In my other sketch I was able to see the results in the serial monitor of arduino IDE, now I don't see anything.
it should happen here, so after I pick a Bluetooth device to connect to but I am not sure how these clocks actually work
From the documentation of clock:
Properties
TimerAlwaysFires
Will fire even when application is not showing on the screen if true
TimerEnabled
Specifies whether the Timer event should run.
TimerInterval
Specifies the interval between subsequent Timer events.
Note: Drift may occur over time and that the system may not honor the timing specified here if the app or another process on the phone is busy.
I think you also must enable the timer.
1 Like
Hi! Thanks for joining the conversation. I enabled the timer like the image below. Is it right?
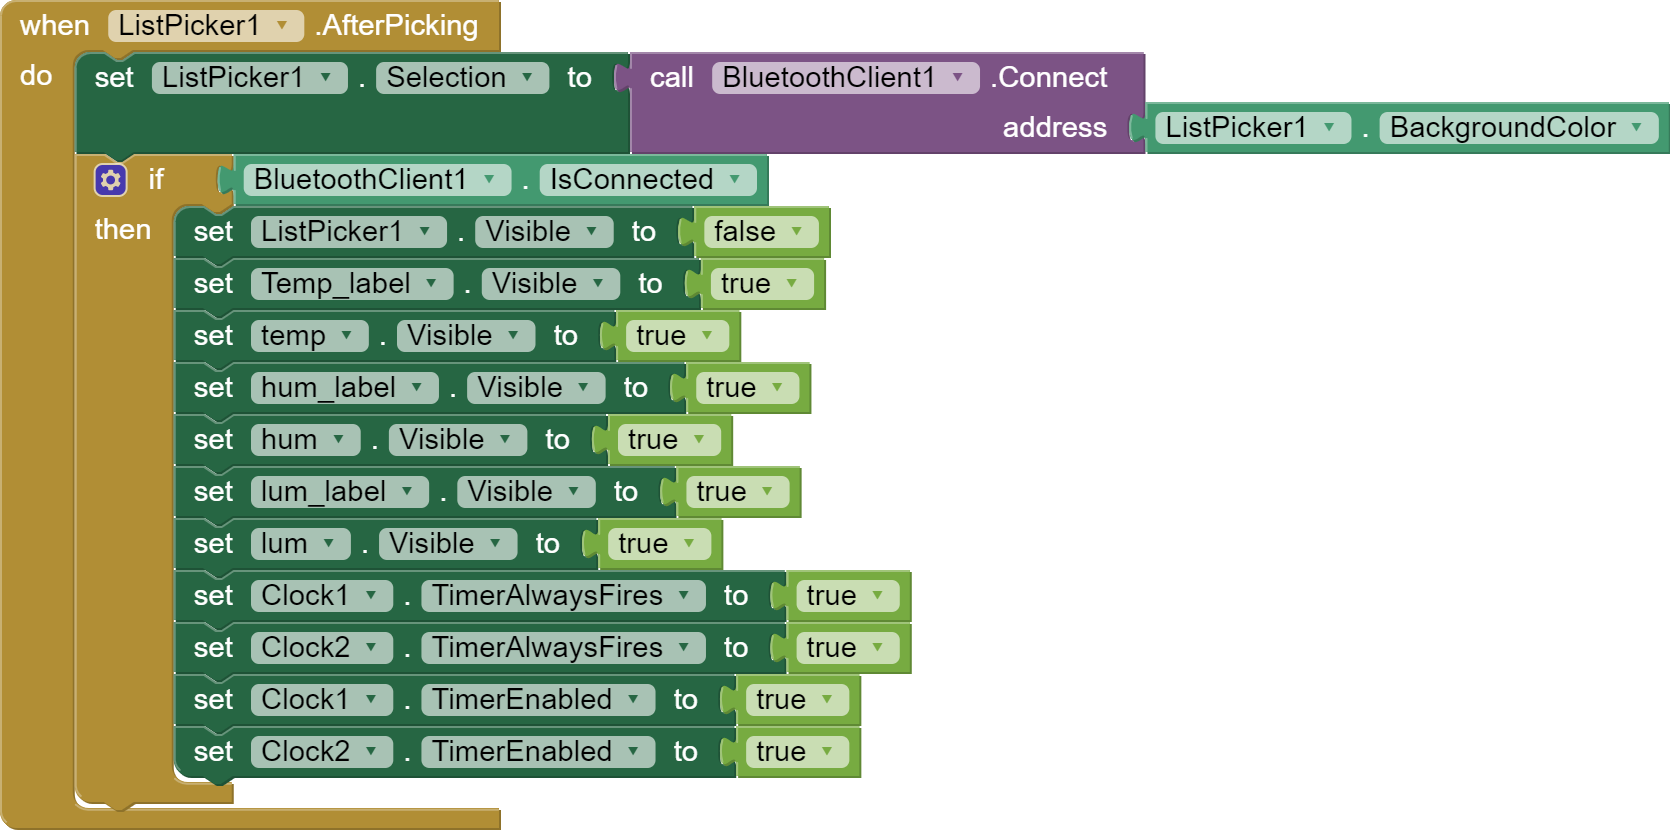
Absolutely nothing happen. No errors, no crashes, nothing. My HC-05 (the Bluetooth module on the breadboard) keeps flashing like it is sending info correctly but the app doesn't show the results.
The complete code is down here, am I not seeing the error?


Here is the arduino sketch too...
#include <SimpleDHT.h>
int pinDHT11 = 2;
SimpleDHT11 dht11;
#define light (A1)
int lvl;
unsigned long lgUpdateTime;
byte temperature;
byte humidity;
void setup() {
Serial.begin(9600);
lgUpdateTime = millis();
}
void loop()
{
if (millis() - lgUpdateTime > 6000) //Loop approx every 6 seconds
{
lgUpdateTime = millis();
if (Serial.connected())
{
  //To App via Bluetooth
  Serial.print(temperature, DEC);
  Serial.print('|');
  Serial.print(humidity, DEC);
  Serial.print('|');
  Serial.print(lvl, 4);
  Serial.println();
}
}
}
Sorry Noobie, I have been away, enjoying the delights a bug that's going around here. What Android device are you using, Make/Model?
They are enabled when required - there is an Example Project here (somewhere) ![]()
Noobie, post #4, what did I say about 'TimerAlwaysFires? It should not be enabled (true) in your App 
You are initialising two Clock Timers but only using one - it would help you to give them meaningful names as per my Example Project.
Why are your Labels hidden and why hide your ListPicker? If the App is just for your use and you want to do that, OK, but a GUI that changes mid-use is not really a good idea. Imagine that happening on a car dashboard...........
Concerning the 'other Timer' -that is to allow time for a connection to be made. It has solved the issue of not connecting for many people so I suggest you copy my example and use a Timer for connection.

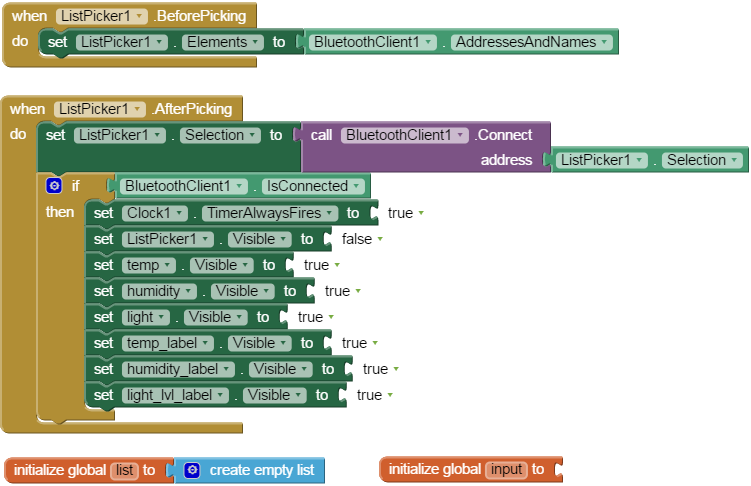
In my example you will see how to assign the List Picker Selection to the Bluetooth Connection Address - what you have in the image above is, sorry to say, completely wrong.
More haste, less speed!
2 Likes
Thanks for the advice, I really appreciate it. I'll try to follow the path you gave me even if I'm walking in the dark. I really don't know how these blocks should be easy to merge in order to create a single app