What do you get on the Android Serial Monitor? Everything expected?
Slight tweaks, including fake data:
Nano33VehicleData2.txt (5.4 KB)
Also important, make sure your Smartphone has Location switched on before running the App.
Yes. That is how I determined the last value is what is being reported to LightBlue.
That version doesn't Identify itself because the "Testing 123" title is removed. However I can guess at the pick list and then the correct one will load up. But it has the same runtime error and no data shows up.
When using LightBlue with that one it does not show up at all on the pick list.
BTW can you tell me what the thing in the top right corner is. Doesn't seem to do anything. Looks like an iron?
![]() That's the 'BackPack' an App Inventor internal copy-paste system for Blocks.
That's the 'BackPack' an App Inventor internal copy-paste system for Blocks.
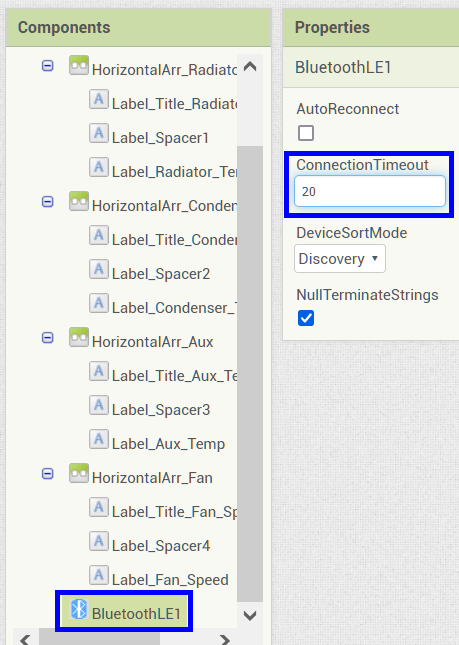
You mean 'set local name'? It's there as "VEH_TEMP", and device name was added too.
The main changes were to include the BLE header file earlier in the code, initialise the first value and use fake values to eliminate any sensor issues.
We could, given the application, use Classic Bluetooth code, which removes the need for UUIDs.
We have something in common - retired aerospace engineers who drive Mercedes.
Actually, we can't go for Classic Serial over BT because there is no way to 'tell' the Software Serial where the Bluetooth module is on the board (because it is integral).
Here is something that could make a difference, based on another User's experience with the same Nano. Set the App to receive the integers as Bytes:
Load this Project, open the Blocks work area, right-mouse menu copy all blocks to Backpack.
Then open your Project, delete the Register for Integer and Integers Received Blocks and replace them by dragging the Blocks from the Backpack.
BLE_RegisterForBytes.aia (189.7 KB)

Thanks, I will have to get back to this next week as I am back on the road first thing in the morning.
Meanwhile, if you interested in this project, here is the story on it.
Latest developments are in this thread including this fan.
Well, took a while to read! Glued to my screen, what a journey. I can safely say I would not have the time (or the wherewithal) for such an ambitious project.
Highlights re Samson (that can be mentioned on this forum)
-
Lebanon Valley Dragway June 4th 2011, video P6040053 from inside Samson's cockpit.
-
Four major reworkings of the rear sub-frame on top of all the engineering required to fit the V12. Mind blowing. My son actually does this kind of stuff on Ford saloons, not to anywhere near your level but still featured in a car magazine.
-
The dishwasher.
-
The visor sticker.
What CAD system are you using for your 3D modelling?
@ewpatton, many Users have had issues trying to work with a Nano 33 BLE. John is using the latest BLE Extension version. The following error is reported:

Can you see an error in the Sketch that results in the UUIDs not being published?
Sketch: Nano33VehicleData2.txt (5.3 KB)
//10/06/2022 12:04:42
//Arduino Nano 33 BLE vehicle data to Android App

#include <ArduinoBLE.h>

const int RadPin = A0;      // Radiator Input Thermister
const int CndPin = A1;      // Condenser Input Thermister
const int AuxPin = A2;      // Auxilary Input Not used at this time
const int FanPin = 9;       // Set Fan pin
const long Period = 10000;  // Recheck period

long previousMillis = 0;    // last time the temperature levels were checked, in ms

#define BLE_SERVICE "0000ffa0-0000-1000-8000-00805f9b34fb"
#define BLE_CHARACTERISTIC "0000ffe0-0000-1000-8000-00805f9b34fb"

                    /*
                      Temperatur Monitor

                      This example creates a BLE peripheral with the standard Temperature service and
                      level characteristic. Pins A0, A1 and A2 are used to calculate the temperatures of 3 sensors.
                      The data is calculated by the time set in the constant Period.

                      The circuit:
                      - Arduino MKR WiFi 1010, Arduino Uno WiFi Rev2 board, Arduino Nano 33 IoT,
                        Arduino Nano 33 BLE, or Arduino Nano 33 BLE Sense board.

                      You can use a generic BLE central app, like LightBlue (iOS and Android) or
                      nRF Connect (Android), to interact with the services and characteristics
                      created in this sketch.

                      This example code is in the public domain.
                    */

// Define the Temperature Service
BLEService TempService(BLE_SERVICE);  // BLE Temperature Service

// Define Characteristics
BLEUnsignedIntCharacteristic TempCharacteristic(BLE_CHARACTERISTIC, BLEWrite | BLENotify);

void setup()
{
               Serial.begin(9600);    // initialize serial communication with PC Arduino Serial Monitor


               pinMode(LED_BUILTIN, OUTPUT); // initialize the built-in LED pin to indicate when a central is connected

               // set advertised local name and service UUID:
               BLE.setDeviceName("VEH_TEMP");
               BLE.setLocalName("VEH_TEMP");
               BLE.setAdvertisedService(TempService);

               // add service
               BLE.addService(TempService);

               // add the characteristic to the service
               TempService.addCharacteristic(TempCharacteristic);

               // set the initial value for the characteristic
               TempCharacteristic.writeValue(0);

               // start advertising
               BLE.advertise();

               Serial.println("BLE VEH_TEMP Peripheral");
               Serial.println("Bluetooth device active, waiting for connections...");
}

void loop()
{
               // wait for a BLE central
               BLEDevice central = BLE.central();

               // if a central is connected to the peripheral:
               if (central.connected())
               {
                         Serial.print("Connected to central: ");
                         // print the central's BT address:
                         Serial.println(central.address());
                         // turn on the LED to indicate the connection:
                         digitalWrite(LED_BUILTIN, HIGH);

                         // check the temperature levels every Period (ms)
                         // while the central is connected:

                         while (central.connected())
                         {
                                   // if Period ms have passed, check the temperature levels:
                                   if ((millis() - previousMillis) > Period)
                                   {
                                     previousMillis = millis();

                                     updateTemperatures();
                                   }
                         }

                         if (!central.connected())
                         {
                                   // when the central disconnects, turn off the LED:
                                   digitalWrite(LED_BUILTIN, LOW);
                                   Serial.print("Disconnected from central: ");
                                   Serial.println(central.address());
                         }
               }
}

void updateTemperatures()
{
// Read the current voltage level on each analog input pin.
// This is used here to simulate the charge level of temperatures.

int Rad = analogRead(RadPin);
int Cnd = analogRead(CndPin);
int Aux = analogRead(AuxPin);
/*
int RadLevel = map(Rad, 0, 1023, 0, 100);
int CndLevel = map(Cnd, 0, 1023, 0, 100);
int AuxLevel = map(Aux, 0, 1023, 0, 100);
*/

int RadLevel = 10;
int CndLevel = 11;
int AuxLevel = 12;

               Serial.print("Rad Level % is now: "); Serial.println(RadLevel);
               Serial.print("Cnd Level % is now: "); Serial.println(CndLevel);
               Serial.print("Aux Level % is now: "); Serial.println(AuxLevel);

               TempCharacteristic.writeValue(RadLevel);   // update the Radiator level characteristics
               TempCharacteristic.writeValue(CndLevel);   // update the Condenser level characteristics
               TempCharacteristic.writeValue(AuxLevel);   // update the Aux level characteristics
}
I think the error here is in the UUIDs:
Sketch BLE_SERVICE = 0000ffa0-0000-1000-8000-00805f9b34fb
Error service uuid = 0000ffe0-0000-1000-8000-00805f9b34fb
Note that the last byte in the first chunk is a0 in the sketch but e0 in the error message. My guess is the wrong UUID is being used for the service which is why you're getting the error.
There could be a typo there, but that is the second set of UUIDs tried after the first set failed with the same error message. This set was used because it worked in a different Project (in fact they are in various examples on the net).

Back from Florida
I tried the code above and got the same results. I'm a bit strapped for time right now as I am packing up for moving. Hope to get back to this soon.
1 Like
I was using Catia V5 when I was working. Now on Solidworks Student Version
1 Like
...you could take a look at ZW3D. More similar to Catia, integrated CAM should you need it.
If you post your App Inventor Project and the Arduino Sketch (rename extension from .ino to .txt) I can take a good look at it.
Sorry for the delay. Just got back from CT and closed on my house.
I appreciate your offer to take a look. See attached.
Fan_Control.aia (192.7 KB)
BLE_Temp_Measurement.ino.txt (6.1 KB)
Looks pretty good. I like the fact that I can read and edit both Catia and Solidworks files. Pricing seems to be on par with Solidworks.