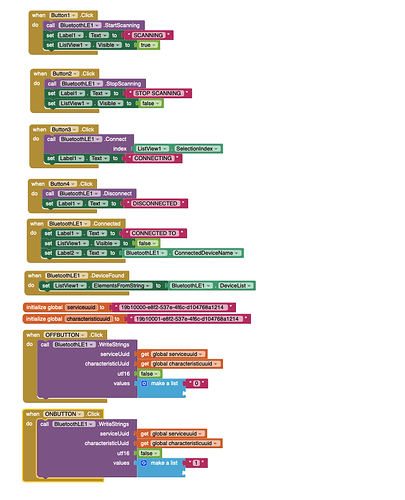
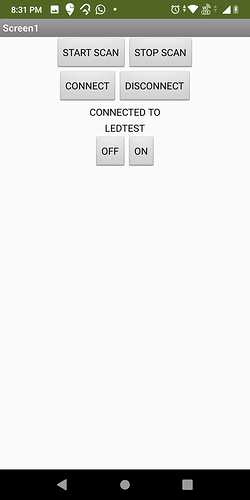
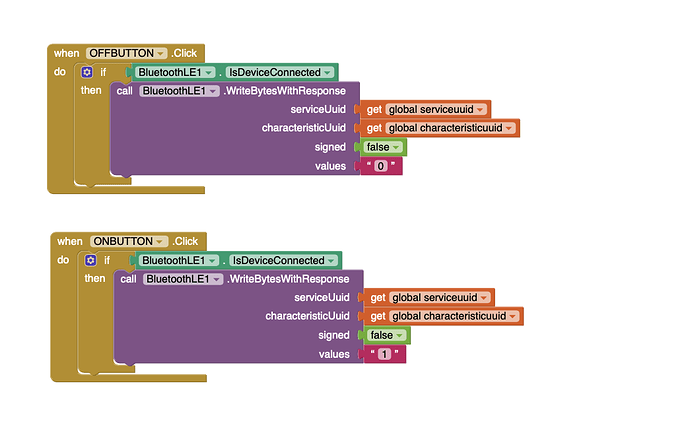
I have connected the BT device (An arduino Nano 33 ) to the App. I found the device when i scanned. I also have a label for the device name once found after scanning. So i presume thr BT device is connected.
Show off your blocks.
The blocks look good. What version of the ble extension are you using?
I am using an extension called BluetoothLE1
Extensions have their versions:
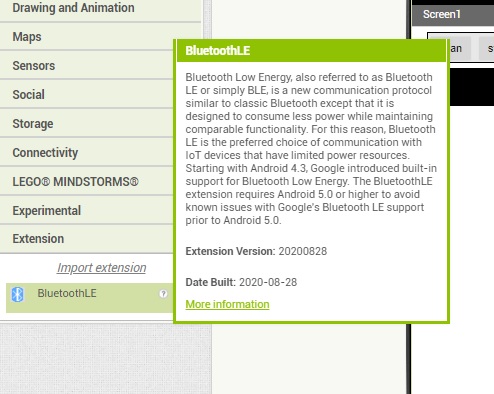
I just downloaded this version of BluetoothLE... It however hasn't made a difference. I still am not able to deliver the value to the BLE device.
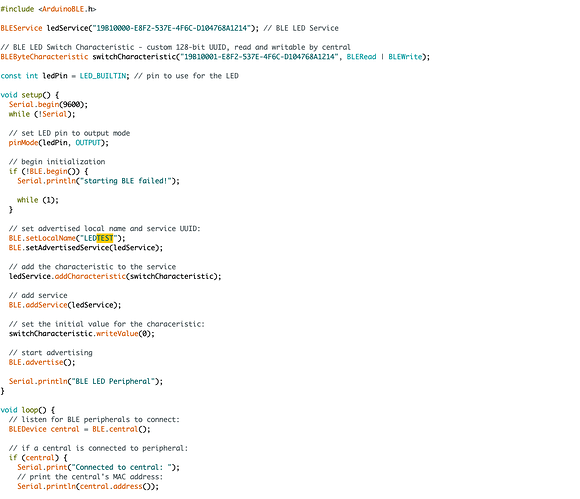
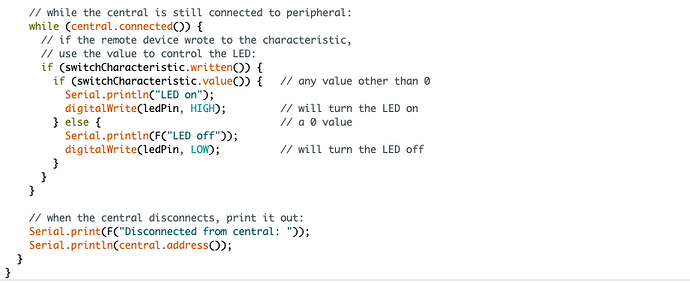
Another thing I think to check is the arduino code. I don't have much experience with arduino with a built-in ble module, mostly I used external modules. Show the code arduino.
It is the standard arduino sketch for BLE peripheral called 'LED'. However i have renamed it as LEDTEST.
Try this solution.
HI Patryk... I was just looking at some other example where they have used "Writebytes"... The have also used an "If Else" in addition to the "write bytes"
I tried it and it worked!!!!
Works like a charm... I can't thank you enough Patryk!!!
But you used with response blocks. I think using response blocks for strings would also work.
I had tried response block previously... with string, with bytes. didn't seem to work. The "if then" block is what i thought made a difference... but again i didnt know about app inventor until yesterday... so i wouldn't know. I can test out response block with string and tell you if it makes a difference.
The if.isDeviceConnected block only checks if the bt device is connected to the app. Prevents an error from popping up when you want to send data with a button when the BT device is not connected. For the sake of sending data, it makes no difference.
Hi all,
[If this ought to be a new thread, please just let me know - but it seemed to follow on logically enough from the topic in hand...]
I'm working on a very similar problem, and having issues with the WriteBytesWithResponse block. It works fine with sending a single byte (with the "values" input set to either a number or a textbox input consisting solely of numbers).
However, it does not appear to work with lists of values as the help text claims it ought to:
- with a list of numbers, only the first byte is sent (and the value received by the Arduino has length:1)
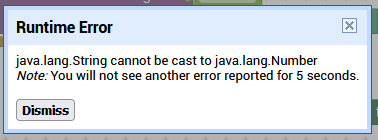
- with a list of textbox entries I get the following error:
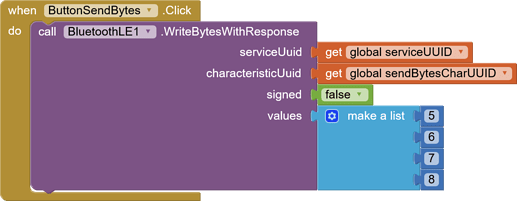
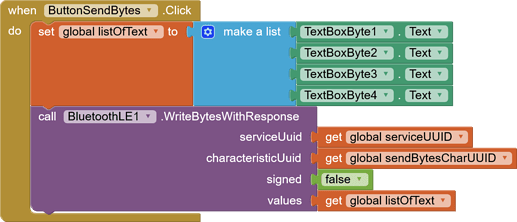
For completeness, here's a set of different tests I've tried, and the results:
Works - one byte sent, one byte received.
Works - one byte sent, one byte received.
Doesn't work - only one byte sent, one byte received - should be four.
Doesn't work - throws error as above.
Any pointers to what I might be doing wrong would be much appreciated.
Cheers,
Jo
Experiment 4 is doomed to fail because the initialization of the list happened before you had a chance to enter numbers into the text boxes.
Experiment 3 might work if you feed the values directly from the make list block, without the global variable. Check the tool tip for the WriteBytesWithResponse block for examples.
Thanks for your pointers, ABG.
Experiment 3b:
Does exactly the same as Experiment 3: the first byte comes through okay, the others don't (i.e. I get 5 0 0 0 instead of 5 6 7 8).
I've also done a bit or experimenting with the .BytesWritten block, which is giving the correct results, which is making me wonder it's more likely that I've done something daft at the Arduino end - the relevant block of code is here, where bytesInBuffer is a 4-element byte array:
//if bytes received, print them out on serial monitor
  if (receiveBytes.written()) {
    Serial.println(receiveBytes.valueLength());
    receiveBytes.readValue(bytesInBuffer, sizeof(bytesInBuffer));
    for (int i = 0; i < sizeof(bytesInBuffer); i++) {
      Serial.print(bytesInBuffer[i]);
      Serial.print(" ");
    }
    Serial.println();
  }
This returns 1 (rather than the expected 4) for the valueLength, and [5 0 0 0] rather than [5 6 7 8] for the contents of bytesInBuffer. Any suggestions here much appreciated.
Experiment 3c:
I also tried repeating 3/3b with the .WriteBytes (without response) block which also, interestingly, returns the correct result to bytesWritten, but I get nothing at all at the Arduino end.
Experiment 4b:
Gives the same error as Experiment 4.
So, a few questions (which I have searched for fairly extensively without much joy so far - please point me towards other answers/reading if these are answered elsewhere):
- What is the difference between the WriteBytes and WriteBytesWithResponse blocks? Both seem to return a response to bytesWritten, even though this is only detailed for the latter block in the documentation. However, these blocks give different results at the Arduino end.
- Is WriteBytesWithResponse instead expecting an external response? If so, what?
- Is there a way to cast a number stored as text to a byte? (My (possibly faulty) understanding was that AI2 is supposed to handle casts like that by itself...?) Or do I need to find a way of sending it in another form and translate it at the receiving end?
Again, any pointers gratefully received.
Experiment 4b will also fail because the write bytes block expects an integer, not a string. The extension does not convert string to integer, you got this information in error. To convert a string to an integer, use the math block multiplication and multiply each text box by 1. This will convert a string to an integer.
@ewpatton Could you do that if we set the textbox to NumbersOnly, then the textbox would return numeric values instead of a string?
Thank you @Patryk_F, that's helpful.
In case it is helpful to anyone else, another issue I discovered on the Arduino side, is that I had it set to initialise a BLEByteCharacteristic (which is only good for sending a single byte at a time) instead of a BLECharacteristic. To send 4 bytes, I had to set it up like this:
BLECharacteristic receiveBytes("(UUID)", BLERead | BLEWrite, 4);
I now have a series of 4 bytes transmitting correctly using the setup from Experiment 3/3b above.
This topic was automatically closed 7 days after the last reply. New replies are no longer allowed.
