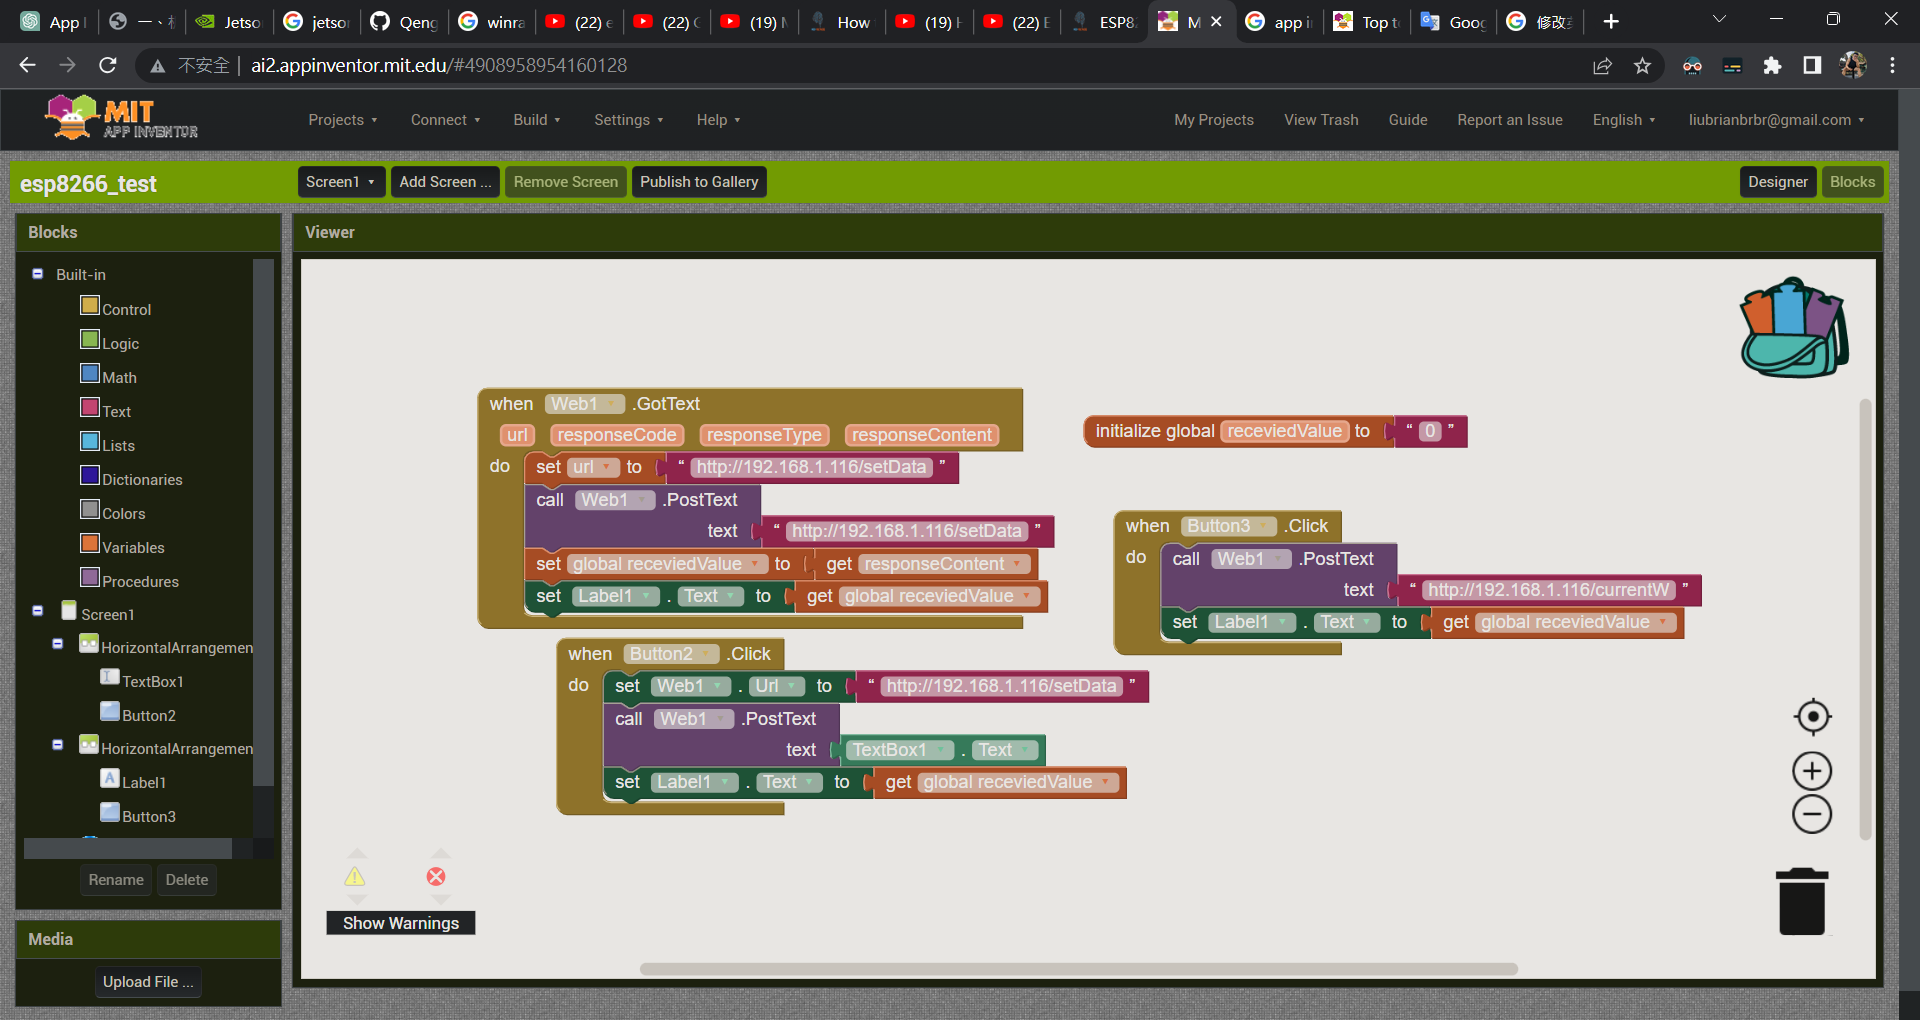
Now my esp8266 keeps sending recevied value in serial(every second),when it get the sensor value, which is not what I want! Because I didn't press the send button
I want my app inventor's app to detect the value of hx711 changing at any time in the label.
I can press the button to send the value in the text box to esp8266 and print it out in the serial
I don't know how correct my code and blocks
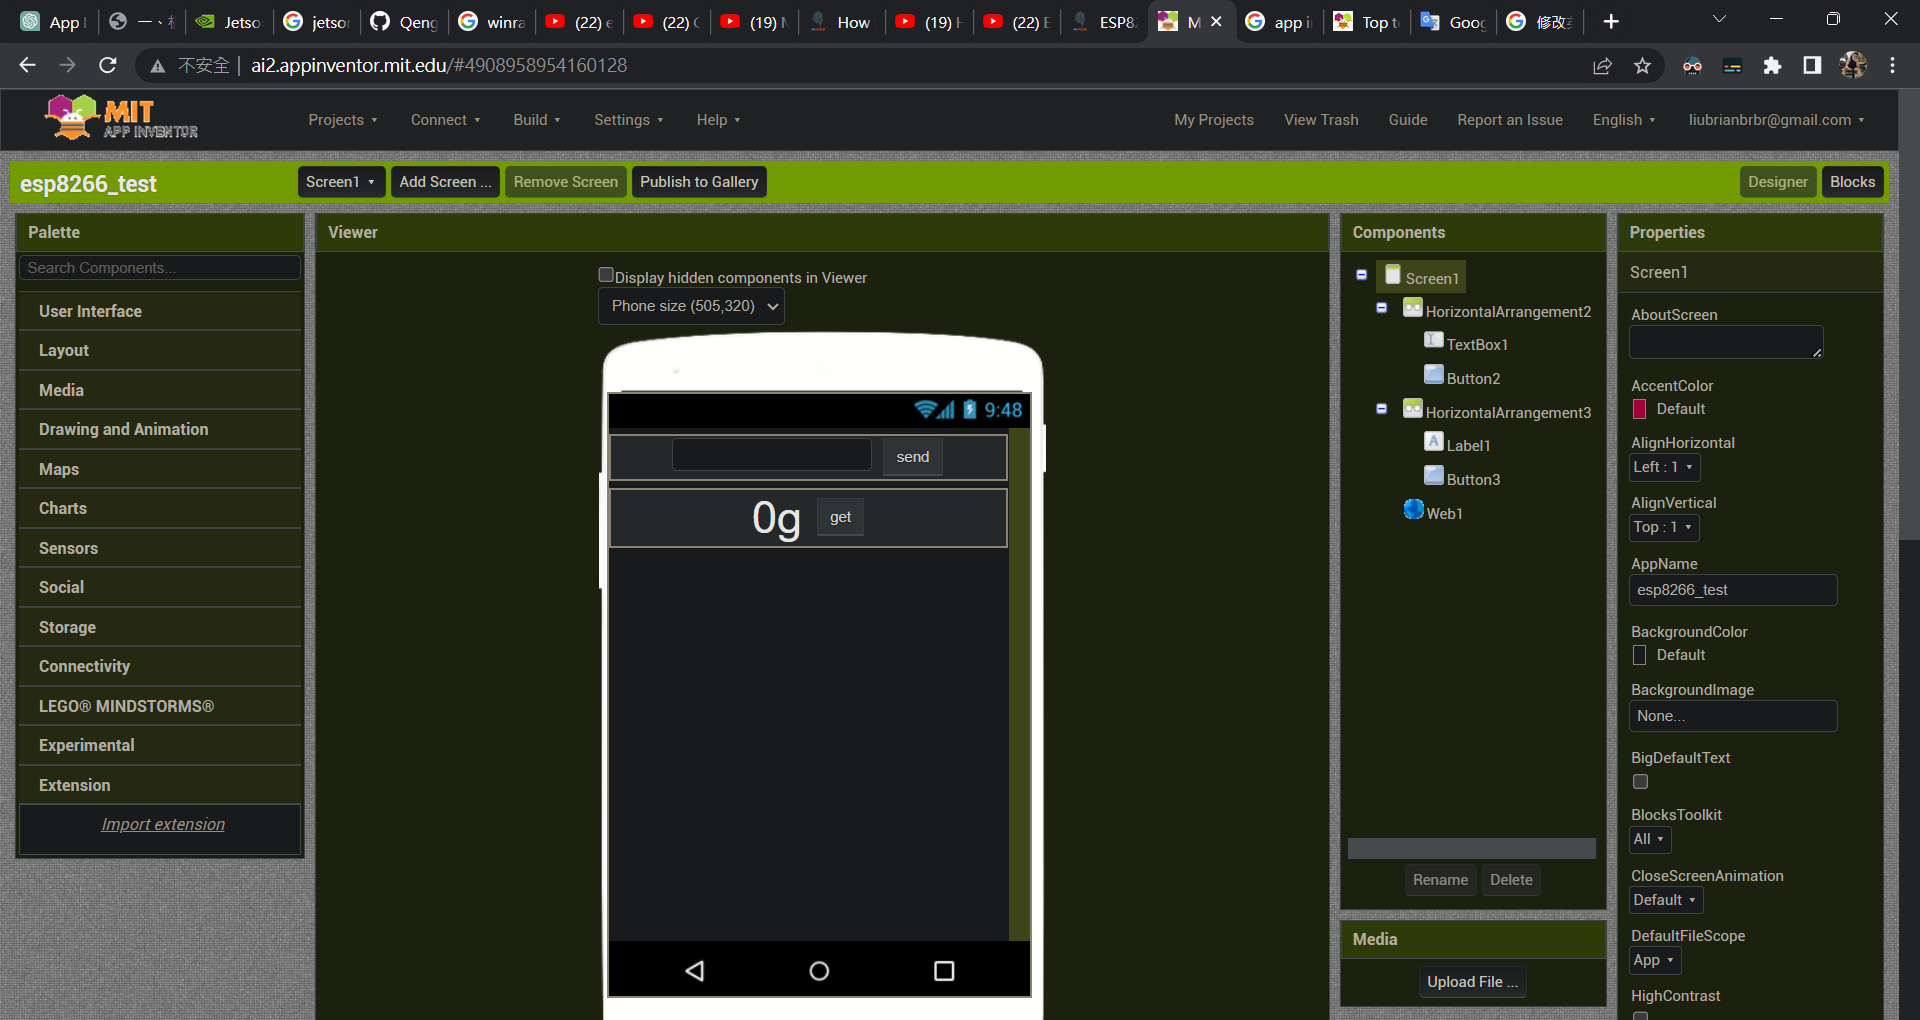
designer:(the get button just testing the function, to try esp8266 can send data to app) I will delete it in the future
blocks:
code:
#include <ESP8266WiFi.h>        // 本程序使用 ESP8266WiFi库
#include <ESP8266WiFiMulti.h>   //  ESP8266WiFiMulti库
#include <ESP8266WebServer.h>   //  ESP8266WebServer库
#include <Arduino.h>
#include "HX711.h"
#include <Servo.h>

ESP8266WiFiMulti wifiMulti;     // 建立ESP8266WiFiMulti对象,对象名称是 'wifiMulti'

Servo servo;
HX711 scale;

const int LOADCELL_DOUT_PIN = 12;
const int LOADCELL_SCK_PIN = 13;

ESP8266WebServer esp8266_server(80);// 建立网络服务器对象,该对象用于响应HTTP请求。监听端口(80)
String receivedValue = "";
float Win;

void setup(void){
  //servo
  servo.attach(5); //D1
  servo.write(0);

  //hx711
  scale.begin(LOADCELL_DOUT_PIN, LOADCELL_SCK_PIN);
  scale.set_scale(-478.507);
  scale.tare();

  //
  Serial.begin(9600);   // 启动串口通讯

  pinMode(LED_BUILTIN, OUTPUT); //设置内置LED引脚为输出模式以便控制LED

  wifiMulti.addAP("CHT-1233", "077333893"); // 将需要连接的一系列WiFi ID和密码输入这里

  wifiMulti.addAP("ssid_from_AP_2", "your_password_for_AP_2"); // ESP8266-NodeMCU再启动后会扫描当前网络
  wifiMulti.addAP("ssid_from_AP_3", "your_password_for_AP_3"); // 环境查找是否有这里列出的WiFi ID。如果有
  Serial.println("Connecting ...");                            // 则尝试使用此处存储的密码进行连接。
  int i = 0;

  while (wifiMulti.run() != WL_CONNECTED) {  // 此处的wifiMulti.run()是重点。通过wifiMulti.run(),NodeMCU将会在当前

    delay(1000);                             // 环境中搜索addAP函数所存储的WiFi。如果搜到多个存储的WiFi那么NodeMCU

    Serial.print(i++); Serial.print(' ');    // 将会连接信号最强的那一个WiFi信号。
  }                                          // 一旦连接WiFI成功,wifiMulti.run()将会返回“WL_CONNECTED”。这也是

                                             // 此处while循环判断是否跳出循环的条件。
  // WiFi连接成功后将通过串口监视器输出连接成功信息
  Serial.println('\n');
  Serial.print("Connected to ");
  Serial.println(WiFi.SSID());              // 通过串口监视器输出连接的WiFi名称
  Serial.print("IP address:\t");
  Serial.println(WiFi.localIP());           // 通过串口监视器输出ESP8266-NodeMCU的IP

  esp8266_server.begin();                           // 启动网站服务
  esp8266_server.on("/", HTTP_GET, handleRoot);     // 设置服务器根目录即'/'的函数'handleRoot'

  //esp8266_server.on("/LED", HTTP_POST, handleLED);  // 设置处理LED控制请求的函数'handleLED'
  esp8266_server.on("/currentW", HTTP_POST, handleW);
  esp8266_server.on("/setData", HTTP_POST, handleData);
  esp8266_server.onNotFound(handleNotFound);        // 设置处理404情况的函数'handleNotFound'

  Serial.println("HTTP esp8266_server started");//  告知用户ESP8266网络服务功能已经启动
}


void loop(void){
  esp8266_server.handleClient();                     // 检查http服务器访问
  //hx711
  // scale.power_down();             // put the ADC in sleep mode
  // delay(5000);
  // scale.power_up();
  // //servo
  // if (scale.get_units(10) > Win) {
  //   servo.write(90);  // 轉到90度
  // }
  // else{
  //   servo.write(0);   // 轉回0度
  // }

}

/*设置服务器根目录即'/'的函数'handleRoot'
  该函数的作用是每当有客户端访问NodeMCU服务器根目录时,
  NodeMCU都会向访问设备发送 HTTP 状态 200 (Ok) 这是send函数的第一个参数。

  同时NodeMCU还会向浏览器发送HTML代码,以下示例中send函数中第三个参数,
  也就是双引号中的内容就是NodeMCU发送的HTML代码。该代码可在网页中产生LED控制按钮。
  当用户按下按钮时,浏览器将会向NodeMCU的/LED页面发送HTTP请求,请求方式为POST。
  NodeMCU接收到此请求后将会执行handleLED函数内容*/

void handleRoot() {
  String hx711Value = String(scale.get_units(), 2);  // 获取HX711的值
  String htmlContent = hx711Value + "g";
  //String htmlContent = "<p>HX711 value: " + hx711Value + "g</p>";  // 创建HTML内容,包含HX711的值
  //htmlContent += "<form action=\"/LED\" method=\"POST\"><input type=\"submit\" value=\"Toggle LED\"></form>";  // 添加LED控制按钮

  esp8266_server.send(200, "text/html", htmlContent);  // 发送包含HX711值和LED按钮的HTML响应
  //esp8266_server.send(200, "text/html", "<form action=\"/LED\" method=\"POST\"><input type=\"submit\" value=\"Toggle LED\"></form>");
}

//处理LED控制请求的函数'handleLED'
void handleLED() {
  digitalWrite(LED_BUILTIN,!digitalRead(LED_BUILTIN));// 改变LED的点亮或者熄灭状态
  esp8266_server.sendHeader("Location","/");          // 跳转回页面根目录
  esp8266_server.send(303);                           // 发送Http相应代码303 跳转
}

void handleW() {
  float Win = receivedValue.toFloat();
  String response = String(scale.get_units(),0) + 'g';
  // 在這裡可以對收到的值進行適當的處理,例如控制LED等
  // 這裡只是簡單地將收到的值回傳給App Inventor作為確認
  esp8266_server.send(200, "text/plain", response.c_str());
}

void handleData() {
  receivedValue = esp8266_server.arg("plain");
  Serial.print("Received value");
  Serial.println(receivedValue);
  float Win = receivedValue.toFloat();
  String response = String(scale.get_units(),0) + 'g';
  // 在這裡可以對收到的值進行適當的處理,例如控制LED等
  // 這裡只是簡單地將收到的值回傳給App Inventor作為確認
  esp8266_server.send(200, "text/plain", response.c_str());
}


// 设置处理404情况的函数'handleNotFound'
void handleNotFound(){
  esp8266_server.send(404, "text/plain", "404: Not found"); // 发送 HTTP 状态 404 (未找到页面) 并向浏览器发送文字 "404: Not found"
}